Leaderboard
.thumb.jpg.9ec558122c0479d844e9a9707b913308.jpg)


Popular Content
Showing content with the highest reputation on 03/19/2020 in all areas
-
You can adjust the projection between a holder and extension in the standalone Tool Manager, but not in Mastercam currently. If you select the parent component in standalone Tool Manager and then CTRL+Drag, it works the same way it does when setting tool stickout. https://www.youtube.com/watch?v=gTVylp7Mo1Y&feature=youtu.be I don't have my 39.5 foot pole to poke the trim comment right now...3 points
-
I actually misspoke- you can ALSO adjust the projection between a holder and extension within Mastercam as well, by right-clicking on the assembly in the Tool Manager, selecting Edit Projection, and using the same method of CTRL+clicking the parent component. Sorry!2 points
-
If CNC was truly concerned about workflow, they would have never have split up the trim menu....2 points
-
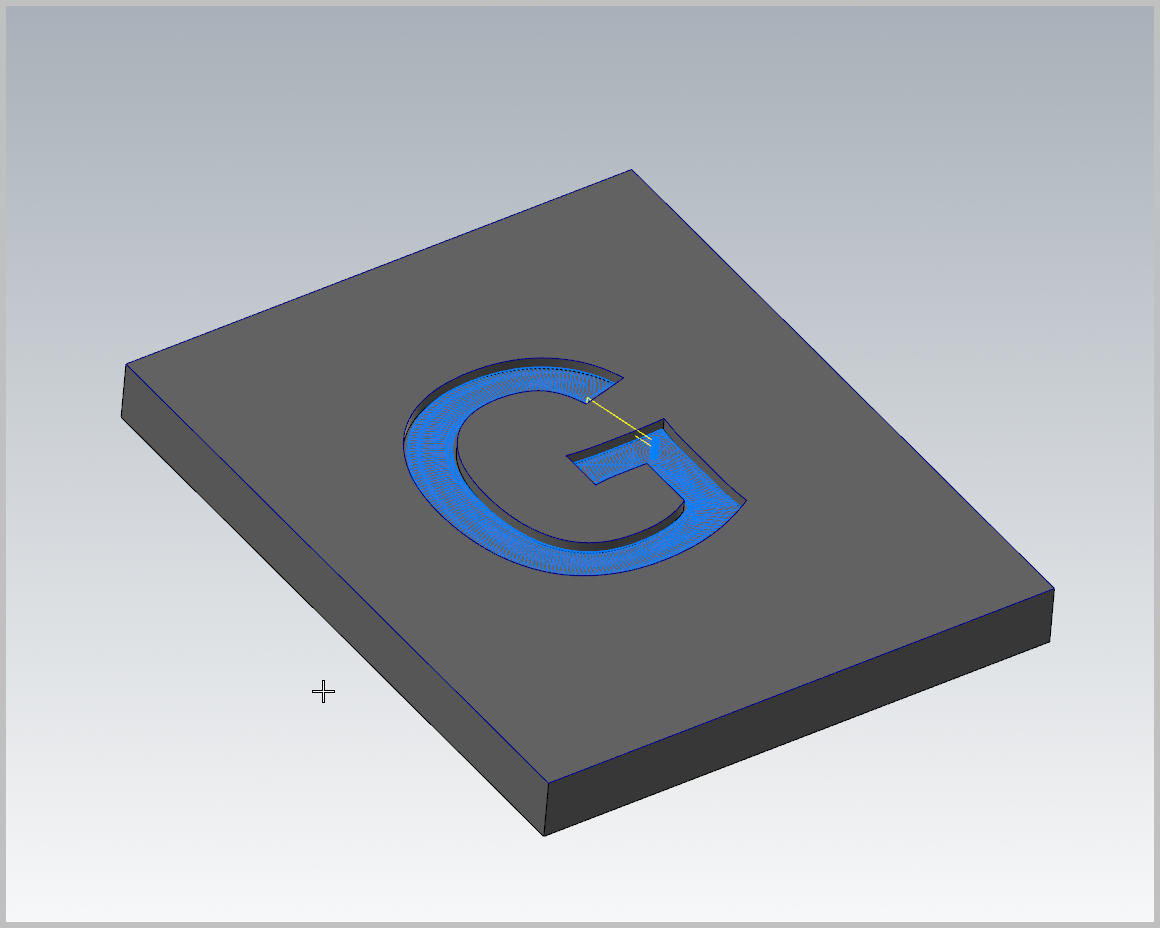
It looks like this geometry was created from a solid model. If you could gain access to that model, you could just select the floor surfaces for the machining regions and be done. If you can't get the solid model, then creating splines is a good option. Set the Cplane to 2d.
 1 point
 -
Re read the 1st comment. With wear comp you don't need to move at least the radius of the tool. That is control comp and this topic wrong and the wording in it is wrong. He might be adjusting the wear value, but some where on the machine they are putting in a Radius value in the control for the tool. That right there is a big red flag. I will normally start at Zero with wear and then adjust from there. Not the radius of the tool that means CONTROL COMP not wear.1 point
-
1. You can create an assembly in the standalone Tool Manager instead of assigning inside of a toolpath. You can always swap if you need to vary outside of your "standard" length. 2. You can edit projection even better from your toolpath. Right click on your tool(inside of your toolpath parameters), then click edit projection. You can then move your tool around the screen with the holder, and click where you want to check your depth. After you set where you want the tool to stay, then you can drag the holder up and down to your desired length1 point
-
Not talking about tool stickout,,,,,, Extension holder stickout from a main toolholder...1 point
-
In the standalone manager, You can stack the extension on top of the holder, but you cannot define a stickout length. So, what we do is assemble the holder, check the extension stickout and model the extension to the appropriate length, then marry them together. What we end up with is a multitude of the same extension modeled at different lengths.. Absolutely the biggest mess that CNC needs to address, This halfa$$ sometimes use this manager and other times use that manager to try and define tools correctly is an insane time waster.1 point
-
Version 1.0.2
12,048 downloads
These are the files used in Mastercam 2019 Training Books and eBooks. Click the "Download this file" button to the right to download a .ZIP file containing all files used in all In-House Solutions books for Mastercam 2019. More files will be added as more books are released for sale. These files are refenced in the following titles: Mastercam 2019 CAD Import and Mill Advanced Training Tutorial Files Mastercam 2019 CAD Import and Mill Essentials Training Tutorial Files Mastercam 2019 Design Training Tutorial Files Mastercam 2019 for SolidWorks Files Mastercam 2019 Handbook Volume 1 Files Mastercam 2019 Handbook Volume 2 Files Mastercam 2019 Handbook Volume 3 Files Mastercam 2019 Horizontal Machining and Indexing Training Tutorial Files Mastercam 2019 Lathe Professional Courseware Files Mastercam 2019 Lathe Training Tutorial Files Mastercam 2019 Mill Advanced Professional Courseware Files Mastercam 2019 Mill Advanced Training Tutorial Files Mastercam 2019 Mill Essentials Professional Courseware Files Mastercam 2019 Mill Essentials Training Tutorial Files Mastercam 2019 Mill Professional Certification Curriculum - Part 1 Files Mastercam 2019 Mill Professional Certification Curriculum - Part 2 Files Mastercam 2019 Mill Professional Certification Curriculum - Part 3 Files Mastercam 2019 Multiaxis Advanced Training Tutorial Files Mastercam 2019 Multiaxis Essentials Training Tutorial Files Mastercam 2019 Multiaxis Professional Courseware Files Mastercam 2019 Nesting Tutorial Files Mastercam 2019 Project Workbook Files Mastercam 2019 Solids Training Tutorial Files Mastercam 2019 Tool Manager Tutorial FilesFree1 point -
Version 1.0.0
685 downloads
The Mastercam 2018 Router Training Tutorial provides detailed coverage 2D Geometry Creation, Drilling, Contouring, Pocketing, Nesting, Block Drilling and Importing graphics to machine. Instructions on Tool settings, proper Stock setup and Custom profile tool creation are also included. This book includes: Mastercam 2018 Home Learning Edition/Demo Software (will last until summer 2019) Mastercam 2018 Router Training Tutorial (PDF)Free1 point -
Version 1.0.0
3,267 downloads
The Mastercam 2018 Beginner Training Tutorial provides a comprehensive step-by-step approach to learning the basics of three Mastercam modules: Mill Essentials (2D), Lathe and Solids. It is a great choice for an individual looking to get a broader overview of the software or an instructor looking to provide the same for his/her students. Four mill projects, two lathe projects, and two solids projects – the same found at the start of our newly revised Mill Essentials, Lathe and Solids Training Tutorials – are combined with practice exercises and the Mastercam 2018 Home Learning Edition DVD (Demo Software) to round out this compilation book. Each tutorial systematically walks through all the procedures from Geometry Creation to Toolpath instructions, Verification and G Code Generation. A wide range of topics are covered including 2D Geometry and Solids Creation, Drilling, Tapping, Contouring, Pocketing, Circle Milling and Slot Milling. It also contains 2D High Speed Toolpaths, as well as proper Stock Setup and Tool Settings.Free1 point -
The Dynamic Xform can mate them very quickly as well. I use it all the time with very good results for those that don't have a CAD system outside of Mastercam.1 point
-
Too much work.....all I do is to build the tool on a level of my choosing and save it as a Mastercam file... Then merge it into my working file and import to tool manager. Need to edit the tool?? no problem....just open up the level and make changes. That way all custom tools are in the file they are used for and don't come from a tool library... You can use that tool in another file just merge it in and use it...1 point
-
Can you post your dxf? Once you figure it out it's incredibly easy. Do you have cut and nocut levels?1 point
-
This. You can also alter dimension notes and labels the same way. If you need to change what the label says, move it, resize it, etc after you already made it, just select the label and hit F4, and use the "Edit Text" option to change the text, and the "Quick Edit" option to move it and access the size option toolbars.1 point
-
Looks like someone else hits "regen all dirty" a little too often as well..0 points