Leaderboard


Popular Content
Showing content with the highest reputation on 04/02/2020 in all areas
-
Good point that I forgot about, Leon82. In our shop, the tool probe in the VF2 stopped working after a certain time of day every day- the sun was whiting out the sensor. Similarly, the lighting in the new UMC-750's is great, but if angled perfectly (or incorrectly) in a shiny new machine, it'll white the sensor out when the spindle head comes down. Since this gentleman's probe works file for setting tool lengths, this is probably not it, but it's good feedback for people having problems.1 point
-
Is there a chance the eye is obstructed?1 point
-
Never set your buffer to 99% you are robbing the OS of needed resources to function. I will set mine to 85% max.1 point
-
That picture is one of the holes in the pattern. The others have very little clearance. Nothing larger than .312 diameter will fit due to a tall "chimney" type feature next to the holes. Unfortunately I can't share a picture of the part. I am using a 12" long, HSS/Carbide Tip Aircraft drill from CJT Koolcarb. I have dialed in the drill, I was actually surprised at how straight these drills are. About .0005" runout at the tip before I even tweaked it. Less than .0002" now. The drills are as you said, Long shank, relatively short flute length. I'm beginning to think it may just be the material that is to blame. I've got a reamer on the way. I took about 75% of the cycle time out of this part, and numerous secondary operations, so i guess we can spare a little time for the reamer.1 point
-
Though I cannot say I know exactly what you're doing here. It seems like a lot of code for just for doing: LoadLibrary / GetProcAddress BTW - If you're running this in a Mastercam add-in, your add-in is "MFC", so it's better to use -> AfxLoadLibrary & AfxFreeLibrary https://docs.microsoft.com/en-us/cpp/build/loadlibrary-and-afxloadlibrary?view=vs-2019 This - #ifdef UNICODE //Test to see if we're using wchar_ts or not. LPCWSTR lpszFuncName = NULL; #else LPSTR lpszFuncName = NULL; #endif Could be replaced with -> LPCTSTR lpszFuncName = NULL; LPCTSTR - An LPCWSTR if UNICODE is defined, an LPCSTR otherwise. https://docs.microsoft.com/en-us/windows/win32/winprog/windows-data-types1 point
-
Yes you are overthinking. Just convert everything to a 3 or 4 place decimal and you'll be fine.1 point
-
Try drilling undersize and then get a endmill ground to size and chase the hole with an endmill. Cast Aluminum can present these challenges.1 point
-
The actual issue with the hole is that when you put a pin in, and shine a light through, you see 3 points touching the pin. Inside the hole it almost looks smeared, with dark spots, and I think i'm able to see a spiral score, like one that would be caused by the drill dragging on retract. Drill manufacturer suggested higher RPM, but do you think that would actually fix it? Or should I just get an extended length reamer to finish the holes, and call it a day?1 point
-
What options are there about smacking the design engineer around a bit with a large trout?1 point
-
How? I have 2 just in case one goes bad. I can't go one day without it. If i don't have it i just stop and look around like a deer in headlights. I'm thinking about even getting a backup to the backup I work from home 100% and i use a laptop (see sig). Even though i dont go mobile often. When i do it works perfect1 point
-
Post doesn't support it because that was right before or right around it was put into the software. You should grab the Generic 4 Axis Lathe post in Mastercam and post with it and see if it does what you need. If so then rob the logic out of that post and put it in your or get a hold of the originally post developer and have them add it for a fee.1 point
-
You should just be able to add them inside of your chain geometry. Chain manager - re-chain all - select points, select pocket chains. If Center on entry point is checked in the helix entry window, it should center over the points.1 point
-
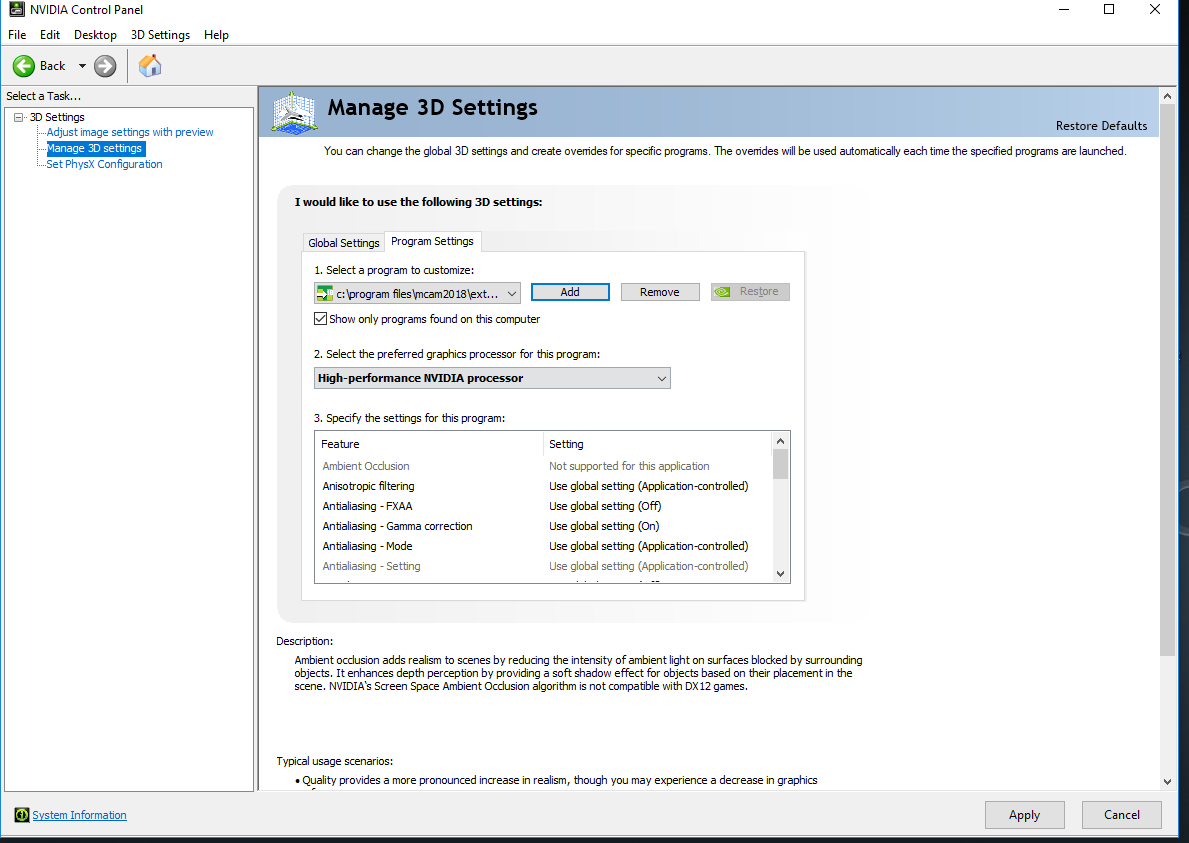
I have seen this issue occur on laptops with integrated graphics. The Tool Manager, for whatever reason, tries to use the Intel integrated graphics first, and when it needs to draw something on the screen, like when you double click on Cutting Tools or Holders after opening a library, it instantly locks up. I went up and down driver revisions for the Intel integrated graphics on my laptop and couldn't solve the issue that way. The solution is to force the use of your dedicated graphics card for the Tool Manager application. This applies to desktops with integrated graphics as well- This is the process for NVIDIA cards: 1. Right click on the desktop and choose Nvidia Control Panel. 2. Go to Manage 3D Settings on the lefthand side. 3. Choose the Program Settings tab on the right. 4. Select Add under "Select a program to customize", and navigate to the location of your tool manager. By default for 2018, that is C:\Program Files\Mcam2018\Extensions\ToolManager.exe 5. Under "Select the preferred graphics processor for this program:", select High-Performance NVIDIA processor to force Tool Manager to open with the NVIDIA card and skip the Intel integrated graphics. 6. Hit apply in the bottom right corner. Repeat these steps for any other installed versions of Mastercam to ensure each tool manager version works with the dedicated card. You should now immediately be able to open up the tool manager and view libraries without crashes. See the attached image for reference
 1 point