Leaderboard


Popular Content
Showing content with the highest reputation on 08/06/2020 in all areas
-
Nick The material came in 0.020" to 0.025" thick, so I followed your earlier suggestion of facing of both sides and it has worked flawlessly! We are turning the inserts every 10 parts & changing the 2.5mm drill every 20 parts. I cannot believe the Harvi 2 1/4" cutter has cut 50 parts without any noticeable wear! We are going to swap it for the next part#, just to be safe. Thanks again to you, and this forum at large.4 points
-
@byte may be able to help you out with that script.2 points
-
Since many people have asked me to share how this works, I thought I would make a post about setting the Control Definition Default settings. Are you tired of your NC code changing whenever you update Mastercam? Why do your NC settings seem to get screwed up? You ran the "Migration Wizard", and things are still broken... Ok, so what's going on? ---> You didn't set the Control Definition Default Settings. It doesn't have to be this way. You can setup Mastercam to handle upgrading without causing you frustration, or the loss of any hair/sleep. Here is a step-by-step process for setting the Control Definition Defaults. What is a Control Definition, and why should you care?: First, what is a Control Definition File? A Control Definition is a file that Mastercam uses to store settings for controlling your NC code output. The CD (Control Definition) contains common settings for things like "Arc Formatting", and the settings for Sequence Numbers (N numbers), among other things. The idea behind the CD is that it gives the programmer the ability to adjust settings by using a Graphic User Interface, instead of having to make edits directly to your post processor. When it was originally conceived, the CD was created with the ability to link and control multiple post processors, and have separate settings for each one. This would give "administrators" the ability to make edits for multiple machines from within a single file. In practice however, nobody ever does this. Every shop that I've worked with uses a single MD, CD, and PST file, all with the same name. So even though a machine might share all the same settings with another machine in your shop, the "best practice" is to use a single MD/CD/PST name for each unique machine on your shop floor. When you create a new job in Mastercam, and load a "Machine Definition" file into your Ops Manager, Mastercam places a copy of your MD and CD into the Ops Manager. These "file copies" are specific to your individual Mastercam file, and are not "linked" back to the originals (or "library copies") of the files. To a certain extent, this does make sense. This convention allows you to make "individual" file changes. So for example, say you had a program that used a Right Angle Head, with a few specific tools. You could setup the "stations" with a RAH component, and have all of those options saved inside your individual Mastercam file. You wouldn't want all those modifications to be made to the "library copy" of your files; they are project specific. Another situation might come up where you are running out of memory for a specific program. For this individual file, it might make sense to disable Sequence Numbers, remove all the "Space characters", and output all of your Arcs using "R" values instead of IJK, just to save space. The CD allows you to do that, without changing the settings in the Library Copy of your CD... Are you with me so far...??? So in a nutshell, the CD contains user-select-able parameters that control some of the formatting of NC code output. Control Definition Defaults OK, so the CD contains settings that format output from the post. Great. Now we get to the issues... The main problem that I see people run into comes when they update to the next release of Mastercam. This problem occurs because the settings in the CD refer to a static file path. Say what? Yes. The settings that are stored inside the CD are stored for a specific post in a specific file location. Those settings are only valid for that exact post processor file name, in the exact folder location you specify. When you setup a new post processor, most users typically create (rename, whatever) a new post, and put it in a specific folder, local or network folder location. Ok, great. But then they go and "link" their CD to that Post Processor, and take the time to configure their CD. This is all well and good, except, that they don't know about the static file path issue. Every Control Definition file has a set of "Default Settings" that are used (you might have guessed), by default. That means that whenever you move your post file to a new folder location (this happens "by default", every time you upgrade Mastercam), the settings for the CD that link your "new" (updated) post processor will revert back to these "default" settings... "Aghhhh!!!!" . . . "WHY!!!!" I can hear the screams from all the frustrated users dealing with these upgrade issues... So, what can be done to solve the problem??? Setting the "Default settings for control type" Ok, start by opening one of your CD files in the Control Definition Manager. Click on the "drop down" arrow for selecting a Post in the post file list. At a minimum, you should have the file path and name of your currently "linked" post processor, and there will be at least one other entry in the list; "Default settings for control type". <--- These are the "default settings" that will get picked up, whenever Mastercam is updated to a new "major" version. So, lets say that you have spent a bunch of time tweaking all of the parameters for "your post". To import those settings to the "defaults", do the following: Open your CD file in the Control Definition Manager. Select the "Default settings for control type" in the "Post Processors" drop-down list. Select the "Tool" page in the Tree. (any page will work, I just picked one for the example.) Move your cursor below the controls, into the "gray area" of the page. Right-Click in the gray area, and you'll get a Right Mouse Button Menu that pops up. Choose "Import > All pages". This launches a "Open" dialog box. Mastercam is asking "which CD" do you want to import the settings from. By default, it will have the currently open CD set to the current file name in the dialog box. Just press "open", no need to re-select the file in the list... This opens a "Control Import - select the type and post key" dialog box. There will be a list with "your" post, the "default settings for control type", and possibly some other file paths, depending on how the post was originally setup, and if it has been "updated" previously. Choose "your post" in the list. Press the "ok" button. All of the settings from "your post" have now been imported into the "default settings for control type" in your CD. Press the "save" button. Doing that process will import all of your current post settings to the "default" settings for your CD. Now, whenever you update Mastercam, the CD will use the "default settings", which just happen to match your current post settings. You will never again have an issue with a Mastercam update changing the NC code output of your post... A few caveats: If you start by just simply taking a new CD file, and setting the "Default settings for control type", you never have to worry about "importing" any settings, since any post that you then link will pick up the "defaults" automatically. If you change any of the parameters for your current "library copy" of the CD, you should also make those changes to the "default settings", or you risk getting your current CD settings, and the "defaults", out of sync. If you do make any changes to your current linked post, just remember that you can "import" those changes to the default settings with the procedure above. Make sure you set the Default Settings for you CD in your current version of Mastercam, before you run the Migration wizard. I thought you could import CD settings from older versions of Mastercam .control files, but it doesn't seem to be working in X9. Hope that helps, Colin1 point
-
It sounds like you got a network software license. They just introduced the option to borrow a license from the network software license. Essentially you check the license out on a PC or laptop then you can pick that computer up and take it home with you. You can check the license out for up to 10 days at a time currently. Once you are done with it you check it back in. If you did get a single or local software license you can deactivate it and activate it at home this step is a bit more work and confusing the first couple of times you do it but you can do it. Once you check out or borrow the license you are no longer required to be plugged into the server. So this would be just as reliable as a HASP. I understand having a physical hasp makes it easy to share or take home but once you use the license borrowing tool its almost easier because you don't have to worry about forgetting the Hasp at home. You would just have to worry about forgetting the computer or laptop at home but thats not likely. They do this still its called the Mastercam HLE (Home Learning Edition). Its free on Mastercam.com When saving a file it will save it as EMCAM file which industrial seats will not be able to open this is to prevent posting. You have some good points in your discussion and you caught the attention of Pete Rimkus from CNC Software as he posted in here. As Gcode said I would reach out to sales _at_mastercam.com and see if something can be done. its worth a try in the very least. Good Luck1 point
-
Glad my boss doesn't see that chart. He thinks we should get 85 % up time on the one mill we have. Good luck when we do short runs, mostly prototype, fixtures have to be designed and made and a nite guy that doesn;t show up half the time. I do all the programming, tool orders ect. And to top it off. IM RETIRING SEPT 15. i'M DONE HERE!!1 point
-
Well you have heard something I have not heard and have my seat of Mastercam with a Sim. They might go in a 100 different directions as a company. Never know Warren Buffet could offer them a Billion dollars and they sell it to him. Hopefully you get it cleared up to your liking and can do what you need to stay profitable as a business.1 point
-
From our i-300st docs... G10.9 X0 or G10.9 X1
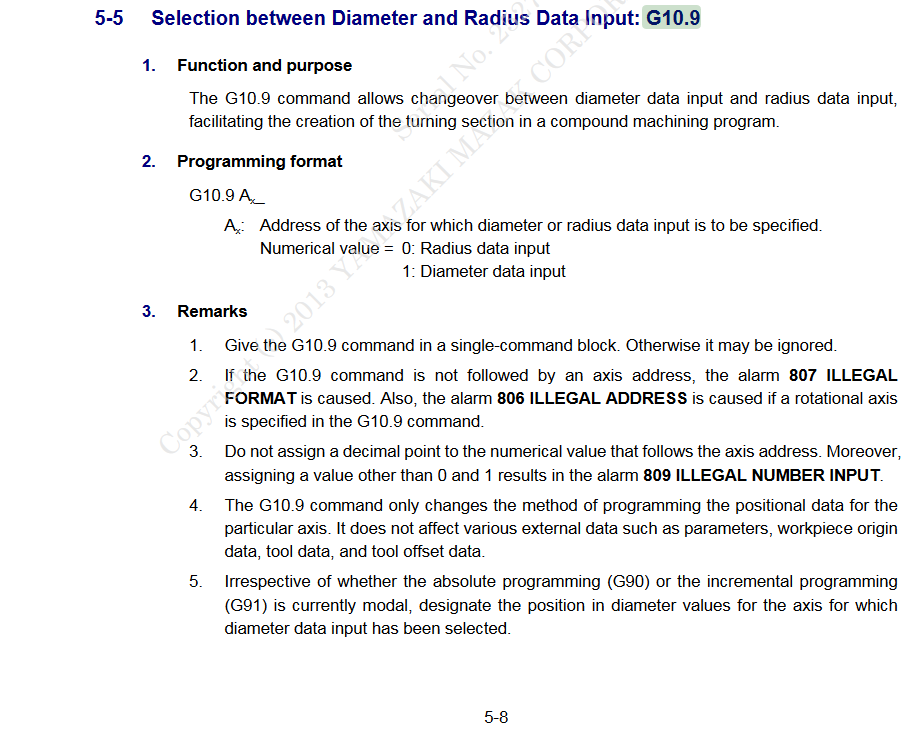 1 point
 -
in mpmaster we use have some logic to suppress toolchanges with single tool. Your post is likely to have something similar. if ntools$ = one, [ #skip single tool outputs, stagetool must be on #stagetool = m_one !next_tool$ ] Take note of the line: #stagetool = m_one setting stagetool to -1 will suppress the toolcalls. If you have a line like this without the # before, then try adding a comment to that line.1 point
-
Happy to help.1 point
-
I'm not sure the OP is legitimate... That said, I'm not sure keeping this a "secret" is really necessary, since there are some structural issues which make a "clean break" between the Mastercam X Series, and the 20xx series of the software. To roll-back the Post Processor, you need to edit the 'Post Version' line at the top. This line has variables which tell MP.DLL information about the construction of the Post itself. You'll see several different Alpha Addresses, with the same "digits" that follow. For example, in Mastercam 2020, I believe that version number is "22.0" so there will be several different letters (alpha Addresses), where the number matches. (M, V, Etc.) You need to modify the integer value, to roll-back the Post version. Change all three of the values from "22" to "20". That should be all you need to do. Please note: there could be errors if the Post Developer has used Parameters or Variables that are "new" to Mastercam 2019 or 2020. If that is the case (rare), then you'll have to comment out the "new" variables, and modify the logic where they are used (to remove the references to those new variables). Be sure to make (several) backup copies of your Post before attempting to modify it. To test: You can use 2018, with any MD/CD/PST loaded. Select all the Ops, and press the G1 button. When the Post Dialog box appears, press CTRL + ALT + SHIFT simultaneously, then press the Letter P on the keyboard. (While continuing to hold down the other 3 buttons.) This enables the Select Post button. From there, browse to your edited Post and you'll be able to run it for a test.1 point
-
Yes, 2021 will run on 64 bit Win 7 This is the last version that will from the Mastercam.com knowledge base https://kb.mastercam.com/KnowledgebaseArticle50697.aspx?Keywords=system+requirements1 point
-
there is a follow button at the top and you will get emails when there is a reply1 point
-
Make the robot a shovel and let it spread the chips when it's just reading a magazine.1 point
-
I think you need to take this directly to sales _at_mastercam.com I have no idea whats going on but it sounds like Tolland needs to get involved. I should be taking this thread down but I'm leaving it up in case this is happening to others1 point
-
Conventional mill cut with a deep enough radial cut to get under the scale. Climb will go through a lot of tools1 point
-
Or.... Preselect the entities you want to copy... EDIT, COPY FILE, OPEN (the file you wish to merge into) EDIT, PASTE1 point
-
"...Issues..." That kind of specificity really helps.0 points