


Leaderboard


Popular Content
Showing content with the highest reputation on 07/02/2021 in all areas
-
Your reseller should definitely be the first point of contact here. A little training on tool and locator setup from them and you should be good to go for this and any future tooling. If you still have questions left that they can't answer after training, please feel free to send me a message and I'll make sure you get whatever you need.3 points
-
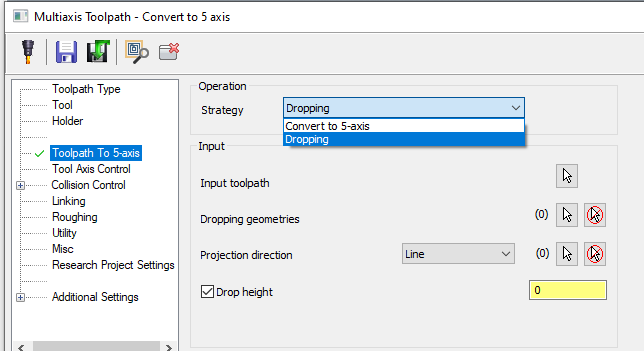
Y'all are doing great, I just want to add that it's even simpler to do that dropping conversion with 3-to-5 if you're trying to drop in a linear axis. Switch the strategy from Convert to Dropping, and you'll see different cut pattern options:
 3 points
 -
Hi Everyone, I wanted to start a topic for anybody that is running a macbook or mac pc with some tips and tricks related specifically to us Mac users. Disclaimer: Before we begin, I should mention that Mac's are an unsupported system for Mastercam at this time and if you go this route and purchase a Mac you could be on your own with troubleshooting problems and/or may run into issues that others do not. I have had no trouble with my mac and absolutely love this system but I am not necessarily recommending macs to anyone as they are unsupported by mastercam technically and you never know what a future mac update, etc. could have an effect on so be aware if you go this route and use a mac for mastercam you will be running an unsupported system. If your not a very technical person, this may not be for you, but in my experience nothing has been difficult or troublesome yet. Now that we have that out of the way lets start, I am going to share some things that i found so far that make life easier and if others have helpful mac specific info to share please add a reply and share the knowledge. first thing I found so far is this macbook has an incredible resolution (looks incredible), but subsequently I found that when I worked from home with no monitors connected my mastercam toolpath manager, planes manager, etc. Text all went really small, I would then change the font size in the ops manager which fixed it but then as soon as I got back to work and plugged in my ultrawide monitor or any monitor the txt was then way to large and it was a constant battle adjusting it back and forth. The solution I found was to drop the resolution from the native 3072x1920 down to 2560x1600, it still looks great and the problem is gone. so for anyone plugging their mac into and out of different resolution monitors the incredible resolution of the mac may need to be bumped down a smidge. found a better solution shown below, not sure why I didn't try that in the first place as I have read this knowledge base article many times but below did fix the small text issue without me needing to reduce screen resolution second thing i found was I really miss a delete key, running bootcamp turns your delete key on the mac into backspace because the mac keyboard does not have a backspace so basically bootcamp turns the delete key into a backspace and if you ever need to delete anything you use the button and also hold down an additional key on the keyboard which is the FN key, being a longtime windows user I use delete extremely often and it is super annoying to have to hold down the FN key on the opposite side of the keyboard to delete files, folders, mastercam entities, toolpaths, etc. so what i found to fix this is a software called KeyTweak https://www.bleepingcomputer.com/download/keytweak/ which allows you to change any keyboard key into another function, the button directly below the backspace (or delete key) on this mac is a button I never use so I altered that button to function as delete, so now my delete button is directly below my backspace button and was easy to get used to and is a single key instead of having to hold the FN all the time. Others may not mind holding fn or may need to use that specific button that i altered so this may not be for everyone but it certainly helped me with my workflow and i love having an actual delete again, third thing is in your bootcamp control panel you can change all the top buttons from special feature buttons to F1, F2, F3 function type buttons, I personally like them to be F1-F12 like a normal windows pc keyboard has and you can still alter the function of those keys with FN any time. Also the mac must be one with an intel processor (typically found only in higher end models), the M1 chips would not work for mastercam and you would use bootcamp with a windows operating system to run the software on a mac since mastercam does not support the apple operating system. thats all the info i can think of sharing at this time, but since there is not many mac topics i wanted to get one started but hopefully other mac users can chime in with any tips or tricks they have found that are specific to mac's to share with the community2 points
-
Yep. Pick whatever 3D CAD Software is available. Depending on the model/software, I might use: Catia Dassault V5 Solidworks AutoCAD1 point
-
Up to you. Do you want all those feature to check out and see what they do? If not then can just next and get the basic free tools.1 point
-
Here are a couple one pager setup sheets. One is a tool list and the other is the operation list. Extract to C:\Users\Public\Documents\Shared Mastercam 2022\common\reports\SST\ In-House Solutions Setup Sheets.zip1 point
-
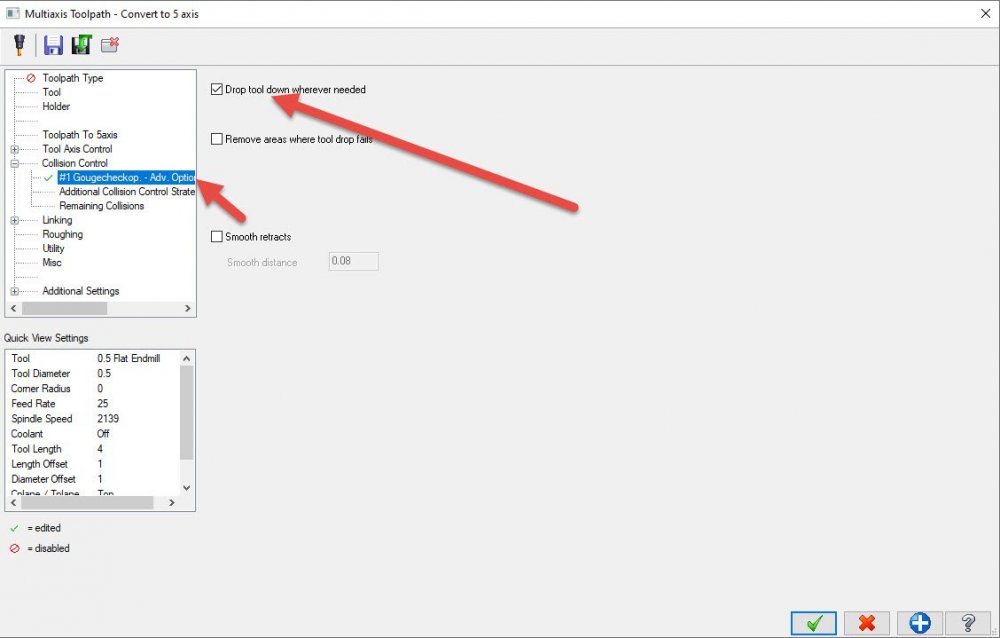
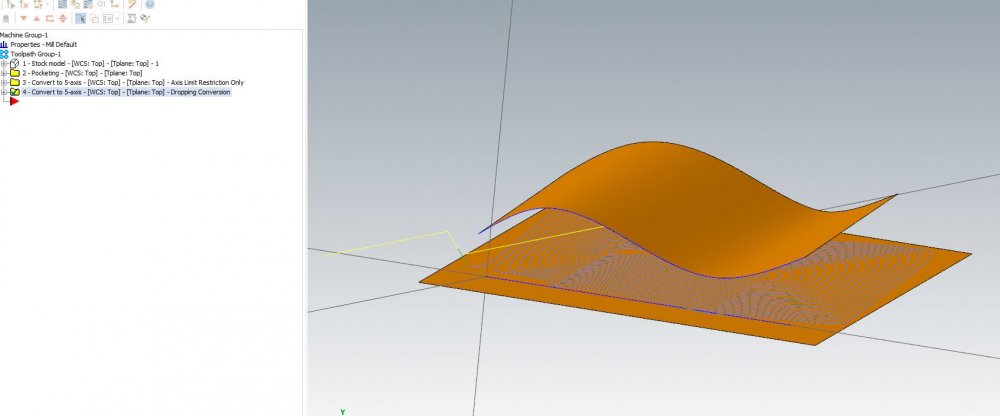
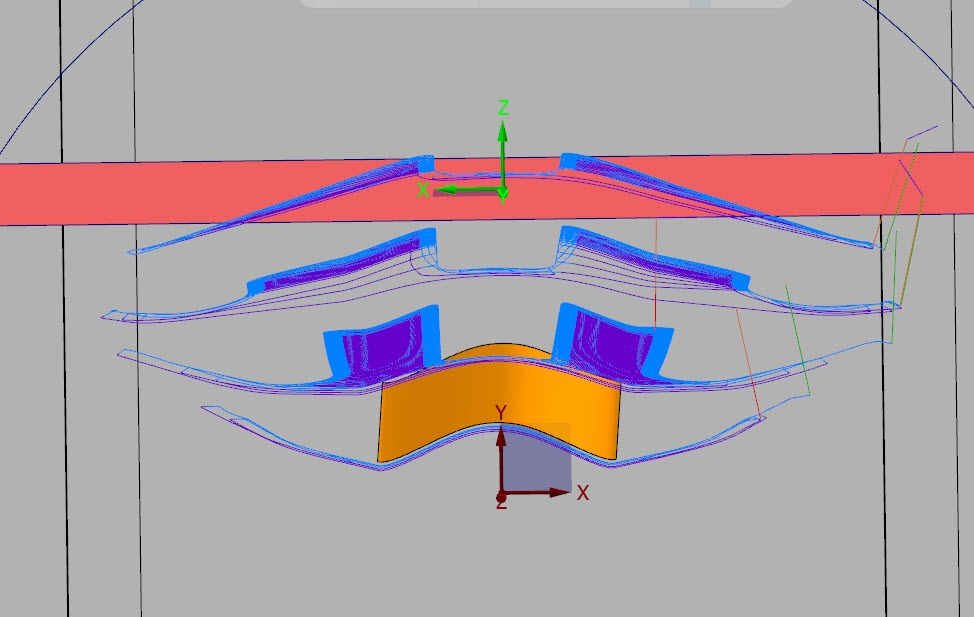
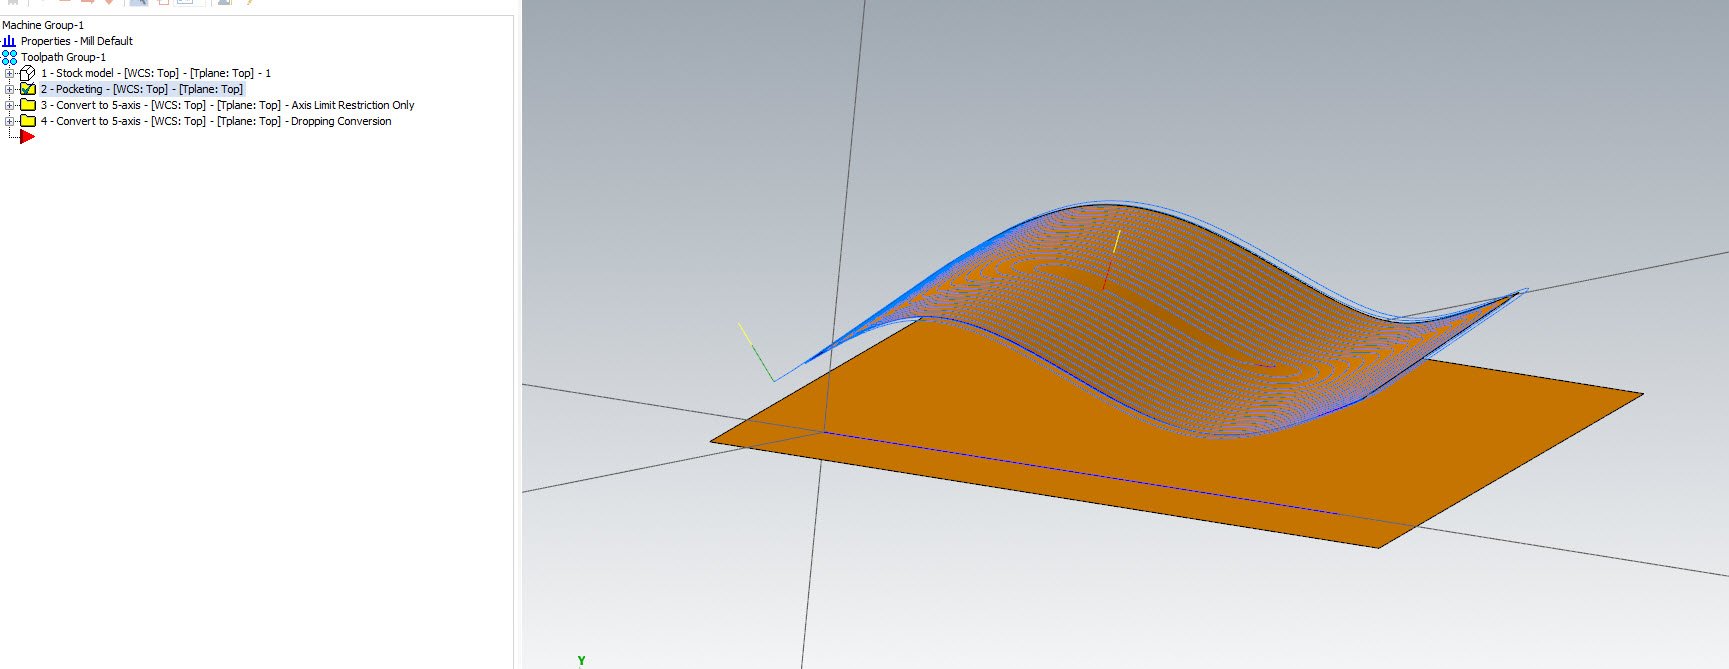
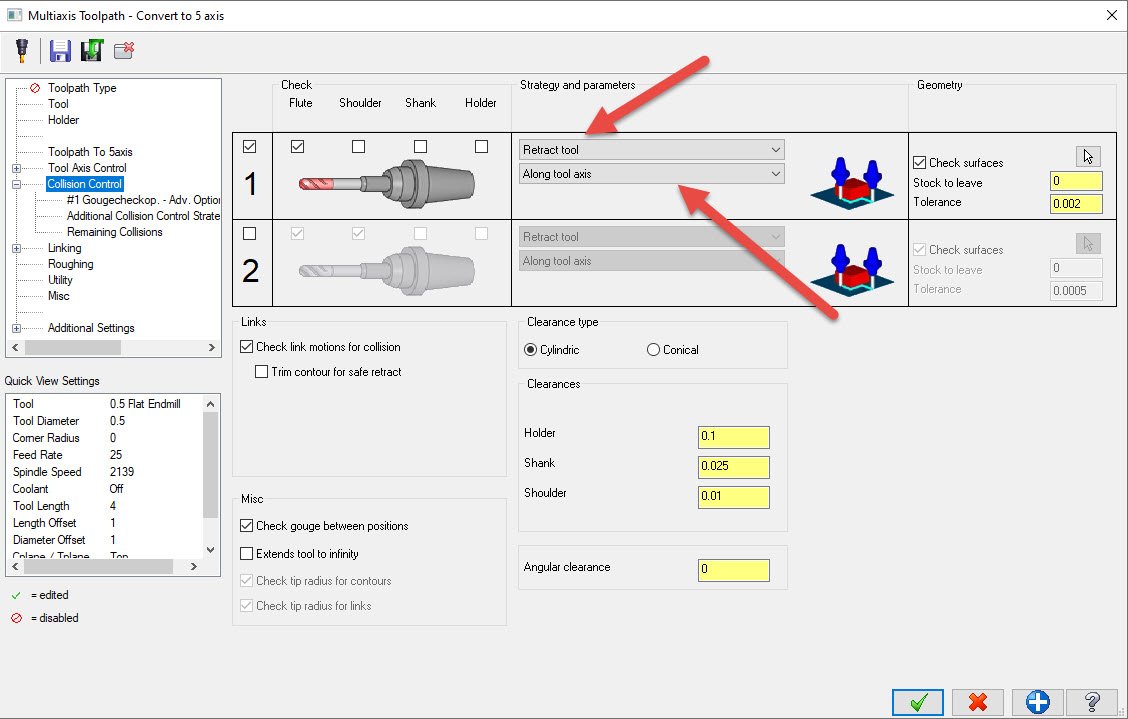
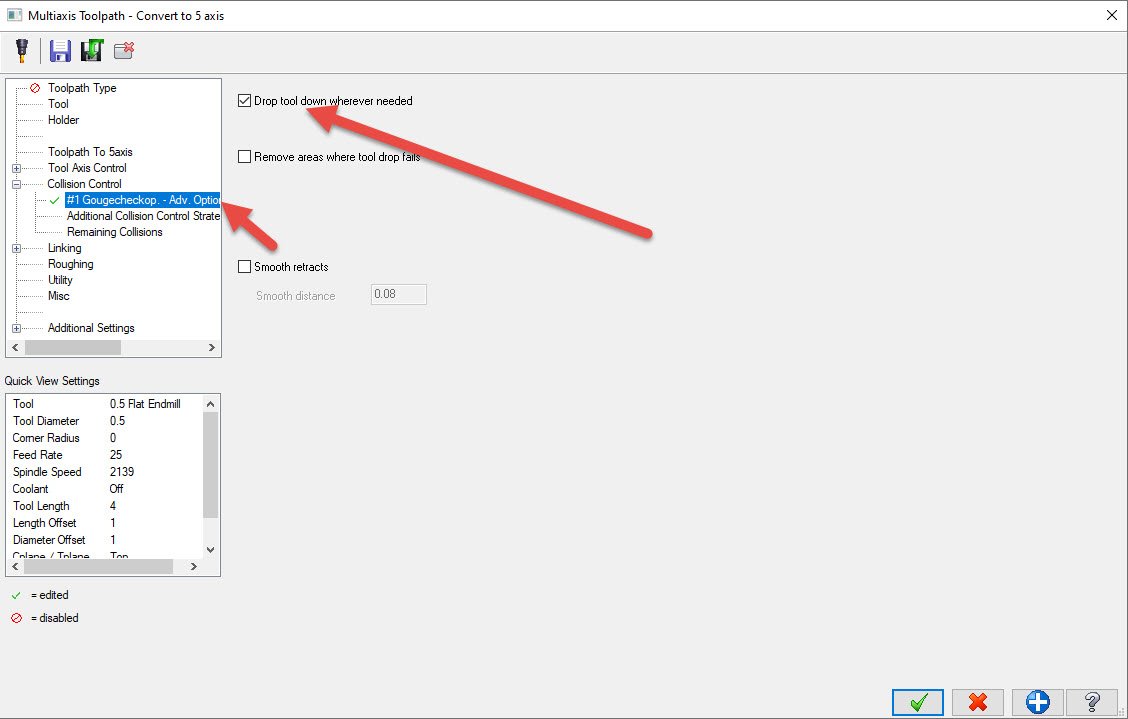
It's true that there aren't many controls if you want to limit machine angle, but it's important to point out that this path is forced to calculate against the floor vectors to ensure that we make safe dynamic style toolpath for all circumstances- IE, we don't introduce tilt that would overengage the cutter and blow up a tool. HOWEVER, because this is Mastercam we're talking about, we still have options here! Attached is a program where we've got a pocketing path on an undulating surface, and perhaps we want to get more specific with the motion. Case #1: We want to restrict the rotary angles so that the path will stay within our machine limits. Check out Path #3- I can use a Convert 3 to 5 axis toolpath even on other multiaxis paths like Pocketing. So here, I take the Pocketing toolpath, turn on Limits in Tool axis control, and limit my tilt motion to a 10 degree cone. Now I keep my dynamic-style motion and restrict it to my tilt needs. Note that this might overengage the tool in certain areas here, but if you're multiaxis roughing you're probably OK accepting some compromises such as this and you've got a conservative stepover to begin with. Case #2: We want to project or drop the roughing motion onto our true surface- the flat draft face underneath my "wave" surface that I toolpathed with the Op #2 Pocket. This is Op #4, for reference. So, once again, I'll use a 3 to 5 conversion path, and this time I'll use a little trick in Collision control. I'll set strategy #1 to Retract tool along tool axis: I'll set my Check surface as that drafted underside surface I actually want to cut down to. Next, I'll go into the advanced subpage for Strategy #1 that opened up when I made my strategy selection, and turn on Drop Tool. What this will do is project the toolpath DOWN along the vector of the tool until it comes in contact with the Check surface I set- which in this case is the final surface I actually want to cut. The end result is that I get the tool pointing/roughing motion created by path #2, but projected to the lower surface. I could combine these case methods and do both a projection and a restriction of tool angle, or add collision tilt away like a normal Morph/Parallel to avoid clamps/etc. The idea here is that while multiaxis Pocketing might not be able to give you exactly what you want due to the restrictions it calculates with, you can always take that motion as a starting point and modify it to suit your needs through a 3to5 conversion path. Hope this helps! Dropped Pocketing Example.mcam


 1 point
 -
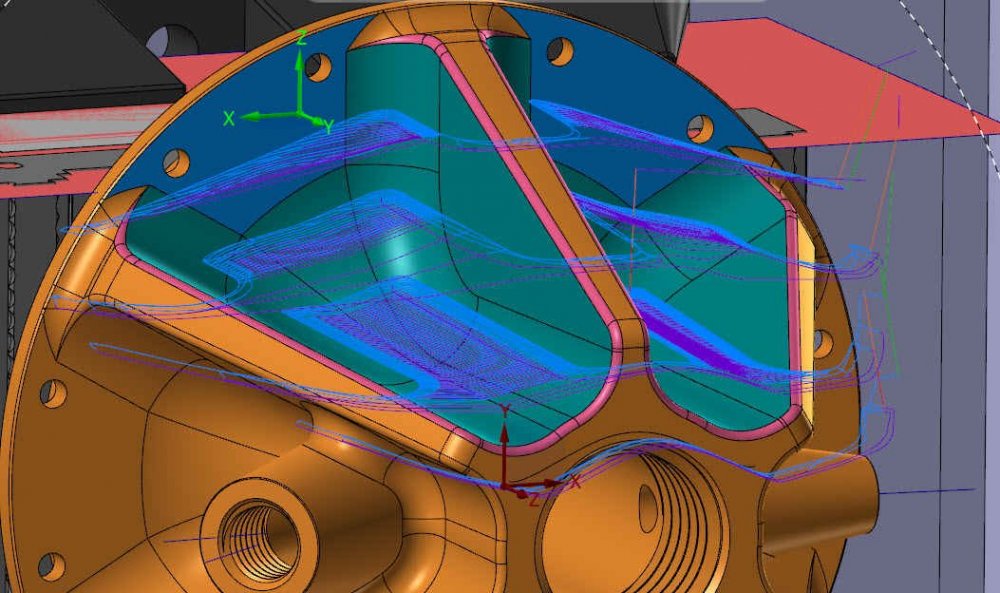
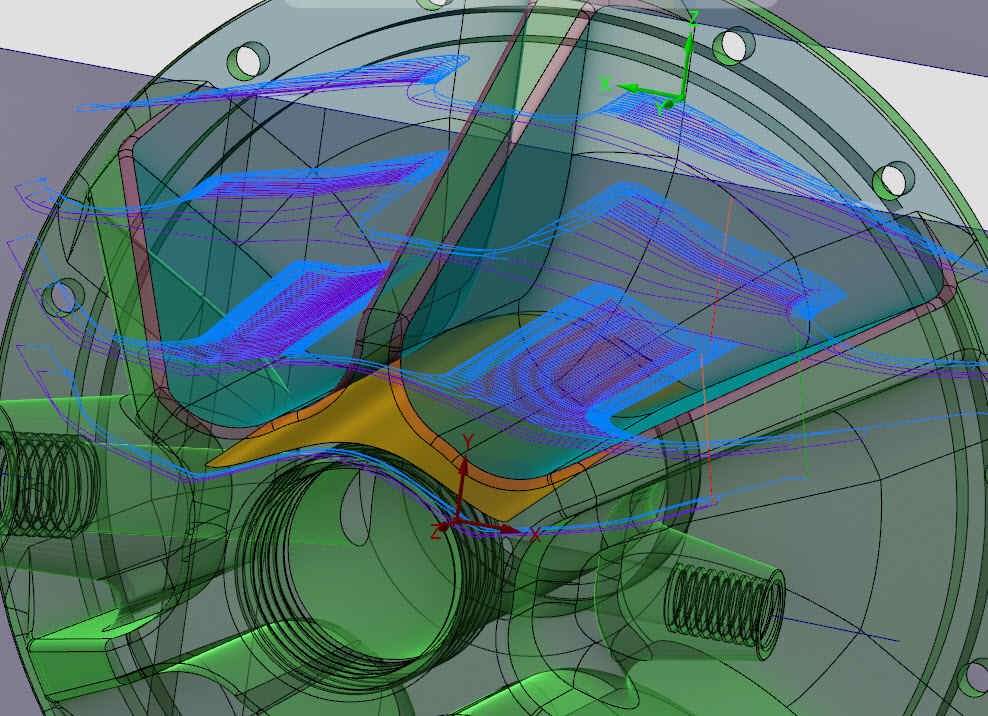
Hi Shiva, 1. Pocketing is pretty unique in that the tool axis control at every point of the path is entirely driven off of the floor surface you select. The tool will always point in the normal direction of the floor, so changing the floor is your handle for affecting tool pointing and establishing tilt limits. That's all well and good, you're probably thinking, but then you immediately run into the next problem- how do I change my floor shape but also cut my floor? One common way to use Multiaxis Pocketing is to draw a false floor below the geometry you're cutting that gives you the tool axis pointing you want, and then simply add the actual floor as part of the Part Surfaces selection that the toolpath will avoid. Here's an example where I want to rough a large amount of material at once from the pockets on the sides of this part, but I also don't just want to point the tool based on the floor surfaces and end up with essentially just motion around a big cylinder: So how did I get the toolpath that is displayed? I drew my own floor inside of the part, that has a gentle kick upwards at each end: Using this false floor, I am controlling the tool vector explicitly along the entire path, but still cutting against all of the actual part geometry; the false floor ends up only being used to point the tool. Here's the floor inside of the part geometry: You'll note that when the toolpath goes beyond the extents of the floor surface I've drawn, it just acts as if we've drawn a tangential straight extension onto the floor, and maintains that tool vector out to wherever the path goes to. 2. Morph is a little easier to understand, troubleshoot, and modify because of the options you have within the path to change the motion, but it can't ever be as efficient at roughing material as Multiaxis Pocketing. Things like the Morph Pocket option inside of the Roughing tab will get us closer to constant cutter engagement, "dynamic-style" motion, but still not close to what Pocketing will do. There are situations when I use one or the other, and there are definitely situations where it is just too difficult to produce a good Pocketing path because of crazy part geometry or machine/fixture constraints, and I need to go to a morph or parallel to get the power and explicit control I need to produce a usable toolpath. 3. In this example, the company wanted to make a video showing off the cutter doing full slotting before tackling the blades. For a production program, I'd probably be using Pocketing to dynamic cut the entire channel
 1 point
 -
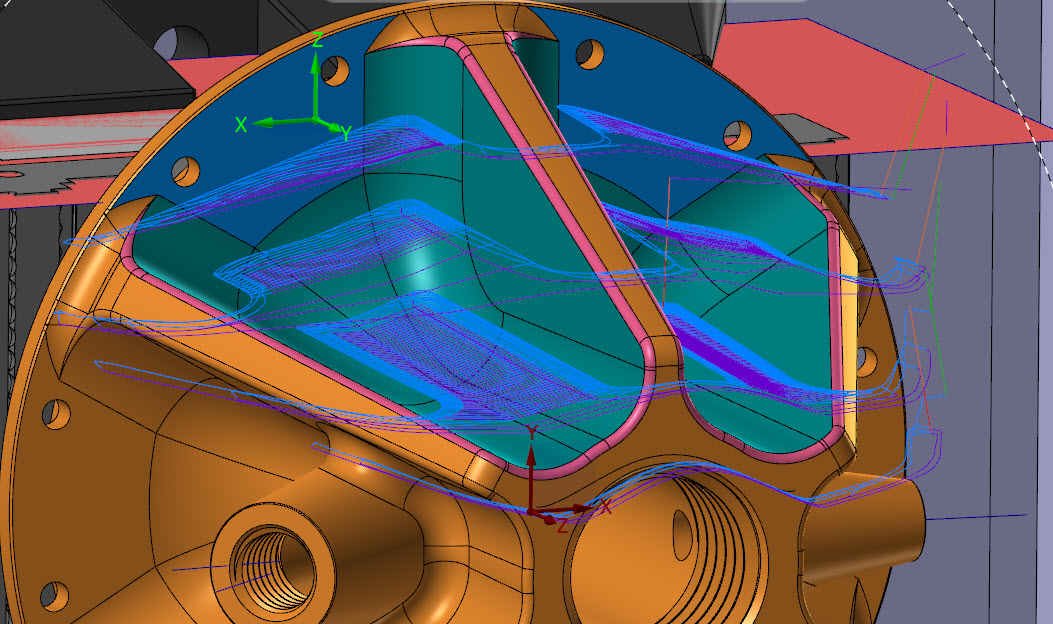
I found an example.
 0 points


.thumb.jpg.15afa8dbfcde0167893a4a297d335e0b.jpg)