Leaderboard


Popular Content
Showing content with the highest reputation on 08/05/2021 in all areas
-
To get this value you need to use "MIN-Z-TPLANE" in the data field2 points
-
See this video for instructions on how to access Mastercam 2022 HLE1 point
-
Set your retract to .1 above your top of stock number. It starts pecking at your retract height Or change to incremental1 point
-
if you are using solid selection try incremental and set to zero see what that does for you. If u want break through add tip comp1 point
-
Yay! I'm helping!1 point
-
Most Fanuc lathes do not require a M6 to do a tool change. When the control sees T0303 it will index to pocket 3 and call up offset 3. I have seen some Cinci lathes that used a M6 but that was a different control. Force tool change will just force the post to retract the tool again, and call up all the same start codes and speeds if you have two tool paths with the same tool number. This can be useful for checking tool wear, clearing chips or whatever you need. The g28 line at the beginning of the program is a "return to reference point 1". The U axis is incremental for "X" and W is for "Z". Essentially, before the program starts, the post is telling the machine to go to "home" before indexing or starting movement. When the code actually calls for movement, a G0 is output, just like your posted code. The T3000 is there to cancel the tool offset at the end of the program. This may or may not be desirable and may be able to be changed in the post (most likely). You can program a "safe move" with approach and retract points in your tool paths. You can also do it with "point" tool paths. I use approach/retract points when needed.1 point
-
Note... some really good posts use tilted tool plane output to position the tool first, then switch to G43.4 for the full 5X toolpath1 point
-
Does your machine have air blast??? Last resort if you still have to stop the machine to remove chips maybe instead of an M00 that requires operator interaction keep it all automated? Tool change to a small diameter empty holder (whatever diameter holder provides good air pressure, empty collet holder would work as well) and air blast your chips out. After good air blast and chips are gone pull the 3/4 back out and continue roughing. Also, that 3/4 should have no problem roughing at full depth in 6061 with a good dynamic routine. Depending on machine HP, reduce your step over amount. Try the non chip breaker style if you have it. This will create longer skinnier chips and actually utilize most of the 3.5" flutes your end mill.1 point
-
WOW ! Great thinking Bob , I would be really appreciative if that were the case where I am employed . I'm sure your guys will come together and make it happen . what's not to like about that DEAL ?1 point
-
Yeah, I think i came that conclusion as well. I justrecalibrated the Haas macros and it seems to be withing .0003 of each other now.1 point
-
make sure that these 2 buttons are not pressed that could be the issue
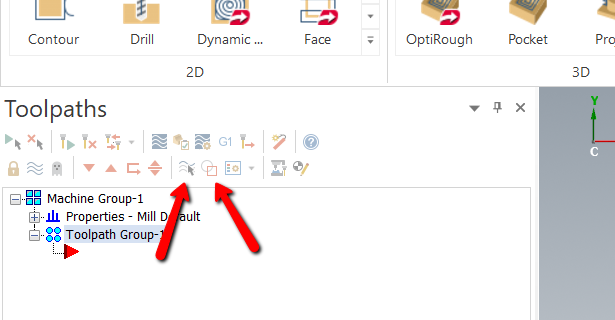 1 point
 -
Many "Power Users" get used to using the "Hide" command (ALT + E). When using "Hide", if you have any geometry selected on the screen, this becomes your "displayed" geometry, and everything else is temporarily hidden. Pressing ALT + E again, un-hides everything. There are a couple useful commands that go along with "Hide", but they are not in the Screen menu by default. (OK, X9 gave us "unhide some" in the main menu at least). So along with the normal "Hide" command (ALT + E), Mastercam also has "Un-hide some", and "Hide More Entities". Both of these commands I find to be extremely useful, so I map them to the F11 and F12 keys on my keyboard. I also customize my Right Mouse Button Menu, and add them to my "Screen" fly-out menu. I use these commands a lot...1 point
-
Once you've gotten used to how Mastercam works, I recommend turning off the following checkboxes in the System Configuration Menu -> CAD Settings -> "Update Cplane when changing Gview" CAD Settings -> "Reset Cplane to Top in Iso Gview" Those two check boxes, more than any other settings, will mess with you during geometry creation. My personal preference is to set a "Plane" myself, and to not have that plane change, until I make the change personally. Having those boxes "on", means that Mastercam will switch you planes for you, often without you knowing it happened. By then the damage is usually done. Another thing I think is a great "Tip" is to get used to using the "Quick Mask" tool bar buttons. These "masks" give you the ability to select "All" of a certain geometry/color type by "Left Clicking" the button, while "Right Clicking" the button turns on the "Only" selection mode. I have a hard time using MC without the "Quick Mask" buttons now.1 point
-
I prefer a bull whip and cattle prod. Today is day one!0 points
-
There are many hidden features. I've been driving Mastercam for twenty years and I just found out I think a year or two ago that you can use a mill face operation without any geometry, and it will use the stock definition for extents.0 points
-
I hit the save button alot.0 points