Leaderboard


Popular Content
Showing content with the highest reputation on 01/19/2022 in all areas
-
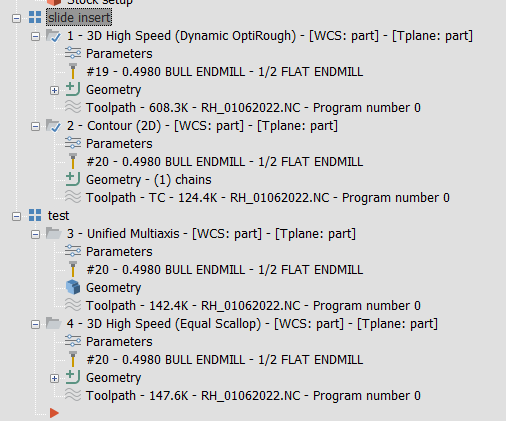
Like everything in life, it varies Overall, I'm a big fan of doing Op # > Subgroup. If I'm doing a single part, I'm likely to do subgroups by feature. If I'm doing tombstoning like JP is above, it makes more sense to do it by Tool. Like Colin, unless there's a really good reason, I only put in a new machine group when the part physically moves from one machine to another. The actual names of the groups may change to try to conform to the customers' needs. Something like this for a single part: Machine group: Op 1 - Prep - G54 - 6" Kurt Vise Facing 2d Dynamic Drill Circle mill Op 2 - G55 @ COR - 6" Soft jaws 3+2 Roughing Opti Opti 5 Axis Roughing Pocketing Pocketing Pocketing 5 Axis Finishing Unified Unified Swarf And a big +1 to really using viewsheets with bookmarks.4 points
-
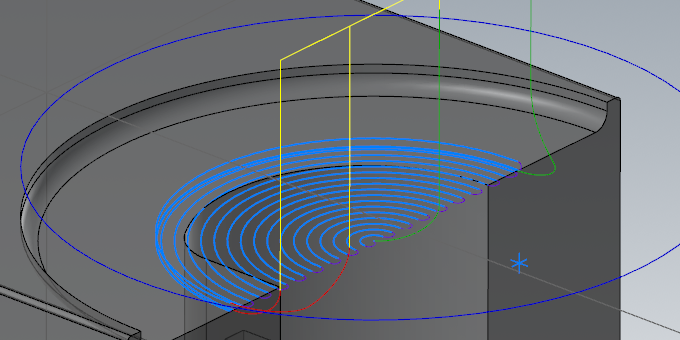
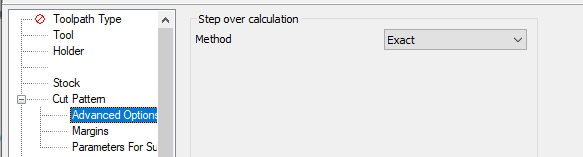
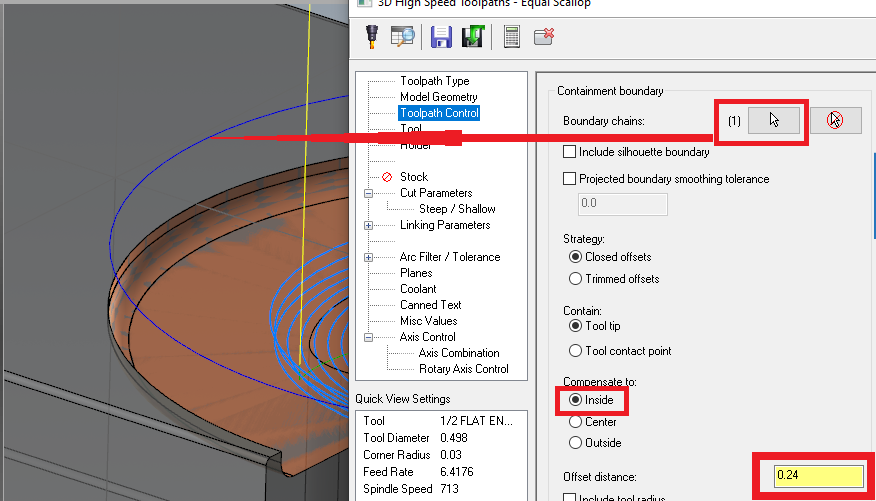
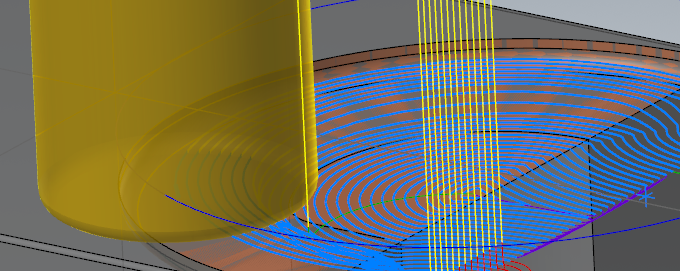
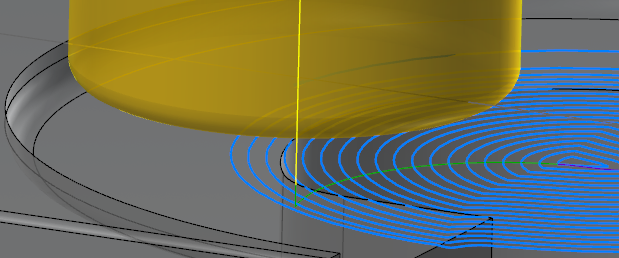
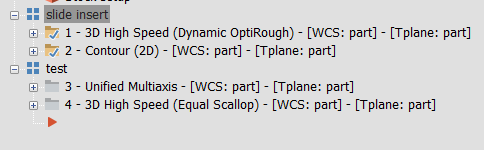
The easy button is Parallel (or Unified with a single curve set to "Parallel" strategy if you're in 2022): Use your surfaces (level 4) because it can't "fill in" the missing surface and understand that you want it machined as if it were solid. Then just set the curve up to the top edge, set your step over and Tool Axis Control to 3 axis. Oh, and you'll want the Cut Pattern > Advanced options.. > Method set to Exact: If you don't have multiaxis, then I'd go with a Equal Scallop. You have to guide it a bit more than Parallel, otherwise it will try to cut the back side of the part. The easiest way to lead this toolpath is to give a boundary (I used your Containment level (#3), and used "Wireframe > Close Arc" to make it a complete circle. Then select your surfaces as your Model Geometry (again, you don't want the gap in the middle). All of the magic here will be on the Toolpath Control page, here's the important bits: Note the Compensate To & Offset Distance settings. If you hit Comp to Center, it'll allow the tool to go all the way up to the edge of the compensation chain, then trim the toolpath. In this case, it will really roll over the edge and waste a ton of time: By limiting it to the Inside, it'll cause the opposite problem, it'll trim as soon as you hit the edge it'll trim, so it won't walk up the wall at all. You can get around that by allowing it to go a smidge over the center by adjusting the Offset distance. I just gave it .010" to give it some wiggle room less than the stepover, and my first image was the result: Note that I didn't mess with any linking settings or anything, so that stuff is all ugly. I don't have 2021 installed over here yet, so here's a 2022 file. I hope my walk-through above helps if you can't get a copy of 2022. slide insert test - 2022.zip
 3 points
 -
No, but Roger at CNC Software did something to add groups with certain information sequentially and it was a huge help for a certain customer. Byte also helped and made a cool Chook for adding groups using a process like it. It is a great tool when needed to add tons of groups without having to add them one at a time. I have asked for years for the ability to add groups without having to do it one at a time. We are stuck with having to use Chook or something to get what should be basic functionality in the Toolpath manager.2 points
-
Doubt it. Have you turned off the display of toolpaths while regenerating?2 points
-
The reality is this takes huge money on the Implementation and Maintenance end. > You need to configure the software. What do you want to "do" with the data? > You either need to pay Zoller to implement your system, pay a 3rd Party Integrator to do it, or pay someone on your company's internal staff to do it (like Zoffen suggested). > How do you want "data" to flow? > Who is maintaining your software & your databases? Who is maintaining your Tool Crib Inventory? JB has attested to the same thing I've seen in other shops with Zoller. They use the equipment for a fraction of "what the system could do", and they use the Presetter to set tool lengths, and print out labels, with Tool Length and Diameter values. The "label" is attached to each Tool Assembly, on a Tool Cart, which is parked next to the machine. The next job comes up, and the Operator unloads all the old tools, and manually loads the assemblies into the tool magazine, and then enters all the new TLO and Diameter Offsets "by hand", at the control. I've seen other shops where this Tool Data was written to an RFID Chip. At the machine, there is an external "tool registration" station, where you scan the RFID tag. This automatically loads the TLO CRC values, without the possibility of operator error. However, the Operator could still accidentally load the wrong tool in the Tool Pot. The only way to really "close the loop", is if you have the ability to assign each Tool Assembly a unique identifier, and then have a "read/write data head", which can engage the tool while it is in the spindle. (Usually a data read/write event, before/after the tool is used. This does add some extra time, but results in process security and reliability.) The problem is > someone has to design the system, integrate all the hardware into the machines, train everyone how to use it, and then hold them accountable. That last part, is typically the hardest.2 points
-
Right, that's how I remembered it working years ago too... But hey, It allowed me to submit my first bug report for my new company, so that's worth something, right?1 point
-
What I meant is that it does everything from your selection down. For example, if I have the first group selected here: And hit Alt+E - it'll expand both groups: But if you only have the second group selected, it'll only act on that one (and any groups underneath it): So it's clearly broken, but in an odd way.
 1 point
 -
I have no experience with other TMS software but I have a feeling it will be about the same. Why will a "MASTER-ASSEMBLY-LIST.toolDB" on a server not work to get started? One thing to not overlook is how things are named in any system. I have created a simple "structured text" language as a common way to name all of my tooling. This makes automating thing alot easier in the future. Good systems start from the ground up and naming conventions are (IMHO) a fundamental of any good TMS. EX:
 1 point
 -
Yup, that's why I made sure to give my thoughts. I don't like downing any company, as some may have merits, that just don't suit my needs, and as I said, the presetter itself is phenomenal. And I would have really loved to have a proper, efficient system of managing tools here. Unfortunately, this was not the way.1 point
-
Alt+E (screen hide in the graphics area) will cycle your selected ops through the three expand/collapsed options, but it does it to every under your selection. I wonder if the system team knows about that? I'll send it in.1 point
-
Try this: Click on the "Machine Group", (This puts your "mouse focus" on the Toolpaths Manager. Now, press "E" on your keyboard. No ALT. No CTRL. Just "E" Press "E" repeatedly. Eventually, the Machine group will be completely "collapsed". Pressing "E" one more time, will expand all of your Groups, but keep the Operations "collapsed". If you continue pressing "E", eventually Masteram will expand all groups and operations (plus signs). Keep pressing "E" (notice a theme here), and you'll start collapsing Ops & Groups.1 point
-
I think so, but I'm not sure where it is these days; I'm accustomed to X9. It's also been some time since I did lathe work.1 point
-
Can you use a point for your inner chain?1 point
-
Flowline should be able as long as the U/V curves follow the shape. I didn't see the file before responding and no the curves don't follow the shape. JParis is a good idea.1 point
-
Surface Finish Blend Chain the inner first, the outer 2nd, define your surfaces and go1 point
-
No models are needed to build the programs for checking a tool at the presetter.1 point
-
Colin, Much love for that detailed response. I'll work on that tonight or tomorrow and report back with a toolpath. That's a great post of knowledge I can put in my spreadsheet.1 point
-
Thanks for Posting the pictures. Set the following settings. Change your Control Definition Settings First. Then "regenerate your Operation, after changing the Filter Settings", and you should see many more "arc moves", instead of the path being broken into so many "line segments". I see "both the entry helix", and the "arc in/out" moves of the path, are still being broken into many small line segments. (I see this in the backplot picture...) In the 1st Picture (Tolerance Distribution): > Change percentage to "25%" for Cut Tolerance and "75%" for Line/Arc Filter. (Gives you "tighter output on the model [cut tol]" with better "arc fitting") > Change "Min Arc Radius" to 0.002". > Change "Max Arc Radius" to 4.0" > For the "radio buttons" set to "Tighten Arc Filter tolerance" option, and slide the "slider bar" to 75%. (This says "only use 25% of the Line/Arc Filter Tolerance Value for generated "lines", and use 75% of the filter value, for creating Arcs. This attempts to give you a better combination of "straight line sections". > Most important thing > enable the Checkbox for 'Output 3D Arc Entry Motion'. < This is important, so you get Helix moves for your cutting. In the 2nd Picture (Control Definition Tolerances): > Set "NC Precision" to 0.00001" (10 millionths) > Set "Chordal Deviation" to 0.0004 (4-tenths) > Set "Minimum distance between arc endpoints" to 0.0012 (12-tenths) > Set "Minimum arc length" to 0.0016 (16-tenths) > Set "Minimum arc radius" to 0.0008 (8-tenths) > Set "Maximum arc radius" to 432.1" (Usually, anything above 200" is fine, unless you work with massive parts.) > Set "Minimum change in arc plane for helix" to 0.00002 (20-millionths) > Set "Maximum deviation in calculated arc endpoints from machine grid" to 0.00001 (10-millionths) In the 3rd Picture (Mill Arc Settings): > Leave "Arc Center Type" alone > Set "Arc Breaks" in all three plane types to "Break at 180 degrees".1 point
-
You want to "skip to the end", or you want to "ignore the output of a particular operation"? You can suppress NC Code output with 'no_nc_out$' Command Variable: no_nc_out$ = yes$ This will "dump the output stream" to a temp file, that just gets deleted. But if you need additional characters in the File (like "M30" or "%" at the end), you need to remember to go into 'peof$' (end of file Post Block), and to set 'no_nc_out$ = no$', so you can then "output additional characters to the NC File". If you don't want to output anymore characters, but you want to "do something" after the NC File has been processed (and had been 'closed' or written-to-disk), then you should perform additional actions in 'ppost$' Post Block.1 point
-
Nope it does everything in thee operations manger not a specific group in the operations manager. Locked up MT for about 2 minutes while it thought about what it was doing. Scared me thought I had crashed Mastercam. Will not be trying that one again on this file. I have had my email and website on mine for years. They still let me even though I am the pain I am.0 points
-
Gotcha. I feel like EMastercam is a whole new forum. I never had the "view signatures" setting turned on and didn't even know this forum had sigs!0 points
-
clock time trumps cores0 points