Leaderboard


Popular Content
Showing content with the highest reputation since 11/02/2010 in all areas
-
Since many people have asked me to share how this works, I thought I would make a post about setting the Control Definition Default settings. Are you tired of your NC code changing whenever you update Mastercam? Why do your NC settings seem to get screwed up? You ran the "Migration Wizard", and things are still broken... Ok, so what's going on? ---> You didn't set the Control Definition Default Settings. It doesn't have to be this way. You can setup Mastercam to handle upgrading without causing you frustration, or the loss of any hair/sleep. Here is a step-by-step process for setting the Control Definition Defaults. What is a Control Definition, and why should you care?: First, what is a Control Definition File? A Control Definition is a file that Mastercam uses to store settings for controlling your NC code output. The CD (Control Definition) contains common settings for things like "Arc Formatting", and the settings for Sequence Numbers (N numbers), among other things. The idea behind the CD is that it gives the programmer the ability to adjust settings by using a Graphic User Interface, instead of having to make edits directly to your post processor. When it was originally conceived, the CD was created with the ability to link and control multiple post processors, and have separate settings for each one. This would give "administrators" the ability to make edits for multiple machines from within a single file. In practice however, nobody ever does this. Every shop that I've worked with uses a single MD, CD, and PST file, all with the same name. So even though a machine might share all the same settings with another machine in your shop, the "best practice" is to use a single MD/CD/PST name for each unique machine on your shop floor. When you create a new job in Mastercam, and load a "Machine Definition" file into your Ops Manager, Mastercam places a copy of your MD and CD into the Ops Manager. These "file copies" are specific to your individual Mastercam file, and are not "linked" back to the originals (or "library copies") of the files. To a certain extent, this does make sense. This convention allows you to make "individual" file changes. So for example, say you had a program that used a Right Angle Head, with a few specific tools. You could setup the "stations" with a RAH component, and have all of those options saved inside your individual Mastercam file. You wouldn't want all those modifications to be made to the "library copy" of your files; they are project specific. Another situation might come up where you are running out of memory for a specific program. For this individual file, it might make sense to disable Sequence Numbers, remove all the "Space characters", and output all of your Arcs using "R" values instead of IJK, just to save space. The CD allows you to do that, without changing the settings in the Library Copy of your CD... Are you with me so far...??? So in a nutshell, the CD contains user-select-able parameters that control some of the formatting of NC code output. Control Definition Defaults OK, so the CD contains settings that format output from the post. Great. Now we get to the issues... The main problem that I see people run into comes when they update to the next release of Mastercam. This problem occurs because the settings in the CD refer to a static file path. Say what? Yes. The settings that are stored inside the CD are stored for a specific post in a specific file location. Those settings are only valid for that exact post processor file name, in the exact folder location you specify. When you setup a new post processor, most users typically create (rename, whatever) a new post, and put it in a specific folder, local or network folder location. Ok, great. But then they go and "link" their CD to that Post Processor, and take the time to configure their CD. This is all well and good, except, that they don't know about the static file path issue. Every Control Definition file has a set of "Default Settings" that are used (you might have guessed), by default. That means that whenever you move your post file to a new folder location (this happens "by default", every time you upgrade Mastercam), the settings for the CD that link your "new" (updated) post processor will revert back to these "default" settings... "Aghhhh!!!!" . . . "WHY!!!!" I can hear the screams from all the frustrated users dealing with these upgrade issues... So, what can be done to solve the problem??? Setting the "Default settings for control type" Ok, start by opening one of your CD files in the Control Definition Manager. Click on the "drop down" arrow for selecting a Post in the post file list. At a minimum, you should have the file path and name of your currently "linked" post processor, and there will be at least one other entry in the list; "Default settings for control type". <--- These are the "default settings" that will get picked up, whenever Mastercam is updated to a new "major" version. So, lets say that you have spent a bunch of time tweaking all of the parameters for "your post". To import those settings to the "defaults", do the following: Open your CD file in the Control Definition Manager. Select the "Default settings for control type" in the "Post Processors" drop-down list. Select the "Tool" page in the Tree. (any page will work, I just picked one for the example.) Move your cursor below the controls, into the "gray area" of the page. Right-Click in the gray area, and you'll get a Right Mouse Button Menu that pops up. Choose "Import > All pages". This launches a "Open" dialog box. Mastercam is asking "which CD" do you want to import the settings from. By default, it will have the currently open CD set to the current file name in the dialog box. Just press "open", no need to re-select the file in the list... This opens a "Control Import - select the type and post key" dialog box. There will be a list with "your" post, the "default settings for control type", and possibly some other file paths, depending on how the post was originally setup, and if it has been "updated" previously. Choose "your post" in the list. Press the "ok" button. All of the settings from "your post" have now been imported into the "default settings for control type" in your CD. Press the "save" button. Doing that process will import all of your current post settings to the "default" settings for your CD. Now, whenever you update Mastercam, the CD will use the "default settings", which just happen to match your current post settings. You will never again have an issue with a Mastercam update changing the NC code output of your post... A few caveats: If you start by just simply taking a new CD file, and setting the "Default settings for control type", you never have to worry about "importing" any settings, since any post that you then link will pick up the "defaults" automatically. If you change any of the parameters for your current "library copy" of the CD, you should also make those changes to the "default settings", or you risk getting your current CD settings, and the "defaults", out of sync. If you do make any changes to your current linked post, just remember that you can "import" those changes to the default settings with the procedure above. Make sure you set the Default Settings for you CD in your current version of Mastercam, before you run the Migration wizard. I thought you could import CD settings from older versions of Mastercam .control files, but it doesn't seem to be working in X9. Hope that helps, Colin60 points
-
eMastercam Community, For the last 10 years we've hosted the Verisurf Free Tools for Mastercam on this forum and over this time you all have contributed to positive discussion, feedback and enhancements on our Free Verisurf Tools. We've released a new website, and along with that we also have made the decision to host our latest Tools on our new Tools page. We will continue to expand on Tools and monitor this forum closely for any suggestions you all may have and improve on existing features. Downloads for the free Verisurf tools are now on the Verisurf webpage. Verisurf Tools for Mastercam Thanks Ernie
 55 points
 -
I hit the save button alot.35 points
-
Ok, so today I accidently found this magical shift-click when creating 2d geo and it's got me wondering, what else am I missing? Pitch in your tips/tricks/methods if you please!31 points
-
Try this new install, it was built with the Mastercam pc2 release SDK. Verisurf Tools X8 Install Ernie30 points
-
Alt+Space seems to work with the level manager, but not with the tool path manager, solid manager, or the MBD window.27 points
-
Doing a part with multiple small pockets. Created a point in center of each pocket for a start point. Trying to minimize my wireframe creation so using the solid for pocket geometry. Was having to go from wireframe to solid selection when chaining each pocket. Lots of extra clicks. So I wondered if I just selected all the points first and then chained the pockets if Mastercam would automatically sort each point to the appropriate pocket. The good news is yes it does. So you can pick all your points first then go chain the contour.
 25 points
 -
Since only 4 people downloaded it I will share it in this thread. http://www.emastercam.com/board/topic/83067-geometry-for-thread-milling/?p=1017401 Both ways mentioned above the the normal way, but sometimes I will use a Helix of the thread like we did well before threadmilling was introduced as an operation. 3D contour to drive it and turn off infinite look ahead. Last thing and yes I agree completely weird you have to do this, but you have to alt-c and use the arc3d chook to get helix moves for this toolpath. Will also have to ignore the weird looking toolpath. Backplot the toolpath and you will see the weird stuff is just Mastercam freaking out. Here is an example where I don't like the threadmill operation. Reason being I want the tool to cut the threads in one pass not jump up and start a new set of cuts. The other place this process is good is where you have to time the lead of the thread to a specific detail. I will use this a lot when doing Mill/Turn parts where the exact start of the thread must be between a certain angle or the pitch must intersect a certain feature. HTH Replaced Forum Download with Dropbox link25 points
-
Hi Colin, First - many thanks for this control and your machine file write-ups! From what I understand - you have shown to modify your existing control file and then export it to the default. But I was curious if I'm modifying the default if I open up the control def manager and I select the default from the existing definitions ? Am I now modifying the "default" control, if not - what am I changing? Also- why can I modify all of the settings except the post text? The grey text at the bottom says system text is active? It seems your method will capture all of the changes, but I'd like to better understand these functions. Thanks again for all your insights, Dan
 25 points
 -
The email hasn't gone out yet but the download is available here http://www.mastercam.com/en-us/Support/Downloads/Mastercam If you are running MC2017 PC1 you do not need to reinstall PC1 has a build date of May 27, 3026 and is version # 19.0.7874.0 That is the same as the RTM that was released this morning if you're running MCfor SW, you will need to do a reinstall24 points
-
Very useful and works like a charm. Good job Verisurf. Thanks Ernie.24 points
-
LOL! We are trying something new, a social experiment in our shop I thought some might find interesting. We currently have redundancy in every department in our shop. We have multiple good machine operators, multiple physical inspection experts, multiple CMM programmers, etc... What we are doing as a shop for the month of August (trial run) is half the team will work Monday-Thursday and half the team will work Tuesday-Friday with each team working four 8 hour days. The fifth day will be paid at 8 hours so essentially they will be given 52 extra days of paid vacation if this is sustainable. My goal is to hit our monthly deliveries and sales targets and so long as they can manage that this arrangement will continue. The ball is in their court on this. If we get the work done there is no additional cost to the shop, our payroll will remain unchanged but the employees will have an additional 2.5 months per year (52 days/ 5 days per week = 10.4 weeks) to enjoy life. We are currently doing well and profitable and we leverage technology to the hilt (cells, robots, etc...) so the shop runs well with a skeleton crew. Monday and Friday will be light but we should be able to shift our work flow to accommodate this. I really hopes this works well because my ultimate goal is to create solid employee loyalty and facilitate a better work-life balance for them. I will keep you posted on the outcome. I'm thinking this will also make hiring pretty easy as well21 points
-
We build a bulkhead for a business Jet. It's flat on one side with pockets on the other. In the past, we have scraped many out of TOL. from warpage. Recently, I re-programmed this part with success and little distortion. Constellium, our material supplier was impressed with the part and asked to purchase one of these to take to the show. Of course, we requested permission from the OEM. They did grant permission as well as instructions to modify the part and rivet a name plate. This was displayed in there area of the Paris Air Show 2023. I am proud of this work. Thanks for reading, Steve Austin
 21 points
 -
I gotta disagree with that. X was so new and different, I wasn't sure if something was broken or that's just how it worked. Either way, I don't recall any major issues with it. I stayed on X2 until X6 came out. X2 was pretty solid, as was X6. I then waited until X8 to update, then X9 which I'm currently still running. Thinking back on it, X and X2 were the only version that I moved to right when they came out. The others, I waited for the first MU to come out before updating.19 points
-
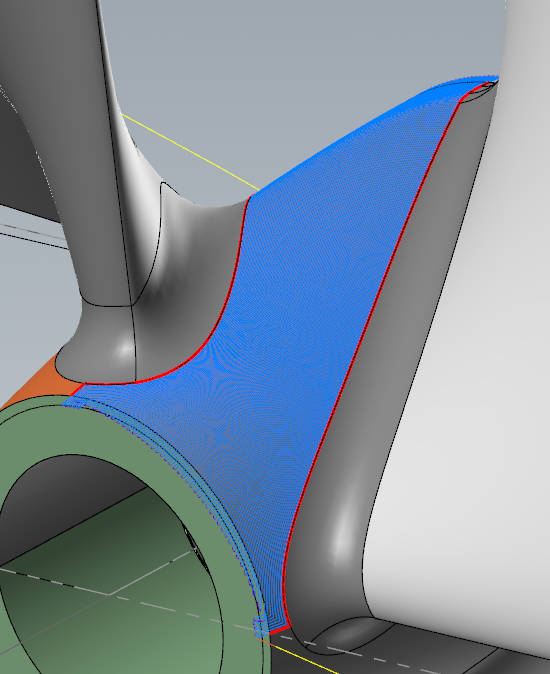
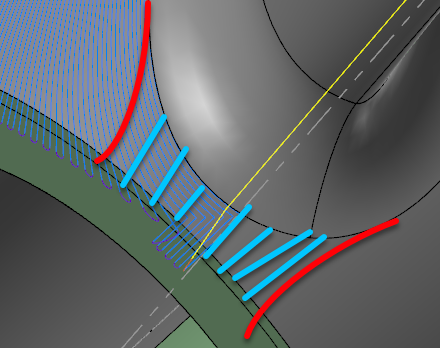
Take a look at this and see if it'll work better for you. I didn't have much time here between meetings with customers, but I slapped a Unified > Morph on it (Guides would give you approximately the same results). I turned on Smooth corners (so it doesn't do a 90° bend in the corners) and I also extended it. Also, I changed your linking to be a blend in small gaps, so it transitions nicely instead of "direct." The only other change is Op2 is the same as Op1, but I put on collision control for you so it won't gouge the blades.Sample - Unified.zip One other thing you can do is get fancy with trimming the "corners" to make the toolpath smoother, and then do a small toolpath in front of the impellers, something like this: I didn't have time to play that much and I didn't want to leave you hanging until this afternoon when I would have had a chance to do it.
 18 points
 -
Hello Everyone, If you own a seat of Multi-Axis in Mastercam, you have a ton of great toolpaths that are available from ModuleWorks. There are actually a bunch of really great 3 Axis Toolpaths produced by ModuleWorks that are included in Mastercam, but they are almost "hidden" from the normal user. These toolpaths aren't actually hidden from the user. But the Mastercam interface makes them appear to be something they aren't, so the average user, even the average Multi-Axis user, doesn't know they exist. If you have a seat of Multi-Axis, do the following: With a Machine Group loaded, go to Toolpaths > Multi-Axis. If prompted, enter a new program name. In the Multi-Axis dialog box, select "Surface/Solid", then select "Triangular mesh". The Triangular Mesh toolpaths are the best kept secret in Mastercam. They have been available since at least X5, so they have been in the last few versions of the software. The term "Triangular Mesh" is perhaps what makes these toolpaths "hidden" from the average user. Typically you would think of a Triangular Mesh object as an STL file, or some other external reference. In terms of the ModuleWorks toolpaths however, Triangular Mesh takes on a new meaning. For most of the 5 Axis toolpaths, the normal direction of the surfaces being cut plays a crucial role in determining the tool axis orientation. With the "Triangular Mesh" toolpaths, the surfaces themselves are not used to orient the tool axis. For these toolpaths the surfaces are simply tessellated using a cut tolerance. In a nutshell, this just means that the "Triangular Mesh" toolpaths are just "3D Rouging and Finishing" toolpaths that don't take their tool axis direction from the surfaces being cut. They just provide great 3 Axis toolpaths that in some ways duplicate functionality in Mastercam, and in other cases drastically improve upon the existing options. Once you've selected "Triangular Mesh" for the toolpath type, go to the "Cut Pattern" page, and look at the drop-down menu for "Pattern". This is where you select the toolpath type, and there are a bunch of them! Toolpaths: Rough Parallel Cuts Project Curves Constant Z Constant Cusp Flatlands Geodesic Projection Rotary So that is nine different toolpath types that are available to you if you select Triangular Mesh. Try the "Rouging" option. Activate the checkbox for "Adaptive" roughing, and now the style is similar to "Dynamic". But wait, it gets better. Normally with Dynamic style motion, you are only allowed to cut climb or conventional. Ok, so if you climb cut only, the cutter has to move from the end of the cut, to the start of the next cut, and typically does a micro-lift at a high feedrate to get there. With the Adaptive rouging from ModuleWorks, you can use "Zig-Zag" stepover. This then allows you to enter 4 parameters: Maximum Stepover, Desired Stepover, Climb stepover percentage, and conventional stepover percentage. So you can easily take say 75% of the stepover value for climb milling, then take 25% of the stepover value for conventional. This allows the cutter to stay fully engaged during the roughing cut, and allows for even higher metal removal rates than a regular "Dynamic" or "Opti" style roughing path. If you've got a license of Multi-Axis, check out Mastercam's best kept secret...18 points
-
Thanks Ernie18 points
-
Hello forum people! I wanted to let you know that after 9 years here at the helm of Multiaxis and Hole Making, I'm going to let someone else have a turn at the tiller. I'm going to transition into owning a shop nearby in Hartford, starting on Monday. This is my last day @ CNC Software. Thank you all for being here! I've been on eMastercam longer than I've worked at CNC, and I'll be here long after, but I may lose access to this particular account. I'm not sure Cheers,17 points
-
Hope everyone enjoys some of the fun I have had making this part.16 points
-
If you have the "Auto-cursor" options enabled, you can press the letter of the keyboard shortcut for the "Auto Cursor Override" options. This means to snap to an Arc Center, you press the letter "C" on the keyboard. "M" for Midpoint, "E" for Endpoint, "O" for Origin, "I" for Intersection, "P" for Point, and so on. There is a lot of time to be gained from using these shortcuts.16 points
-
Hit the space bar to repeat the last command.16 points
-
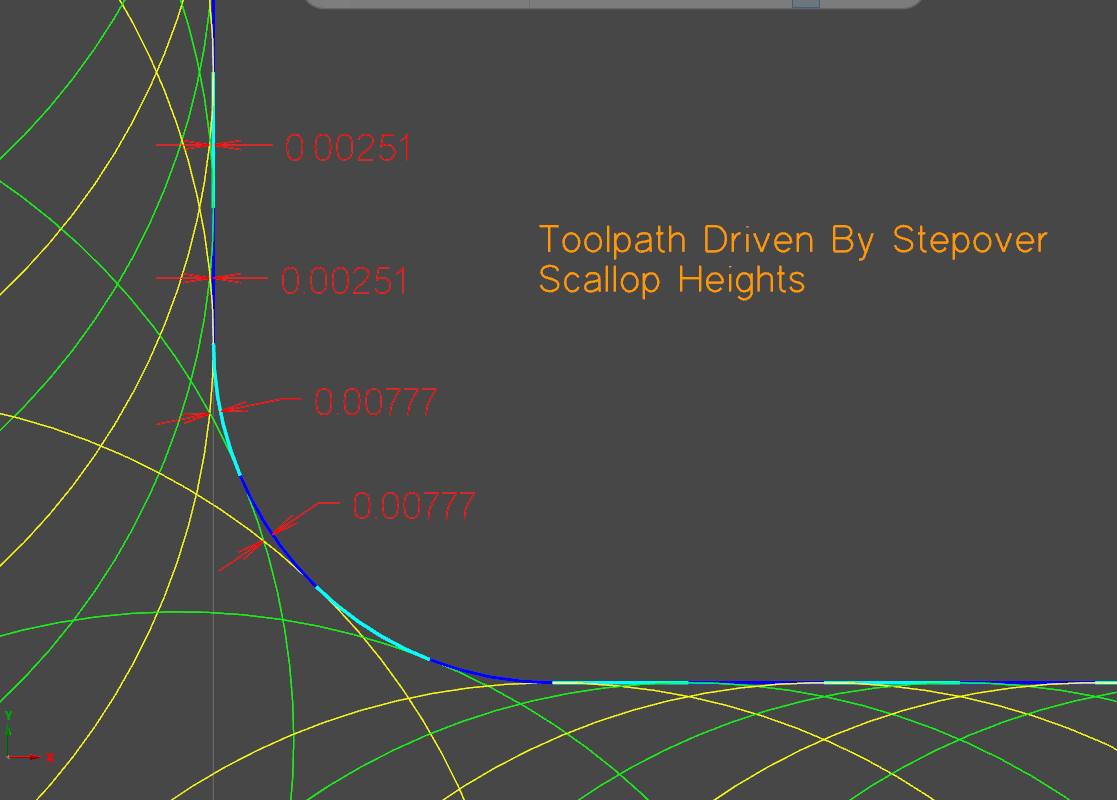
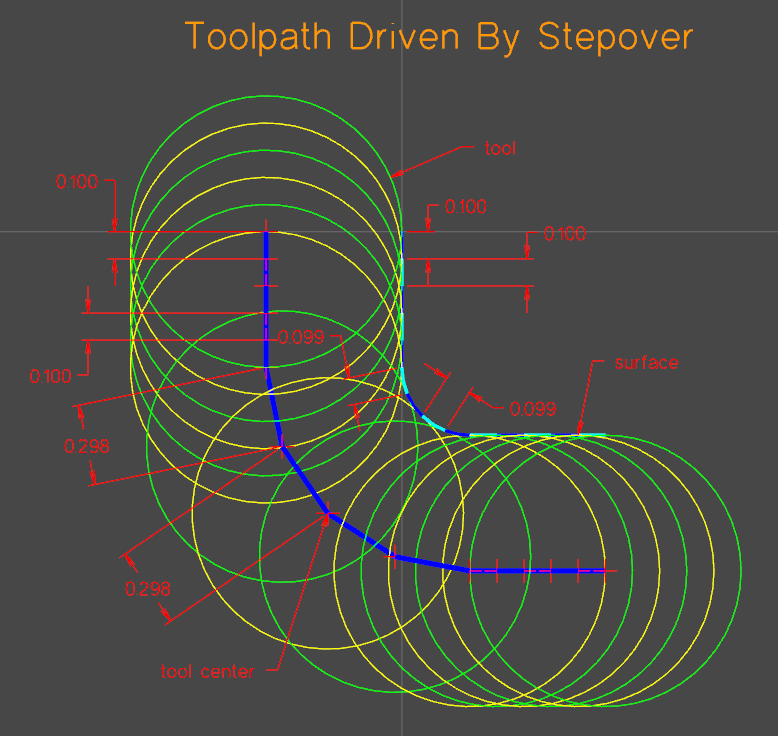
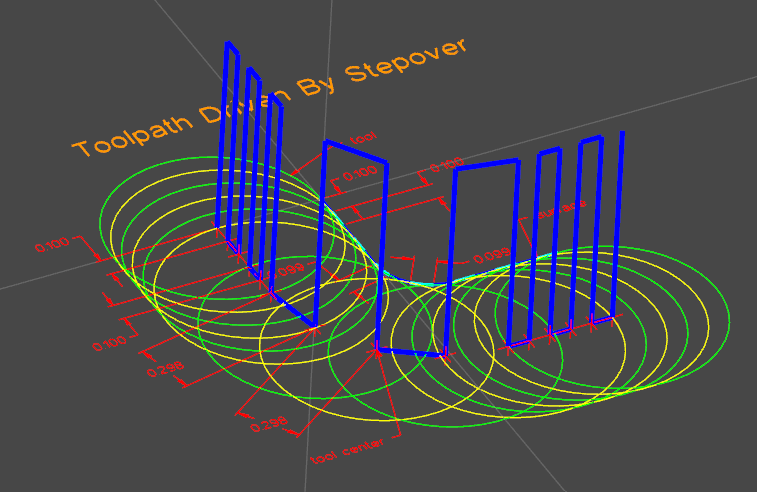
Wanted to do an in depth explanation of this because it took me a long time to figure out when to use stepover vs scallop and why. Tool center and tool contact point are two different things. The toolpath lines we see in backplot are where the center of the tool will be. When surfacing around a radius and driving by stepover, the center of the tool must take larger steps to keep the stepover at the contact point consistent. In these pictures you can see when driving the toolpath based on the stepover, the stepover around the radius stays consistent at .099-.100, but the tool center stepover is much larger around .298. An unexpected consequence of using stepover is the scallops around a radius will be bigger or smaller than scallops left on flat surface. When using scallop to drive the toolpath, you tell Mastercam you care more about the height of the scallop than the stepover. This causes the stepover of the contact point to shrink around outside radii and grow around inside radii. Dropbox Link To File and Pictures (MC2023) Please correct me if there are any mistakes in this explanation. I think I have a solid understanding of this concept but there's always more to learn. Hope this helps!
 15 points
 -
With the old benchmark thread getting so cluttered it was getting difficult to find the benchmark file. I decided it was time for a new one. Benchmark 2.0 File location: Its on the ftp under unspecified uploads since there are no folders for x6 yet. Directions: Open the file and dirty the operations. Change the filter to .005 to dirty, and then back to .0001 to run. As we all know, just dirtying the optirough will automatically dirty the stock model. Post your results as well as the version of Mastercam you are using and see how your system stacks up against others. Here is a simple online calculator for adding up the total time. Time Calculator Old benchmark thread15 points
-
Once you've gotten used to how Mastercam works, I recommend turning off the following checkboxes in the System Configuration Menu -> CAD Settings -> "Update Cplane when changing Gview" CAD Settings -> "Reset Cplane to Top in Iso Gview" Those two check boxes, more than any other settings, will mess with you during geometry creation. My personal preference is to set a "Plane" myself, and to not have that plane change, until I make the change personally. Having those boxes "on", means that Mastercam will switch you planes for you, often without you knowing it happened. By then the damage is usually done. Another thing I think is a great "Tip" is to get used to using the "Quick Mask" tool bar buttons. These "masks" give you the ability to select "All" of a certain geometry/color type by "Left Clicking" the button, while "Right Clicking" the button turns on the "Only" selection mode. I have a hard time using MC without the "Quick Mask" buttons now.15 points
-
We've got a production part that's been running for years in batches on 10 to 15 pieces. Theya are big steel casting and have about 200 tapped holes in each part. There are 120 5/8-11 blind holes 12 radial bosses with 10 holes each Running old school on our old HBM's it took about 2 to 3 hrs to tap these holes depending on the motivation of the operator. (blow out the hole.. add tapping paste , tap, check threads, clear chips off the tap ... repeat ) Friday we tried this on a modern machine Sandvik through coolant tap Sandvik rigid tapping collet and collet holder 1000 psi through spindle coolant 90 sfm = 554 rpm @ 50 ipm the machine has torque monitoring and Sandvik provides torque values new tap, time to change ... and breaking torque this particular tap is rated at 1300 holes at 90 sfm in 4140 steel if the machine hits the torque limit it backs out of the hole and stops the operator set it up and got ready to run it.. I got called away to answer a phone call...and missed the whole show 120 holes in 18 minutes and every hole gages perfectly the boss's jaw was on the floor It will be interesting to see how this proccess holds up long term15 points
-
Hello Recently, I've seen ActiveReports setup sheet for sale. Here is a sample setup sheet I developed that I am releasing for free. You can find the files github.com: https://github.com/themachinist/mastercam-setup-sheet/ And here is a short tutorial on installation and usage: Written instructions: 1. click the download ZIP button the github page 2. extract zip to %wherever_you_keep_your%\shared mcamx9\common\reports 3. Go to Settings > Configuration > Toolpaths 4. Make sure Setup Sheet program is set to ActiveReports 5. Go to Reports 6. On the right hand side click the file cabinet icon next to File name: 7. Navigate to %wherever_you_keep_your%/\shared mcamx9\common\reports\mastercam-setup-sheet-master 8. Select "sample-setup-sheet.rpx" 9. Click the green check mark There is one caveat: I have released this under a non-commercial license. You may use it at your business, but you may not sell copies or derivative works. Regards, Dave14 points
-
Mastercam Machine Definition - what is it, why do I need it, and how do I use it??? I decided to make this post to help answer the all too frequent questions that pop up related to the Machine Definition, and what role it plays in configuring post processor output. The Machine Definition is a Graphic User Interface that was created by CNC Software to give Mastercam some "intelligence" about the type of machine you are using. There is a distinction that I'm making here between the "Mastercam" interface (where you create Tool Paths) and the Post Processor, that formats your Tool Paths into NC code. When the Machine Definition "format" was created and added to the Mastercam Interface, there was a set of "components" that were developed, along with an "Axis Combination" utility. Together, these form the basic setup to let Mastercam have some "Awareness" of the capabilities of your particular machine. The main issue that confuses the average user is how CNC Software went about "hooking up" certain functions inside Mastercam to work with the Post Processor. If you've had any experience going from 3X, to 4X or 5X, programming a multi-spindle lathe, or even trying to move a program from a Vertical machine to a Horizontal machine, then you've probably been exposed to the Machine Definition issue. In order to understand some of the issues, it helps to get a little historical perspective on how Post Processors are handled. First, Mastercam used to ship with a whole bunch of Post Processors. These posts were "removed" from the Mastercam Installation disks, starting with the Mastercam X series. (or was it X2, I can't remember...) The reason I believe was to help combat piracy, since Mastercam isn't worth that much without a working Post Processor... So you have a situation where Mastercam had a huge "library" of posts, and these were moved to the "Post Installation Program", which is an "exe" file that is available from your Reseller. All of these posts have accompanying Machine Definition Files and Control Definition Files that have to be maintained. This is in addition to the "Generic Fanuc" Post Processors, that are the "template" files for most post processor development projects. Because the Machine Definition was added to Mastercam after Version 9, much of the "Tool Path" functionality and the available post processors, had all been developed without the need or use of a "Machine Definition" or "Control Definition". I've already covered a little bit about Control Definitions, especially how to set the "Default Values", so I won't get into much of the CD. When the Machine Definition Files were added to Mastercam, a decision was made to only "hook up" certain features of the Machine Definition to the Post Processor. This was done (I believe) mainly for practical reasons. It takes a great deal of development time and testing to hook up even one "feature" of the Machine Definition to work with the "template" style posts. 4 Axis vs. 5 Axis One of the biggest differences with how the Machine Definition is handled is the difference between 4X and 5X Post Processors. To understand this difference, it helps to know some info about how the post works internally. With "MP" based Post Processors, there is a huge difference in how Rotary values are calculated. With a 4 Axis Post, the MP.DLL "post engine" makes all of the 4th Axis rotary calculations, based on the orientation of your Tool Plane's Z Axis component. MP will take either the "Top" plane, or the "Front" plane, and use that plane for the "Rotary Zero" plane orientation. When MP "sees" a change in the Tool Plane orientation, it will automatically calculate the new rotary position for you. This happens "behind the scenes", and is based on the value of the Post Variable 'rotaxtyp$'. Since there is a bunch of stuff being calculated "automatically" for you, one of the things that CNC Software was able to do was say "Ok, if you are using a 4X Post, we can make some basic assumptions about your setup." For Mill, this means on a 4X machine you are limited to a machine that is either Vertical or Horizontal. The other limitation is that your Rotation Axis must be Orthogonal, about the X or Y axis. (aligned with +X, -X, +Y, or -Y). For Router, the 4X Rotary is about the Z axis. You cannot use X or Y, only "Z" as the rotation axis for a 4X Router post. For a 4X Machine, (Mill or Router), the Post has logic that reads the "Positive" rotation direction (CW or CCW), and the "type" of axis. (Continuous vs. Index) None of the 4th Axis Posts (Mill, Router, Vertical, or Horizontal) have "Rotary Limits" hooked up inside the post. Only the 5X Post has any concept of "Rotary Limits" built into it. Lathe Mastercam Lathe is the one area of the product that they spent a great deal of time "hooking up", but not in some of the ways you would expect. For a 4X Lathe, Mastercam will handle up too a Dual Turret, Dual Spindle machine, using only the "Generic Fanuc 4X MT_Lathe" Post. On the Machine Definition side, the Post does not read settings from the "components" of the Machine Definition, which is a little confusing at first. What is read is on the "tool path" side, and it is the "Axis Combination" that is read at the "Tool Path" level. That means when you are creating a Lathe path (or Live Tool Milling), you must select the "Axis Combination" to tell Mastercam what set of components (spindle and turret) are being selected. Moreover, you also have to setup the Tool Definition independently (there are turret/spindle settings for top/bottom, and left/right that are not read from the Axis Combination settings.) That said, once you've picked a "Axis Combination", and set the "type" of cut you are doing, there are string settings internal to the post that control the setup and output for all the different turret/spindle combinations. No matter what you mess with inside the Machine Definition, you will not be changing the output in the Post Processor. (A few things like "Max Spindle Speed" for the Lathe Spindles do get picked up and read from the MD, but the NC output is not usually configured this way.) 5 Axis Posts So the Elephant in the Room that I often get asked about is the 5 Axis Post. The Generic Fanuc 5X Mill Post is actually a feat of engineering genius. I say that because "out of the box", it has the capability to support almost any imaginable configuration of 5X machine. The Post is built using "switches" that are numeric variables inside the post processor. These "switches" control the configuration of the NC machine, including the type of machine (Head/Head, Head/Table, Table/Table, or "Nutating" configuration.) Once you specify the "basic machine type", then you configure the Rotary Axis orientation and zero positions, and setup the Rotary Axis Limits. All of these settings are read from inside the Post Processor. The 5X Post has the least amount of features that are "hooked up" to the Machine Definition. "Coolant" is still configured inside the Machine Definition for the Generic Fanuc 5X Mill Post, and some other basic settings like "Linear Rapid Rate". Other than a few parameters though, the bulk of the configuration does not involve the Machine Definition file at all... Part of the issue that is created with the 5X Machine Definition files however is "compatibility" inside Mastercam. There is some logic that actually checks the capabilities of your Axis Combinations, against the existing tool paths you have in your Mastercam file. If a conflict is found, Mastercam will not let you "replace" your MD file. So sometimes it is necessary to add a 3rd Rotary axis to your Axis Combination, to get around that issue. So why even have the MD, if it isn't "hooked up" to everything? The MD is actually a powerful tool, in the hands of a post developer that knows what they are doing. There are many 3rd Party Post Providers like In-House Solutions and Postability, that create their own Posts. These Posts are fully configured to read all the settings "correctly" from the Machine Definition file. I think the main issue is just time and development priorities. Rather than updating the "old stuff", which includes the "MP-based" post processors, it seems that the focus is on the new Mill-Turn product, and the MP.NET language. Another reason is to support "Right Angle Head" or Block Drill attachments. If you have had any exposure to the MP.NET product, you would see that all of the machines being built do use the MD architecture. So, in summary: The MD gives you the architecture to "hook up" component properties to the Post Processor, but most of the functionality is left for you, or your Reseller, to make use of. Axis Combinations are used by the "Tool Paths" themselves. This info is "available" to the Post, but not "hooked up" by default. CNC Software did hook up the 4 Axis Posts, to read some, but not all, of the parameters for the 4th Axis Rotary Settings. For 4X Mills, only Vertical or Horizontal are allowed, and must rotate about X+, X-, Y+, or Y-. The Generic Fanuc 4X MT_Lathe post makes the most use of Axis Combinations, but still relies on the internal variable settings to configure the post. The 4X Router post is the only 4X post that supports a 4X on the Z Axis. (Right Angle Head style). A Programmable 4th Axis, mounted on Z, is not supported in the Mill Posts. The Machine Definition does support Mill Machines using Right Angle Heads, where the offset is done only in XYZ, and the "station" or orientation of the tool is "fixed". So basically, a 3X Mill, using a RAH is supported in the Machine Definition, and by using the "Get angled head" function inside the Tool Path itself. The 5X Post DOES NOT read any Rotary Settings from the MD. This is setup inside the Post itself. Very few settings are read from the MD in the 5X Post. You can "hook this up" yourself, but that requires advanced skills in post editing. You must configure the 5X post, using the variables at the top of the post. Almost all "new" development is being done using the Machine Definition, so at some point this "disconnect" of stuff being "hooked up", or not, will go away. 3rd Party Post Developers, Resellers, and advanced users have the ability to use the MD if they choose to. With MP.NET, it is possible to hook up "Simulation" to the MD, and load in Component Models. This will let you build a machine, and drive it inside Machine Simulation. Well, I hope that helps clear up any confusion or misconceptions about the Machine Definition File inside Mastercam... Best regards, Colin Gilchrist14 points
-
Hum you must not be programming anything then that repeats or you care to go back and look ever again. Levels are key to being a good programmer in my humble opinion. I have taught Mastercam to well over 200 people and in every class I taught, the first thing I always taught them was why and how to use levels. I give someone a 1000 prints and tell them to go put them in a file cabinet. Now they can just stack then in there in less than a couple minutes with no problem. Now I go ask them to pull a certain print. What are the odds they are going to find that exact print? Now I ask them to go pull another print tomorrow or next week. What are the odds they will even remember what or where they were put. Now that person has to go through all those prints to find the correct one. How much time does that waste every time they have to go do that. The programmers levels should be their internal file cabinet for keeping things tracked. You can create a csv file that is a standard template you load in every time you fire up Mastercam. You can have a file you use as a template. There are many ways to keep things organized, but that is the key. It may seems like it takes a lot of extra time to do it upfront, but in the long run saves tons of time and allows not only others to follow your work, but you as well. I am not trying to beat you up I am just trying to give you good advice to help you in this profession. I would never hire anyone who doesn't understand levels and naming them are an important part of programming.14 points
-
Hello fellow forum members, I've decided to offer a condensed version of my Basic Mill Post Processor Development course to the members of this site, for little or no direct cost. Please allow me to explain the details, and hopefully it will be of interest, and provide you with some benefit. With all the anger and ill will being professed in our country lately, I've decided I'm going to try and do my part to help those in need, rather than just complaining about the situation. I think one of the ways I can do that would be to offer Post Processor training at a reduced cost to forum members that might not be able to afford to pay out of pocket for the training courses I've offered in the past through Eapprentice. I'll be teaching a more condensed version of my Basic Mill Post Course coming up in December. I will host three separate Saturday classes, with each day consisting of about 6 hours of training. The class will start at 2:00 PM Eastern Time, and will go for 3 hours, with a 5-10 minute break on the hour. We will break for dinner at 5:00 PM for one hour, and resume at 6:00 PM. Class will wrap up at 9:00 PM. I will not be providing a recording of these training sessions. You could make your own recording of the broadcast if you choose to do so. I recommend using "Camtasia", it is a fantastic program for recording on-screen video and audio. It is a commercial software program though, so you'll need to purchase a copy, or look into other available video recording options. Please test your setup prior to the class commencing, if you intend to record the training. You'll also need to be sure you can attend the live session during those hours. For users in North or South America, that probably won't be an issue, but if you are on another continent, the times my make it difficult. Europe for example is 5-6 hours ahead of me, which would mean we'll be wrapping up class at 2:00-3:00 AM. Just something to consider. The class dates are December 3rd, 10th, and 17th, and each day will follow the same training schedule. I've got a limit of 25 students for my account, so I'm going to cap the registration at that number. Please don't sign up if you won't be able to attend all three sessions. If I don't get all the spots filled, then I'll open it up to anybody else that can attend some, but not all of the sessions. (You can let me know if that is the case, and I'll add you to the bottom of the list for now...) In order to sign up and be accepted you'll need to email me at: "colin" AT "eapprentice" DOT "net". (Use the quoted words with "@" and "." to make the proper address. Note: it is not " dot com"... You will need to provide your full name, the company you work for, your return email address, your company's business address, and your HASP or NETHASP number. I'll need to be able to verify that you are a legitimate Mastercam user before I'll accept you into the course. Also, you will need access to a commercial license, since Educational or "Home Learning Addition" users will not be able to post process the code anyway... Edit: please also provide your emastercam user name, if you have an account. It just helps me keep track of everyone... NOTE: I will not accept users from countries with Mastercam export restrictions. If you aren't a legitimate (paid) user of Mastercam, please don't bother to ask. I will be verifying IP addresses. Update; what do you need to participate? How does the "online" class work? You will not need direct access to Mastercam, but it would help if you can record the class, as it tends to just be one big "information dump". I host the class online, with "Go to Meeting" software. So it is basically just a "live", online class where I go over how the posts work, and talk about the details of the MP Language. The format is similar to a Webinar or online meeting. I just show what I'm doing on my screen, and give what is essentially a long lecture, with some interaction from the students as I teach. So you can certainly ask questions as you participate in the course. I do cover a bunch of practical examples, but it isn't like a "guided" class, where the students have a "work book" or "lesson" they have to complete. The main idea will be for me to explain the MP Language, how variables, strings, and post blocks/functions work, and give a bunch of examples of me making post edits. It is a lot to absorb without being able to do the modifications yourself, but I'm trying to strike a balance between being able to give free training, and taking up a huge amount of my time. When I was teaching the "paid" courses, I would host a 2 hour session on Tuesday and Thursday nights to cover the course content. (4 hours per week, for 6 weeks) In addition, I would host a one hour "Office Hour", which was just an online meeting time for students to ask specific questions. This turned the course into 40+ hours worth of my time, and it takes a lot to host and manage that much time commitment. In addition, I recorded every session, produced the sessions into edited video, and uploaded the video onto Eapprentice as "library" material for the students. It was an incredible amount of work, so that's why I'm trying to reduce the time commitment on my part. Plus I think it would be cool if I could not only help the people that want to learn, but help to give back to the less fortunate in some way as part of the whole deal. If you do record the training sessions on your own, it will give you your own library of material to refer back to at a later date. There are some "Free" video recording software packages available for download. NOTE: I have not used or tested these, and make no claims about how good they are. Camtasia costs like $300 per license, so it is not "cheap", but it is really great software. https://www.movavi.com/screen-recorder/ - I'd recommend this software, but make sure you get the "light-weight" version, as it is cheaper. It's only $30 bucks, and no limit on video size. I didn't realize you have to get the "jumbo" recorder with Tiny Take, and that still limits you to 60 minutes. That is lame in my opinion. The "Studio" version of Movavi has a bunch of extra editing stuff. If you plan to do other editing and recording, it might be worth it, but for only this class, just stick with the cheaper version. Here is a link to the store: NOTE: you need to scroll down the page about 2/3rds of the way down. It is "Movavi Screen Capture", not the "Movavi Screen Capture Studio". (It won't hurt to get the "Studio" version, but it's almost double the cost! If you want to go "all out", the very top link is the "Movavi Video Suite", and that software has all kinds of cool features. http://srecorder.com/ - Claims to be "free". That kind of scares me, as they must be getting "Something" from you somehow... https://tinytake.com/tinytake-pricing - This company has a 1 year license for $30 bucks! So, what is the cost to you? I'm not charging a fee for attending this course. My previous Basic Post Classes were $495.00 for the course fee. That course was 24 hours of training. I'm condensing the material down into 18 hours, so I figure the "value" of the training is roughly $350.00 if this was to be a paid training class. Although I am not charging you directly for this class, I do want you to "pay" for this course in another way. This is completely on the honor system, I'm not going to be following up with any of the attendees to verify that you actually followed through with my request, but please keep in mind the relative value of the training, and choose one of the options below. The option you choose is completely up to you. My recommendation for those in America is to consider spending $100 dollars or more on this option, if you can. If money is very tight for you, there are even some "no cost" options. Seek out a homeless person or family in your community and buy them breakfast, lunch, or dinner. Have a genuine conversation with them, pay for their meal, and be sincere about it. Consider giving them some money or a "help bag" (see below) at the end of your interaction. Bonus points if the person you help is a person of color, an at-risk youth, or LGBTQ. Being compassionate towards someone is not the same thing as supporting their lifestyle, so please consider that when picking the person you help. The less you have in common with the person(s) you help, the better. Instead of buying a meal, offer to rent a motel room for someone for a night (or two if you can). No strings attached, just the offer of shelter to someone who truly needs it. Bonus points if they are struggling with addiction, or have made choices you personally disagree with. Offer them compassion, not judgement. It is probably a good idea to have them go with you to the motel clerk when you rent the room, and just explain to the clerk/manager that you are renting the room for this other person to help them out. (Many of the "cheaper" motels will accept a smaller deposit in cash, so that way you aren't putting a credit card at risk. Every time I've done this at a Motel, the front desk person was understanding.) Consider providing them with some food as well, or a small amount of money. Tell them that you hope they spend it on something they truly need, but attach no strings to the gift, only love. Another option is to go to a discount retailer like Walmart, Target, or the Dollar store, and make up some "help bags". This is a Gallon Freezer bag, or grocery bag, filled with some essentials. Add a couple pairs of clean socks, some water, granola bars, travel sized toothbrush and toothpaste, canned food (chili is good), matches, toilet paper or tissues, fingernail clippers, dental floss, a cheap razor, a small pocket knife or utility knife, and possibly a pre-paid phone card. Put a roll of quarters in there (that's 10 bucks), and anything else that you think might be helpful. You certainly don't need to put everything I listed in there, but rather to maximize the content of the bags, while minimizing the cost. This allows you to make several bags. My wife and I try and keep one or two bags on the back seat of our car so that we can hand them out at stoplights when we see someone in need. I think we average about $25-30 dollars on the cost of each bag, including the roll of quarters. So try and make up at least 3 of these bags (more is better), and give them to someone you see in need. Offer a kind word and a smile to whomever you give one to. You can also volunteer your time instead of spending money. I'd recommend a minimum of 4 hours, or more if you can. Go to a retirement community and spend a few hours with a Senior that is lonely and could use the company. Engage them in conversation, or have a meal with them. Another option is to volunteer at an animal shelter or the humane society. Bonus points for serving at a soup kitchen or food bank. The point of this is to touch someone's life that needs the help, and to help someone that you wouldn't normally consider helping. I'd much prefer you to help someone in-person, and not just make a donation somewhere. It is really easy to just whip out a card and donate, but that is too "hands off" and doesn't make enough of an impact on your life. A quick anecdote: I learned about the value of doing these in-person actions from my Mom and Step-dad. When I was a teenager they started a very small Church in a "bad" part of Capitol Hill in Seattle, in order to minister to those that wouldn't have been accepted in a Church in the suburbs. We met in the living room of the pastor's apartment, and tried to reach out to the local homeless and at-risk youth in Seattle. It was one of the most rewarding experiences I've ever had. I truly believe that if you follow through with one of the options above, you'll get just as much benefit from doing it, as the person who receives your help does. I was walking with my Step-dad Tim on Broadway avenue and we had a kid pull a knife on us. Tim calmly explained that we didn't have any money on us, but we were trying to find people like him to help, and he invited this kid back to our "Church" to eat with us and get out of the cold. I thought we were going to die when it happened. (I was about 17 at the time, and this kid was only 15.) It turns out the boy was gay, and had been kicked out of his home because his parents couldn't accept his sexuality. He pulled the knife on us because he hadn't eaten in two days and was starving. Instead of calling the police on him, we ended up feeding him and offering him a place of acceptance. The kid's name is Bryan, and we are still friends to this day, over 20 years later. He is now a Seattle Police Officer. So that's it. If you'd like to take my Basic Mill Post Processing class, and you are willing to "pay" for it as mentioned above, shoot me an email with the details I asked for, and I'll add you to the roster. Let your conscious be your guide and give your love freely to the world. -Colin14 points
-
Hey Everyone, I bought a Space Pilot (3D Mouse) about 4-5 years ago on Ebay. Actually, I won an auction for 3 of them. Needless to say, I can't use 3 of these things, and so I've had two of them sitting in the boxes they arrived in, in my garage. I've had one of the three Space Pilots on my desk for a while, and it is a great tool. However I find myself using my wireless Space Mouse much more often, since I can use it with both of my Laptops. I'd like to let these other two Space Pilots go to new home, where someone can actually put it to use. So naturally I thought to myself, what is the best way to find new homes for these worthy tools? And I came up with an Essay Contest. Yes, I have been known to be cruel and sadistic at times. (A little English Lit humor for you, to greet this new year.) But seriously, when was the last time you saw a good old fashioned "write me a letter" campaign? The cool kids these days are into Tweets, Likes, and how many idiots on Instagram trolled their pictures. I'm not cool, and hence, I get to set the terms of my contest as I see fit. First, the disclaimers: I bought these units "used" on Ebay. I have no drivers (software) for them, nor do I have original boxes or manuals. Google is your friend and sole companion in the endeavor to get these working on your system. I have one (Space Pilot) working under Windows 10. No warranty is expressed or implied by me. If the units break, you're not out any money, so you got what you paid for from the beginning. I reserve the right to pick my two "winners" as I see fit, and am under no obligation to use any sort of objective ranking system in choosing the winners. There is no fee for entry, other than the time it takes you to write a post in this thread. Second, the contest rules: Write me an essay. Tell me your story; who you are, where you work, and about your family. I'm not looking for a sob story, or to necessarily help someone "down on their luck" here. Just be genuine. Be authentic. Tell me your story, and how you think having a Space Pilot would benefit you or your work, and I'll consider you in the running. In fact, the more "woe is me" your writing is, the lower the score you will receive. If your situation in life is "crap" at the moment, tell me that, then tell me how you are working to rise above it. I'll choose two winners on 1/11/2017. That's next Wednesday. I'll ship you a used Space Pilot, at my expense. (You'll just need to PM me your shipping address.) Thanks, Colin14 points
-
i live atlanta ,georgia. i did not find that much manufacturing jobs. i make $21 hr to program and setup machines for production no seat at office work like operaters. is there any place in usa good payment. please refer me which state is good for manufacting jobs and payment. how much did they pay per hour .14 points
-
So sometimes I think i've finally gotten this whole HSM thing figured out, but then on the next part the situation is never the same. So what I've got is some long reach (~4x dia) roughing to do. I ordered some 1/2" Garr V5's with 1.88 reach, and .88 loc to get down in there, but they didn't come in time, so had to use some Niagra "Stablizer's" instead with a longer 2.25 reach, shorter flute at 5/8 loc. Anyways, I come up with some numbers, used an OptiRough path with 10% step over and 100% step down, 250sfm, and .0015 actual chip load (1910ss @ 24ipm). This sounded horrible untill I doubled the speed and feed. But after roughing that entire part, the flutes were just trashed. Maybe had about one left cutting, lol. Material - 17-4ss 35-40rc Cutter - Niagra STRN430-0.500-E1-R030.3-Z4 (1/2" 4flt R.03 2.25 reach .625 loc) Toolpath - Dynamic OptiRough 250sfm, .0015 chip load, 10% radial (.05"), 100% axial (.500") Holder - Albrecht APC milling chuck Any ideas, or critiques to fix the tool life issue, and still peel off the metal are greatly appreciated. Sorry the video isn't that impressive... thought of it too late. <iframe width="560" height="315" src="https://www.youtube.com/embed/vLSUedHpKLw" frameborder="0" allowfullscreen></iframe>14 points
-
Many "Power Users" get used to using the "Hide" command (ALT + E). When using "Hide", if you have any geometry selected on the screen, this becomes your "displayed" geometry, and everything else is temporarily hidden. Pressing ALT + E again, un-hides everything. There are a couple useful commands that go along with "Hide", but they are not in the Screen menu by default. (OK, X9 gave us "unhide some" in the main menu at least). So along with the normal "Hide" command (ALT + E), Mastercam also has "Un-hide some", and "Hide More Entities". Both of these commands I find to be extremely useful, so I map them to the F11 and F12 keys on my keyboard. I also customize my Right Mouse Button Menu, and add them to my "Screen" fly-out menu. I use these commands a lot...14 points
-
and as I Have said at least 100's of times......don't... It uses copious amounts of system resources to visualize a thread. When I import tooling that has threads, the very first thing I do is get rid of the thread. File under, Just because you can doesn't mean you should. JM2C YMMV13 points
-
Yep. I made a little video to show how to do it:13 points
-
My co-worker and I looked at a project several years ago. We both agreed on a cycle time window. Customer had a time study from a competitor that was 25% lower than our time study so the sales guy asked us to take a look at it so we did. We revised our number and figured out a few ways to shave some time with form tools. We dropped 5%. But we said not a second less. So we told the sales guy to advise the customer to put in putative damages clause because there was no way in hell that part was going to be made in that other AE's estimation. They did do that but they went after the sexy quote instead of the honest one. End result; the AE that wanted to be the hero got fired. He was off by roughly the amount we estimated. Basically the customer got the machine for the builder's cost and because they bid the job based on that AE's time study time they lose money. Every. Single. Part. They never once asked why we thought the cycle time would be what we thought. I'll tell you what, when we saw that cycle time we assumed we f***ed up, and took an even deeper dive on it the 2nd time and we found 5% savings. Lost the sale but maintained our integrity and didn't cost our company money.13 points
-
I learned how to edit posts back when V6 (not X6 for the kids in the room) in the mid 90's. I was working for Mori Seiki (not DMG for said kids) at the time and I had a showroom with 7 machines I think and I needed like 4 different posts. This also pre-dated MPMaster so I had to start with MPFan. My local reseller (CAD/CAM Consulting) was instrumental in helping me get started. They gave me the old Post Processor Book which I read cover to cover on a business trip (on my own time). I asked a few questions and was able to figure a fair chunk of it out. I'm nothing special. Barely graduated High School. Suck at math (at least the paper and pencil kind). However, I wrote LOGO (Apple) and BASIC (Commodore, etc...) programs as a kid so I had a very basic understanding of computer programming. I said all that to tell you that YOU are responsible for your own knowledge. Not your employer. Not your school. Not your CAD/CAM reseller. YOU! It's not popular. It's not convenient. It might even be offensive. However, truth is true regardless. Now all that said, you should be able to get hold of the Post Processor Documentation from your reseller. They are responsible for getting you that information if you ask for it. They aren't helpful or knowledgable? Good. It's an opportunity to expand your professional network. Post Processor Development is hard? Good. We should all strive to do hard things. That is what creates elite professionals. Don;t know how or where to start? Good. You can to the right place. There's some GOOD mentors here if you don;t mind putting in the sweat equity. Guys like @Colin Gilchrist, @crazy^millman, etc... have been here forever and are more than happy to share their hard earned knowledge. So, you will need to have an idea of what modifications you need to make so I'm going to suggest you create a SIMPLE sample file (or files) to work from. This will save you untold hours of immense grief. Too few do this and pay the price later. This file should contain only enough "stuff" that you need to create any anticipated conditions you will encounter. So drilling cycles. Drill. Drill with Dwell. Peck. Chip Break. Bore. Bore with Shift. Bore with shift and dwell. A contour path or a rectangle... or a single line. A small surface patch. etc... Seriously. Simple is your friend when you're debugging a post. If you've got some massive mold cavity with 200 operations, you'll NEVER get anything accomplished. Toggle the coolant modes. etc... Seriously, you can have a decent sample file with like 20 operations and like 3 tools to test 90+% of what you'll run into. And last but not least, figure out where/who your resources are. Don't ask for free $#!+ (not that you did/do/are... I just put that in for the benefit of future readers of this topic) ... ask for help to learn. You'll get WAY farther personally and professionally. Post work is hard. There's no two ways about it. I'm not nearly as good as I was BITD because I've got new tools/toys that make post building infinitely easier but i never forget where I came from because it's what brought me here where I am now. HTH13 points
-
March 23, 200013 points
-
Folks, I wrote this small open source .NET application to help a colleague to rework a problematic VERICUT library where the tool origin was in the insert and not in the gage point. It started as a simple calculator for 2D rotations and I ended up making it support 3D rotations too. The executable and the sources can be found here: https://drive.google.com/drive/folders/0B-zWGlBf98V0b0lOcF9RcUpvX28?usp=sharing It´s important to keep both the executable and the 'Readme.txt' in the same folder otherwise you won´t have access to my half baked help file... The sources are in a sub-folder - It was coded in Visual Studio 2017. Maybe it can be of help for those who are starting from zero in a programming language, It´s a very simple application in essence but can help beginners to figure out some things. Hope it helps you freaks, Daniel13 points
-
Hi guys, X+ build with SDK for 2017 beta 4. http://www.gmccs.de/downloads/SetupX+_2017_en.zip Also, if you are interested, two chooks for fixtures. (they are not translated yet). One chook for loading fixtures to your part. One chook to setup fixtures. http://www.gmccs.de/downloads/SetupX+_Fixtures_2017_en.zip (video) http://www.gmccs.de/videos/record_000001.avi All chooks are available in the chooks/X+ folder ; or customize your ribbon bars and add the chooks. Edit: How to setup a fixture? (video)13 points
-
3D Connexion issued new drivers for their line of 3D controllers this week They are version 10.4.2 dated 4-25-16 Do not install them, especially if you are running MC2017 betas MC2017B4 and 3DC devices do not play well together with the 10.4.2 drivers At this time, it's unknown whether is an MC issue a 3DC issue or a combo of both The best thing to do at this point is nothing Stick with the old drivers, (version 10.3.0)13 points
-
In addition to "importing" Planes from an existing Mastercam file, (Planes Manager -> Right-Click -> Import), you can also import Tool Paths directly from an existing Mastercam file. It works just like creating an "operation library", except you are just picking the tool paths directly from the other MCX file. Right-Click in the Toolpaths Operations Manager, and choose "Import". You will get an "Import Toolpath Operations" dialog box. Use the "Browse" button to search for the existing Mastercam file. In the lower right corner of the dialog box is a drop-down menu for File Type. Choose the option for "Mastercam X Files", and you can import tool paths into your new Mastercam session. You can do this from any Mastercam "X" file. So that old file you did ten years ago in Mastercam X4? Yep, you can import those tool paths and update them. Keep in mind that some of the old tool path options have changed, so Mastercam may "reconfigure" the operation options, but it should keep the "old" settings as closely as possible. I find this to be much more useful to me than maintaining Operation Libraries, since these can not only get out of date quickly, but I also want the "strategy" that those various sets of parameters represent.13 points
-
I have the operation number automatically posted in a comment in the NC file and I also have it set to a macro variable (#750). This way if something isn't right at the machine the operator can check what operation is currently running (via the macro variables on the machine) and write up a quick change request form with the exact operation number and the issue.13 points
-
Enlighten us on the magical shift+click. Do you mean for selecting chains?13 points
-
Thanks Colin!!13 points
-
Thanks ,I will try it .13 points
-
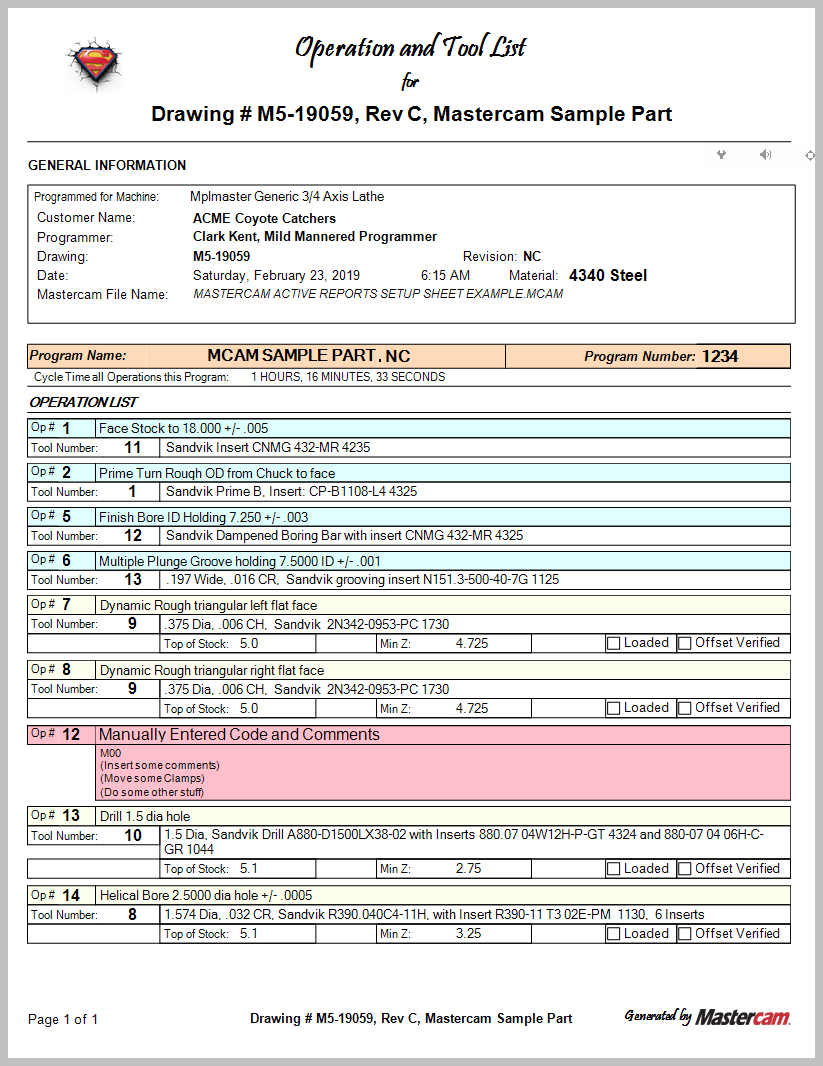
Greetings all, I have developed a setup sheet that is really more of an Operation check list. Developed for minimal paper waste. It works with all three of the main program types without changing report templates: Mill, Lathe, and Mill/Turn. The operations are color coded: Blue is turning, Yellow is Milling, and red is Manual Entry. If the tools are named in Mastercam the way that I recommend, all of the information will be there for the operator: Insert codes, etc. Included in the zip file that is attached is a sample turning program with milling, the Active report templates, a Word doc with instructions on how to install and where to enter information. For best results, pay close attention to the Word doc on what and where I enter the names and comments of the tools and operations. Disclaimer: Use at your own risk. Active_Reports_OP_Tool_List_short.zip
 12 points
 -
Our girls play many different instruments. Something the new teachers have got the girls doing is a basic thing for the instruments is playing scales. If you are not musically inclined then you may not know this is going through different keys and playing notes up and down the music scale is called "scales". The idea is to sharpen your playing by muscle memory of what each note is. Doing advanced 5 Axis and Mill-Turn work is fun, but just got some work that is 2.5 and 3 Axis work. I really like getting back to basics and I related it to what our kids are having to do with playing scales. They really don't want to humble themselves to do it, but we have seen an improvement in the playing doing so. They have had to admit they have as well. I have done this for 30 years and nice to go back to my routes and program some basic parts. Funny taking stuff I would have programmed by hand 30 years ago and do it with a CAM system and feel like I could do it faster by hand than in the CAM, but then I look at the Dynamic stuff and take a part quoted a 4 hours to machine and get it done in 1 hour is not something I could have done with pencil and paper as easy. Had a customer call last week and tell me about the California program running in their shop. Invar part we cut the roughing time in half from dedicated process that had been used for years. Had to tweak the drilling a little, but everything else was run like it was programmed. I think we could cut another 10% to 20% more out of the program if I was onsite to watch it run. Each project should remind us all to play the scales going through and defining our tools correctly, calling up holders, organizing our levels, back plotting the toolpaths and even running it through Verify. Easy to forgot the basics if we don't humble ourselves and be willing to go back to them. Back to programming some nice 2.5 and 3 Axis work. Soon I will hear the scales our girls are playing and I will be diligently programming away going through the scales of programming the parts. Chopsticks is still music and thankful I can still do the basics of programming the chop sticks of Manufacturing. It was just a thought I had this morning and wanted to share. I hope everyone has a great day.12 points
-
I always find a pleasure when I see companies that are looking for top notch people in order to become top notch providers. This seems to be a great spot and with the right atmosphere for a high level professional who is looking for the extra mile. I remember the first company I worked as programmer, 12 years ago... I was hired as a Heidenhain operator, with a xxxxty salary but coming from unemployment that was a great opportunity. The company was doing low/mid level aerospace 3 axis jobs and was buying all NC-Programs from a PowerMill guy that worked at Panasonic during the day and was doing programming for small companies in the neighborhood during his regular shift. (Yes, you got the ideia) One day a big part with lots of 3D surfaces and a complex geo got in the queue, and this guy declined to program it. I asked for an opportunity, said that I could make it myself if I was given a chance. In the next 2 years I got 5 salary raises, normally right after the delivery of another part that that shop never thought they could make a few months earlier. After two years, we were among Embraer´s top 3 tooling suppliers, and specialized in complex jobs no one wanted. But the company was still reluctant to enter into the multiaxis world. I wasn´t. Short story, I learned a lot and made a lot of mistakes too. One day I decided to quit to pursue a 5 axis programming job that would start a few weeks later, with a 3 months internship in Germany, my boss sponsored a barbecue at my home, and made a toast in front my entire family - Told me that he was happy for me, that I had to move on and pursue things he wasn´t able to offer at that moment, and that thanks to me his company was in a new level and could do complex work, that I was leaving a legacy and that with it they could move on, and that my stay taught them how important it is to give people a chance, and that if they´re the right people, the company stay competitive. I´m not bragging about myself, just telling a small story I had in my life. Needless to say some tears rolled over my face and my wife´s, and that toast made me to pursue everyday the best for my employers, and to constantly keep in the horizon that I´m here to share and learn with the teams I work with. Smart companies surround themselves with the best people around: Employees, contractors, customers, suppliers, consultants, you name it. Good luck in your search!12 points