Joseph
-
Posts
23 -
Joined
-
Last visited
Content Type
Profiles
Forums
Downloads
Store
eMastercam Wiki
Blogs
Gallery
Events
Everything posted by Joseph
-
Try this HLE Hardware acceleration.pdf
-
Mastercam 2020 HLE Hardware Acceleration Option
Joseph replied to aeast25's topic in Educational Forum
This info came from the Mastercam Forum, I added pictures to make it easier for my students HLE Hardware acceration.pdf- 5 replies
-
- 2
-

-

-
- mastercam2020
- mastercamhle
- (and 2 more)
-
Corian countertop material works real well
-
Your I's and J's are absolute values
-
The bottom of your part is at Z zero the top is at Z positive 1 inch. Take a look at the Gcode to see if the Z values are starting at about one inch above zero.
-
Check that you are setting on the parallels. It looks like the top of your part tapers down to the left.
-
Fillet with no trim is quick and easy
-
Change the rough pattern from zigzag to either parallel spiral or clean corners. I don't know why. Be sure to check "First rough then finish" if you want to cut the center then the perimeter.
-
Brian, A scanned image is a raster graphic, think of a black and white newspaper photo. It’s just a bunch of dots. MasterCam needs vectors, lines, arcs, splines. Newer versions of MasterCam come with a raster to vector chook, older versions it was an add on. It works, but it’s not perfect and often needs extra work to make it look decent. Hold ALT and press C to bring up the chooks and look for rast2vec. To get a nice looking raster to vector conversion is often difficult and you may want to job that part out, but here are some tips if you want to try it. Do one name at a time. Scan at a high resolution, start with 600 DPI. The signatures should be ink, the cleaner and bigger the better. Save the scan as a graphic file, bmp, gif, jpg, jpeg, pcd, pcx, tif, tiff Use a graphics editing program to clean up and fix any bad areas before converting to vector. Sometimes it helps to scale up the raster file, convert to vector, scale down the vector file to hide imperfections. Sometimes you have to redraw some or all of the vector file to get the results you are looking for. You can get good results, but it take some care. Do a google search for raster to vector and you will find a ton of information. Best of luck
-
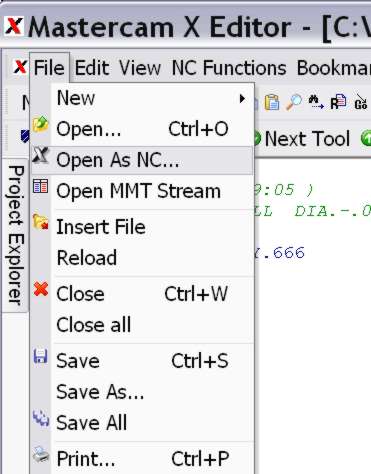
Can you use File, Open as NC ...
-
Do a search for HDU High Density Urethane or sign foam. It's still expensive, but may be an option.
-
Now that was great. Very clear with the examples, and I'm sure a lot of work. Thanks
-
I apologize if you already know this, but if you go to the Haascnc web site under the customer service tab there is a section for manual updates. The newest mill manual is Rev Y dated December 2009. A search found several references on probes and how to save and use the local variables in a macro. I think this would be real handy once you get it figured out, but I doubt that an ideal Haas in an ideal environment could consistantly hold that tolerance.
-
Do a google search for logotypes.designer Even an EPS file will need some work to get what you want, but this will be a good start. Good luck and have fun
-
Set up sheets Job tracking Changes after the job has run Similar parts Reference for the future There's no reason you can't program both ways, but the complex stuff and things that need to be tracked should be done in MasterCam. What would your customer want?
-
I put a file on the ftp under X3_files called LA.MCX. It will need some fine tuning depending on what you want to do with it, but it's a starting point. Good Luck
-
There can be a lot of reasons for taps breaking. The best article I've ever seen was written by Kirk Gordon of Gordon Engineering. I think it's too long to copy and paste here, so I hope this link works. It's worth reading. http://groups.google.com/group/alt.machine...en&dmode=source
-
Create Line Tangent through point
Joseph replied to dgoering - DEPCO LLC's topic in Industrial Forum
In X3 try Create Line Endpoint Select the point then click on the tangent icon(just left of the apply icon in the ribbon bar) and select the circle. -
Try create arc 3 points. Select the point then in the function ribbon bar is an icon for tangent. Select the tangent icon and pick the 2 arcs
-
You will probably have better luck if you approach both holes from the same direction. Temperature matters, thermal expansion makes a big difference on big parts. Is it possible to finish one hole, rough the other and let your inspection dept. tell you how far to move the last bore?
-
Hi Jim, You're welcome. I started by cleaning it up with Corel Photo Paint,then MasterCam raster to vector. It is almost always still rough with raster to vector, so I ususlly just reconstruct it using the conversion as a guide. Took about 20 minutes. Have fun. Joe
-
Hi Jim, Try schoolofmines.mc9 in the mc9_files folder. It's just geometry, see if that's close enough for what you need. In Mastercam go to help project geometry. Joe
-
Try taking one letter that doesn't work and scaling it up 20 times then pocket - chain. If there is a mismatch in the geometry the chain will stop at the mismatch. The error may be less than the chaining tolerance and will be worse when you scale it up. Probably less work to get different letters. Joseph