cnc22
-
Posts
27 -
Joined
-
Last visited
Content Type
Profiles
Forums
Downloads
Store
eMastercam Wiki
Blogs
Gallery
Events
Everything posted by cnc22
-
You Could try roughing and then try finishing the walls with a tool that cuts both sides at the same time. Look at Thin Bit.
-
Why does it add the point when selecting the edge of the solid?
-
I was going to ask the same question a while back. I always use arc center filter when picking circles for drilling cycles. ( I do this every time no matter what size the hole is after picking the quadrant of a 2-56 hole by mistake years ago ) If you notice with the arc center filter active when you move your mouse over the edge of the circle that sometimes a small E with a vertical line next to it will show up. If you move your mouse more it will disappear then come back with more movement. If you pick with the E on the screen you get the annoying extra blue point. If the E is not there, no blue point. Maybe someone knows if there is a setting to turn this on or off.
-
Thanks. Could not find anything that large there.
-
Does anyone have the geometry for Torx fasteners? We need T50 & T55 for a project that needs to WEDM thru a cap. Thanks for the help and MERRY CHRISTMASS.
-
Looking for a supplier of Beryllium Ccpper sheet alloy 25 "A" temper .010" plus/minus .001". Small part the size of your fingernail that I have to form. Also need .010" Copper C120000 sheet. Same size part. These are prototype flight hardware parts and will never be high volume so I need a supplier that will sell small quantities if possible. Thanks for the help
-
I am setting a different offset if you look at the file. It's the A180 and the code being the same. Both paths are in Quadrant 4 ( +X, -Y ). It should be the first path in Quadrant 4( +X, -Y ) and transformed path in Quadrant 2 ( -x, +Y ) so I can keep my datum references on the solid jaw and the work stop. Craig-B seems to have a solution but I am trying to do this without a post mod. I hate any unnecessarray copied or extra geometry.
-
I have been there. Hopefully I am missing something. When I use rotate it essentially rotates the coordinate system and I get an, A180 rotation that puts XY zero on the rear left corner again when it increments the offset. See the attached a file. the code in the transform is the same as the first path except for the A180. The backplot looks correct. Trying to get this setup with my double vise. Tmp.TXT
-
Is there a way in X8 to transform rotate the program and not the coordinate system. What I am looking for is using a double vise and want to keep my datums always against the solid jaw and stop. In the front set of jaws XY zero would be the rear left and in the rear set of jaws XY zero would be the front right ( part rotated 180 degrees around Z ). Then all I need is to increment my offsets for the number of vises that I use. I know this can be done by copying and rotating geometry but that makes the file more confusing and prone to errors if a change comes up. Thanks for the help.
-
In Solidworks draw a circle. Draw a triangle with the 3 lines tangent to the circle and the ends coincident and add the dimensions to the lines. Do not dimension the circle and remember that the sum of the length of any 2 sides can not be greater than the length of the third.
-
In my mold building days, had an insert cutter with 3 round inserts. Cut a core or cavity. Can't remember? Detail was small. Checked the tool diameter and it was wrong. Had the sales rep come in and he called the US milling manager and he said we had the wrong inserts in the cutter. Got the new inserts and still wrong. Called the home office and asked the tech on the other end to get the same cutter body and install the same inserts to see if I lost my ability to read a micrometer. Reply was that everything was as it should be. Had the rep come back in, showed that things were still not right on their newest great cutter and he took it, sent it back to the home office. Rep came back in a few weeks later, I asked if he heard anything about the cutter and he said they figured out that the whole lot that came from across the pond was wrong. Asked him how is that ISO 9000 Stuff working for you. I still have the visual in my head of the tech at the home office twirling his finger around his head as he talked to the idiot on the other end of the line that can't read a micrometer because there is no way we could make a mistake.
-
I have installed X8 on a new windows 7 PC. Old PC running X6 on windows XP. In X6 I have tool bars to the right of my operations manager so it is closer to the work area of the screen. I can not figure out how to move them there in X8. Or is there a way to use my X6 tool bar file? I am also trying to figure out where all of the other files from X6 go, since X8 is a fresh install and I can not use the migration utility. Thanks for the help.
-
Ben, did you try that in X6? I switched it back to OptiCore 7 1/2 hours ago and I have not been at my PC much today and it still has not finished regenerating. If you regen as OptiRough do you get the starnge out put like the .jpg in my first post?
-
In the original post I started as OptiCore and it would not regen. Changed to OptiRough and got the strange output.
-
Weird thing is OptiCore worked fine 1 hour prior on the part in post #12.
-
Her is a screen shot of a similar part done just before this one using OptiCore.
-
Brandon. That is what I do when OptiCore fails. What might be 3 or 4 tool paths is 1 when Opticore works and saves time and makes things easier. I appreciate the input.
-
Problem with Min Depth -.222 is it thinks the top of the stock is -.222 when it is really .01 and it rapids into the part. Weird thing is I used OptiCore on 2 similar parts right before this one and it worked fine. If you look at my original post you will see that I am actually trying to use OptiCore on this but it will not finish regenerating. If someone is running X6 MU1 maybe they can change the tool path type to OptiCore and see if it regenerates. Thanks for the help.
-
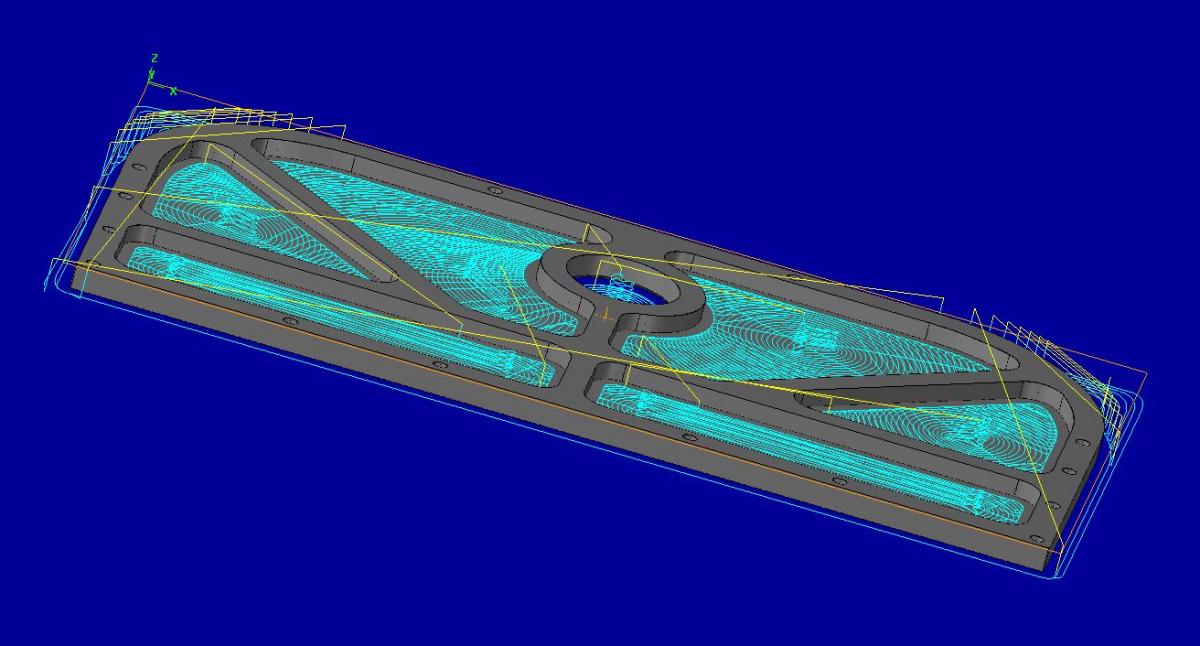
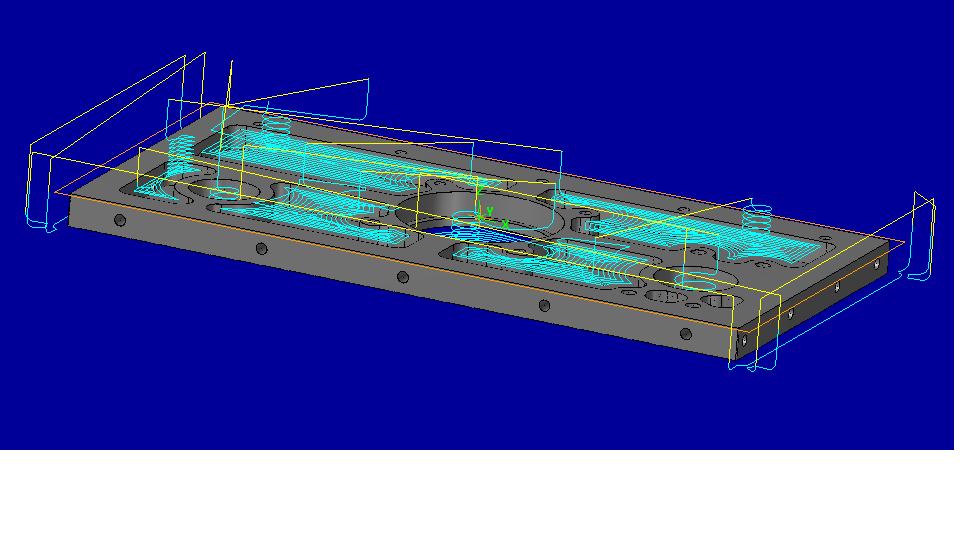
I believe core is correct. I have stock defined and if you notice it is cutting the ends but not cutting the front and rear walls on the perimeter of the part. If you change the step over to 10% it cuts the front and rear walls to the proper depth??????
-
Stock to leave .003 floors & walls.
-
I set step down to .225 ( The pocket depth ) and the thru pockets cut thru in 2 passes and the blind pockets only cut to Z-.155 The blind pockets are .225 deep????
-
Hope I attached the file correctly. Could someone tell me if I am doing something wrong. Running X6 MU1. Simple part. Trying to use OptiCore on this and it would not regen. Went to OptiRough and it only cuts to depth on the thru pockets and starts high and cuts to "Z" zero for the blind pockets from .310 above the part, which is the maximum depth set on the steep/shallow page. I am thinking this "Z" issue is keeping OptiCore from regenerating. I really like the OptiCore path, it makes life so much easier. OptiRough.zip
-
Talked to Terry at Verisurf today and he was very honest and helpful, no hard sell. Understood where we were coming from and suggested different solutions and directions that we might take. I have a bunch to learn.
-
We have an older Brown & Sharp manual cmm that we would like to upgrade the software on. It has a MH20i indexing probe head and the machine is still very accurate. In the future we would like to get a cnc cmm, but we want to keep this manual machine for simple part inspection. We are looking for a cost effective upgrade that will make this machine more friendly to use. If anyone has done this, your input would be greatly appreciated.
-
Do a search for Higbee thread. There is a youtube video of another software doing this. Makes nice for threads. We do this for some customers. Wish this was a canned operation. Mcam.