JayM
-
Posts
180 -
Joined
-
Last visited
Content Type
Profiles
Forums
Downloads
Store
eMastercam Wiki
Blogs
Gallery
Events
Everything posted by JayM
-
It is possible to have Mastercam post output macro variable codes like T#1 T#2 T#3, very easy actually. But this could cause some issues depending on how your program runs. For example what if you have more than 21 tools in a program? What if you use the same tool twice in different locations?
-
Crazy place to put it
-
The spindle speed will be set to max RPM but it will not adjust the feed rate.
-
Exactly. The material calculations for tools work well for some people, generally those doing very basic machining or operations. Good luck.
-
The panels can also be "torn" off and stacked on top of each one. I like to stack the Levels manager and Planes manager on top of one another.
-
I remember the same thing, probably about 12 years ago.
-
"Better" is a difficult thing to answer. I generally recommend creating a tool library per material rather than driving by the material. Reason being it is possible to get much more specific about the speeds and feeds for your tools if they are defined in the tool library. Driving a tool by material will give general speeds and feeds for each tool. For example, a given 1/2" carbide endmill. The speeds and feeds can easily be calculated based on the number of flutes and desired SFM and feed/tooth, but it does not take into account the cutting length. If you have a short cutting length, 1/2" that could be driven much harder than a long cutter length 2".
-
I have....it is different, but a good move.
-
If you have a Nethasp then you can certainly access the license over a VPN. First make sure that the Nethasp license server is installed and actively serving the license to your local network. If you are using the Nethasp connected to you current computer then you may need to install the Nethasp license manager. Second, setup a VPN on your network. You may be able to do this through the router or through your server. If you have an IT department/company contact them, they will know exactly what you need. From your remote location (house, hotel room, coffee shop) you will connect to the VPN through that locations internet service. Once you are connected, it is like your computer is actually in the office and Mastercam should be able to find the license. One more thing, if Mastercam does not locate the license, modify the nethasp.ini in c:\program files\mcamx9\, and specify the server IP address. There are many customers who access Mastercam licenses via VPN but if it doesn't work for your company your reseller will not be able to help.
-
It happens for a variety of reasons, the specifics are not important. It is a very simple procedure to correct, use JParis's steps and move on...
-
There is no issues importing SWX 2016 files into Mastercam, if you have the update that JParis recommends. Also I would never recommend using an IGES file if anything else is available. IGES will give you a surface body instead of a solid. Go to Mastercam's download page http://www.mastercam.com/en-us/Support/Downloads/Mastercam
-
Was told this is being added in next version....just have to wait till......then
-
Except for many dynamic toolpaths. Choosing solid faces for machining and avoidance regions is usually pretty easy and efficient, depending on the model of course. Edge chaining still leaves some to be desired.
-
Finish Contour will jump on the first couple of passes, especially with a very small step over. You can eliminate some of these by setting Advanced Settings > Only between surfaces. Also change your ramp length to a much smaller value, between .1 and .01. For rouging the part you might try a large tool that can overlap all of the material left, and just use the same toolpath for roughing as finishing, just leave stock on the roughing one. If you can upgrade to X9 I would recommend using Optirough with a Stock Model. M00006033-1-3.MCX-7
-
Yes a very clean way of getting short code from the program. I have been trying to get the surface toolpath to output the same way, it just doesn't want to see the surface as a series of helix's. Another option would be to use Surface Finish Contour with the Ramp option turned on. A short ramp between passes will usually eliminate the "zipper" line, depending on setup.
-
Change your cutting method from "Spiral" to "One Way". It is a balance of what is important. "Spiral" will give a toolpath with zero retracts but essential runs point to point, "One Way" will filter to a very short program but steps down between passes.
-
Try replacing the post in my file with your machine definition. It could be something in your post. If my program still comes out shorter their must be something different in our toolpaths. Upload your file again and I will take a look.
-
Here is an example with one arc move per step down. About 500 lines using Mill default M00006033-1.shorter.MCX-7
-
Turn on tolerancing to get G2/G3 arcs
-
I agree. If it is a high speed face mill, the manufacturer probably has specified the "correct" radius to define it as. I would not recommend trying to finish profile with the tool, they are not precisely repeatable and that would be the only reason to get the exact profile.
-
Some more information would be helpful to answer your question. What tool do you use for finishing? What surface finish do you need? Flowline is good for this part, or contour. Both will give you similar motion. You could also use the High speed spiral toolpath that should work well for this part. I don't see any need to use the scallop toolpath. It is a very simple shape so good choices are pretty open. If there is a specific issue that you are having with flowline describe it so that we can address that.
-
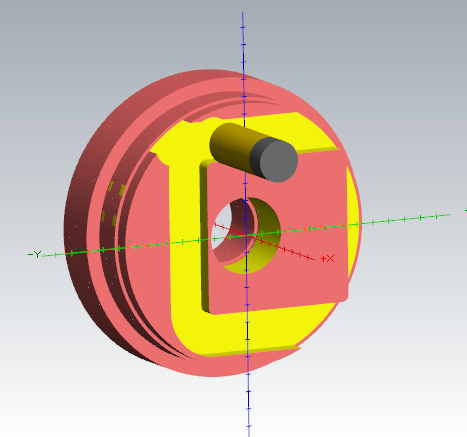
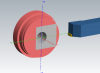
I am not sure that this is a bug. See the screen shots below, this is what I get whenever I verify your part from X9. It may be a setting in your program, in the Simulator Options, do you have 5-axis set?

-
Surface toolpaths do not use compensation (G41/G42). All motion is calculated from tool centerline, Mastercam will offset the XY position based on the tool diameter and tool nose radius. If you find yourself programming these features often I would look into upgrading to Mill 3D. The restmilling operations will save you a lot of time programming and machining.
-
Contact your reseller, they can help you get the install files.
-
Which Mastercam version are you using? This behavior was changed I believe in X8 or X9. If you have X9 and set the Work Offset # in the Plane Manager all toolpaths that are not explicitly set (have their boxes greyed out) should reflect that setting.