MrFish
-
Posts
532 -
Joined
-
Last visited
-
Days Won
1
Content Type
Profiles
Forums
Downloads
Store
eMastercam Wiki
Blogs
Gallery
Events
Everything posted by MrFish
-
Just a heads up that this is a bug and has been listed as defect CNC00101254. This toolpath works fine in X4 MU3.
-
We machine this stuff every day and the biggest issues we have is when the parts haven't been annealed after recieving it from the supplier as there are so many different grades of 17-4 that one block can machine quite different to the next rapidly reducing cutter life. We use MQL with both tipped and solid endmills with good results. We only heat treat to H900 condition most of the time and for parts the size of your fist the stability is very good, anything larger or with thin cross section and I would be finishing any critical areas once hardened. Again solid carbide and MQL works great on the hard stuff.
-
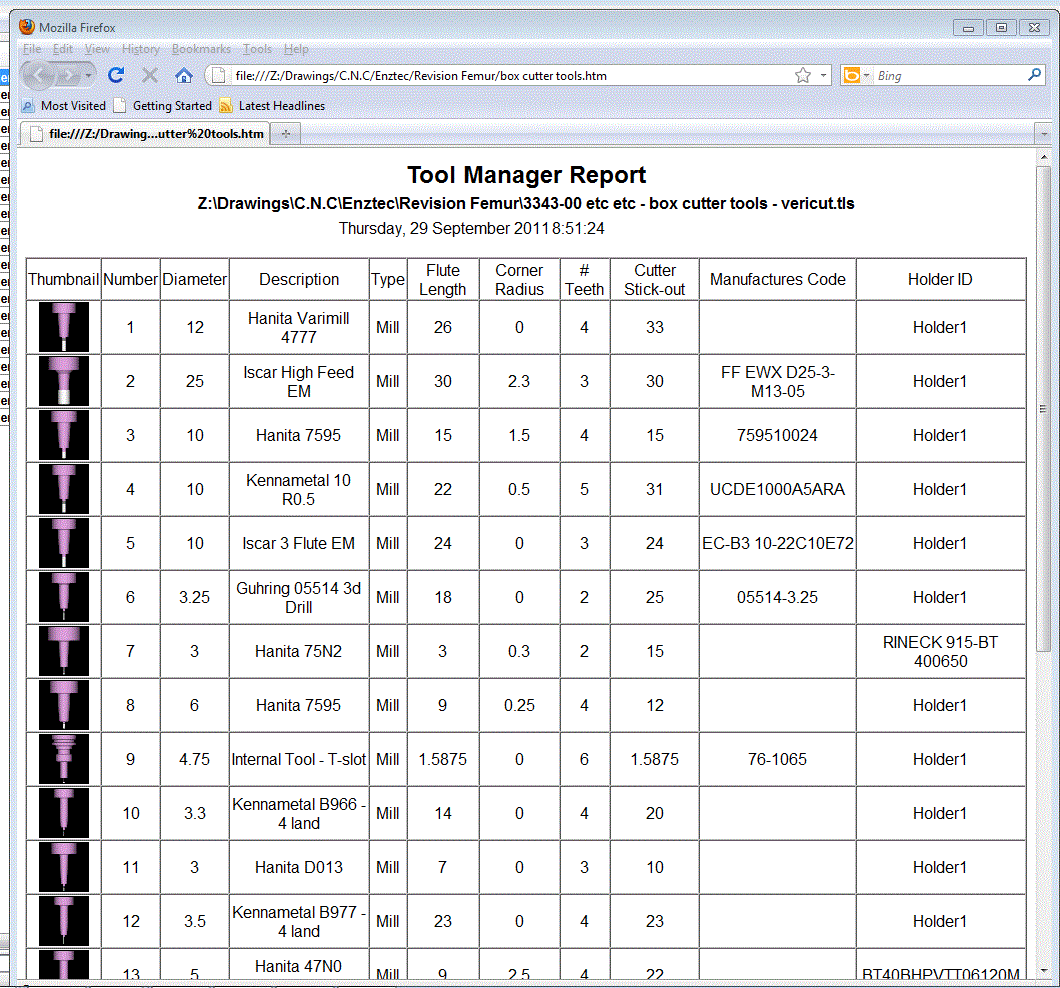
Robert do you have any suggestions as to how to get the Tool manager Report to output the correct holder descriptions when they are transfered from mastercam and get the right cutter stick out since the shank of the tool is now part of the holder ? In the above example the "Holder1" description is holders that have come from the mastercam interface. The correctly titled holders are ones I have added in vericut. The "Cutter Stick-out" should read 38mm for tool 1 but because vericut adds the 5mm of shank to the holder this is not output correctly. This causes crashes at the machine when cuters are not hanging out far enough. At this stage I can only see the report template as being redundent with these two major components not correct, which is a shame as I often modify tool and holder lengths slightly when doing 5 axis work in vercut to get a crash free program and it is a bit of a pain to keep going back into mastercam to alter holders and cutters just so i can get an accurate setup sheet from mastercam.

-
This is how I do it too, just frustrating that I have to.
-
This is one of the biggest issues with the interface. Vericut adds the shank of the tool to the holder therefore not verifing it correctly, and if I want to adjust the cutter slightly in vericut it's not easy since the shank is now part of the holder.
-
Hi Marting Already use the interface but Vericut cannot define the cutters properly as Mastercams tool manager is too basic to release the right information I am told by CG Tech.
-
Does anyone know if the new toolmanager in X6 will output more infomation so other progams can accuratley reproduce the cutters/holders . My problem specifically is with vericut not beinag able to produce the right cutter/holder geometery when using the Mastercam/vericut interface. C G Tech tell me that mastercams tool manager does not currently put out enough information for vericut to accurately reproduce the cutter/holder combinations correctly.
-
points and lines work well, you just have to be careful on your selections, like all 5 axis work.
-
Excellent video Dave, learn't alot of little tips. Been using all these toolpathes for a while now and now understand why they work the way they do. How about a multi axis one ?
-
no not refering to work offsets, refering to the operation not being in the right place at all. The toolpath in the picture is a transform by toolplane toolpath that has had the datum point selected as the centre of the hole on face 1 and the toolplane is a custom wcs that aligns with face 1. As you can see it backplots in completely the wrong place.
-
So by the time X6 Mu1 comes out and we can realistically trust it X7 will be in beta testing !!
-
No one ? just wanted to check before I send to QC.
-
Has any one else had a problem with X5 not creating the toolpathes in the right position when using Transform by Toolplane toolpathes with a new origin shift ?
-
thanks , for suggestions. Mic - there is a definite negative Z axis move , I know because Vericut didn't simulate it and the machine stuck the cutter into the job !! I will look into the R comp and see if it fixes problem. This would be a shame as it would be nice to be able to use circle mill to size holes instead of having to create a plane for each hole and then use contour paths to get a spatial axis move instead of M128.
-
Hi Leigh, a bit off topic , sorry for the hijack , but whats happening with RACE FACE, are you guys still manufacturing, who owns you ?
-
Can some one with a switched on 5axis brain take a look at the code below and try and explain to me why I am getting a negative Z axis move with the rotation on line 3407. Our machine is a DMG DMU 60 Mono Block - this has a tilting head for B axis and rotary table for C axis. The code is a mastercam cicle mill operation and you will notice that it is cutting and repositioning with M128 TCPM on. DMG tell me that this Z axis movement at the machine is correct because of the tilted plane, but both mastercam and Vericut don't simulate any Z axis move and personally I can't see why the Z axis is moving when the B axis is already at B-30 and all the 3407 line of code is doing is rotating the C axis by 180 degrees ? 2464 TOOL CALL 11 Z S8066 2465 * - HANITA D013 2466 * - FLAT SPOT STEEP ANGLED HOLES 2467 ;HANITA D013 TOOL - 11 DIA. OFF. - 11 LEN. - 11 DIA. - 3. 2468 L Z-.1 R0 F MAX M91 2469 L X+136 Y-.1 R0 F MAX M91 2470 CYCL DEF 32.0 TOLERANCE 2471 CYCL DEF 32.1 T0.014 2472 CYCL DEF 32.2 HSC-MODE:0 2473 M23 ;UNLOCK B 2474 L B-30 C+270 F MAX 2475 M140 MB MAX 2476 M128 2477 M3 2478 L X-3.342 Y+53.699 B-30 C+270 F MAX M20 2479 L Z+22.669 B-30 C+270 F MAX 2480 L X-3.342 Y+36.449 Z-7.209 B-30 C+270 F MAX 2481 L X-3.342 Y+36.35 Z-7.379 B-30 C+270 RL F200 2482 L X-3.226 Y+36.309 Z-7.355 B-30 C+270 2483 L X-3.207 Y+36.35 Z-7.379 B-30 C+270 2484 L X-3.212 Y+36.382 Z-7.397 B-30 C+270 2485 L X-3.226 Y+36.411 Z-7.414 B-30 C+270 2486 L X-3.25 Y+36.436 Z-7.429 B-30 C+270 2487 L X-3.28 Y+36.454 Z-7.439 B-30 C+270 2488 L X-3.314 Y+36.465 Z-7.445 B-30 C+270 2489 L X-3.351 Y+36.467 Z-7.447 B-30 C+270 2490 L X-3.387 Y+36.46 Z-7.443 B-30 C+270 2491 L X-3.42 Y+36.446 Z-7.434 B-30 C+270 2492 L X-3.446 Y+36.424 Z-7.422 B-30 C+270 2493 L X-3.466 Y+36.397 Z-7.406 B-30 C+270 2494 L X-3.475 Y+36.366 Z-7.388 B-30 C+270 2495 L X-3.475 Y+36.334 Z-7.37 B-30 C+270 2496 L X-3.466 Y+36.304 Z-7.352 B-30 C+270 2497 L X-3.446 Y+36.276 Z-7.337 B-30 C+270 CODE REMOVED FOR FORUM TOPIC 3394 L X-3.42 Y+33.103 Z-12.783 B-30 C+270 3395 L X-3.387 Y+33.089 Z-12.774 B-30 C+270 3396 L X-3.351 Y+33.082 Z-12.771 B-30 C+270 3397 L X-3.314 Y+33.084 Z-12.772 B-30 C+270 3398 L X-3.28 Y+33.095 Z-12.778 B-30 C+270 3399 L X-3.25 Y+33.113 Z-12.789 B-30 C+270 3400 L X-3.226 Y+33.138 Z-12.803 B-30 C+270 3401 L X-3.207 Y+33.199 Z-12.838 B-30 C+270 3402 L X-3.213 Y+33.234 Z-12.858 B-30 C+270 3403 L X-3.246 Y+33.268 Z-12.878 B-30 C+270 3404 L X-3.342 Y+33.199 Z-12.838 B-30 C+270 3405 L X-3.342 Y+36.449 Z-7.209 B-30 C+270 F1000 3406 L X-3.342 Y+53.699 Z+22.669 B-30 C+270 R0 F MAX 3407 L B-30 C+90 F MAX 3408 L X-3.342 Y-53.699 B-30 C+90 F MAX 3409 L Z+22.669 B-30 C+90 F MAX 3410 L X-3.342 Y-36.449 Z-7.209 B-30 C+90 F MAX 3411 L X-3.342 Y-36.35 Z-7.379 B-30 C+90 RL F200 3412 L X-3.226 Y-36.392 Z-7.403 B-30 C+90 3413 L X-3.207 Y-36.35 Z-7.379 B-30 C+90 3414 L X-3.212 Y-36.319 Z-7.361 B-30 C+90 3415 L X-3.226 Y-36.289 Z-7.344 B-30 C+90 3416 L X-3.25 Y-36.265 Z-7.33 B-30 C+90 3417 L X-3.28 Y-36.246 Z-7.319 B-30 C+90 3418 L X-3.314 Y-36.236 Z-7.313 B-30 C+90 3419 L X-3.351 Y-36.234 Z-7.312 B-30 C+90 3420 L X-3.387 Y-36.24 Z-7.316 B-30 C+90 3421 L X-3.42 Y-36.255 Z-7.324 B-30 C+90 3422 L X-3.446 Y-36.276 Z-7.337 B-30 C+90 3423 L X-3.466 Y-36.304 Z-7.352 B-30 C+90 3424 L X-3.475 Y-36.334 Z-7.37 B-30 C+90
-
Hardmill - it opens and you can fill out all the details fine but when you tick to apply it does nothing and leaves the tools as they were. Nevermind - just tried it on my current file and it works fine - must have been a hangup of some sort. Will test it more and see if I can get a repeat.
-
I can't get the Tool Renumber under the right click - edit selected operations function to work in X5 - Is anyone else having this problem before I send it into QC.
-
Once again I've jumped the gun and found my problem myself - needed to update the machine def.
-
I can't get my X5 MU1 tool library default file to stick. It is listing as looking to the right place in the config file but when I open the Tool manager it is looking at my old X4 tool library ? Is anyone else seeing this or have any suggestions ?
-
Is there anyway to have the Tool List display the number of flutes ? thanks
-
Is there anyway to have the Tool List display the number of flutes ? thanks
-
Frostfritt - here is what I ended up with , didn't need the radius function so modified it a bit and had to add in the Greater Than Equation to get it to stop after the last tool. 0 BEGIN PGM MEARSURETOOLSEQ MM 1 L Z+0.1 C+0 B+0 R0 FMAX M91 2 L X+136 Y-0.1 Z+0.1 C+0 B+0 R0 FMAX M91 3 Q30 = 7 ;Start tool number 4 Q31 = 9 ;End tool number 5 LBL 1 6 TOOL DEF 0 7 TOOL CALL Q30 Z S500 8 L M6 9 TCH PROBE 481 CAL. TOOL LENGTH ~ Q340=+0 ;CHECK ~ Q260=+50 ;CLEARANCE HEIGHT ~ Q341=+0 ;PROBING THE TEETH 10 Q30 = Q30 + 1 11 FN 11: IF +Q30 GT +Q31 GOTO LBL 2 12 FN 10: IF +Q30 NE +Q31 GOTO LBL 1 13 FN 9: IF +Q30 EQU +Q31 GOTO LBL 1 14 LBL 2 15 L Z+0.1 C+0 B+0 R0 FMAX M91 16 L X+136 Y-0.1 Z+0.1 C+0 B+0 R0 FMAX M91 17 M30 18 END PGM MEARSURETOOLSEQ MM Works a treat and i now have time to make a coffee while the machine sets the tools for me (I WISH). Thanks for stairing me in the right direction.
-
Steve - exactly what I am after. frostfritt - thanks will give it a try - much appreciated.
-
I'm looking for some help in developing a macro to speed up the tool setup procedure. On our Haas machines there is a handy renshaw developed macro for setting your tools up off the tool setter. You basically tell it the first tool and last tool and it automatically indexs between the tools and runs the tool measeurement cycle. I was hoping that some clever Heidenhain guru could help me to write one to do the same thing on our DMG with Heidenhain 540 controller ? I understand the basics of the Heidenhain language but not enough to write a indexing style macro with adjustable start and end tools. Any help is much appreciated.