.jpg.cc55b1e846f0b4d0335b9e6c4907ffe1.jpg)
nperry
-
Posts
150 -
Joined
-
Last visited
-
Days Won
2
nperry's Achievements
")


-
We don't have regular IT stuff going on, that I know of. Though this particular guy did just get a new PC and simultaneously upgraded to 2024 (he was on 2020 previously), and it seems like his new setup has some, uhhh, "graphical challenges" with 2024. This hadn't been going on though so it seems to have just popped up over the weekend somehow.
-
Okay this one isn't my issue but it's another guy in the shop who asked me about it. Usually I relish these types of challenges but I'm having trouble with this one. Click on analyze position (or any analyze function probably), select a position...see that little white square that marks your selection point? Overnight his turned huge. I'm guessing it's probably about 8 times the size of the standard box. Anyone know if/where there is a setting to adjust this?
-
Be careful what you wish for.
-
Got it, I can recreate this. So the next step for you is going to require a little more work, and this is just based on what I would do. Someone else might have a better solution. I'd create two separate machine and control definitions - one called "MPMaster 3x" and another called "MPMaster 4x". Each one would have one default axis combination - the 3x definition would have the 3 axis combination that I showed you how to create and only that combination in the menu. The 4 axis definition would have the "default" that's posting out A motion and only that combination in the menu. That way when you select a machine you select either a 3 axis or 4 axis and you only get the motion you're after and you never have to bother with switching your axis combination in the menus. If you don't have a 4 axis machine and you flat out don't need to have A motion posted out at all then your solution is simple: go back into that axis combination menu and delete the "default" axis combination. Then your current operations in that file and future operations will automatically default to the new axis combination you created, which is the 3 axis one.
-
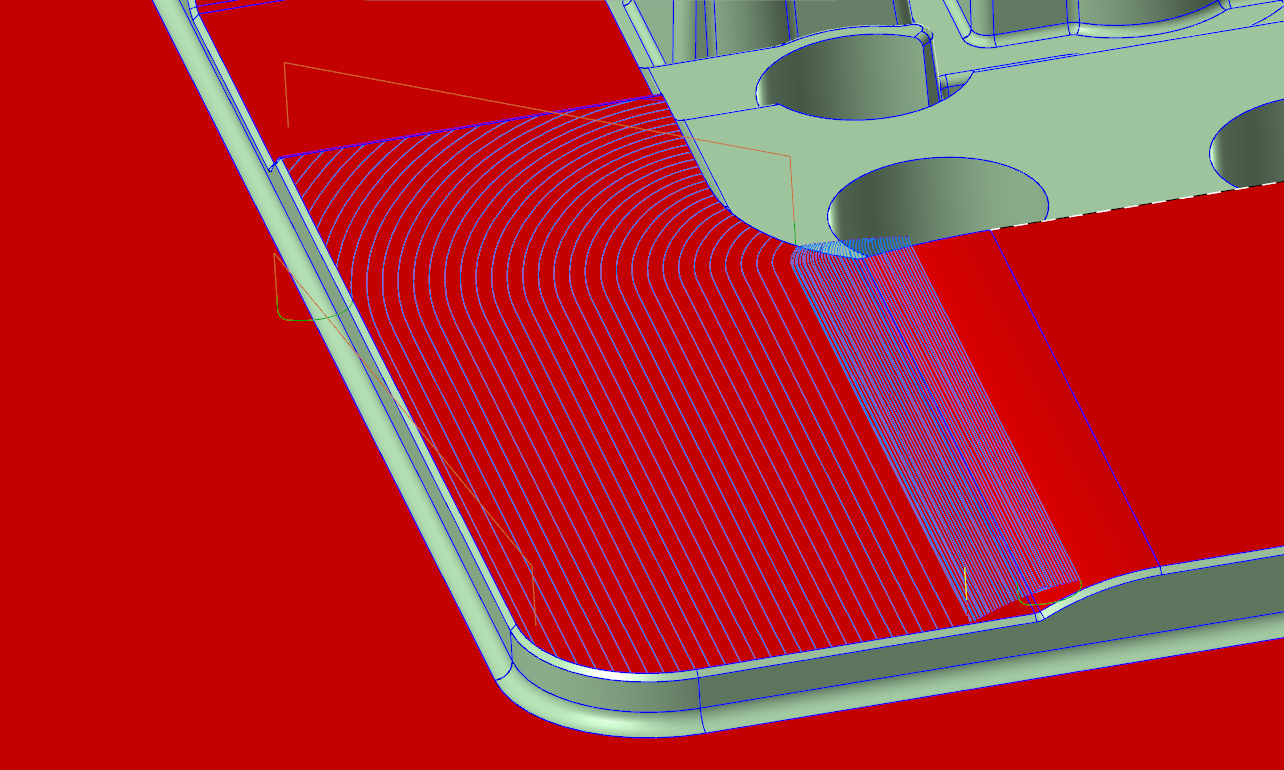
Sigurd - best I could come up with on hybrid. Set your steep/shallow to on, select the top floor as the minimum depth and your bottom floor as the maximum depth. Knock the min depth down a couple tenths and knock the max down .005. In cut parameters set keep tool down to 100% and in transitions check option "straight". I'm not sure if it'll be appropriate for the finished product but it gives a clean path that looks to do what you want. I don't like the top down cutting though, prefer to start on that flat and work up the radius but I don't know that it's possible with hybrid.

-
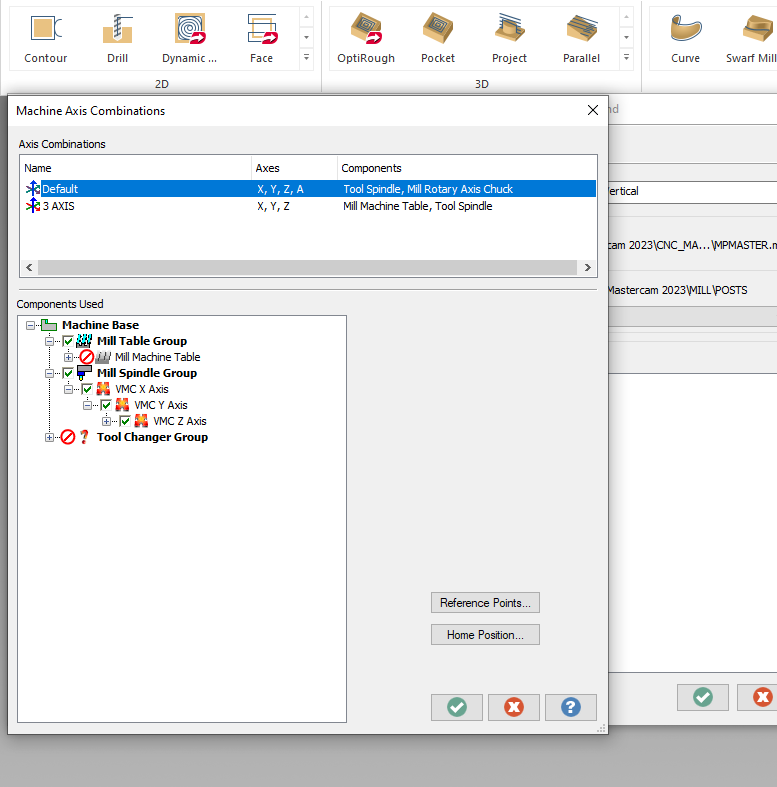
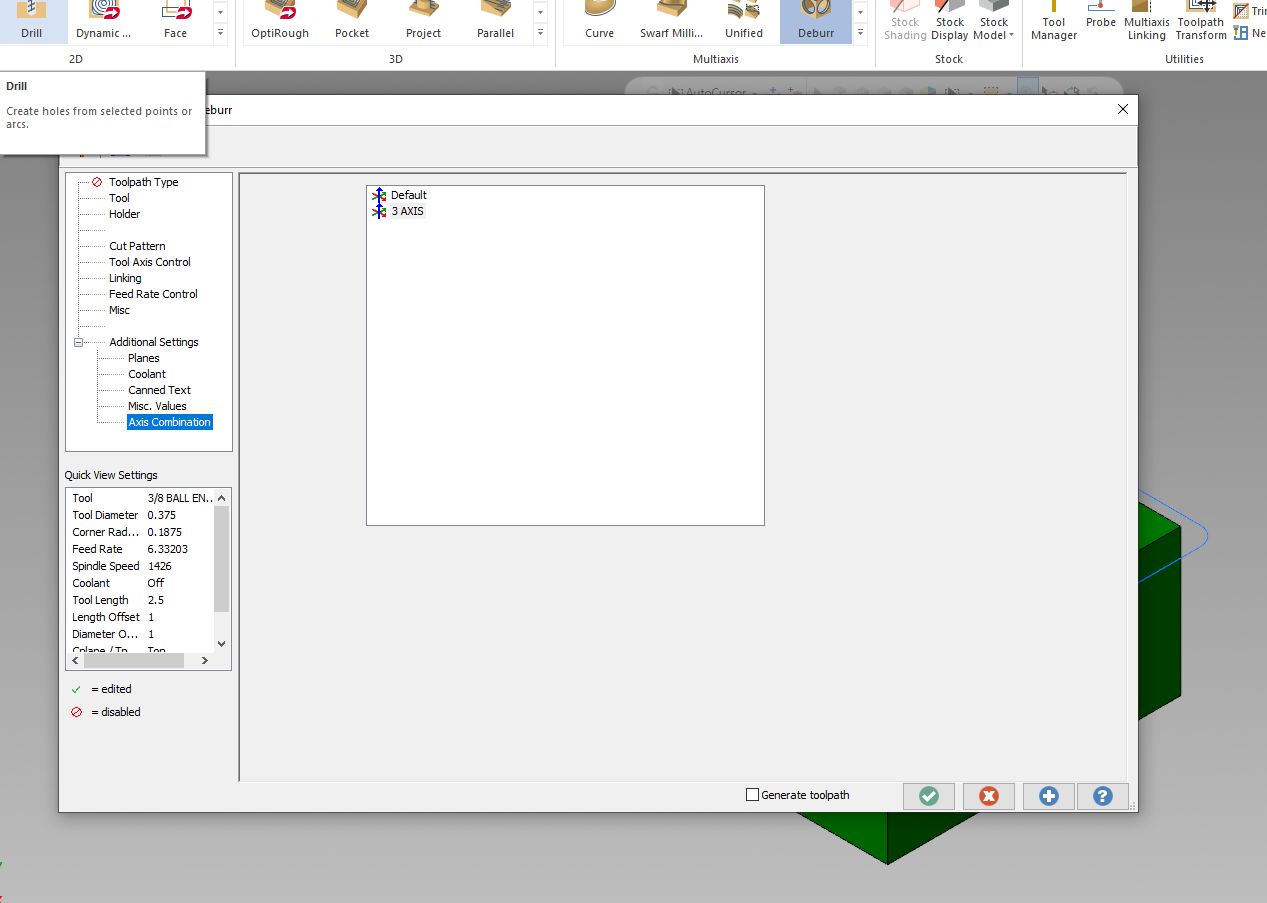
Here's what you want to do: In the main ribbon > machine tab > click machine definition > on the top ribbon click axis combinations > in the top box right click and create a new axis combination (rename to 3 axis) > in the components used selection down below click on "machine table group", but nothing in the submenus below it > then check the next menu below titled "machine spindle group" and all of the submenus below that - x axis, y axis, z axis > back out of those menus and save everything on the way out > next go into your deburr cutter path parameters > click additional settings > click axis combination > click new axis combination called "3 axis" > green check, regen, post Voila! No a axis moves in your code.


-
The right angle head post we have is based on Fanuc 4x Router. OP - your setup looks mostly correct to me. When we use the right angle head to machine features on the 5 axis we need to plug in the B/C, A/B rotational values manually.
-
This was my file initially. I couldn't use the doctored file because those pockets were tight and I needed cutter comp on them, so no dice on the surface contour or swarf cutter paths walking down those walls. One trick I use pretty regularly to get rid of steps or help minimize deflection is to add a spring pass into the path, except run it conventional instead of climb. That'll help suck the cutter into the work instead of push it away and it really helps to take out that last stubborn couple thou.
-
I also have a Logitech Ergo trackball and also love it. When I was getting into the trade the journeyman I worked with was a big CAD/CAM guy. We had two workstations next to one another during the time we worked together, he used Mastercam 9 while I was using X6. He had a trackball and I couldn't stand the sight of them back then, so I used to pick on him for it. At some point during our debates he recommended that I get one sooner rather than later and gave me the most valuable advice that is still, to this day, the greatest advice I've ever been given during all my years in the shop: "It'll keep the r*tards off your computer." (Pardon my language, it was a different time back then.) Now when I come into work and someone complains about having tried to get onto my computer (and failing) my retort is always "Trackball don't lie."
-
.thumb.jpg.e1ed32e8dc33a68b1f20806bb5d55e08.jpg)
Code Expert 8 Seconds for Splash Screen, Do the Math!
nperry replied to Jobnt's topic in Industrial Forum
This. I watch guys routinely "X" out of the entire code expert application and then repost code only to have the splash screen pop up again, not realizing how much time they're wasting. Just open the application once and leave it open. -
They actually are not working at all or are you saying that they aren't "sticking"? I've seen it before where I set up hot keys and next thing you know Mastercam has totally erased them.
-
Based on the help file it seems like it should be possible to do transform-translate, move the points where you want and have those points correspond to a WCS of your choosing. It doesn't want to seem to go though. Rob, there's also another trick you could use in your situation. If you were to program that setup with 4 separate, but the same, toolpaths, you could highlight them all, right click, then go to edit selected operations menu and click edit common parameters. From there you can change a lot of the information in the parameters of all the operations provided you want all of those operations the same.
-
Oh yeah that is coming out wonky. Gotta be a way.
-
Go into your transform operations, on the left side within the "Method" box, click on "Tool plane" and then check the box "Include origin". Should get you what you want.
-
Someone with more experience than me in X+ should probably chime in, but from what I remember it loads right into Mastercam and I feel like it also loaded specific comments. I hired into my current shop right at the tail end of X+ being free...I can't remember all the specifics about its functionality.