


.jpg.cc55b1e846f0b4d0335b9e6c4907ffe1.jpg)
nperry
-
Posts
154 -
Joined
-
Last visited
-
Days Won
2
Content Type
Profiles
Forums
Downloads
Store
eMastercam Wiki
Blogs
Gallery
Events
Posts posted by nperry
-
-
JB - I know I struggled with this in the past and if I remember correctly it had something to do with the boxes in the lower section of the docked panel on the right.
In the graphical section of active reports designer if you click the word "detail" it'll highlight that bar blue, then look at the menu to the bottom right. I could swear it was something in "behavior". Maybe try fiddling with the option "Keep Together".
-
Went to add an edit and couldn't, but this should've gone with above post.
So, OP, when you get blank pages like that it's typically because you aren't following the correct structure. It's difficult for me to make sense of the structure you have in place right now. My main sheet is (FILE), which calls (MILL-FILE), which calls (MILL-TOOLS), which calls (MILL-TOOL).
Assuming you have (FILE) shown, you're then calling (FILE) and (MILL FILE) in the same report. Then one each of those calling (OPERATION) and (MILL TOOLS). I don't think that structure is agreeable.
I think you need to be (FILE) - (MILL-FILE) and have that calling both (OPERATION) and (MILL TOOLS).
-
 2
2
-
-
I'm attaching an old tips and tricks page that used to be on CNC software's website. Might still be but when I search I can't find it.
The first section, structure, is the most important and helpful part.
-
3 minutes ago, gcode said:
Did IT update your video drivers overnight??
We don't have regular IT stuff going on, that I know of.
Though this particular guy did just get a new PC and simultaneously upgraded to 2024 (he was on 2020 previously), and it seems like his new setup has some, uhhh, "graphical challenges" with 2024.
This hadn't been going on though so it seems to have just popped up over the weekend somehow.
-
Okay this one isn't my issue but it's another guy in the shop who asked me about it. Usually I relish these types of challenges but I'm having trouble with this one.
Click on analyze position (or any analyze function probably), select a position...see that little white square that marks your selection point? Overnight his turned huge. I'm guessing it's probably about 8 times the size of the standard box. Anyone know if/where there is a setting to adjust this?
-
14 hours ago, TFarrell9 said:
Here's to hoping 2025 corrects this annoying bug.
Be careful what you wish for.
-
 1
1
-
-
11 hours ago, amw said:
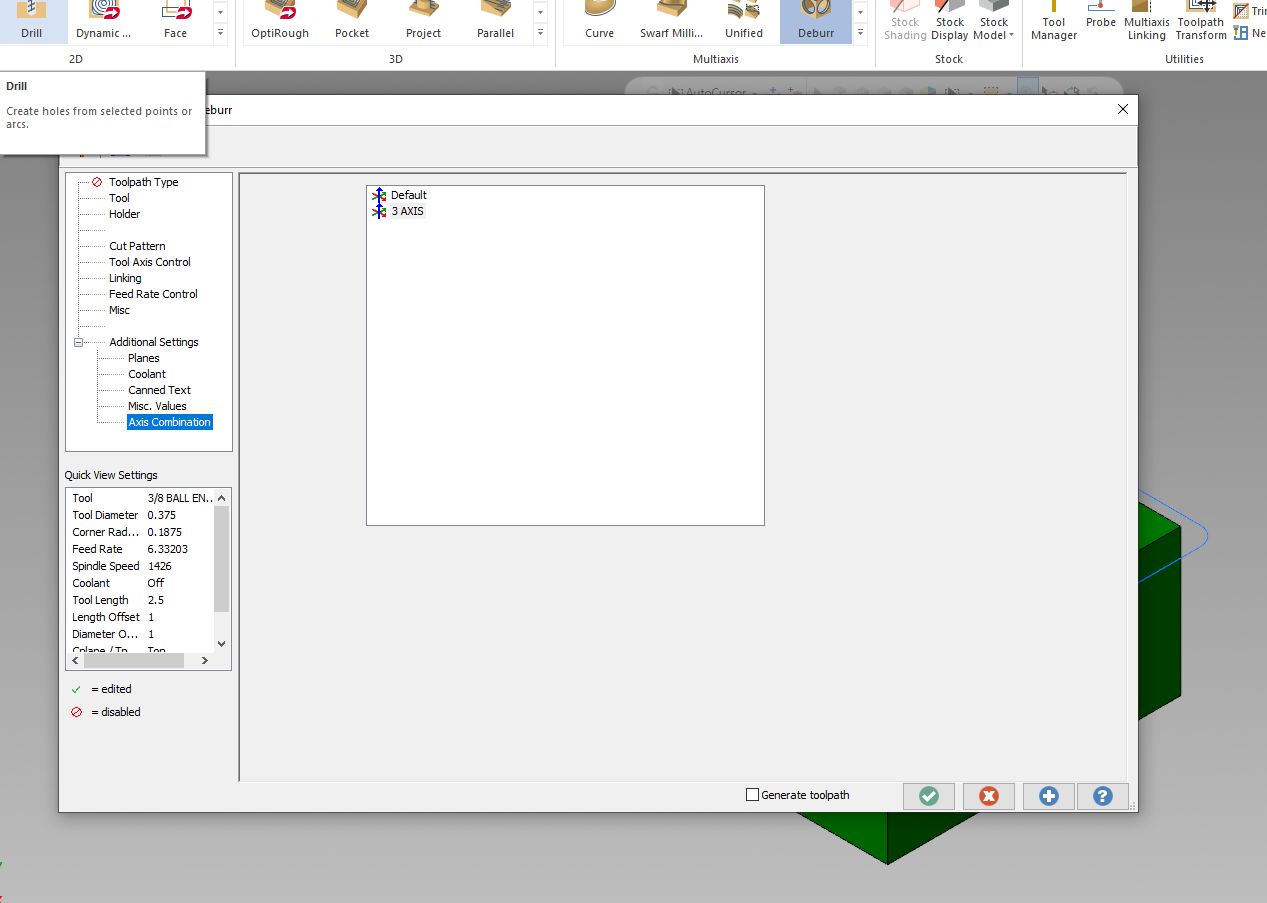
Nperry I tried this tonight and it almost works. I created a new axis combination and this does post without rotation if posting just the deburr toolpath. But if i post the full program along with other operations (which use the default axis combinations) it posts with rotation again. I dont want to have to change the axis combination in every operation. Any other suggestions?
Got it, I can recreate this.
So the next step for you is going to require a little more work, and this is just based on what I would do. Someone else might have a better solution.
I'd create two separate machine and control definitions - one called "MPMaster 3x" and another called "MPMaster 4x". Each one would have one default axis combination - the 3x definition would have the 3 axis combination that I showed you how to create and only that combination in the menu. The 4 axis definition would have the "default" that's posting out A motion and only that combination in the menu. That way when you select a machine you select either a 3 axis or 4 axis and you only get the motion you're after and you never have to bother with switching your axis combination in the menus.
If you don't have a 4 axis machine and you flat out don't need to have A motion posted out at all then your solution is simple: go back into that axis combination menu and delete the "default" axis combination. Then your current operations in that file and future operations will automatically default to the new axis combination you created, which is the 3 axis one.
-
 1
1
-
1
-
-
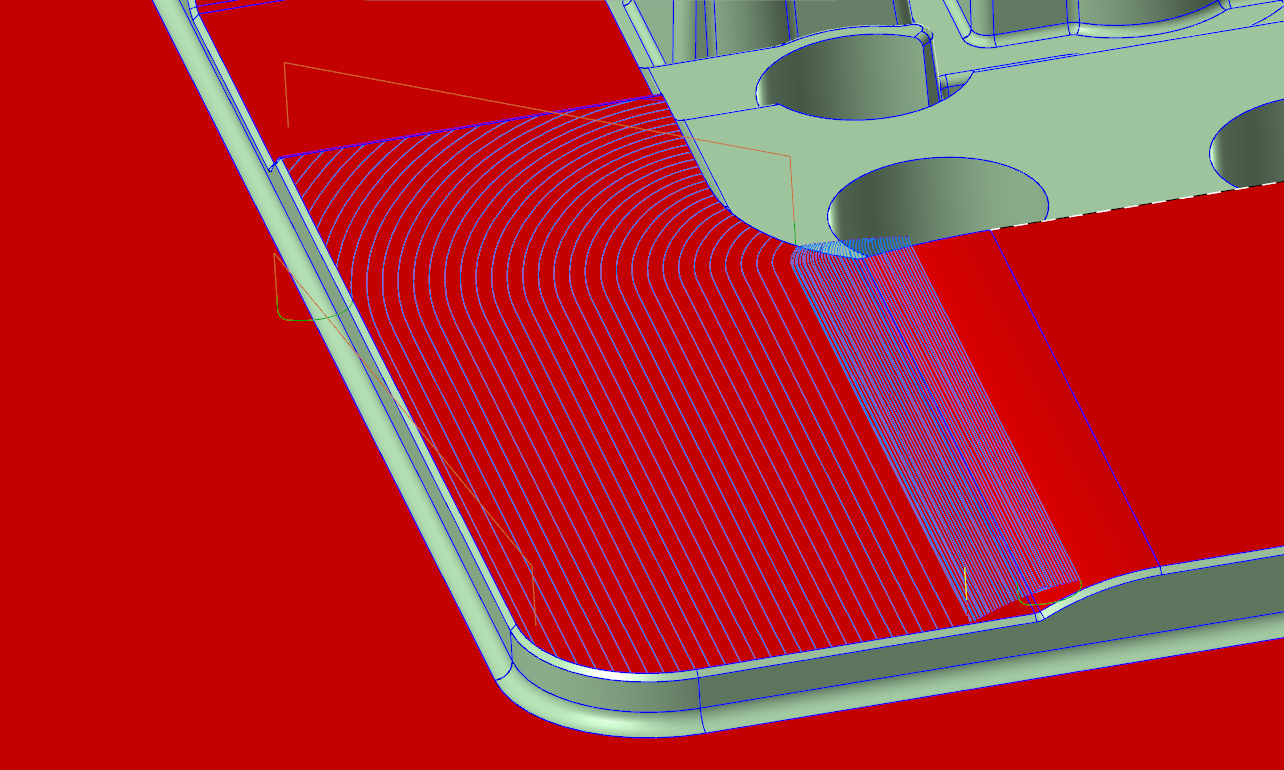
Sigurd - best I could come up with on hybrid. Set your steep/shallow to on, select the top floor as the minimum depth and your bottom floor as the maximum depth. Knock the min depth down a couple tenths and knock the max down .005. In cut parameters set keep tool down to 100% and in transitions check option "straight". I'm not sure if it'll be appropriate for the finished product but it gives a clean path that looks to do what you want. I don't like the top down cutting though, prefer to start on that flat and work up the radius but I don't know that it's possible with hybrid.

-
1
-
-
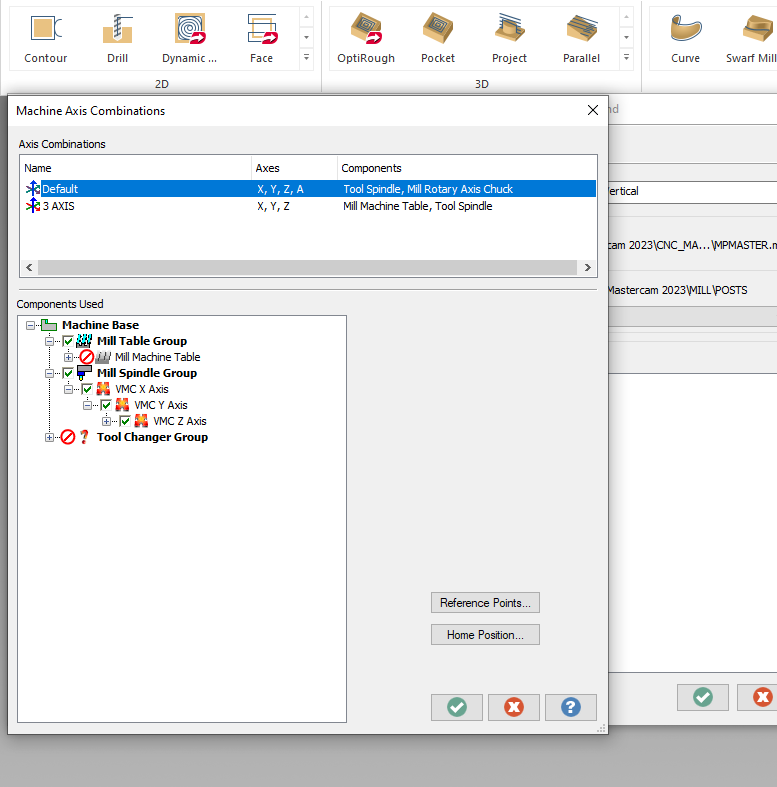
12 hours ago, amw said:
Hi Guys, Im using the Deburr operation on a 3 axis machine, and have selected 3 axis mode within the deburr toolpath. The part machines ok but for some reason the deburr operation makes the program post like a 4th axis program. The code includes A axis values for all operations, lock and unlock codes, and I get an alarm at the end of the program when the 4th axis is sent home.
Using MPMaster post. Any ideas how to fix this? I could possibly make another post and get rid of lock codes and the A axis home move at the end, but it would be nice to have the normal MPMaster post work properly with this.
Here's what you want to do:
In the main ribbon > machine tab > click machine definition > on the top ribbon click axis combinations > in the top box right click and create a new axis combination (rename to 3 axis) > in the components used selection down below click on "machine table group", but nothing in the submenus below it > then check the next menu below titled "machine spindle group" and all of the submenus below that - x axis, y axis, z axis > back out of those menus and save everything on the way out > next go into your deburr cutter path parameters > click additional settings > click axis combination > click new axis combination called "3 axis" > green check, regen, post
Voila! No a axis moves in your code.


-
1
-
3
-
-
1 hour ago, Jake L said:
My custom RAH post is made from the MPRouter post. Made the modifications a few months ago.
The tutorial videos I watched said the MPFan or MPMaster posts don't have the logic for RAH out of the box.
The right angle head post we have is based on Fanuc 4x Router.
OP - your setup looks mostly correct to me. When we use the right angle head to machine features on the 5 axis we need to plug in the B/C, A/B rotational values manually.
-
1
-
-
8 hours ago, JB7280 said:
Hey Ron, I was checking out your file, and had a couple questions. When you machined the floors in the pockets, you used a Horizontal toolpath. Any particular reason you use that, versus area mill, or pocket? Just different ways to skin the cat? Or is horizontal better in some way?
Also, when stepping down the pocket like you are, in the swarf and Surface Contour toolpaths, I almost always end up with steps, or ridges on the walls. What's your trick to eliminate that??
Oops....I also just noticed the date on that post


This was my file initially. I couldn't use the doctored file because those pockets were tight and I needed cutter comp on them, so no dice on the surface contour or swarf cutter paths walking down those walls.
One trick I use pretty regularly to get rid of steps or help minimize deflection is to add a spring pass into the path, except run it conventional instead of climb. That'll help suck the cutter into the work instead of push it away and it really helps to take out that last stubborn couple thou.
-
1
-
-
On 8/8/2023 at 2:34 PM, 5AXIS505 said:
I use a Logitech Ergo and absolutely love it. It was a bit of an adjustment to get used to the trackball but I find its faster and far more comfortable.
I also have a Logitech Ergo trackball and also love it. When I was getting into the trade the journeyman I worked with was a big CAD/CAM guy. We had two workstations next to one another during the time we worked together, he used Mastercam 9 while I was using X6. He had a trackball and I couldn't stand the sight of them back then, so I used to pick on him for it. At some point during our debates he recommended that I get one sooner rather than later and gave me the most valuable advice that is still, to this day, the greatest advice I've ever been given during all my years in the shop: "It'll keep the r*tards off your computer." (Pardon my language, it was a different time back then.)
Now when I come into work and someone complains about having tried to get onto my computer (and failing) my retort is always "Trackball don't lie."
-
1
-
-
6 hours ago, Newbeeee™ said:
Have a shortcut on your desktop (/mastercam/extensions/codeexpert) and open it 1st thing in the morn.
Once it is open, any new posting (did) opens(?) virtually immediately. Then just close down that posted prog, keeping codeex-spurt open....?
This. I watch guys routinely "X" out of the entire code expert application and then repost code only to have the splash screen pop up again, not realizing how much time they're wasting. Just open the application once and leave it open.
-
2
-
-
They actually are not working at all or are you saying that they aren't "sticking"? I've seen it before where I set up hot keys and next thing you know Mastercam has totally erased them.
-
Based on the help file it seems like it should be possible to do transform-translate, move the points where you want and have those points correspond to a WCS of your choosing. It doesn't want to seem to go though.
Rob, there's also another trick you could use in your situation. If you were to program that setup with 4 separate, but the same, toolpaths, you could highlight them all, right click, then go to edit selected operations menu and click edit common parameters. From there you can change a lot of the information in the parameters of all the operations provided you want all of those operations the same.
-
1
-
1
-
-
Oh yeah that is coming out wonky. Gotta be a way.
-
Go into your transform operations, on the left side within the "Method" box, click on "Tool plane" and then check the box "Include origin". Should get you what you want.
-
8 minutes ago, sharles said:
So, maybe I need to contact Gunther and see if he can approximately replicate what I have in our Excel sheet??? Does it load right into Mastercam like our Varco reports does so that it will automatically grab as much information as possible, but still allow us to make generic comments like I showed in our Excel sheets?
Someone with more experience than me in X+ should probably chime in, but from what I remember it loads right into Mastercam and I feel like it also loaded specific comments. I hired into my current shop right at the tail end of X+ being free...I can't remember all the specifics about its functionality.
-
1
-
-
9 minutes ago, sharles said:
Hey guys,
thanks for all the replies and input. As I've tried to remember why we abandoned our attempts at using AR 4 years ago, the biggest problem is, say, when we output a drill, ream,tap, bore toolpath, it may have 20 or more tools. We didn't want 20 different entries in our report. We simply want one that gives the name of the toolpath the operators will run, how long mastercam thinks it will take, and a very generic description "drills all mounting holes", not 5 pages listing every tool in that one toolpath. That's what the tool build sheet is for, NOT the toolpath sheets IMO.
I've never looked into Gunther's X+, so I'm not sure what it does from the things some of you are saying about it...
Thanks again!
X+ is/can be a very bare bones setup sheet. Just the pertinent information, easy to read, very succinct. After Gunther started charging I built one for our shop that was modeled off of what we used on X+ (not because X+ isn't worth it, more because I had time and was up for a different kind of task). It could be you're looking for something akin to this based on what you're saying here.
-
1
-
-
12 hours ago, Jobnt said:
I hope so. The current method is, as my signature states, the Joe Biden of computer Apps.
What do you mean by that?
"Powerful but really, really dumb" is my best guess.
-
1
-
-
The first sheet and third sheet you show in your post....no doubt in my mind that can done with ActiveReports. It's a lot to go through though, and I think someone who is well-versed in AR would be able to do it within maybe a week without interruption. The second sheet I'm not sure if there's a good way to go about doing that.
-
1
-
-
46 minutes ago, Marion said:
Hello,
I'm a French student doing an internship. I've customized a report with ActiveReports Designer. I've added extra UXD tags but the extra parameters page doesn't show up when I generate a report from Mastercam. After several tests, it seems that it's the request for two of my sub-reports that's causing the problem. Indeed, when I delete them, the dialog box is displayed. On the other hand, calling up the third sub-report doesn't seem to cause any problems.
So I'd like to know if there's a particular configuration for the sub-reports, or an item they should or shouldn't contain.French support doesn't know and US support never replied to my email.
Thank you for your help.
And sorry for my English..
I've attached a helpful tips and tricks page for getting started on Active Reports. The node hierarchy is the first thing covered and the most important thing to learn. As noted in the page, when your hierarchy is out of place your information won't appear or will appear incomplete.
The contents of your subreports, generally speaking, should follow the tag outline I'm certain you've found in the help file (i.e. operation tags in the operation subreport, tool tags in the tool subreport, nc tags in the ncfile subreport...you get the idea). Sometimes they get finnicky, once I needed help to "seed" a tag in a different report to get it to appear the way I wanted in the setup sheet. I'm not sure how common that is though, hopefully you can accomplish what you want without having to do anything like that.
-
1
-
1
-
-
14 hours ago, PeteS said:
Hi there!
So I am fairly new to the ActiveReports Viewer, and have some questions.
I want to create setup sheet that will include both sequence numbers and tool numbers + descriptions.
First I created one following //TOOL RecordSet Pattern, but this one does not have the Sequence #s.
Now I am trying to go with //OPERATION and noticed there are OOI-xxx (Optional Operation Information) commands providing all the info I need.
But the problem I run into is that //OPERATION does not like OOI commands, like it does not operate them.
I.E. I try to run OOI-TLNO under //OPERATION, but nothing happens.
Can someone chip in some of their knowledge on this topic? Thanks!
From the setup sheet Tag Glossary:
"Raw operation data is supplied for more advanced setup sheet customization. The XML tags listed here are all nested within every operation parent node and Mill and Lathe tool nodes."
I'm guessing this means you're going to have to add tags to TOOL as well as OPERATION.
-
23 hours ago, crabbydad said:
recently upgraded to Mastercam 2023. I programmed a hybrid and tool path looked good. When I ran thru verify, It shows tool holder crashing thru part. Ran back plot and looked at path from front view and it shows huge arcs in the XZ. I could not get it fixed, so I ended up programming my second op in 2022 using the same toolpath and parameters with no issue. I ran into the same issue on another part with an area rough. I was able to change the direction of the containment and it worked. I went back to the original part that had an issue and tried repicking the containment in a different direction, different containment and no containment, with no resolution to the crashing in verify. Anyone else had this issue? When i first had the problem, I reran the migration wizard to see if this helped, but it didn't
I've struggled with this along with one of my counterparts at work. 2023 showing gigantic gouges in verify that are non-existent. I've verified beautifully in 2022 and moved the file into 2023 (because of trying to work around other 2022 glitches) and had verify show non-existent gouges.
Very frustrating.

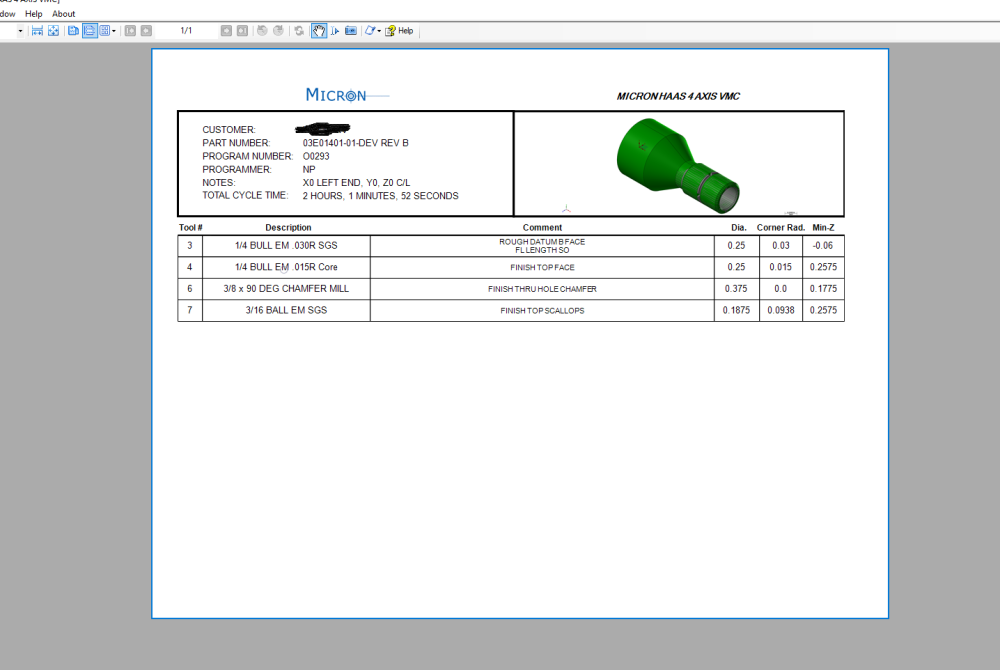
Setup Sheet, need information to start on next page.
in Industrial Forum
Posted
Got it. So it's been a while since I've messed with it in great depth, but your setup comments box, could you just make that vertically longer to force the beginning of your operation list to start on a new page?