.jpg.cc55b1e846f0b4d0335b9e6c4907ffe1.jpg)
nperry
-
Posts
150 -
Joined
-
Last visited
-
Days Won
2
Content Type
Profiles
Forums
Downloads
Store
eMastercam Wiki
Blogs
Gallery
Events
Everything posted by nperry
-
This works beautifully! Thanks for your help David.
-
Yeah I've been able to get decent stuff out of 3+2 also, but still not quite there. I just want simple 3+1 in this case. We've got 25 Haas machines on the floor, all different vintage. I can verify and machine simulate till I'm blue in the face and the odds of true multi-axis code hitting the floor and not running into a snag that's going to take me an entire day to troubleshoot is slim to none. I need to keep things as simple as possible.
-
Here you go, Aaron. Right now it's set up in 4 operations, all 3 axis. The motion I have is exactly what I want, but for some reason I cannot get it to output for 4 axis positional moves. I change the WCS information and play with the tool axis control parameters and I can't get anything satisfactory. I've tried all of the direction controls and also using lines. DEBURRFILE.MCAM-CONTENT
-
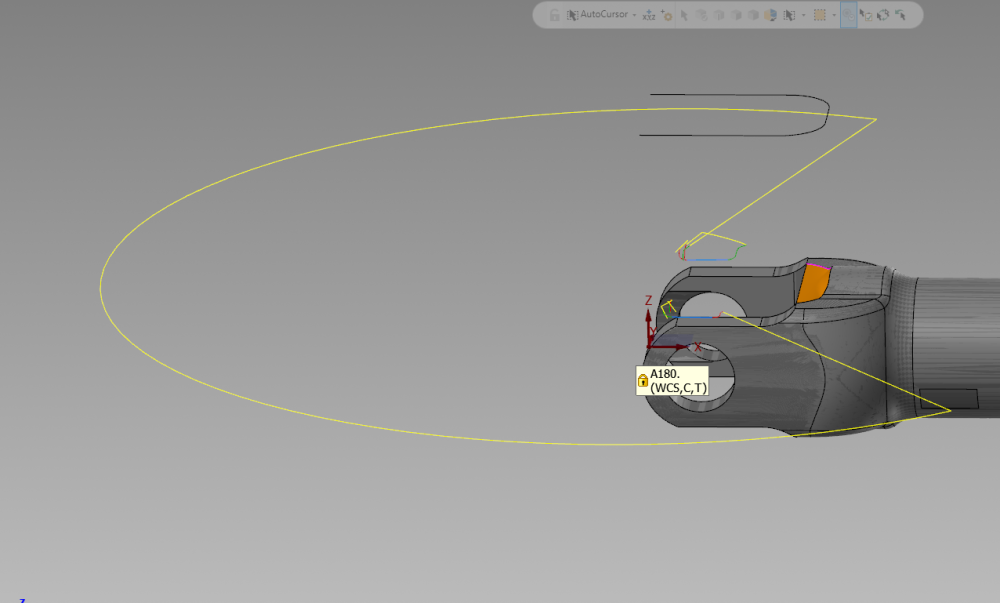
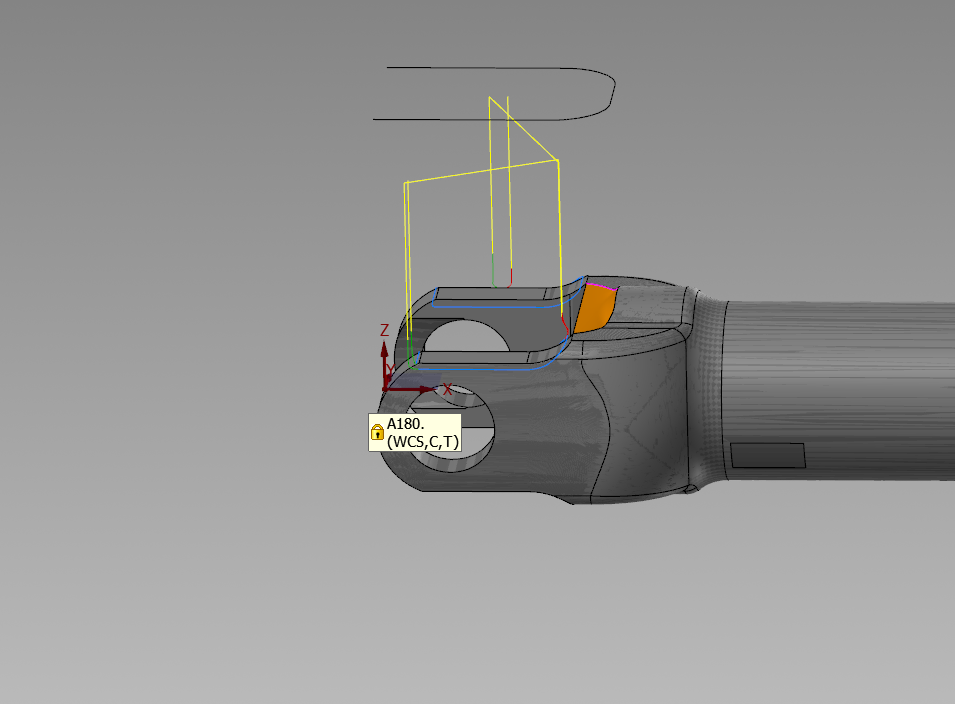
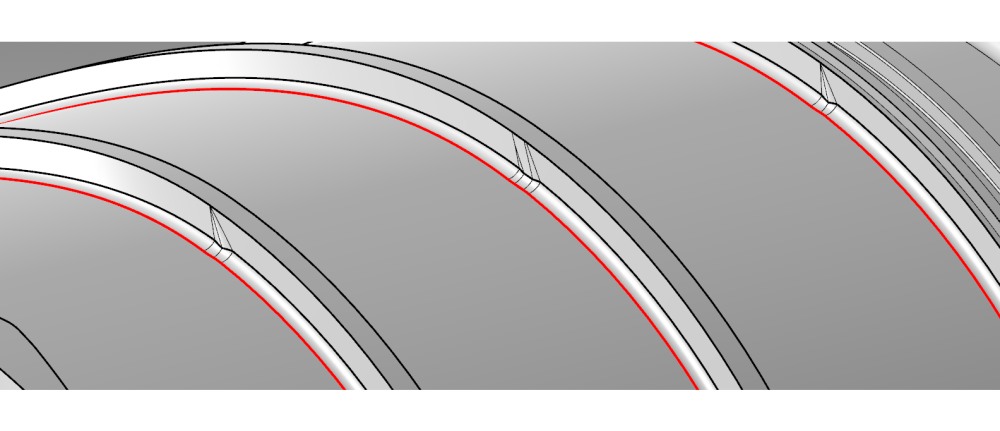
Been using the deburr toolpath a lot lately which has really come in handy. Only issue is I can't get this path to agree with the 4 axis rotary setting. You can see the results below for the 4 axis motion and then the clean 3 axis motion. All I want to do is get that 3 axis motion to output with A180. My present workaround is to program it for a 3 axis operation and then go in and hand code the rotary position. Kind of annoying though. Anyone know how to make this toolpath clean with the 4 axis rotary setting in the tool axis control parameters? Current settings for the 4 axis motion are 4 axis (rotary) in tool axis control, direction is Z axis. Planes are WCS A0., Cplane A180., Tplane A180. I've tried to change the direction with the same settings and every option yields different, but results that are equally as silly as what's pictured.
-
.thumb.jpg.e1ed32e8dc33a68b1f20806bb5d55e08.jpg)
Do you prefer Stock Models or .STLs for use in Mastercam.
nperry replied to [email protected]'s topic in Industrial Forum
This seems like a neat trick, Aaron. I'm curious, are mesh files on a level immune to hollow stock syndrome? -
Is this something that happens intermittently for you? I routinely work with large, very detailed solids that sometimes will have between 400 and 500 toolpath operations. What you're describing doesn't always happen to me, but sometimes it does. Somewhere along the line the file size explodes, even though it doesn't seem warranted, and makes it damn near unusable. Addendum: I've also experimented with it the same way you have. Take giant file, clear every single toolpath operation, wipe every single level of every single entity, delete every solid. resave. File size still giant. File still near unusable.
-
Nailed it. Thank you, sir.
-
I don't know how new this is but I recently noticed that when I click on an operation it automatically toggles the toolpath display. Anyone know how to disable this?
-
Okay...that looks nice. I'll tinker around and see what I can get in 21. Thanks Aaron.
-
If they come in to check on the status of the project I might try to broach the subject. It's cast prototype though...I'm unsure how much thought or care goes into some of these details. We've got a bunch of exceptions for the interior features of the part, too. Granted, we can tip to make a lot of it work but you're basically looking at having to run a .250 ball EM with ~13" of stickout to make the interior of the part the way it was designed. Luckily we got clearance for .250 rads all the way around. Either way though, you guys know how it is, it's just so much more difficult to make clean paths off of geometry that's no good or nonexistent.
-
That's what I was afraid of. I might bring it into a newer version and try unified, but I'm not going to be dedicating a lot more time to playing around. I'll likely end up going with Ron's suggestion and surfacing everything on. Thanks for the help, fellas.
-
Error is "Cannot build native curve." on swarf toolpath.
-
Here's the cast model. Only difference is the top corner radii on the OD won't be there after finish turning, so no need to consider those. 1736119534_10333228_A_1-INNERMIDDLEHOUSING_ROUGH_STEP.stp
-
That was the first path I put to it and I kept getting an error along the lines about how it couldn't "create a natural curve". I noticed the gouge control you're talking about though, I'll go back in and play with that a bit. The track is a cast feature so I've got a lot of leeway as far as the machined surfaces in there.
-
5X Curve yields me something that almost wants to think about being usable. It follows decent but gets jumpy around those choppy surface areas. The geometry is garbage too - I had to draw a bunch of nonsensical lines to get everything to connect, so I'm sure that's not helping. In my minds eye it makes sense that if the geometry/solid were unrolled it would be really easy to take a ball endmill and lay down a really, really clean waterline path on it. I'm just struggling to make that come to life. Is 5X Curve capable of that? I've only ever used it on straight walls. Here's a close up of what the majority of the walls look like...

-
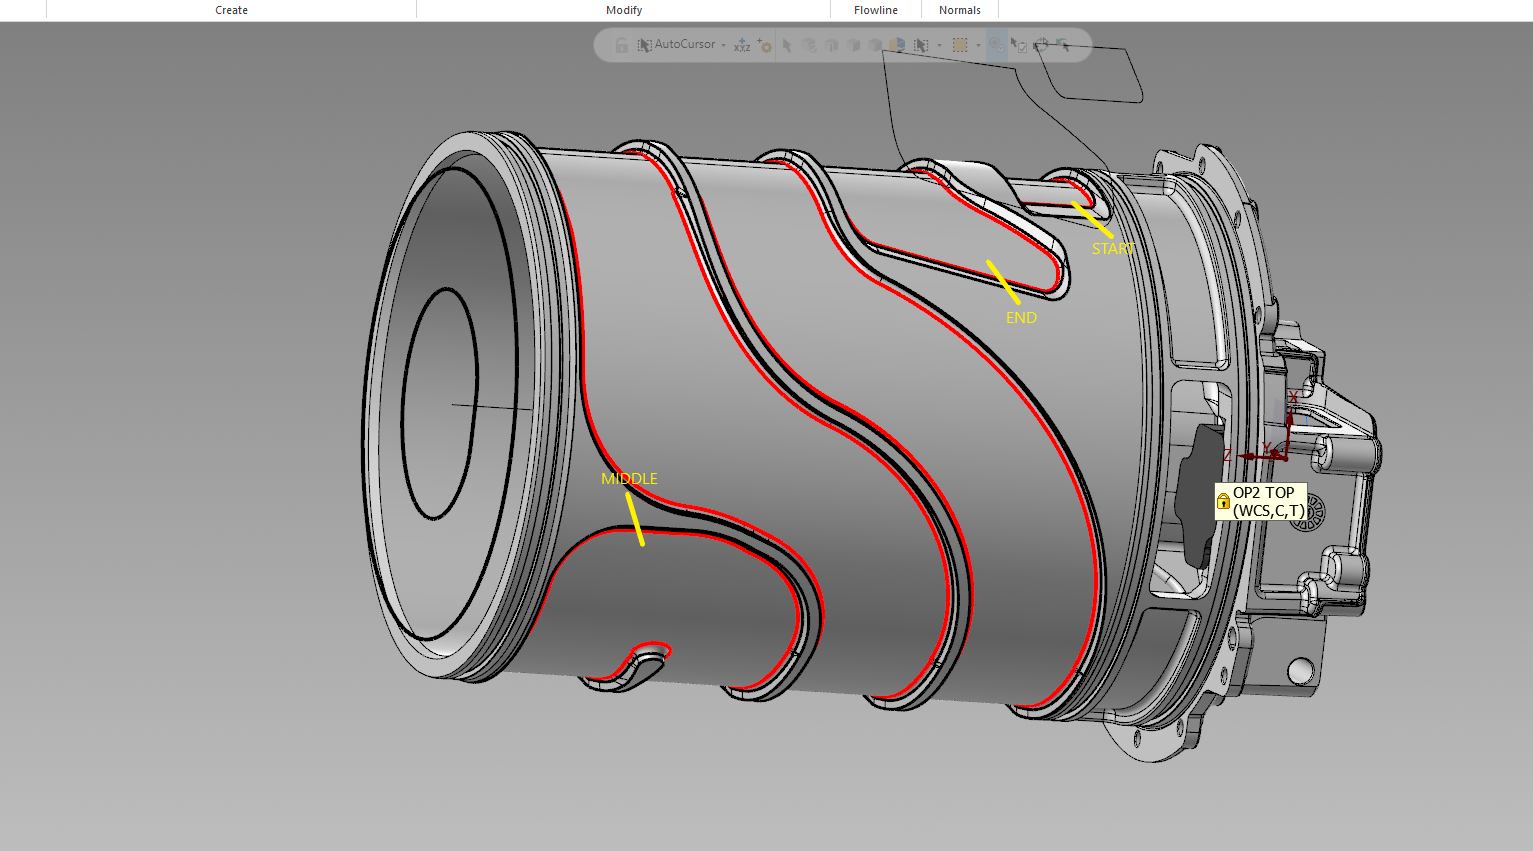
Trying to figure out the best way to do this one - the floors I've got down with a 5X flow, and it looks nice. I'm trying to figure out how to do the walls as cleanly as possible. You can see that the outer track has a start and end point, with a 180 degree turn in the center. You can also see that there's variation on the walls, extreme on the ends, but also more moderate variation on the angle all the way around the track. There's some chunks of solid in there that also are not very clean...I'm unsure how well it's going to come out with those little sections where the flow is different. Going to run this part on a UMC750 and I'm programming with 2021.


-
I'd thread mill any tapped holes if I were you. Copper will go waste your taps quickly and unpredictably, in my experience.
-
Pitch in your little gems that make mcam life easier
nperry replied to jlw™'s topic in Industrial Forum
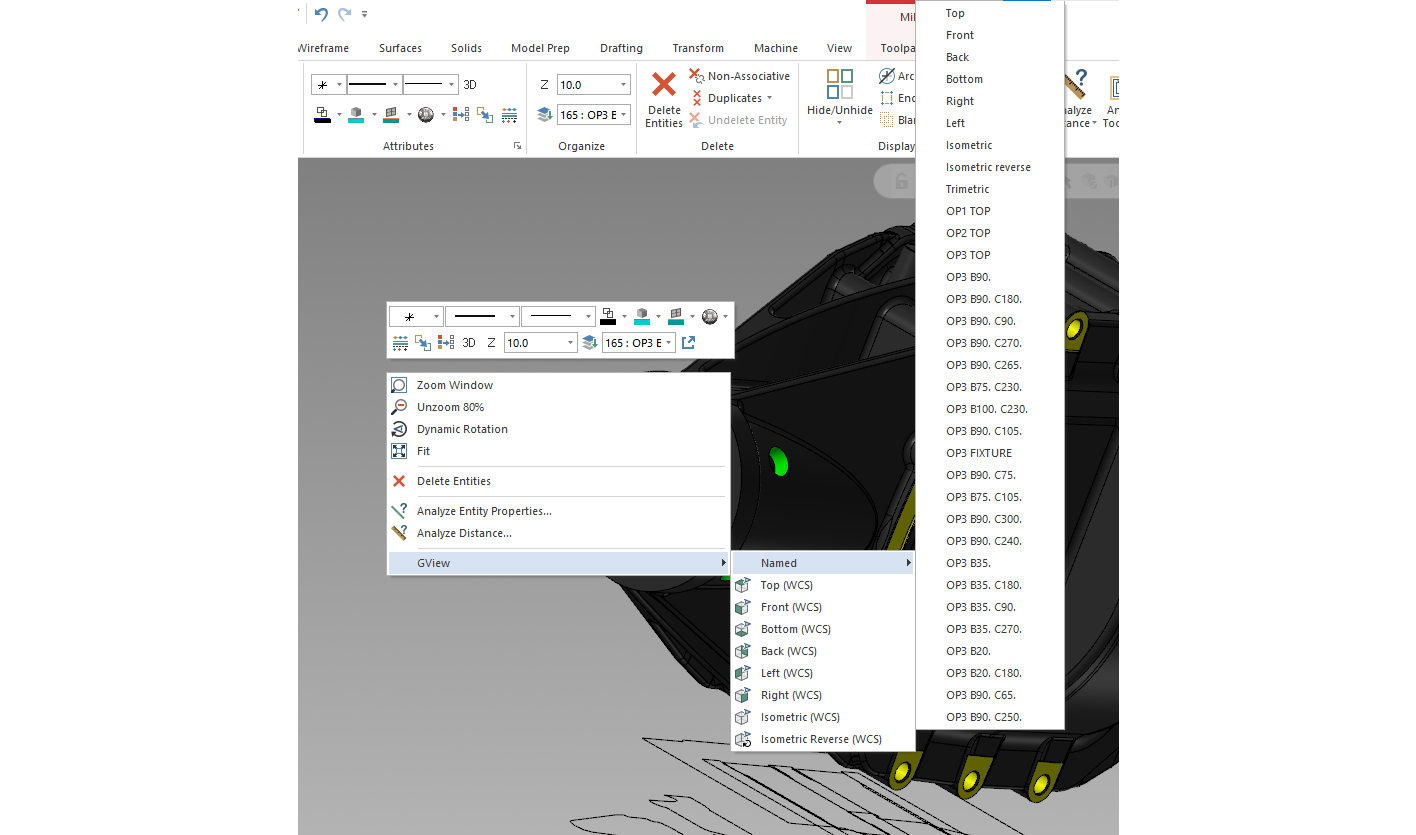
Figured this one out from a guy on reddit, actually. In the RMB customization if you make a new submenu and start adding standard views to it (ie top, bottom, left) it will automatically add a "named" submenu at the top that contains all your additional created planes in the file. That coupled with a hotkey for WCS = Cplane makes for some pretty quick plane changes.
-
I don't know that I've struggled with this issue, but knifes edge/islands are often an issue for me with this cutter path. I feel like it lacks control - I find that there's situations where I can output one not great opti-rough or take the time to lay down five paths and come up with something that's more reliable when it hits the floor even though it took more work for me on the front end.
-
I was mistaken in that equal scallop allows for different selection in both open and closed contours - scallop only has one selection. In "Cut Parameters" the first drop down menu at the top of the page is labeled "Cut Method". I'd think that should be set to one way for constant climb milling.
-
Do you have it set for open and closed contours to both go "one way"?
-
I should have noted - I don't have these issues with the moduleworks machine simulator. That simulator seems like a little more work on the front end to get set up but it does seem to run okay.
-
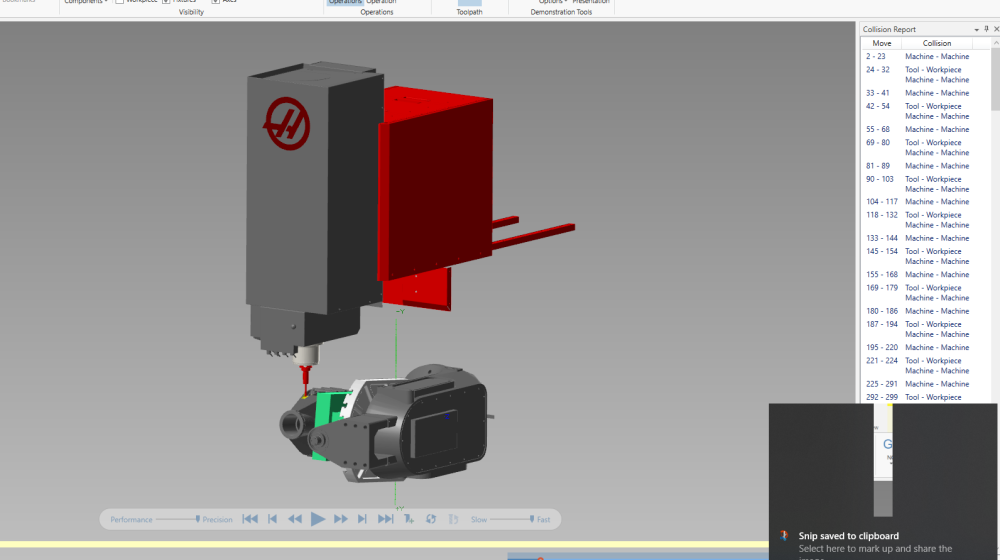
Anyone else have any issues with this? UMC 750 machine simulator on 2021 shows constant machine/machine collision on the sheet metal. Also shows constant tool/workpiece collision on optirough cutter paths. See screenshot. If I open this file in 2022 and run the simulator it seems to better. That's a pain though...figure this should work just fine in 21.
-
In the "Surface Parameters" page of the Flowline operation you can click on and then use the "Direction" menu to control lead-in and lead-out so you aren't starting on top of the stock.
-
Local disk > users > public > public documents > shared mastercam 2021 (or whichever version you're using) > common > reports > sst Copy the files I posted into that folder. To access the setup sheet, right click in your toolpath manager and select "setup sheet" option. In the lowest box there is an option for "report templates", make sure that "setup sheet (mill)" is selected.