Corey Hampshire
-
Posts
215 -
Joined
-
Last visited
Content Type
Profiles
Forums
Downloads
Store
eMastercam Wiki
Blogs
Gallery
Events
Everything posted by Corey Hampshire
-
Surface extensions with Waterline
Corey Hampshire replied to Corey Hampshire's topic in Industrial Forum
Thanks for the help! -
Is there a way to get the tool path in Op 1 to extend straight off the surface like I have it set to do in Op 2? I have played with linking and cannot get what I want. I want a tangent extension along the surface, I'm not really looking for an arc lead out. I am thinking more along the lines of "Extend/Trim" that we use in Unified. I want to use waterline for the obvious reasons of different leave amounts, minimum retracts, holder collisions, and all the goodies the newer tool paths have. Test.mcam
-
How many machines do you program for?
Corey Hampshire replied to Oakprogrammer's topic in Industrial Forum
On a consistent basis, I personally support 5 horizontals, 2 lathes, 1 mill turn, 4-4 axis vertical mills, 5-3 axis vertical mills. There is something like 45 machines in here with controllers on them and I have pretty well poked the buttons on them all at one point or another. There are 4 of us programmers here and we split the work into cells, so each person has there own area they support. All different controllers too, Fanuc, Mazak, Siemens, Heidenhain, Makino, Haas and Landis (grinders). It's one of the things that keeps this job fun, is it's always different day to day. Someone always has a problem to solve. -
Mastercam suddenly not opening SLDPRT files
Corey Hampshire replied to Sigurd's topic in Industrial Forum
Can you share a link to the article that helped solve it? I have been having an issue in 2023 sometimes, but can open the same solid in 2024 without issue. -
I used HSM Advisor yesterday on a project I am working on. I have a 25mm 4 flute Sandvik indexable screwed onto a heavy metal shank that I am using to side mill the cheeks on a crankshaft with. Normally I would run it at .004 a tooth and 475ish sfm. That is where I started at. It worked out to be 40 IPM and 1900 RPM. This particular crank is a 6 cylinder so I had 6 pins to play on. HSM Advisor suggested 76 IPM and 2100 RPM. I took the advice offered here and started at my normal speed and feed and adjusted up each pin. I ended up at 72 IPM and 2100 RPM. The only reason I didn't get to 76 like HSM Advisor suggested was that I ran out of pins. I will try it on the next crank. Of course surface finish suffered as I increased feed rate, as expected, but for what I am doing, it doesn't matter on this op. I was able to take a solid 4 mins of cycle time out, which will work out to over 24 mins a crank from my baseline. Time is money as we all know. 24 mins times 30 cranks and HSM is priceless. This is just one op. It has paid for itself already and stuck money back into the companies pocket. This has really got me thinking about my approach to, well, everything. There are other projects that I want to go back and re-apply this on now. I have a dynamic milling project I am probably going to do today or tomorrow in a horizontal cat 45 mill so I will get the chance to play more on HSM Advisor then. Thank you guys for the info, feed back and help. This place is awesome and I read here everyday. I always seem to pick up something new and it makes me think daily.
-
Thanks all for the feed back. It looks like I have some experimenting to do. This will be fun and educational I'm sure.
-
Let me start with this statement, I have very little Dynamic Milling experience under my belt. The types of parts we have here at work, there is limited opportunity to apply this method. When I see the chance I try and use it and have been successful for the most part. Then I see you guys recommending HSM Advisor and my mind went into chaos. My methodology for finding feeds and speeds has always been, go with the manufacture's recommendation as a start. Lets say 4340 steel, 1.375 depth of cut is required. Cat 50 Mori mill. Mill chuck, thru air, hydraulic part clamping. I am going to use a 3/4" 7 flute endmill with an ALCRN Base and 38° helix endmill from Garr. https://www.garrtool.com/product-details/?EDP=64186 I pull up their website and it says .003 a tooth and I know from my experience with this material 450 sfm is a pretty good spot for tool life and performance. I set the stepover % to 8%. https://www.garrtool.com/doc/pdf/tech/TECH_VX7_f.pdf I then use Mastercam and let it calculate it out for me and run with the speeds and feeds it comes up with when checking the RCTF check box. Matercam comes out with 88.7 IPM and 2292 Rpm. I hit post and go on with my next project. Then yesterday I downloaded HSM Advisor and was exploring that software. When you guys recommend it, I tend to listen. HSM Advisor mirrors Mastercam's speeds and feeds initially. Then I click on the HSM Checkbox and my head explodes. I can't wrap my head around 4226 rpm and 172.7 ipm. Why the RPM increase? Is this to get the heat out and get the temp into the proper range for the coating? Of course with the RPM increase, the chip load lightens, so we can feed it harder also. Am i living life wrong? Should I be spinning my tools faster and running my feeds higher? I know this is a calculator and everything we do is a variable, so it's not plug and play. That said, MRR is way higher than what I came up with in Mastercam and off Garr's website. Am I missing the boat?
-
Using ribbon hotkeys makes MC sluggish
Corey Hampshire replied to cbarton's topic in Industrial Forum
When things start getting laggy I will either restart the program or go to File/Repair File. Most times running repair file will make it happy again. I believe it used to be called Ram Saver for the record. -
I believe @JoshC has tried AMD Processors. He may be able to shed some light on it if he can chime in.
-
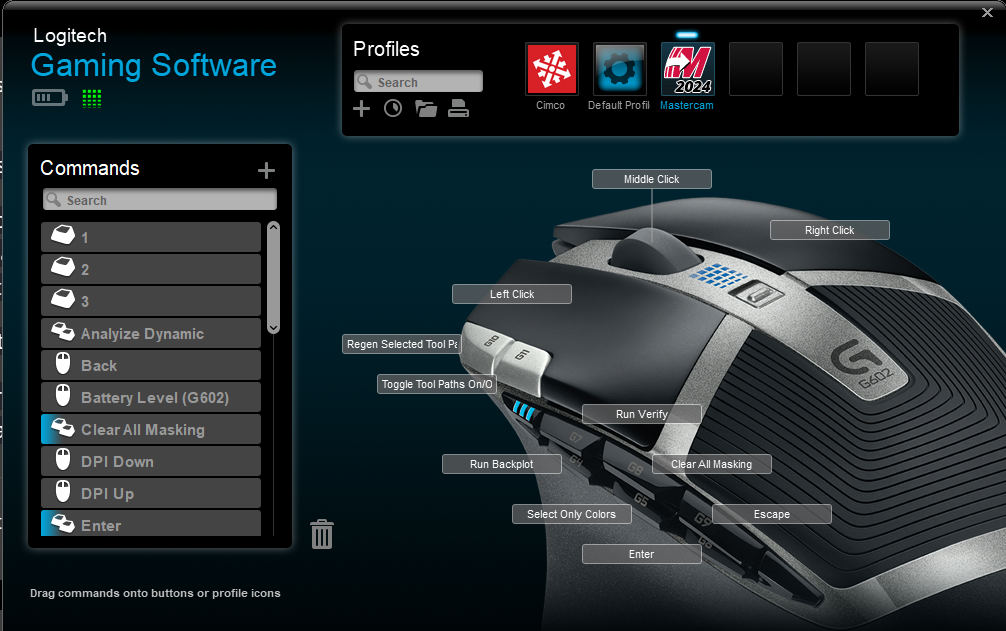
Yes, I have the 602 at work and the 604 at home. Same thing, just the 604 is the latest and greatest. You take my mouse away and I'm back to being a newbie. It's amazing what you get used to and the muscle memory you acquire.
-
Here is what I have mine set up like. Enter and Escape has been amazing. Someone on here suggested that and I tried it and fell in love with it. I also like toggle tool paths on and off and regen.

-
Thanks Aaron, and #Rekd. That's the info I was after.
-
Any feedback on how much performance difference there is between the same generations of i7 and i9? I run i7's and was curious as to how much is gained going to an i9.
-
A source for 60° head torx screws
Corey Hampshire replied to So not a Guru's topic in Industrial Forum
Very good points Ron. I have started swapping screws on our feed mills as well. I feel they stretch and fail eventually. Screws are cheap. Another point, I think is over looked is using a torque wrench. I buy a lot of them from Sloky. They are a clutch style, so it feels like you are really bearing down on it, and the screw stops turning. https://www.slokyusa.com/ I had a part last week where we were getting insert failure at 1 and 1/4 parts. Swapped holders to make sure we had adequate thru air to limit the heat ( was sub par in my opinion before) and also bought them torque wrenches. Now we go 7 parts and index the inserts instead of trashing a cutter. -
I run a Logitech G602 and a G604 (new version of the G602). The G604 you can switch between clicky center scroll or free wheel. I find I like the clicky scroll. The programmable buttons on the side are amazing for me and the work I do. Of course, the left hand runs the SpaceMouse Pro. https://www.amazon.com/Logitech-LIGHTSPEED-programmable-connectivity-hyper-fast/dp/B07QN369XX?th=1
-
I don't believe that for a second, Josh. You would never hit anyone, you don't have a mean bone in your body. You, most likely, showed them a better way and why.
-
Carry over settings from Inch config to MM config
Corey Hampshire replied to Corey Hampshire's topic in Industrial Forum
Thanks Ron. That's a really good way around it. I think I will do that. -
Carry over settings from Inch config to MM config
Corey Hampshire posted a topic in Industrial Forum
Hi All, I was working on a Metric part the other day, which was actually a first for me. In the process I changed my config to the MM version. I noticed none of my settings as far as look (glow stippling, clear colors, etc.) carried over and they we pretty much factory default. Is there a way to easily carry over what I have setup on my Inch config to the MM equivalent? -
Aaron, Thanks for taking the time and explaining this so well. Especially on a Saturday. I don't know why I chose parallel for a tool path. You're spot on, I should have used project. I guess, in my head I knew I wanted it to make a Parallel tool path to the wall. Also, great tips on the offset side and setting it .0001. Offset in feed control zones just slows the feed rate down before it comes in contact to the surface, correct? In other words, if I put .050 in there, .050 before the endmill gets to the ears it will slow down the feed to 25 IPM? I worked some more on the contour tool path and using tool path editor. I really want to learn how to use it, as there are times when I can't Mastercam to give me what I want and settle for it instead of fighting city hall. I figure I just need to use it to learn it, so I gave it a shot. I attached what I came up with. I took the circle and broke it at the intersections of the ears. I then modified the feeds to slow down in that area to 25 IPM. I know it's the same thing as feed control zones, I'm just trying to learn. Putting in the sweat equity. If someone wants to look at tool path 3, this is where I played with tool path editor. I'm open to feedback as always. Test 2 (1).mcam
-
I am working on a little test part to try and learn how to better manipulate the tool paths to get it to do what I want it to do. I am hopeful that someone will take the time to show me some tricks to accomplish this. I want to just do a simple contour around the round boss. That's easy. I have that handled in op 1. I want the tool path to speed up and run at a higher feed rate when the cutter isn't fully engaged. How can I make contour (or another tool path) accomplish this? Where the ears are at, I want 25 IPM and where the endmill is about 40% engaged, around the boss, I want 50 IPM. Could someone take some time and show me how they would do this? I know about tool path editor, but I have never really used it. I was screwing around with it, and was able to save my toolpath geometry to a level, turn off computer comp and then things started getting funky. If you drive off the tool path geometry, every time you would want to change a leave amount, you have to start the process over again? You basically draw exactly what you want the tool to do and shut off compensation, correct? I decided to throw a multi axis tool path to it and play with parallel locked to 3 axis. I thought I could use feed control zones to change the feed rates but never made it that far. I had some minor success, but I notice it wants to drive the center of my cutter to into my boss. I'm not sure how to get around that. How do I offset the tool to stay on the outside of the boss and use it like you would use contour? Also, as it goes around the boss, it sure would be nice to change the start point of that path so that the tool doesn't try and retract, or put a weird linking move in. How can I manipulate this? Sorry for the rambles, I hope someone can digest them. Thanks for the help! Test 2.mcam
-
Do I meet the minimum at 37?
-
Following this topic because I was literally talking with my co-workers about wanting to try these (Vardex makes similar items). I would like to try some and I have an application for them.
-
I have played with something similar once before. I used a C hook (Alt+C). I think it was ZSpiral that I used. You could set the z start and end at zero and get the result you want. I'm no expert in this though, just an idea.
-
I am today years old and just learned about the radial menu buttons on my space mouse. Thanks Aaron! Those could come in handy.
-
Is there a way to choose the location that the setup sheet is saved in? I would like to be able to save them in my part folders so that everything is together.