


Jespertech
-
Posts
119 -
Joined
-
Last visited
-
Days Won
1
Content Type
Profiles
Forums
Downloads
Store
eMastercam Wiki
Blogs
Gallery
Events
Everything posted by Jespertech
-
I was in the middle of typing this exact issue out when I noticed you had already solved it lol for some reason it had the plunge direction and the cutting direction flip flopped, definitely good to know going forward to check that out for any 3d tools. looks like we both learned something new today
-
any chance you can post the file? I would just need the 3D tool and groove profile to mess around and see if there's a way around it.
-
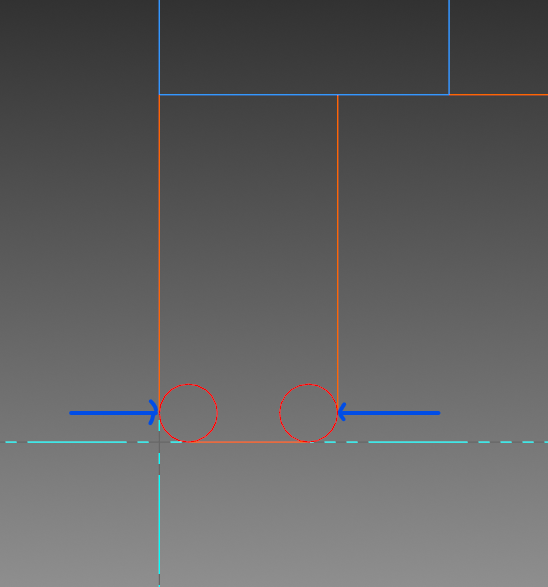
I'm not sure if this will work the same for a 3D tool but if you go to edit tool and then select draw tool make sure that both edges display the available cutting edge definition (the red circles on front and back edge of tool) . It could be an issue where it only recognizes the front edge so it will drive the path off of that and just compensate for the width of the tool.
-
I'd check the parameters in the grooving cycle page and make sure "extend groove to stock" is set to parallel to groove walls and not tangent. If that's not the problem you could always play around with the adjust start/end of contour tabs.

-
I believe I just selected the center point of my rotary. I should have made a separate level with an actual created pt for reference though. I can see how not having that information isn't very helpful... I also deleted pretty much everything (levels , fixtures etc) out of the file in hopes to be able to post it, but I had to create a zip file anyways because it was still too large. So that too is why the point is nowhere to be found.
-
yea, that can be tricky. You can try to recreate just the feature in question and post that.
-
This is a part that I cherry picked from another topic on this forum last week. I just completed my multi-Axis class at MacDac (my local reseller) and have been trying to get as much experience as possible with different parts and toolpaths. You have to remember that there are "99 ways to skin a cat" and this is just one possible approach. Different toolpaths will produce varying results depending on the machine and setup. But I'd recommend digging deep through Emastercam and reading all of the posts that relate to multi axis finishing etc. It has been by far the most helpful resource in my programming apprenticeship. BALL TP.ZIP
-
it's a beautiful thing!
-
I've been meaning to give wolverines a go. I always say I'm going to try out different boots but then end up going with the same old Keens. Before them were Irish setters and before those were timberland pros. I guess it wouldn't be fair to claim a favorite without having tried them all though.
-

vise orientation and bounding box edit
Jespertech replied to sendithard's topic in Educational Forum
Dynamic transform has saved me so much time over the years. Before I began utilizing it I was stuck manipulating my parts with 3 to 4 different functions (translate to plane, rotate, move to origin, etc.) The fact that it incorporates all of these features in one makes for one powerful tool. -
vise orientation and bounding box edit
Jespertech replied to sendithard's topic in Educational Forum
Wow,I had no idea that was an option. I’m literally about to drive back to work to play with this feature. Thank you. -
vise orientation and bounding box edit
Jespertech replied to sendithard's topic in Educational Forum
In some instances you can use the "vector from/to" within the translate function. This will allow you to grab the corner of your stock and then the point where you want to move it to. It's a quick solution for simple alignments. vector fromto_Trim.mp4 -
GOTCHYA! Happy Holidays everyone, Thanks for all the help and advice throughout the year.. Cheers
-
Is it possible for you to share your file? that would be the best way to get to the bottom of this problem.
-
Suggest me a book that is about Self development.
Jespertech replied to imran98k's topic in Educational Forum
So I recently purchased this book directly from Moore tool and I cant thank you enough for recommending it to me on a similar post a while back. Its as if its itching a scratch that I've been reaching at for years. I'm not even half way through it and have been able to reference it in regards to helping others at work on multiple occasions. As someone that started their career doing everything "the old school way" (manual lathe / mill) I think it should be a prerequisite read for those entering the trade today. -
Dynamic tool path for face grooving , how good is it
Jespertech replied to Socal_Tom's topic in Educational Forum
I would personally stick to the grooving cycle for face grooves. As Colin explained above the dynamic cycle works great with button inserts and I have had lots of success with OD Rgh profiling. But when it comes to the Face groove I try to keep my cutting force engaged Axially to prevent deflection and chatter. Plus you can really be as aggressive as you want because its seating the insert as its cutting. Where as the dynamic can overload on side pressure and blow out the insert or bend the tang of your tool. which can get pricey$$$ -
Can you provide a print?
-
Wow, I definitely underestimated how much I could learn from that particular thread. I think this will be what I need to keep moving forward. Thank you, I'll hopefully have a finished model to post here soon.
-
After about 4 solid hours of giving it everything my primitive mind has to offer I'm waving the white flag. Usually a model would be provided with which I could reverse engineer and figure out how to go about creating this. But of course, this time around there is no model. This is my first attempt at creating a solid with this type of feature and I don't feel too confident with my approach. I've included my MCAM file and 3 cropped images ( ) that pertain all the available info I have.. If any of you solid/surface wizards are up for a challenge and can enlighten me on how to go about this It would be much appreciated. sincerely, Man trying to get some sleep tonight and not obsess over not being able to do this! ADAPTER SHAFT.mcam
-
Thank you for the input. The majority of my files are kept on the network server so I don't have to worry about that bogging me down. They are PCle M.2 NVMe class 35 SSdrives. I don't really have any issues given the type of work I do and my current laptop runs circles around the company provided unit (glorified toaster oven) I was using. I'm just finding that as I become more involved with MCAM I'm also trying to become more involved with the IT side of things as well.
-
In an attempt to optimize performance on my laptop I was wondering if I should download MCAM to a separate SSD from my operating system. Is this common practice, or does it cause more harm then good in the long run? I'm currently using an Alienware area 51M with I9 processor, NVidia RTX2070 8GB, 32gb DDR4 RAM, 2 256GB SSD , 1TB SSHD, The plan is to have my OS on one SSD and MCAM on the other SSD. Then use the 1TB hybrid drive for random downloads etc. I figured id check in here first before finding out the hard way that this is just a can of worms not worth the time.
-
Whelp, looks like I've got myself some homework for the weekend.
-
I was able to get it to stick to that end point once I changed the WCS ,C , T plane from "3rd position" to "TOP". But I don't know why that would make a difference in this situation.
-
When using stock models I'll just create a separate group with the specific title for the model i.e. "OPTI RGH STOCK".. That tends to help in isolating it for me.
-
This was the "aha!" moment I needed, thanks for taking the time to add that. I've used the solid from surface feature before but failed to modify it with "thicken" so I never saw much purpose. But that just eliminated all the extra steps I was hoping to avoid. This is gunna save me a lot of time with future projects.


