peon
-
Posts
1,039 -
Joined
-
Last visited
Content Type
Profiles
Forums
Downloads
Store
eMastercam Wiki
Blogs
Gallery
Events
Everything posted by peon
-
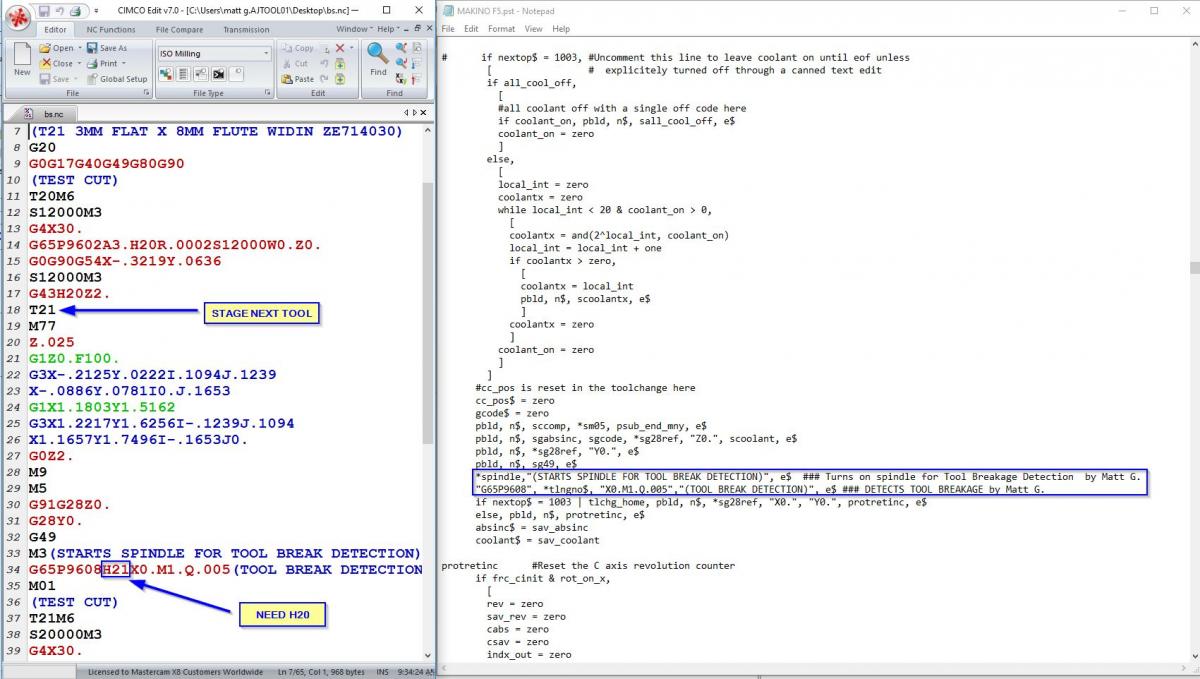
I got it!!! Thanks to Ron Branch along with Bsmith and Ben Wood from the Mastercam forum leading me in the correct direction. I added the following to my post: Section = # Common User-defined Variable Initializations (not switches!)sav_toollogic: 0 #Save tool height offset value for Blum Tool Break Detection Section = # Toolchange / NC output Variable Formats fmt "H" 4 sav_toollogic #Saved tool height offset value for Blum Tool Break Detection Section = psof$ #Start of file for non-zero tool number sav_toollogic = tlngno$ #Added for Blum Tool Break Detection Section = ptlchg$ #Tool change sav_toollogic = tlngno$ #Added for Blum Tool Break Detection Section = pretract #End of tool path, toolchange"G65P9608", sav_toollogic, "X0.M1.Q.01","(TOOL BREAK DETECTION)", e$ ### DETECTS TOOL BREAKAGE
-
Please see attached pic. I finally decided to add "Tool Breakage Detection" to the post, although the H value is posting incorrectly with multiple tools in the program. I turned off tool staging in the control definition and it made no difference, therefore I turned the tool staging back on. Perhaps someone can lead me in the right direction
-
I installed the new download (06/09/2016) and the cycle times generated correctly.
-
Thank you for checking this out Gunther
-
Gcode, that was my 1st thought, but all the numbers in "Stepdown", "Stepover", "Tl diam." etc are all in inches correctly on the setup sheet.
-
Yep, see the difference in the screen shot below.
-
I noticed the cycle times are way off in the 2017 PC1 release of 2017. Do I need to change something to correct these cycle times? Perhaps something in the Window's regional settings?
-
Thanks much Gunther! The gentlemen at our facility love these setup sheets. Such an easy useful utility!
-
I apologize. I made a nasty comment about Monster Mills when the product I was describing were Gorrilla Mills. I overwrote this post.
-
I couldn't watch your video. Told me I had to sign in. But here is a screenshot of the procedure that works for me in X9.
-
I noticed on all the workstations WITHOUT Microsoft Excel, generate the setup sheet fine EXCEPT for the screenshot. The screenshot is not reduced in size and therefore displays a zoomed depiction of the part. On all our workstations WITH Microsoft Excel, the setup sheet works perfectly fine. I checked the .png files and they match the setup sheet.
-
Mad, you are zoomed too close. You must zoom out and then grab the handle.
-
Keep in mind, with the small molds we build, we are ALWAYS using small cutters below 1/4", therefore running at 10,000 rpm all day. After a few hours at that speed, the spindle would grow in the Z .003" on all three machines. If you had an overnight run, you were screwed. Machining moldbases with larger cutters and slower spindle speeds were fine.
-
I used to operate three Yama-Seiki's which were purchased brand new with the Fanuc 18i controller. The machine is garbage. STAY AWAY!! After several spindles, loose gibs from the factory and thermal comp issues in the spindle Z axis on ALL 3 machines, you'll have more headaches than you need. As far as the 32M which you inquired, I'm sorry I haven't had any experience with that particular controller. We also build tools for the plastic mold industry.
-
It hasn't worked for a long time Rick. What you have to do is enter any other percentage, tab, and then enter your desired percentage and then tab. It should calculate correctly the second time around. I don't know why it hasn't been fixed.
-
CNC has to put this good man on the payroll. He continues to impress most of us with his ingenuity. The new tool manager and active report features are over engineered GARBAGE compared to Gunther's sweet chooks that work wonderful for the majority of users. Please notice I said "compared". Thank you much Gunther!!! You make most of our working lives happier!
-
I can't hate on that individual. He's prolly doing what he's told with an AK-47 at his head. But I'm NOT willing to help him either.
-
Jack in the Box?! Sweet! No such place in these parts
-
Is this the sticky booger that can't be flicked?
-
See the pic
-
- In the assembly file, blank all parts except the part you wish to step out - Save a copy and in the "Export STEP" pop-up window, select the black arrow in the "Coordinate System" section and then select the main csys.
-
Thanks much for the update Aaron. I threw many situations at Daryl's program on Friday and got the same slow results. I'll tweak the precision factor as I also had it set to 2 and see what happens.
-
I used that free software to reduce the .stl file sizes. It was very useful when using the old verify in X6 and previous versions.
-
oneyankfan1, You're an idiot!
-
+1000 Don't worry gcode, most of us still love ya man.