Search the Community
Showing results for tags 'X7'.
-
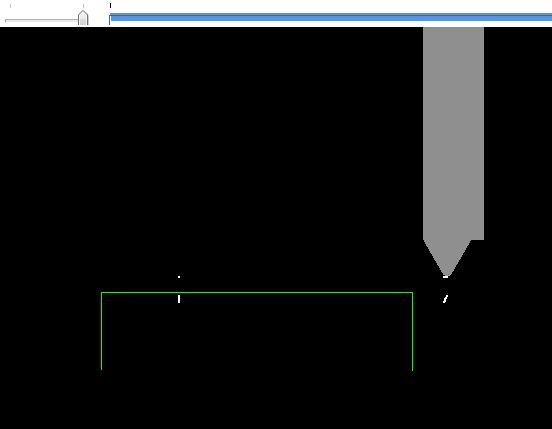
Hi all, Please see my attached picture. Its seems that my cutter will ride the edge of the cavity, which i wouldn't want to happen. Any suggestions? I always have a hard time with Lollipop Endmills and blends. What i have done in the pass is extrude the top face up 0.002" and then add the the surfaces created to the Drive surfaces and avoids what is happening here. But for some reason when i tried doing it now, on this program, it gives me a wacky toolpath.
-
I am new to the surface machining and not sure if i have this part setup right or if i am doing the type of operation. I have attached Pictures of my Mastercam file showing all of the settings along with the result of the actual machining. I have also attached parasolids of the part after the roughing operations (just linear toolpaths, worked great) and after the final machining. The starting stock size is a 3/8" thick plate 6 1/2" x 10 1/2". The actual mastercam file is too large for me to add it to the post. Any help in figuring out how to prevent the goughes would be greatly apprecated. If anyone needs more information please let me know. Mastercam & Pics.pdf Part.zip
-
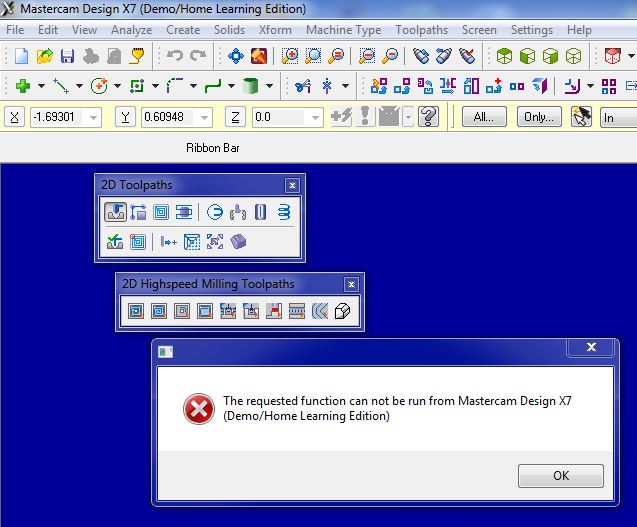
Hi all, I am using the book 'Learning Mastercam X7 Mill 2d Step By Step', which includes a 'Mastercam Design X7 Demo/Home Learning Edition' CD. Everything was going fine until I start learning toolpaths in Chapter 5. When I click any button in the ‘2D Toolpaths’ or ‘2D Highspeed Milling Toolpaths’ toolbars it says, ‘requested function can not be run from Mastercam Design X7 Demo/Home’. So, I can't use the demo software from Chapter 5 onwards, i.e., about two thirds of the book. Anybody know a solution for this? Can I upgrade this software, or do I need to buy another version? Thank you.
-
I am having an issue wit X7 verify. on some parts I save my stock from running the verify so I can use it on my next operation to verify. I have had no issues until just a few weeks ago and now every time I try and use the exported stl stock file it tells me one or more issues has occurred. any ideas?
-

Surface Finish Blend stay toolpath x7
DBronson posted a topic in Machining, Tools, Cutting & Probing
Subject should be " Surface Finish Blend stray toolpath x7" Hi, Surface Finish Blend is one of my favorite toolpaths. I feel I understand it well, but sometimes these stray wall climbing paths form. They don't actually touch the surface but are out in space. Takes me a lot of tweaking to get rid of them sometimes. I start with simple setting; .002 or .005 Total Tolerance/ .01 Step, Zig zag, Gap is 800 and No Arc Filtering on a 3/8 Ball milling .270 typ fillets. Anyone have an answer to this? Thank you -
Hi, Attached is an image showing the issue. I am currently using Mastercam X7 MU2. When I use the backplot, the display only shows the endpoints and not the yellow path lines. This only happens with the threading tools (internal and external) and does not appear to be a problem when trying it on Mastercam X2. Has anyone seen this? I have tried updating the graphics driver and reinstalling Mastercam but the issue still appears. Thanks,

-
 Has any one notice any peculiar behavior when X7 is open too long? When it starts to go buggy, you import a an entire toolpath group from another file or from a group of ops, the 'tool' parameter page is empty. AND all the tools imported in got add to the first MAch/Tool group and gave random numbers to the tools listed. So say 'tool 3' was 1/2" em, when I went back in there were drills and different end mills that were also tool 3' that I imported into the different toolpath groups Same result if you add tools to a toolpath group the imported ones don't show up. they post and you can renumber the tools, but you CAN NOT edit them I showed In-House this but no solution was found. once I closed MC and restarted it was fine. We cleared the Temp in hopes that that may help..... This time I got lucky and I closed with out saving and it must have erred after my last save, the two times before I had to redo all the affect toolgroups. If anyone has seen this and know of a setting or something to stop the problem from happening. please let me know. Thanks in advance Rick
 -
 I am trying to use a Chook to create a .NCI file for an existing operation in the Operations Manager. I am currently using the nci_manager function (defined in AssocHok_CH.h) with mode NCIMGR_POST_ONE. This is successfully creating a .NCI file for the operation, however the file is NOT identical to the .NCI file that is generated if I were to manually post the selected operation using the UI. The main difference is the CHook version is not using GCode 1000 (null tool change) between seperate passes in the toolpath. It is instead using GCode 1002, and reposting the same tool definition (GCode 20001 - 20009) over and over again for every new pass. I am trying to figure out how to get the CHook version to match the .NCI file that is produced manually. The only hint I found on how to use mode NCIMGR_POST_ONE is the comment: //create ascii nci for 1 operation - call post per cfg settings. I then ran the function GetCurrentCfgFilename() to find where the cfg file was located, and made sure that the Mill Post Processor file (.pst) defined there matched the active post Mastercam was using when manually outputting the .NCI file. Still had the same tooling GCode mismatch. Finally, I decided to remove all .pst files from my C-Drive to see what happens. I could no longer create the .NCI file using the Operations Manager because the active post no longer existed, BUT I could still run my CHook version and post the selected operation just like before. That seems to indicate that the CHook version was not actually using the post processor defined in the cfg file (because I removed it from my C-Drive), but I have no idea where to take it from here. Any advice on this would help out a lot. Thanks!
 -
hello, I am trying to machine this part but I am having trouble. The tool is cutting way too much material because the depth of cut is not set properly. How do I set the depth of cuts? Thank you 5FINAL.MCX-7
-
Version v1.2
This is an electronic only purchase downloadable in PDF format Published by In-House Solutions Using the Quick Fix Fixture (available through Tru Education), students can machine unique designs on round pieces of plastic, aluminum or brass to make medals, coins, poker chips or whatever their imagination leads them to. This is a Mastercam X7 Single Project. The Single Project series offers a wide variety of engaging projects that can be purchased à-la-carte in eBook (PDF) format. These projects range in difficulty but are generally targeting beginner-intermediate Mastercam students. Each of these projects can be machined, and some include instructions for doing so, using Techno machines as an example. Difficulty: This project requires Mastercam Mill or Router and the Rast2vec C-Hook (which is included in an educational or industrial license but not supported by the HLE).From $15 -
Me and my fellow co-worker have downloaded X+ in order to get better set-up sheets. We would like to use the excel option as the out-put but are clueless at how to modify it. Any help would be appreciated.
-
.thumb.gif.b2f8d84f284177ecd2bf348424895690.gif) Hi Guy's Sadly I cant use Tools #'s sequentially I have to run through the Machines tool magazines and see what's available. So my MC Tool #'s right out of the gate are Whacked out . When I finally change them before I post The look great in MC and don't show up in the posted Code !?! Even 1 solo operation and a solo 2D toolpath. Am I doing something wrong? Thanks ! Tony
Hi Guy's Sadly I cant use Tools #'s sequentially I have to run through the Machines tool magazines and see what's available. So my MC Tool #'s right out of the gate are Whacked out . When I finally change them before I post The look great in MC and don't show up in the posted Code !?! Even 1 solo operation and a solo 2D toolpath. Am I doing something wrong? Thanks ! Tony -
I havent been able to figure this out, I am able to simulate everything on my parts except my threadmill paths, I have created all of the threadmills in the tool manager, but when I simulate the paths I get an error, I have attached a screen shot.

-
 Are there different types of "selected" states for entities? I ask because, other than using "SelectionManager.SelectAllGeometry()", which highlights the selected Geometry like manual selection, any other type of selection thru code does not highlight the entities. It seems that only the highlighted entities will get erased by hitting the "delete" key. Selecting entities thru code, and verifying that they are selected, will not be erased when hitting the 'delete' key. And it is also the same for code requiring preselected geometry. Im bringing this up because I need to preselect geometry thru code. Manually selecting beforehand, or using "SelectAllGeometry", works. Ive tried 'SelectAllGeometryOnLevel', and SearchManager.GetGeometry. Ive then run a loop to debug.writeline geometry.selected, and it comes back TRUE. I can also rerun the loop and use Geometry.selected=False, and debug,writeline tells me the geometry is not selected. Im trying to translate, and scale, a large amount of entities. The .net version is prohibitively slow, and Ive found that outputting some on-the-fly vbs works well. However, it only works on geometry that is preselected manually, or preselected using SelectAllGeometry, which highlights the geometry. The selection thru VBS "Chaining" fails the same way .... I either have to manually preselect, or use "SelectAll" Is there another way ?
 -
Version v1.3
This tutorial includes a variety of projects that are using Nesting options in Mastercam to fit parts onto a sheet of material for best yield. You will learn how Nesting operates on geometry and how you can create and use tabs to assist in holding down the nested parts. You will also learn how Nesting operates on toolpaths and how you can use WCS (Work Coordinate System) to set the parts of an assembly in the proper view for machining.From $20 -
When I rotate the view during verification, the cuts disappear while the tool keeps moving. See the attached video for a better idea of what I'm talking about. I used to be able to look around uninterrupted in previous versions. I'm glad I can finally stop reconfiguring the verify colors whenever Mastercam needs to be restarted, but it is incredibly annoying to have to pause and resume the simulation whenever I want to rotate the view without missing anything. Is anybody else having this issue? Any solutions? I poked around in MastercamSimulatorDefaults.xml, but nothing jumped out at me. X7_MU1_UVBS_ROTATE.zip
-
Version v1.2
This is an electronic only purchase downloadable in PDF format Published by In-House Solutions The guitar is a more advanced project that introduces solids geometry creation and machining. It teaches how to use an existing template and levels to create the guitar shape as a solid. 2D toolpaths are then used to machine the guitar. This is a Mastercam X7 Single Project. The Single Project series offers a wide variety of engaging projects that can be purchased à-la-carte in eBook (PDF) format. These projects range in difficulty but are generally targeting beginner-intermediate Mastercam students. Each of these projects can be machined, and some even include instructions for doing so, using Techno machines as an example. Difficulty: This project requires Mastercam Mill or Router.From $25 -
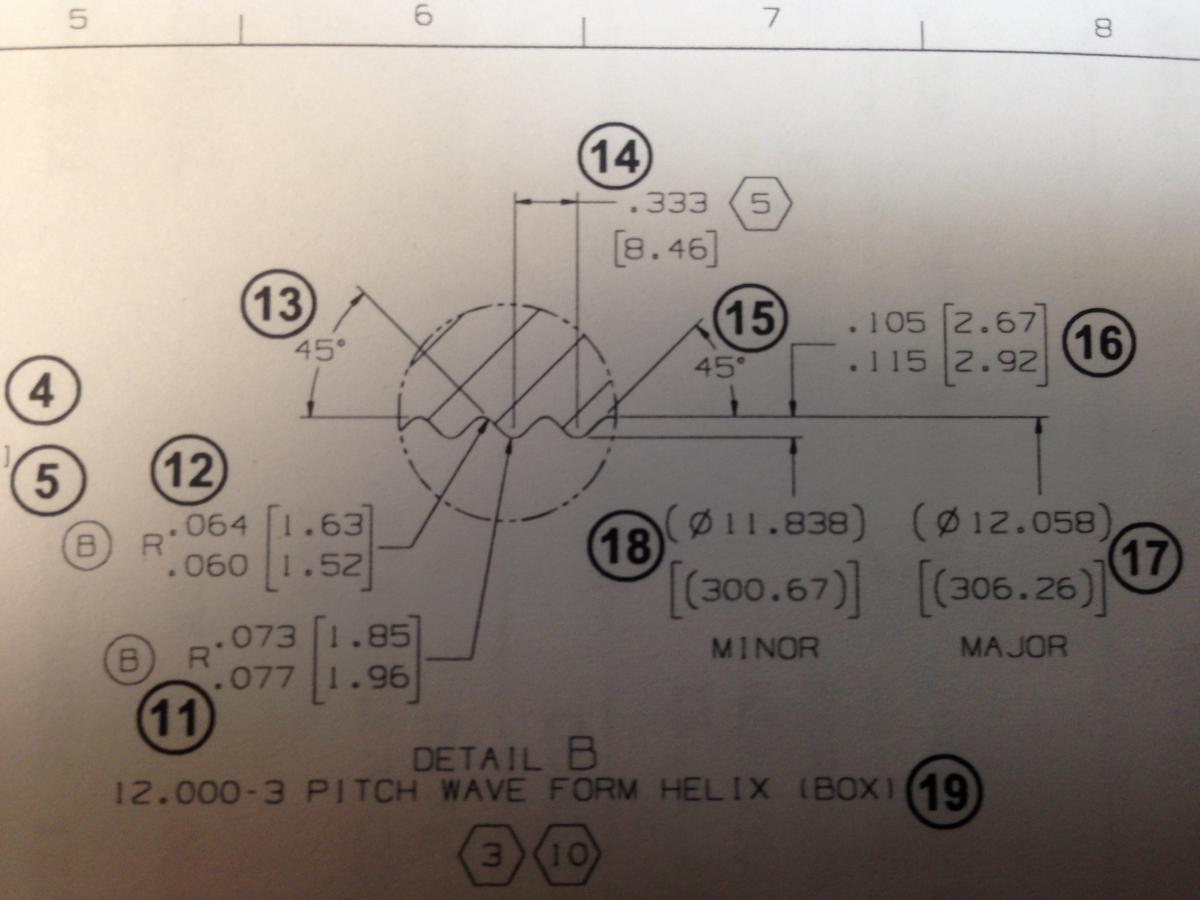
I'm cutting a custom wave form thread. the thread angle is 45 degress. I have had custom inserts ground for this but was curious on the set up of my operations manager as far as infeed angles and stuff goes since a G76 cycle does not have a 45 or 90 options. I imagine I will need to use a thread angle of 0. for a direct infeed but would just like some input
-
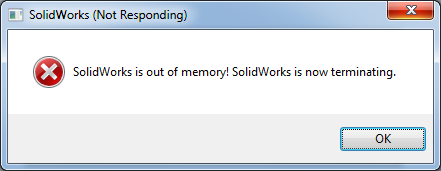
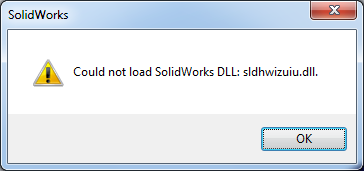
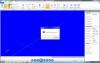
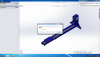
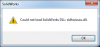
I am user support for my school district. The CAD/CAM teacher, who uses SolidWorks, recently purchased Mastercam for SolidWorks. He typically installs things himself and came to me with problems after installing Mastercam for SolidWorks. Mastercam is version x7. SolidWorks is the Education 2013 version, SP3 - 5, depending on which machines have been tinkered with. I will try to give as much background as possible on the setups and I can fill in where necessary. - Using Dell Precision T1650 workstations - Quard-core Xeon CPUs - Win7 32-bit w/4GB RAM - Win7 64-bit w/8GB RAM. (The difference is because 4 of his 15 machines are a year newer with better specs.) I will be honest, I have no idea how either software works and have never used them myself. I have only been trying to fix this from a troubleshooting/software standpoint. I'd be very happy for some help or direction. He installed SolidWorks 2013 Educational himself, on all workstations. Without the Mastercam plugin loaded, when he opens an assembly file from a mapped network drive (that the student computers ONLY Have read access to) he gets the "read-only" warning but proceeds anyway. After a few moments, the file opens and they can work. I assume they save changes to the local hard drive, or are only viewing and not changing for more of a "theory" approach. After he installed Mastercam on all workstations, and it is loaded at startup, he does the same process and gets the same screens...until the system tries to load the associated ".sldprt" files for the assembly. Then for almost each one you receive a warning dialog titled, "Database Setup Error," with the text, "Unable to open the master database due to the following database access error: Unspecified error." You can click OK to go on but will be prompted MANY more times, for almost every single file referenced. The part names being referenced at the bottom of the screen are pointing to locally installed parts that I have verified ARE present, in the "C:\SolidWorks Data\browser\Ansi Inch\..." folder structure. During this process, the SolidWorks Resources Monitor begins screaming that "SolidWorks" is running low on memory..." Sometimes the application will allow you to continue through all the warnings and the file will eventually complete loading. Other times it will crash SolidWorks alltogether. Still other times will yield different errors,. I have attached three screenshots of the various messages I get, and I don't always get them every time. It is not consistent. Now, with all of that said, I have ZERO problems opening the same exact file, from one of his 64-bit machines. SolidWorks does not scream at me, and no error messages. However, our 32-bit systems do meet the specs of Mastercam. The only difference I can think of is that on the 64-bit machines SolidWorks installed as the 64-bit version . I have done considerable troubleshooting on this issue and have found that GDI objects are not outrageously high, network and locally stored files get the same messages, and all the info related to the error messages I am seeing do not help me. GDI objects around just over 3,000 on BOTH 32 and 64-bit systems when both applications are loaded. If I turn off Mastercam, SolidWorks will open the same files just fine and not complain at all, not even the Resource Monitor. I am loosing what little hair I still have, and would appreciate ANY insight into this issue. I even went so far as to completely wipe a machine, build it with a fresh Win 7 Pro, latest updates, and still it pukes all over itself.

-
MasterCam X7 32-bit, VbExpress 2010, Is there a way to open files "quietly" using the nethook API? Im using the GetOpGroupDataInExternalFile to scan hundreds of existing files for specific Tool/Op data. I love this, its a LOT faster than loading thru the Interface. When I see a possible candidate, I have to open the file and scan thru it's operations to see if the remaining Op/Tool settings are what I was looking for. But if I open an X6 or older file, I get that series of Dialogs wanting me to upgrade the control file ("The control file being read is from a previous version of Mastercam") and the user has to, at the very least, close 6 dialog boxes before the Op data can be read, and that would be for every file opened thru the interface. Is there a work-around ? TIA
-
-

Version v1.2
This is an electronic only purchase downloadable in PDF format Published by In-House Solutions The lithophane project is a great way to introduce students to CNC milling with Mastercam Art. The tutorials guides you each step of the way; from geometry creation to the finished part. This is a Mastercam X7 Single Project. The Single Project series offers a wide variety of engaging projects that can be purchased à-la-carte in eBook (PDF) format. These projects range in difficulty but are generally targeting beginner-intermediate Mastercam students. Each of these projects can be machined, and some include instructions for doing so, using Techno machines as an example. Difficulty: This project requires Mastercam Mill or Router and the Mastercam Art Add-OnFrom $15 -
Version v1.2
This is an electronic only purchase downloadable in PDF format Published by In-House Solutions For this project, students will design a light switch plate and then create toolpaths to machine it on a CNC machine. Students will learn to use a number of 2D toolpaths including pocket, facing, contour and engraving. This is a Mastercam X7 Single Project. The Single Project series offers a wide variety of engaging projects that can be purchased à-la-carte in eBook (PDF) format. These projects range in difficulty but are generally targeting beginner-intermediate Mastercam students. Each of these projects can be machined, and some include instructions for doing so, using Techno machines as an example. Difficulty: This project requires Mastercam Mill or RouterFrom $15 -
Version v1.2
This is an electronic only purchase downloadable in PDF format Published by In-House Solutions This more challenging project details how to create a 3D wireframe drawing and machine it using both 2D and 3D toolpaths. This is a Mastercam X7 Single Project. The Single Project series offers a wide variety of engaging projects that can be purchased à-la-carte in eBook (PDF) format. These projects range in difficulty but are generally targeting beginner-intermediate Mastercam students. Each of these projects can be machined, and some include instructions for doing so, using Techno machines as an example. Difficulty: This project requires Mastercam Mill or RouterFrom $15 -
Version v1.2
This is an electronic only purchase downloadable in PDF format Published by In-House Solutions The lithophane project is a great way to introduce students to CNC milling with Mastercam Art. The tutorials guides you each step of the way; from geometry creation to the finished part. This is a Mastercam X7 Single Techno Project. The Single Project series offers a wide variety of engaging projects that can be purchased à-la-carte in eBook (PDF) format. These projects range in difficulty but are generally targeting beginner-intermediate Mastercam students. Each of these projects can be machined, and include instructions for doing so, using Techno machines as an example. Difficulty: This project requires Mastercam Mill or Router and the Mastercam Art Add-OnFrom $25