Search the Community
Showing results for tags 'lathe'.
-
 Hey! I am trying to define a turning operation in Mastercam using NETHOOK API. Currently, I am unable to access the tools for performing turning operation, as Mastercam supports only milling operations as default, but we want to work with lathe and millturn operations. All the tools are in the form of mill tools. Is there a method or class to refer and call turning ,roughing and finishing tools (lathe operations, millturn operations). The operations and tools list in Mastercam NETHOOK API are also milling operations. Is there a documentation to refer for turning or lathe operations?
 -
Example 1 mm of chamfer X50. Z1. G1 x52. Z-1. F. 1 A axis X50. G1 X52. A-135. F. 1 (WE NEED THIS TYPE OF POST) HELP ME FRIENDS THANK YOU❤
-
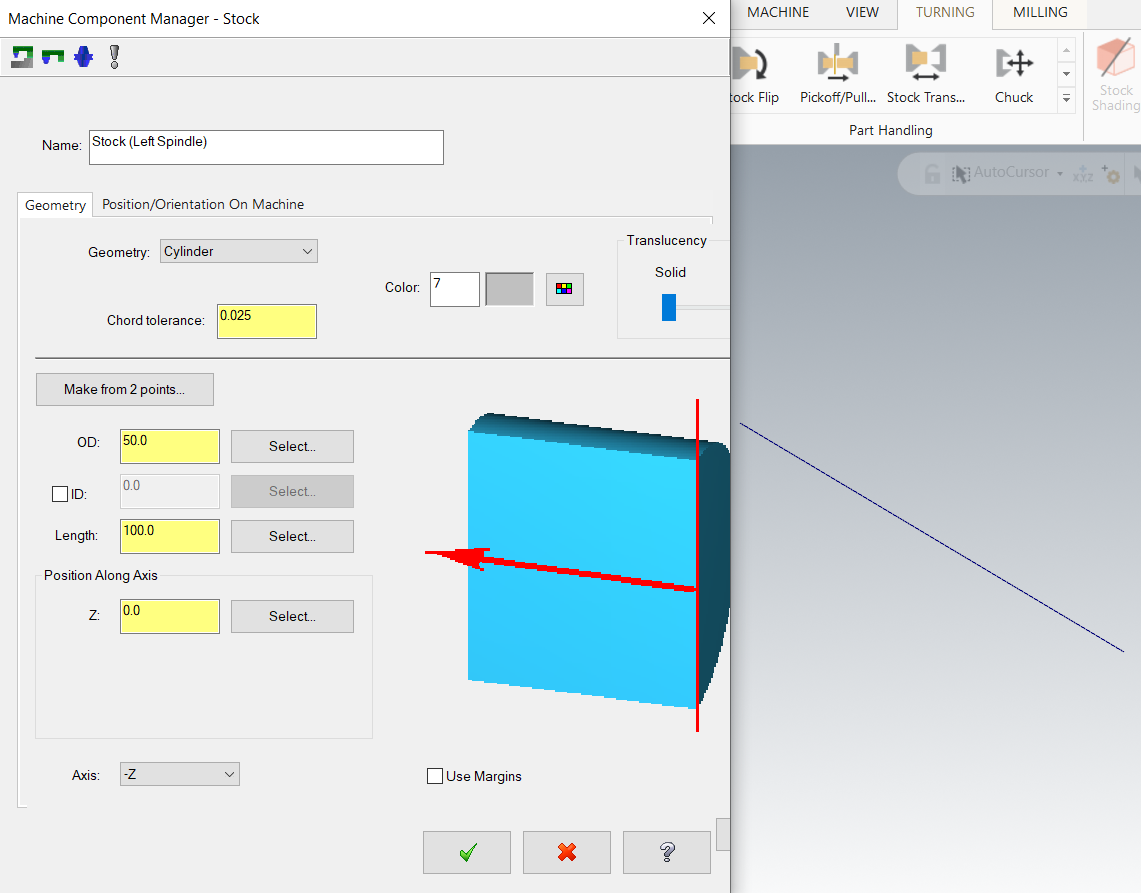
A little back story on this: currently, on every single lathe program we make, the first operation we do is either run a skim cut around .03 deep into whatever diameter stock we're using, and around 3 inches long. We then will program our steady rest to locate and clamp on this cleaned up area. The way I currently am doing this is manually drawing a line in wireframe at the desired depth into the stock and then using a rough toolpath chained to that line. Is there a way to create a toolpath that could easily be imported into a new program to accomplish this instead of having to manually do it for every program we do? The biggest issue is that the stocks are almost never the same diameter. I feel like there should be an easy way to accomplish this and I'm just missing something.
-
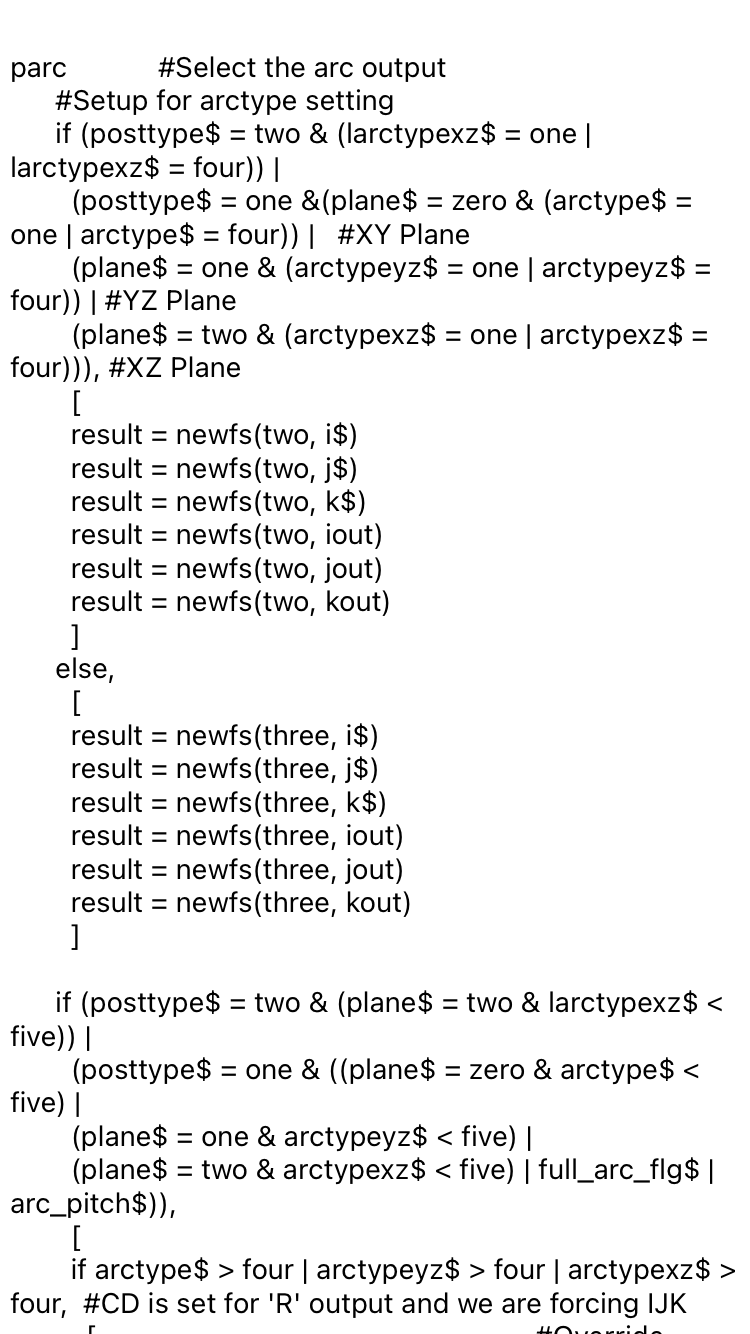
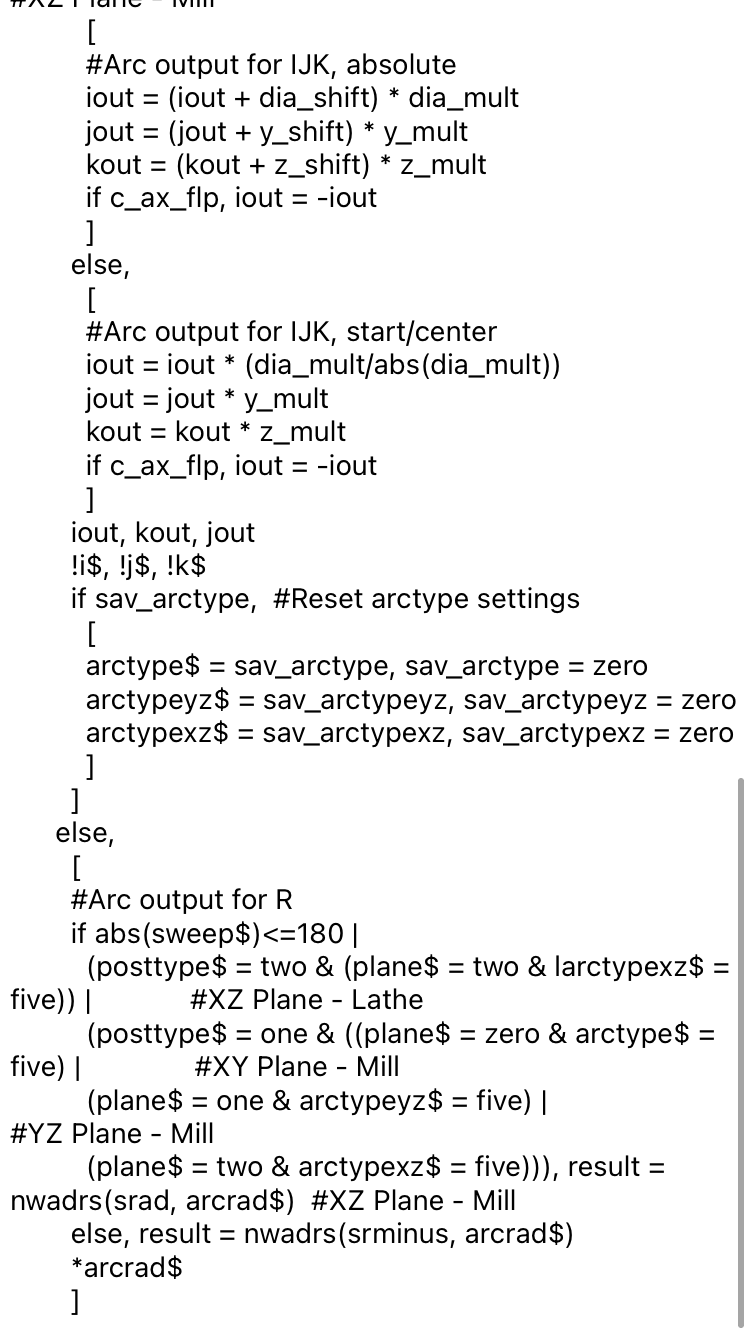
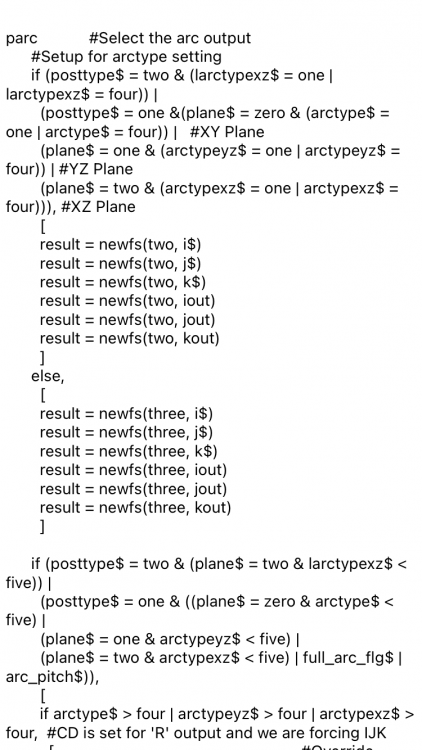
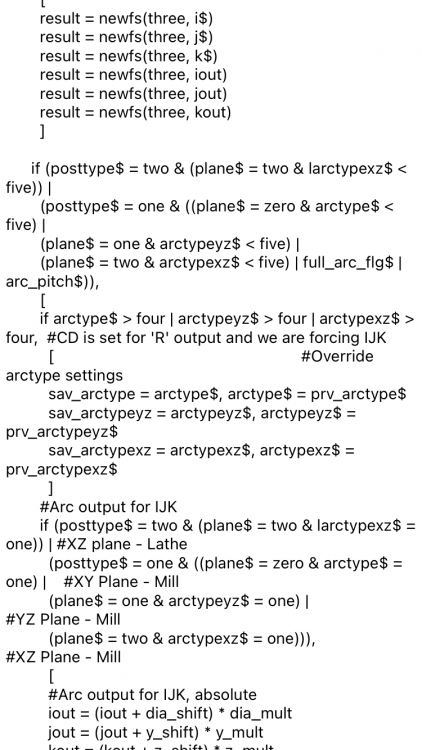
Hello. I don’t know if this is the right forum to ask for help, anyway I’ll post my question. I’m using Mastercam 2017 where I work and we are using the Generic Haas ST 4X MT Lathe post for our Lathe programs. We just want to change from IJK to R the arc output. We already changed the arc center type to Radius in the control definition setup but we still getting I, K in our programs. This is the “parc” section. Can anybody could help me what I have to change to get “R”??? Thanks.

-
I have a MasterCAM file with a wireframe spline contour that needs to be turned on the inside of a part. However, MasterCAM all of the sudden "goes off track" at the end of the spline, and fails to cut it accurately. I think this is maybe a relief angle limitation? Any ideas on how to address this are appreciated. I've attached the file. Note that this operation is only machining part of a longer contour (as part of a repair), so we cannot extend the start or end of the contour. (Not that that helps, but just FYI.) Also note that this is not just the toolpath not rendering over the wireframe (due to where the tool origin is located). If that were the case, the backplot would render the tool in the correct location, which it does not: coords.mcam
-
Hi all, I am trying to simulate a lathe operation on a lathe billet with a machine I have created myself based on a commercial CNC lathe model. I follow the tutorials to create the .xml file with the kinetic diagram and the solid parts of the machine. Once I get it, when I try to open it, the following message appears on the screen several times: A translation axis is missing in xml. machine definition initialised with default definition. The thing is that I don't know how to solve it. I hope I can find help here, I have looked all over the internet and I haven't found anything that could help me. Thank you very much.
-
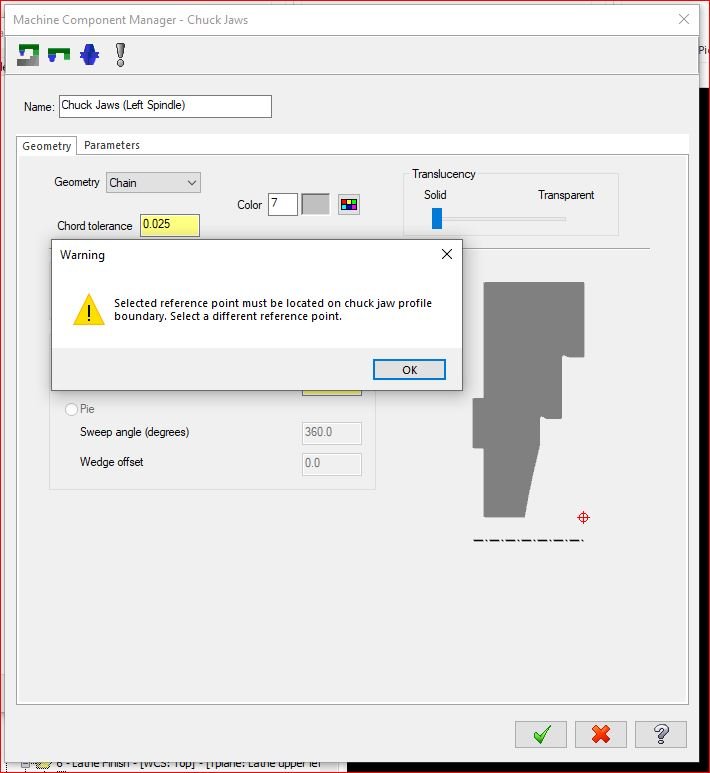
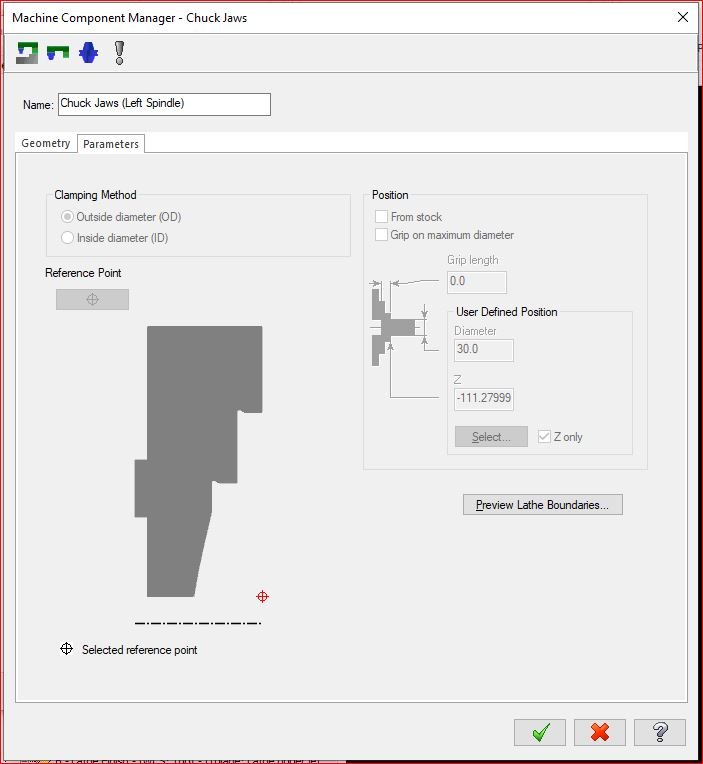
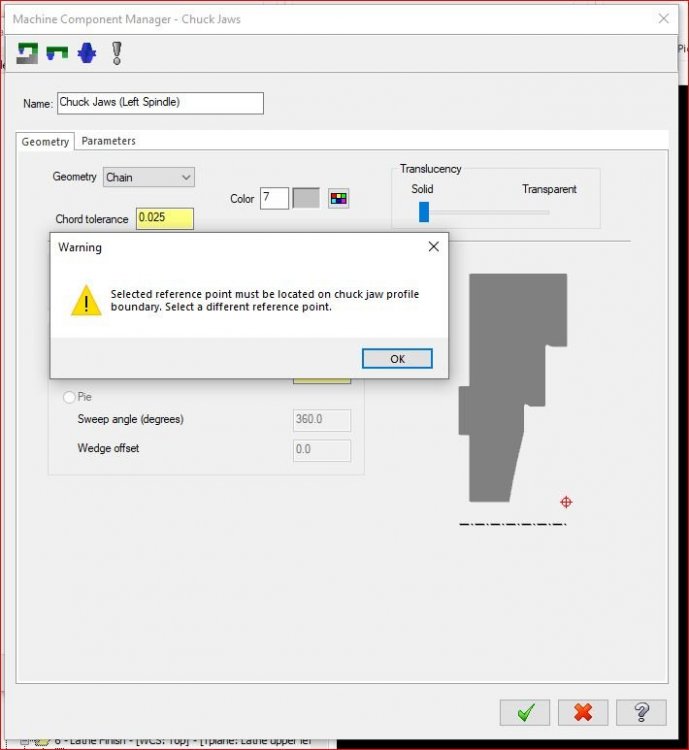
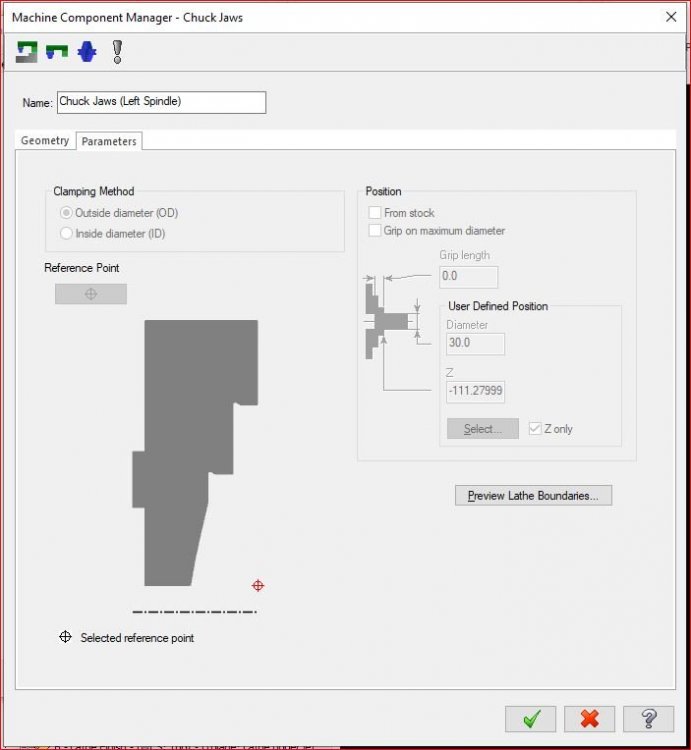
Hello, ever since I updated to 2020, I can not make custom lathe chuck jaws like I used to, so I have been making programs without them. The problem is that when I choose to use a chain to define my jaw profile, MasterCam then wants the reference point to be in the bottom right-hand corner of the most extreme entities, and this point must be touching the jaw profile, but in the majority of jaws I want to design it is not. And I can not for the life of me figure out how to get around it. I know there is a parameters tab there with a button to reset the reference point, but it gets greyed out when using a chain. I am running the most current version. Any help would be appreciated. Thanks Chris
-
This enhancement in lathe 2020 looks nice but I wondered if there is a way to show jaws NOT spinning in verify (using mill toolpaths) ?
-
Hello guys, This is my first time posting here, and I am a real beginner when it comes to Mastercam. I'll try to make it as easy to understand as possible. First, some basic info: Software : Mastercam X6 (Japanese Lang.) OS : Windows 7 SP1 (64bit) Machine : Nakamura Tome Lathe (Dual spindle, dual upper turrets) Contoller : FANUC POST : Custom-made at the time of software introduction The part to be machined: A long cylindrical bar, which may be 500 to 2000mm long. It is to be machined first by holding in the left chuck only, and then it is pulled out little-by-little and machined whilst holding between both the chucks. Finally, it is held by the right chuck only and completed. The machining process includes face turning, center drilling, OD turning, and multiple grooving operations. What I tried: I was able to do the first stock advance, and the corresponding processing. When I tried to do the stock transfer, the active spindle automatically changes from left to right. How can I stop this changing of the active spindle at every stock transfer, and have it change only at the last transfer? *I could not find anything in the settings dialog (my understanding limited by my level of Japanese). I'd be extremely grateful for any guidance Loading gif
-
Hello everyone, I was creating a simple lathe toolpath (finish a line) and when I went to prepare my stock setup, into Machine Group Properties, I couldn't see all parameters to fill, it means, I can't see all the window, as the picture below. I have already tried, for hours, change my screen resolution but didn't work. And the fonts are also BOLD, does anybody know how to fix it? Will help me a lot. PS.: I'm using Mastercam 2019 (I tried using Up1, Up2, and Up3). The error does not appear in Mastercam 2020 (Any TP or Beta) Thanks Kenny Machado

-
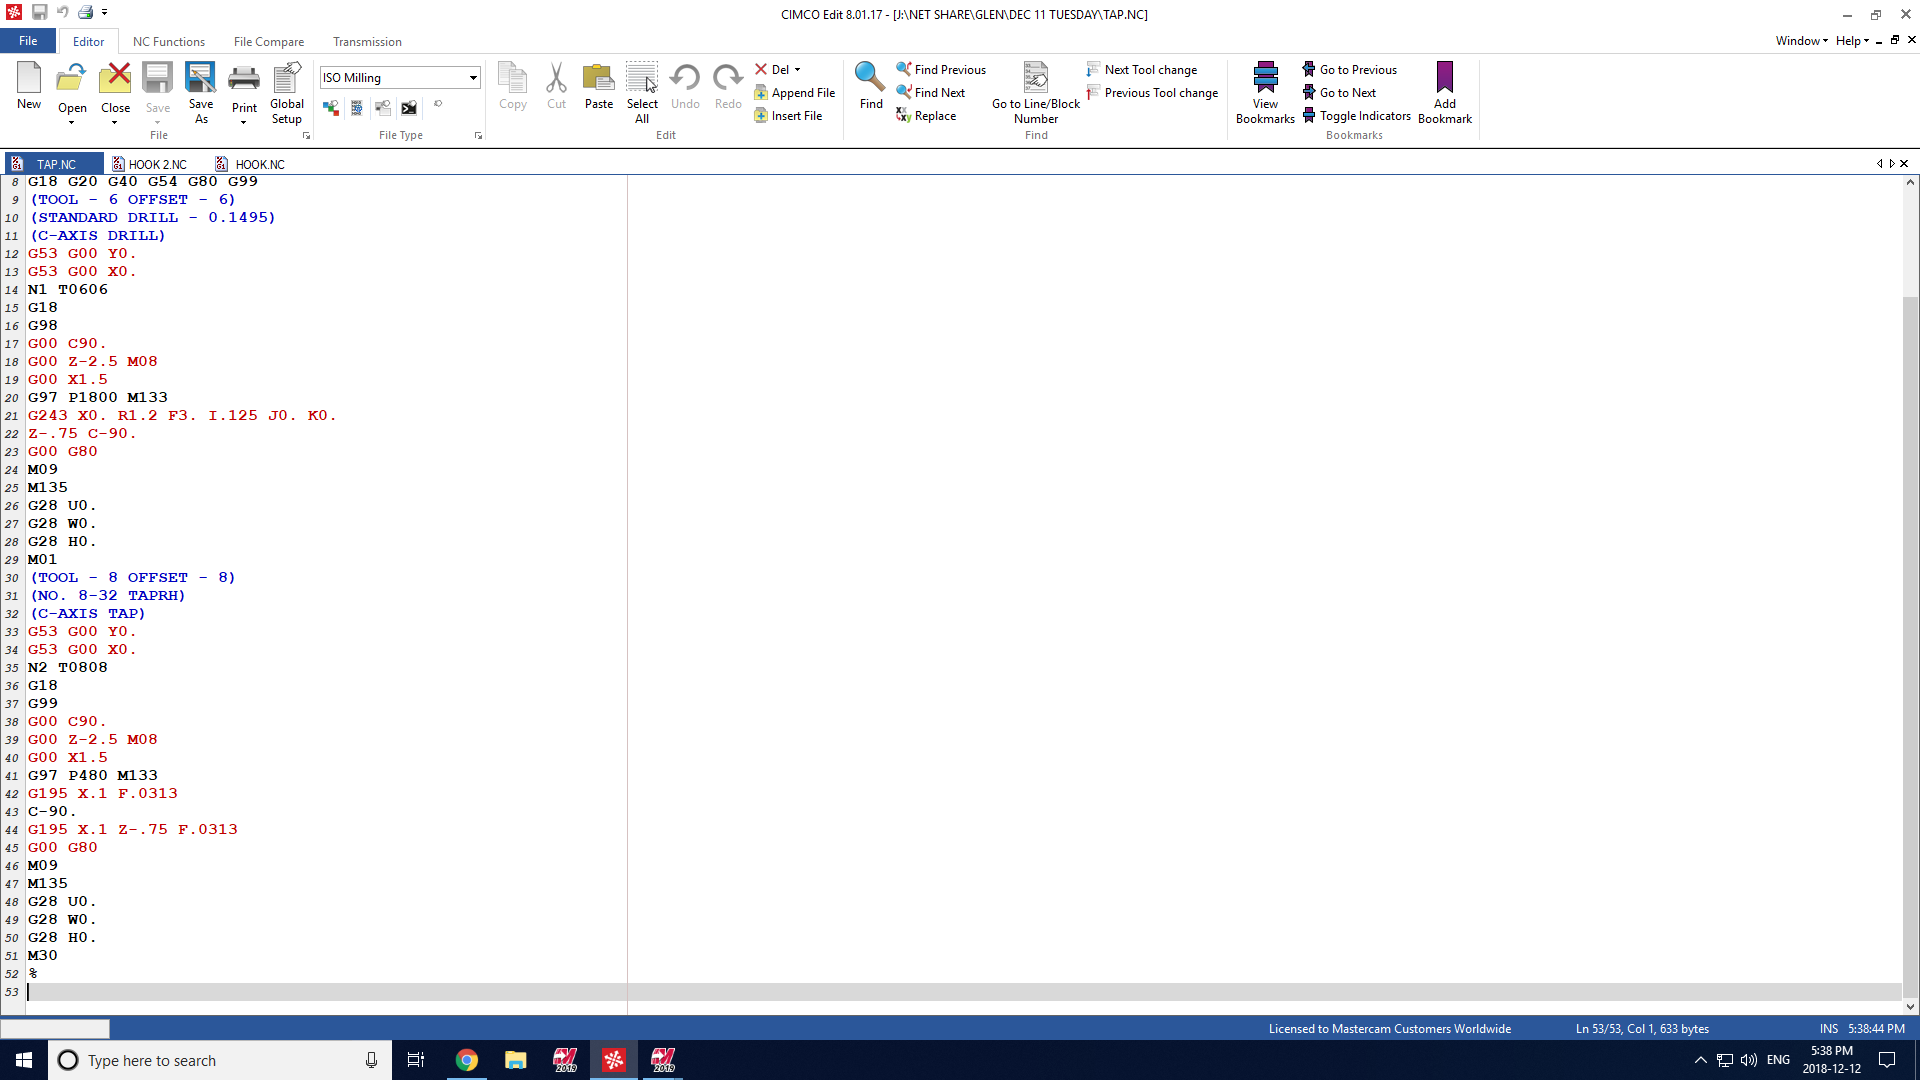
 Hi guys My name is Glen, I am new at emastercam and new to cnc lathe machines. i just have a question regarding tapping with live tooling( radial). I can back plot it and everything seems fine but when i post it machine error NO SPINDLE SPEED. This is the G codes for the drilling and tapping, i only have problem with tapping. thanks in advance
-
Hi guys My name is Glen, I am new at emastercam and new to cnc lathe machines. i just have a question regarding tapping with live tooling( radial). I can back plot it and everything seems fine but when i post it machine error NO SPINDLE SPEED. This is the G codes for the drilling and tapping, i only have problem with tapping. thanks in advance
-
Hello everyone, Can someone please help me with the attached part. I am still stupid (learning) LOL Anyways, I need to machine a groove wound around a shaft diameter. I would appreciate any help at all but if possible could you explain in a rudimentary way. I would not want misunderstand. How can I create a line at the bottom of the groove in order to generate my tool path Should I use a lathe button tool or a 1/16 ball end mill. Is there anything else I am not thinking about. Thank you so much. This site and you guys are fantastic I am so happy I found it and became a member. MachineGroove.mcam
-
hey guys I'm a bachelor student in mechanical engineering and I'm doing my final project on a simple 2 axis lathe CNC available in my university and I'm using MasterCam 2018 for generating g codes so recently i was looking for a challenging shape or object to turn with CNC and I found this old YouTube video of someone making an asymmetric shape in 2 axis lathe and I can't figure out how he did it. there no explanation about the video so I'm asking you guys if anybody can help me figure this out https://www.youtube.com/watch?v=D_0PafcGSK8 thanks and sorry for bad english
-

Version 1.0.0
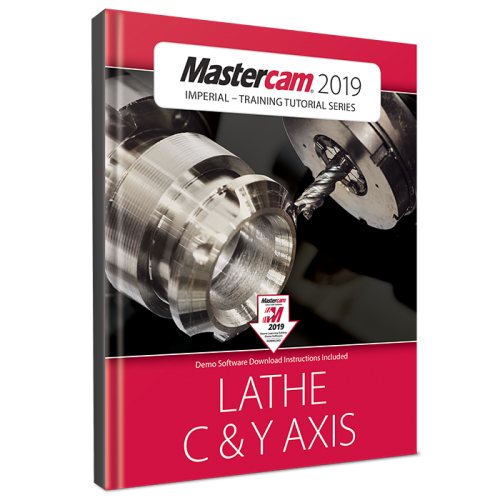
This is an eBook. An internet connection is required to access it. Published by: In-House Solutions Inc. ISBN: 978-1-77146-813-8 The tutorial consists of part-oriented tutorials intended for the advanced lathe user that wants to learn how to program lathe parts that include milling operations. You must have the Mastercam Lathe and Mill Software in order to use this tutorial. You will learn how to create the more complex 3D geometry and Advanced C-Axis toolpaths. The tutorial also covers toolpaths that support the Y-axis rotation and examples on how to use the Mill toolpaths on a Lathe with Live Tooling.From $39.99 -

Version 1.0.0
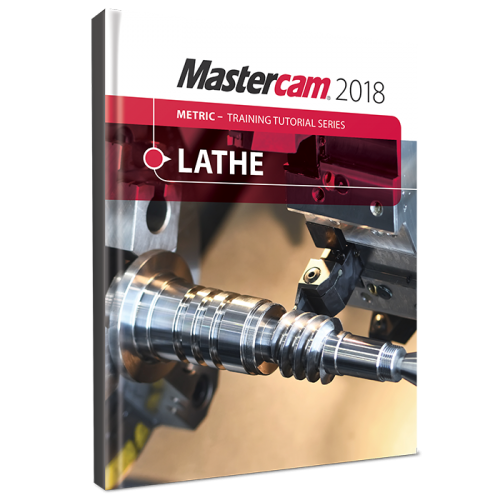
This is an eBook. An internet connection is required to access it. Published by: In-House Solutions Inc. ISBN: 978-1-77146-796-4 The Mastercam 2019 Lathe Training Tutorial consists of part-oriented tutorials, and practice exercises that provide users with an excellent foundation in Lathe. The material emphasizes the machinability of parts with suggested fixtures, setup sheets & more. The Lathe Training Tutorial is ideal for beginners and current Mastercam users alike. Step-by-step tutorials introduce 2D geometry creation along with detailed coverage of 2D toolpaths such as Face, Rough, Finish, Drilling, Grooving, Grooving on an angle, Inside Boring, Cutoff, Threading and Canned Cycles for Rough and Finish. Details on Stock Transfer, Stock Flip, Stock Advance and tailstock toolpaths, in addition to instruction on importing a SolidWorks file and using the Turn Profile command to create Geometry and a VTL tutorial are also found within.From $39.99 -
I have a toolroom type CNC lathe with a Siemens 828d control on it. The control only has 8 active tool offsets possible. However, the tools are hand changed on an Aloris type toolpost, so I could have way more than 8 tools for a job. So the question is; how to change the number of active tool offsets? I'm sure this control is also used on lathes with larger tool turrets than only 8. Any info or links welcome
-
Hello everyone, I am using 2018 and when I create a face groove tool I would like the add the tools back clearance. Is this possible in 2018 or is it something I will have to wait until 2019 for?
-
Importing solidworks file Tutorial #7.SLTPRT shows as 30 entities in levels manager and manual states it should be only one entity. Page 534 of the manual also shows it as one?
-
Hello, everyone. In these days, I am learning how to creat a lathe custom tool. But when I get into the Geometry tab, I am confused about geometric tool orientation and tool orientation in turret. I want to know how I can select these two configurations. From the tuorial, these two configuratons are set in same position. I do not know whether I can always do that.
-
Version 1.0.0
973 downloads
The Mastercam 2018 Lathe Training Tutorial consists of part-oriented tutorials, and practice exercises that provide users with an excellent foundation in Lathe. The material emphasizes the machinability of parts with suggested fixtures, setup sheets & more. The Lathe Training Tutorial is ideal for beginners and current Mastercam users alike. Step-by-step tutorials introduce 2D geometry creation along with detailed coverage of 2D toolpaths such as Face, Rough, Finish, Drilling, Grooving, Grooving on an angle, Inside Boring, Cutoff, Threading and Canned Cycles for Rough and Finish. Details on Stock Transfer, Stock Flip, Stock Advance and tailstock toolpaths, in addition to instruction on importing a SolidWorks file and using the Turn Profile command to create Geometry and a VTL tutorial are also found within.Free -
Good Day, I created a part for our lathe complete with a stock flip, after the fact I wanted to change the order of my setups. What is the best way to do this with minimal re-programming? I have my programs in operations groups as follows: Setup-1 Stock Flip Setup -2 I swapped Setup-1 with Setup-2 but the masks are still applied to the Setup-1 programs from the stock flip, I'm sure I could post and everything would be fine but the MC file is kind of messed up. My guess is that I need to delete the stock flip and re-create it put the geometry on a new level and re-select geometry. Anyone else have a better method? TIA, Greg
-

Version 1.0.0
This is an electronic only purchase downloadable in PDF format. Published by: In-House Solutions Inc. ISBN: 978-1-77146-724-7 The Mastercam 2018 Lathe Training Tutorial consists of part-oriented tutorials, and practice exercises that provide users with an excellent foundation in Lathe. The material emphasizes the machinability of parts with suggested fixtures, setup sheets & more. The Lathe Training Tutorial is ideal for beginners and current Mastercam users alike. Step-by-step tutorials introduce 2D geometry creation along with detailed coverage of 2D toolpaths such as Face, Rough, Finish, Drilling, Grooving, Grooving on an angle, Inside Boring, Cutoff, Threading and Canned Cycles for Rough and Finish. Details on Stock Transfer, Stock Flip, Stock Advance and tailstock toolpaths, in addition to instruction on importing a SolidWorks file and using the Turn Profile command to create Geometry and a VTL tutorial are also found within.From $39.99 -
Version 1.0.0
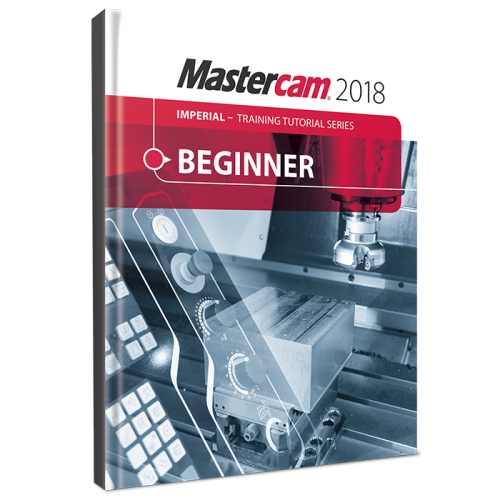
This is an electronic only purchase downloadable in PDF format. Published by In-House Solutions Inc. ISBN: 978-1-77146-705-6 The Mastercam 2018 Beginner Training Tutorial provides a comprehensive step-by-step approach to learning the basics of three Mastercam modules: Mill Essentials (2D), Lathe and Solids. It is a great choice for an individual looking to get a broader overview of the software or an instructor looking to provide the same for his/her students. Three mill projects, two lathe projects, and two solids projects – the same found at the start of our newly revised Mill Essentials, Lathe and Solids Training Tutorials – are combined with practice exercises and the Mastercam Home Learning Edition DVD (Demo Software) to round out this compilation book. Each tutorial systematically walks through all the procedures from Geometry Creation to Toolpath instructions, Verification and G Code Generation. A wide range of topics are covered including 2D Geometry and Solids Creation, Drilling, Tapping, Contouring, Pocketing, Circle Milling and Slot Milling. It also contains 2D High Speed Toolpaths, as well as proper Stock Setup and Tool Settings.From $39.99 -
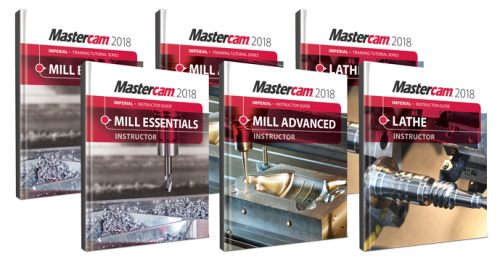
Version 1.0.0
The Mastercam 2018 Instructor Kit for Mill & Lathe is the ultimate toolkit for instructors looking to enhance their 2D mill, 3D mill and lathe classes while minimizing prep time The Instructor Kit for Mill & Lathe offers an array of tools to make Mastercam easier than ever to understand. This package includes: Mastercam 2018 Mill Essentials Instructor Guide Mastercam 2018 Mill Essentials Training Tutorial Mastercam 2018 Mill Advanced Instructor Guide Mastercam 2018 Mill Advanced Training Tutorial Mastercam 2018 Mill Lathe Instructor Guide Mastercam 2018 Mill Lathe Training Tutorial Mastercam 2018 Home Learning Edition / Demo Software Practice Exercise, Quizzes, Mid-Term and Final Exam Tests Completed parts (.MCAM) for verification purposes Instructor PowerPoint® presentations Note: Files included on the instructor resource CDs in the print version of the kit will be available as a download$200