


PGcam
-
Posts
20 -
Joined
-
Last visited
Content Type
Profiles
Forums
Downloads
Store
eMastercam Wiki
Blogs
Gallery
Events
Posts posted by PGcam
-
-
7 minutes ago, crazy^millman said:
.mcam a Mastercam file or a .z2g or .mcam-content
Oh sorry, didn't know what you meant by "sample file".
Are you able to open .mcam from Mastercam 2022?
-
6 hours ago, Werktuigbouwer said:
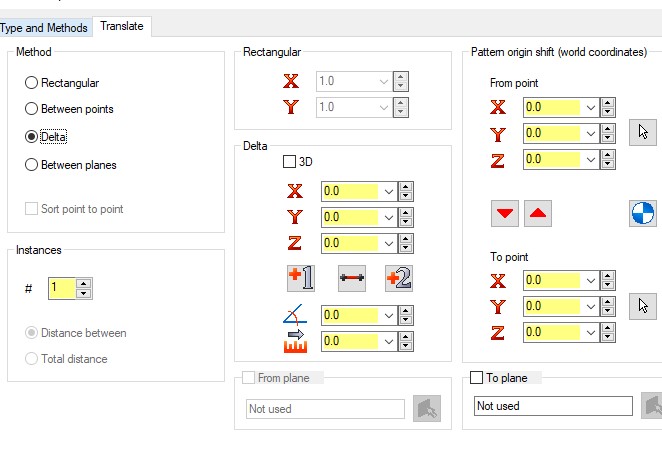
Also set the start field to 0
And delta to 2
2 Instances?
or Click +1 & +2 buttons and draw a line?
Or set some other value under the Translate tab?
I've tried a bunch of combinations. The closest I get is G54 and G55 output, but now get extra duplicate code under G54.
-
1 hour ago, crazy^millman said:
Need that sample file.
What's the extension and the usual location of that file?
-
I still get same result as in my previous screenshot.
Weird.
I really want to see it work, but must be doing something dumb.
-
On 9/11/2023 at 10:16 AM, Leon82 said:
Leon, in my original post I describe how to get the same toolpath @ G54 and G55.
From your screenshots, all I get is duplicate gcode @ G55. G54 does not even generate.
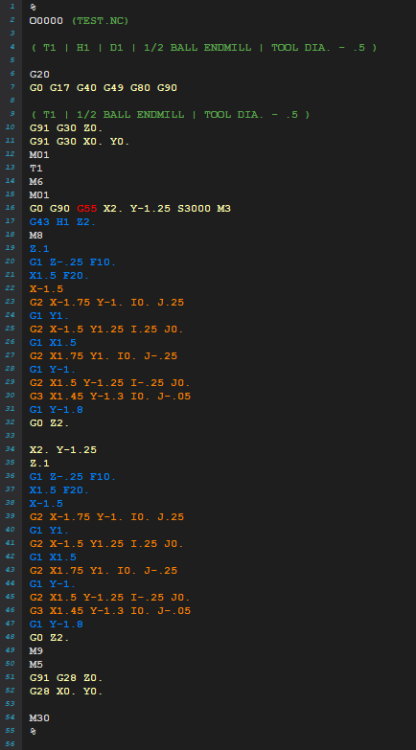
What am I missing?
-
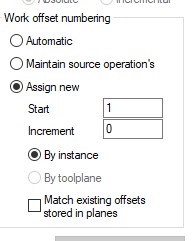
6 hours ago, Leon82 said:
assign a new offset per instance and keep the offset distance at zero.
Leon, would you mind posting some screenshots of what you're referring to?
-
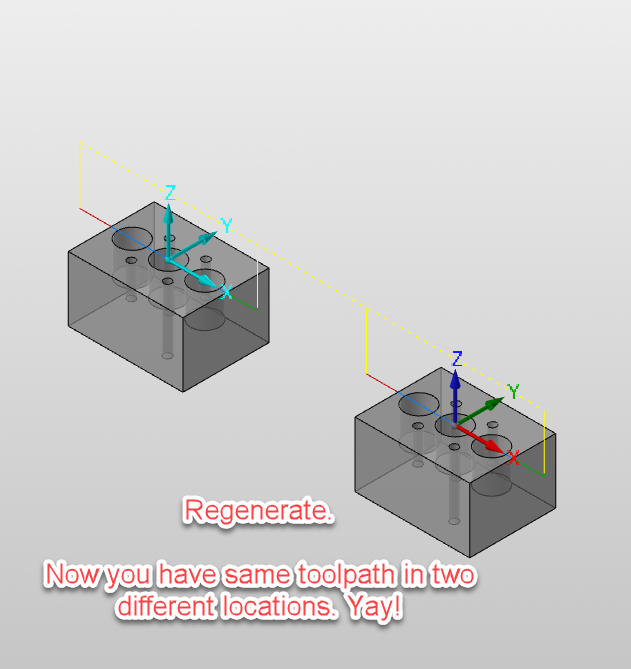
Tutorial: Simplest method for copying toolpaths to G55 in Mastercam and avoiding manual gcode editing
I’ve encountered several CNC programmers who aren’t familiar with the use of planes in Mastercam, even with years of experience, so I decided to make this tutorial. Hopefully it’s easy and intuitive to follow.
This is the quickest way to duplicate your toolpaths to your 2nd part in another vise in your machine, once you get the hang of the steps in the procedure.
This method eliminates unnecessary tool changes, and if you make changes in the source toolpath, they will automatically be applied to the transformed toolpath copy. Making production faster and more efficient, even if you have to edit your program in Mastercam later.
Let’s begin…
STEP 1
First, model and toolpath your 1st part.
STEP 2
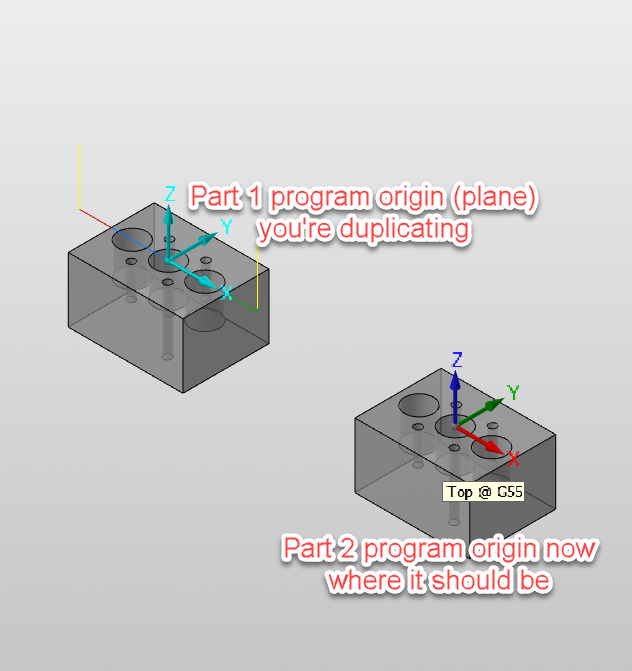
Translate-copy your model somewhere to the side, in X or Y direction. Distance doesn’t matter but avoid changing Z height, to keep the process simple.
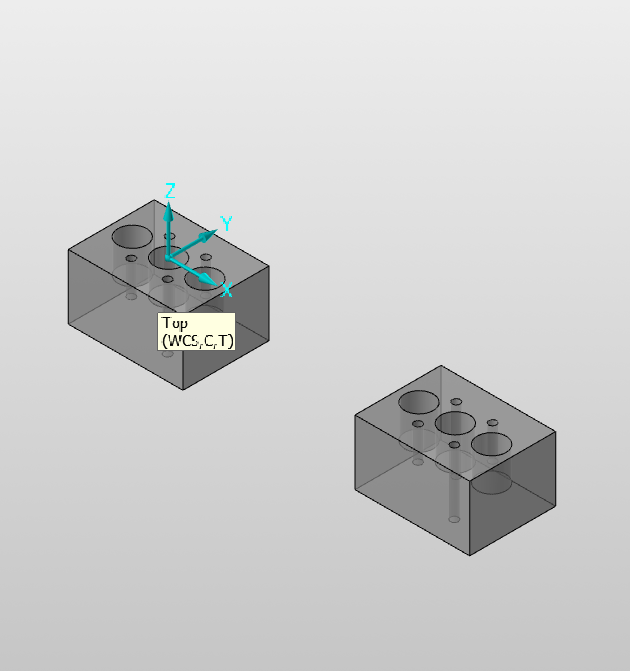
Now you have 2 models at some random distance appart. One will be your G54 and the other your G55.
At the end, Mastercam will output G54 for your Top plane, and G55 for the other plane we’re about to make.
The two different points is where you will pickup with your edge-finder while setting up your two parts for simultaneous machinning.
The terms Plane, Program Origin, Offset, Pickup Location, G54, G55, G56, etc… all mean the same thing in this case.
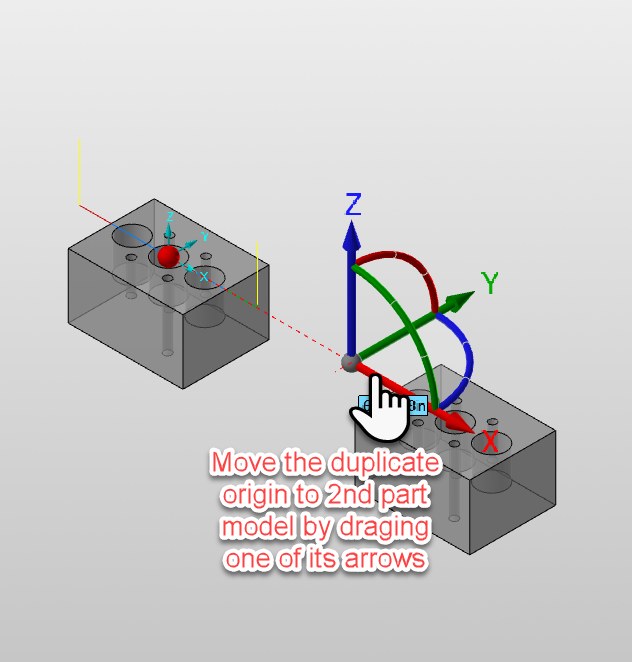
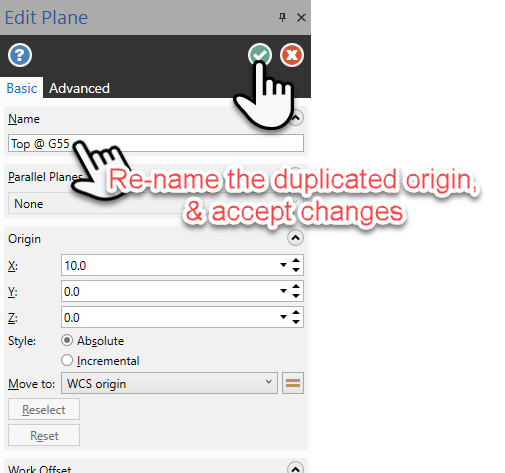
STEP 3
After copying your model to the side…
Go to the Planes manager panel, right-click on the plane you’re using for your 1st part (TOP?), select Duplicate
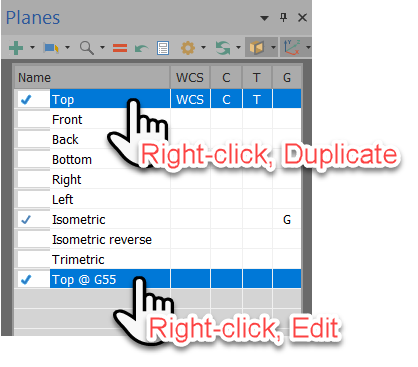
Normally when you duplicate the "Top" plane, it will show up as "Top-1", this is what you want to Edit (move and rename). In my screenshot I already have it renamed. Terrible, I know...
Edit the duplicate plane: shift it to the same location on the 2nd part, give it a new name like “Top @ G55”, or “Origin 2”, whatever you want to name it, accept changes.
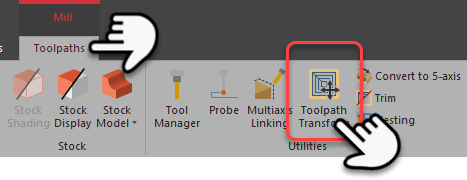
STEP 4
Now go to your Toolpaths tab, click on Toolpaths Transform
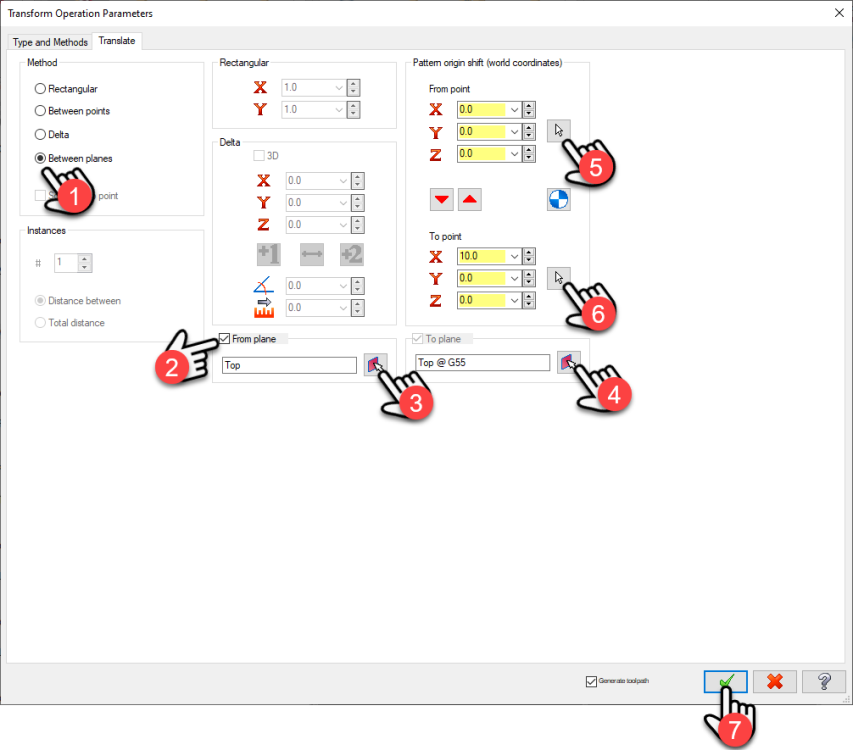
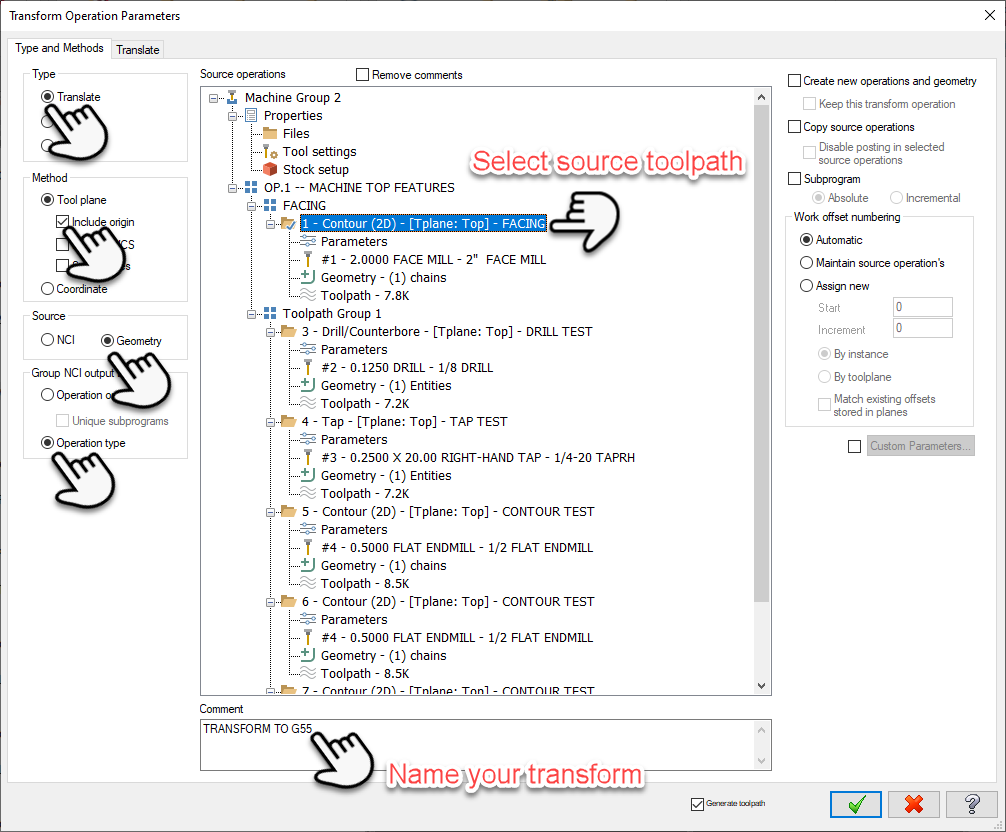
STEP 5
In the Transform Operation Parameters window, make sure to select:
Source operation: your source toolpath
Type: Translate
Method: Tool plane; checkmark Include Origin
Source: Geometry
Group NCI output by: Operation type
In Comment box write: “TRANSFORM TO G55”; this will add a separate line of text on top of existing toolpath name in final NC output, to make it easier to differentiate between source toolpath and a transformed toolpath

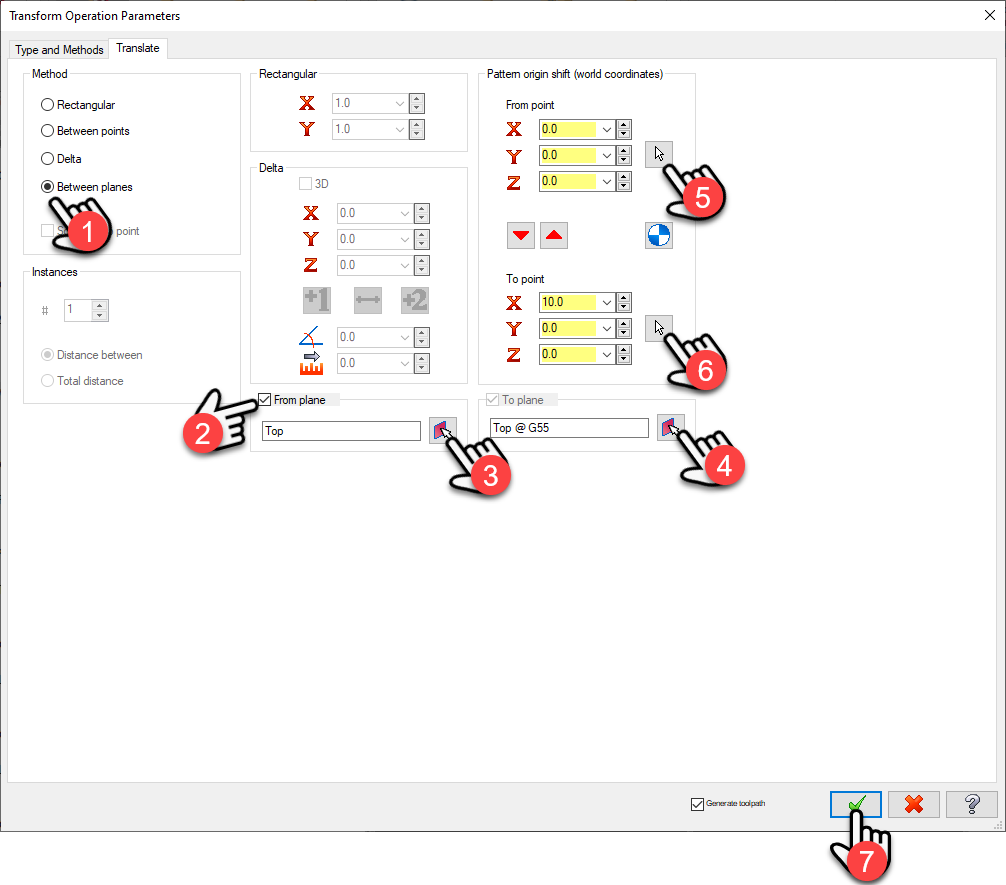
In the same Transform Operation Parameters window, now go to the next tab Translate, and select the following:
Method: Between planes
Checkmark: From plane; select part 1 origin
To plane: select part 2 origin (the plane you duplicated and moved)
Under Pattern origin shift: click on the mouse cursor button under From part, select origin 1 location
Under Pattern origin shift: click on the mouse cursor button under To part, select origin 2 location
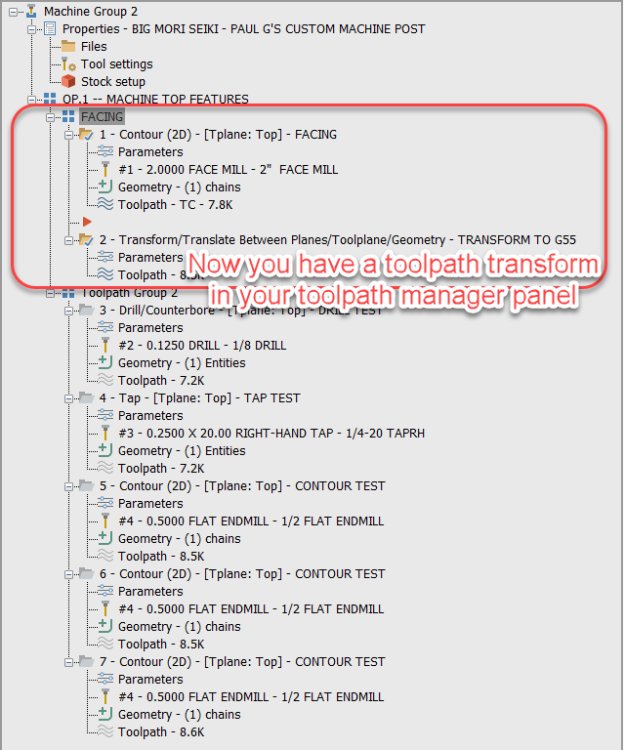
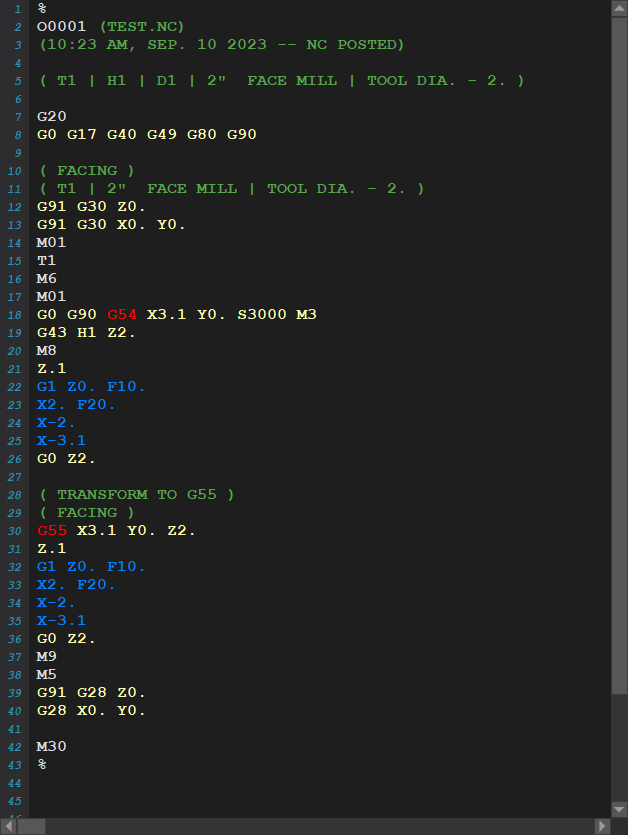
END RESULT
Nice clean NC (gcode) output, with automatic G55 output, no unnecessary toolchange or send-to-home commands.
When tool is done machining 1st part @ G54, it rapids to the clearance plane Z2., and goes directly to machine your 2nd part @ G55 without any interruption.

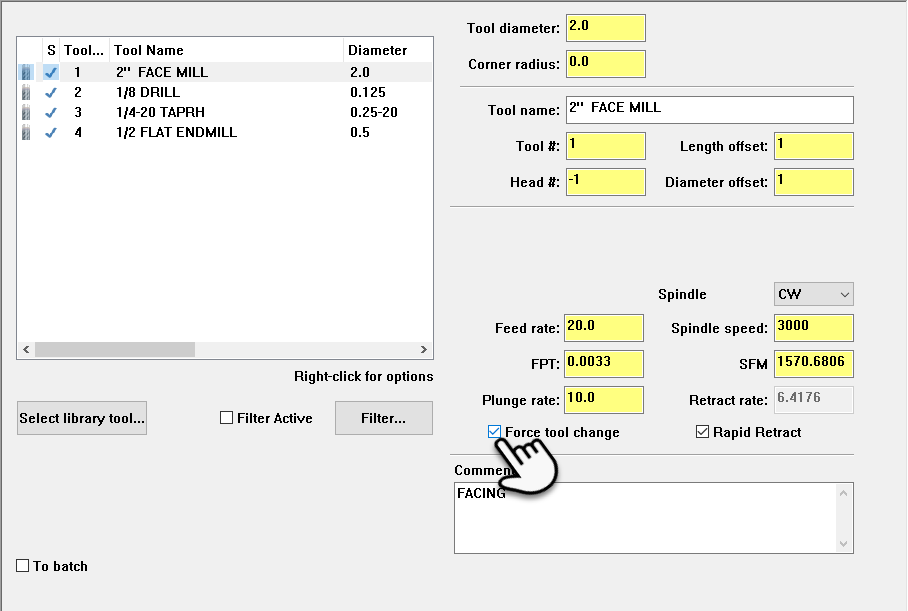
If for any reason you DO want to send-tool-home and M01 between your source toolpath and tansformed toolpath (if for example, you’re proving your 1st part before running production), you can always checkmark the “Force tool change” option, and turn it off after you’ve proven your program, to speed up production.
Hope this useful to someone out there in the beginning of their programming career.
If you’re doing this for the first time, it may take a while to practice and understand the steps, but once you get used to it – you're on autopilot. It takes only a minute to get a toolpath transform.
If you already know all this, excellent! Please share some other useful tips on this topic.
- Paul G.
-
Hi all!
I'm using the X+ addin for Mastercam to make setup sheets for our operators. They complain the screenshot is way too small.
I played around with the CSS file, but all it seems to do is blow up the image, making image blurry / pixelated.
Is there anything I can change to make image bigger while keeping it nice and crisp / sharp?
-
On 8/21/2023 at 2:39 AM, Zorander said:
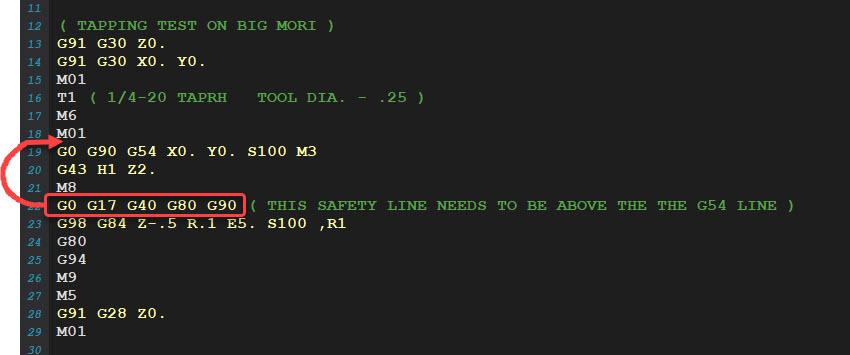
Open your post xxxxx.pst, search " pbld, n$, "G43", tlngno$, pfzout, pscool, e$ ", it after about "G0 G17 G40 G80 G90", "sgcode sgplane sg40 sg80 sgabsinc", or use other codes replace this line;
cut this line codes to be above "pcan1, pbld, n$, *sgcode, *sgabsinc, pwcs, pfxout, pfyout, speed, pspindle, e$ ".
or you can upload your post to do it.
hope to help you.
Zor,
Adding "G0 G17 G40 G80 G90"
above
pcan1, pbld, n$, *sgcode, *sgabsinc, *sgplane, pwcs, pfxout, pfyout,
[if nextdc$ <> 7, *speed, *spindle], pgear, strcantext, e$... inserts "G0 G17 G40 G80 G90" to every toolpath in my NC output, but I only need it for my tap G84 cycle
-
I typically modify post processors on my own according to production needs and machine limitations, so I'm not familiar with 3rd party custom post processor.
What is so cool about this one here from In-House Solutions, that everyone's excited about?
-
OK this is my current production post processor where I'm trying to modify the G84 tap cycle
-
Nobody wants to help me

-
Hello!
Our ancient Mori Seiki 3X mill can only run the G84 properly when it is formatted in a weird way. I'm attempting to modify the generic Fanuc 3X mill post processor, so it outputs the tapping cycle in that weird format in my gcode. I got it mostly, but cannot figure out how to get the safety line "G0 G17 G40 G80 G90" to show up above my G54 line in my tapping gcode (only for tapping, not other toolpaths).
Please help!
-
13 hours ago, crazy^millman said:
You found a bug in the software in my opinion. I think it is the sub transform of the original transform in each operation. When I post just the one operation by itself with each tool I don't get the same warning. When i use the Transform operation in just one toolpath group I do. I cannot see anything you are going wrong and this needs to be submitted to QC at Mastercam to Review. For now say no and just accept it is a false warning for your posted code. Not ideal, but will keep you moving forward.
OK I can live with that. Appreciate you taking a poke and your feedback.
I've since rebooted my laptop and the problem no longer persists.
-
-
Same here. WTF is going on? I don't have different tools with the same T#!
-
Hello! Is it possible to edit the generic machine post for Fanuc 3X Mill, to have it output every tool change looking like this?:
G28 X0 Y0
G30 X0 Y0
M01
T1
M6
M01
G28 X0 Y0
M01
I currently only get the following by default, which does not work for my old machine:
...
T4 M6
... -
On 7/8/2020 at 11:23 AM, JoshC said:
please try this.
1. if you search the start menu for “choose a default app for each type of file” you should see that under system settings as I show in the first image below
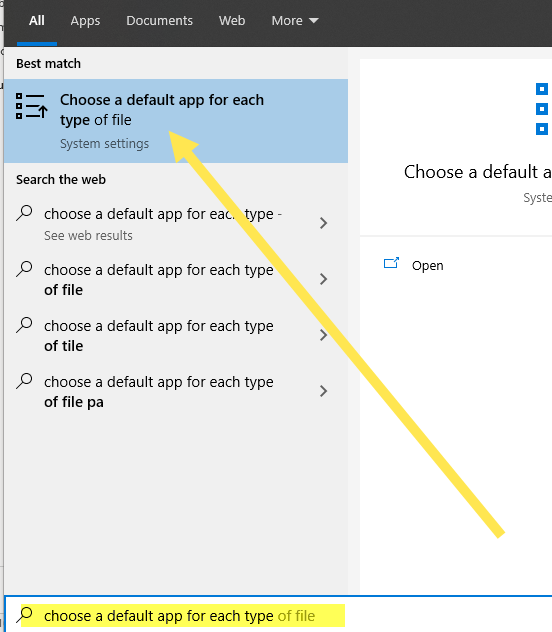
2. From there you should be able to set the .mcam file extension to open with McamVersionSelecter executable
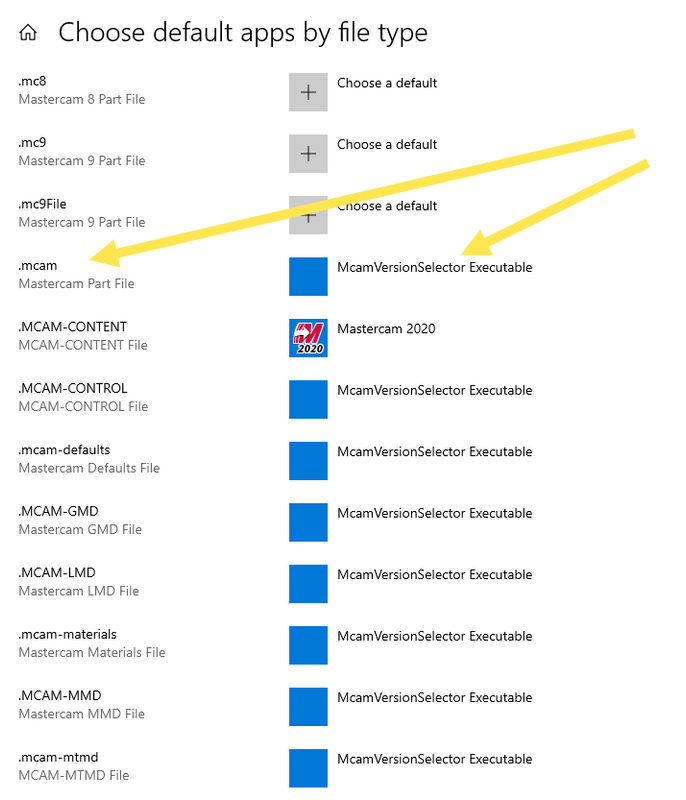
Thank you so much sir. Worked with Mastercam 2022!


How to copy toolpath(s) from G54 to G55 in Mastercam
in Industrial Forum
Posted
How do you set delta = 2?