


jpatry
-
Posts
101 -
Joined
-
Last visited
-
Days Won
3
Content Type
Profiles
Forums
Downloads
Store
eMastercam Wiki
Blogs
Gallery
Events
Posts posted by jpatry
-
-
On 3/2/2024 at 8:09 AM, crazy^millman said:
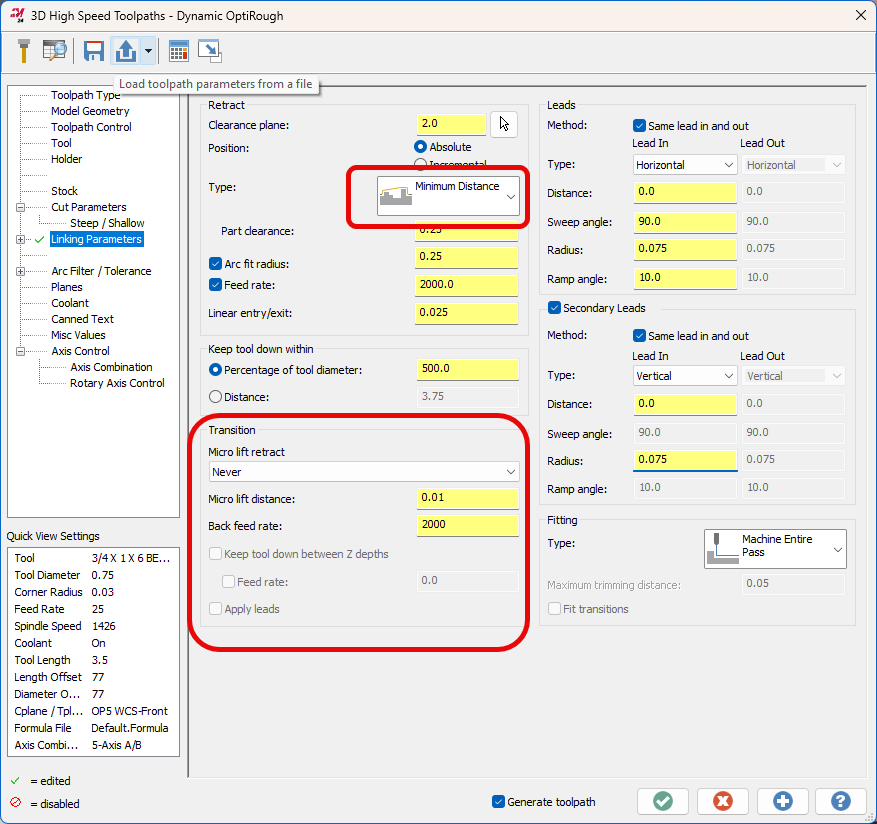
Use the type and transition settings correctly that have been in the software since around X5.
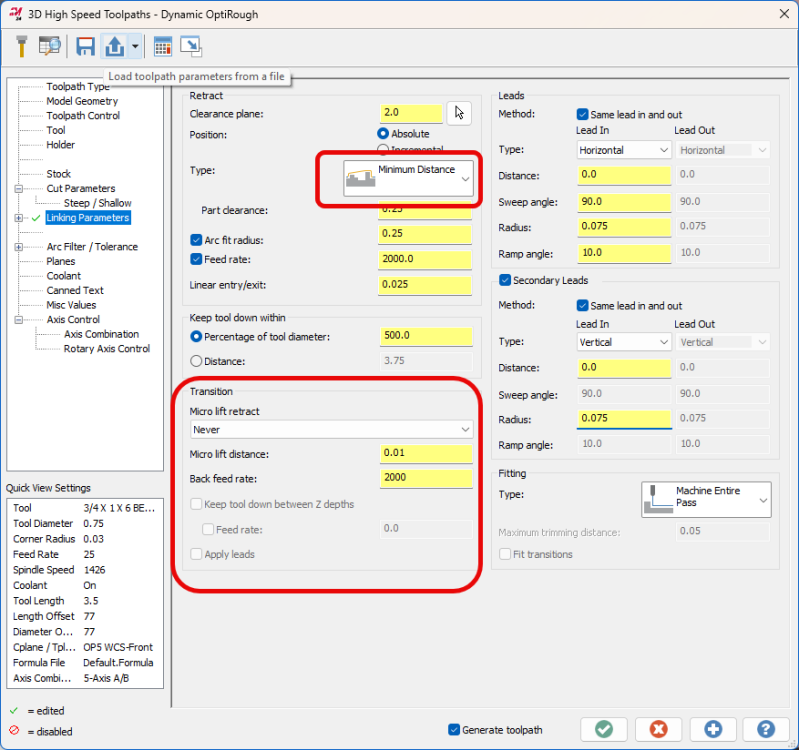
The other thing that factors into this is the optimize stepup and stepdown settings in cut parameters
-
On 1/26/2024 at 1:28 PM, rchipper said:
This may be a silly question but:
Is there anything in Mastercam that will give me the cubic inches of material removed so I calculate that into cycle times? Looking at speeding up my quoting times.
Thanks in advance.
Stock models show cubic volume, so just compare the final one to the initial.
On 1/26/2024 at 1:47 PM, #Rekd™ said:HSM advisor does I believe.
HSM Advisor will give him MMR, which is necessary for his calculation, but it knows nothing about how much metal he started with or the cubic volume of his part.
-
On 1/26/2024 at 5:42 PM, Aaron Eberhard said:
You can iterate really quickly via the keyboard by using X (NeXt), J (AdJust), O (PreviOus)
Nice, I'll have to start using that.
I wish the camera followed the chaining progress, though.
-
On 12/14/2023 at 10:18 AM, Tinger said:
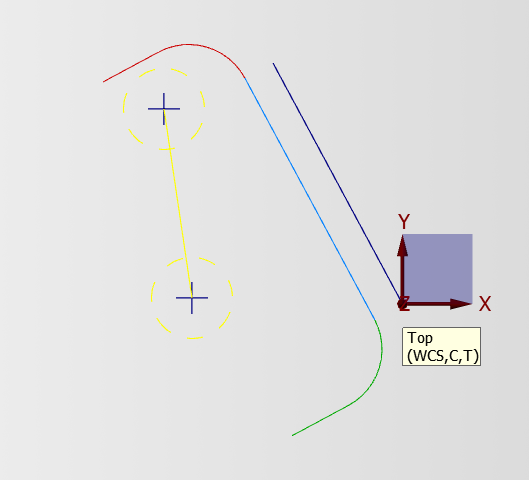
I was reading my probing routine documentation and it has O9816 to find an external corner. It says you can use I & J if the part surfaces are not parallel to the machine axis, but it does not say anything about defining the nominal angle value. This makes me think that the routine can account for some misalignment error to the axis but not a full 24.965° like I have in the pic. I would think an angle of this magnitude would need vectored moves to be remotely accurate. Has anyone used this routine in a situation like this?
My goal is to find both the red corners and set G54 between them.
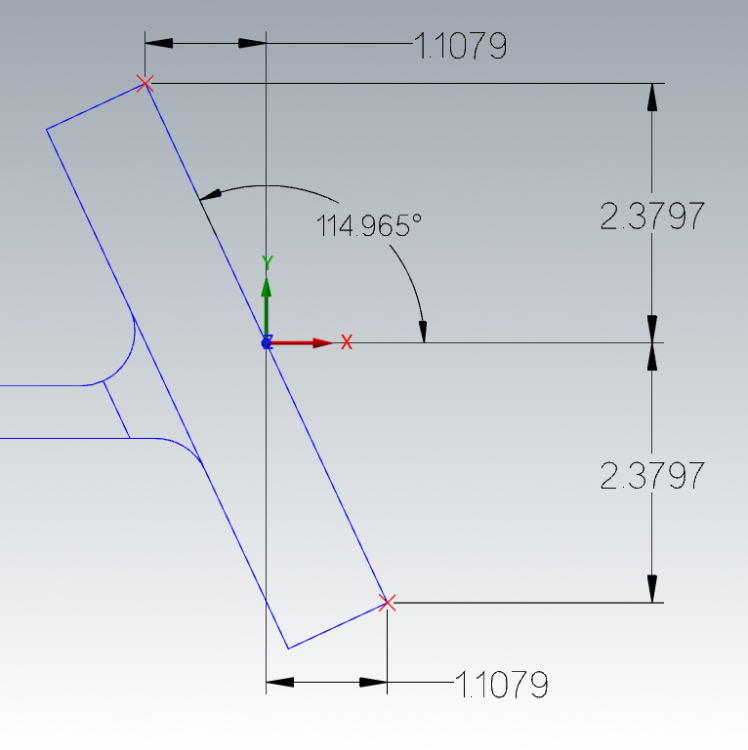
I would locate the WPC with a tooling ball, and probe that, instead of trying to locate on the intersects of angles on a skewed part
-
On 12/11/2023 at 11:27 AM, rgrin said:
I'm not sure that is right. To me it looks like it is doing a profile ramp since his cutter plus his helix radius is probably too large to run that helix in between his chains. The other thing could be since he has helix Center on Point and he might not have a point selected.
Yeah, too large of an entry helix creates some very janky stuff at the transition between entry motion and cut motion.
From what I have seen is because it sees material on both sides of the tool, and conventional mills in the helix, and then has to reposition itself to climb mill in the actual cut motion.
Reducing the helix radius always made this go away.
-
On 8/15/2023 at 2:57 PM, Chally72 said:
This is currently slated for Update 3
Is this update out yet?
-
14 hours ago, Aaron Eberhard said:
Try regenerating your area rest toolpath, and watch your processor and ram temperature.
The other day I couldn't figure out why my stock model operations were taking cripplingly long times to regenerate.
Turns out that someone had reset the thread limit back to 4 in the multithreading manager settings, after putting it back to 16 everything was back to normal.
-
18 hours ago, cncworker said:
Thanks everyone! I have Cimco Edit, but apparently not the full blown version. I am missing some tabs at the top as well.
Yes, Mastercam ships with a gimped version of Cimco, it's still good, but nowhere near the god tier of the real thing
-
On 11/26/2023 at 8:20 AM, SlaveCam said:
If previous operation uses "One other operation" setting and that "other operation" is not immediately before 3D High Speed, I get the joyous "Reporting computation error". If the "other operation" is right before 3D High Speed, it works.
Can you use a stock model as an intermediary?
-
 1
1
-
-
Program the profile cutting to an offset contour, should achieve the same result,
Will run on a single offset, but may also be confusing for whoever is setting up the job
-
22 hours ago, Aaron Eberhard said:
To be fair, I haven't spent much time trying, but I don't believe you can cause the engraving toolpath to enter from the sides.. Can you share a file with what you're trying to accomplish?
Yeah, the best you can do with the Engrave toolpath is use the ramp entry setting.
Honestly, I wish Engrave got reimagined as a variant of 2D Dynamic or even OptiRough instead of what appears to be a variant of Pocket.
-
22 hours ago, crazy^millman said:
Need to think about using the Emuge Floating holder and that will make the process more successful. Ream the holes before roll tapping them
I like the idea of the reamer.
I'm still trying to convince the powers-that-be to buy at least a couple of those micro float tension-compression holders, but they still think putting taps in standard ER collets and holders is good enough.
-
I have noticed a radial discrepancy of roughly .002" between a contour chained on a solid edge and a contour chained on wireframe created on that edge.
I know this has to be a chaining tolerance issue, so I'm curious where and what exactly are the settings for both of these?
-
On 8/8/2023 at 2:49 PM, cruzila said:
tried to save a model chamfer operation to defaults. It erased, deleted, wiped out ALL Viewsheets!!
This was posted on the MC site and already has a number, so just FYI here.
"We have this in the system as R-35372. The equally annoying workaround is to save the file before saving to defaults. The viewsheets are still removed but reopening the file brings them back."
Huh, so that's what happened to me the other day...
-
On 10/20/2023 at 10:13 AM, crazy^millman said:
Stock Allowance Macro work where you can have up to 6 Points? O9820
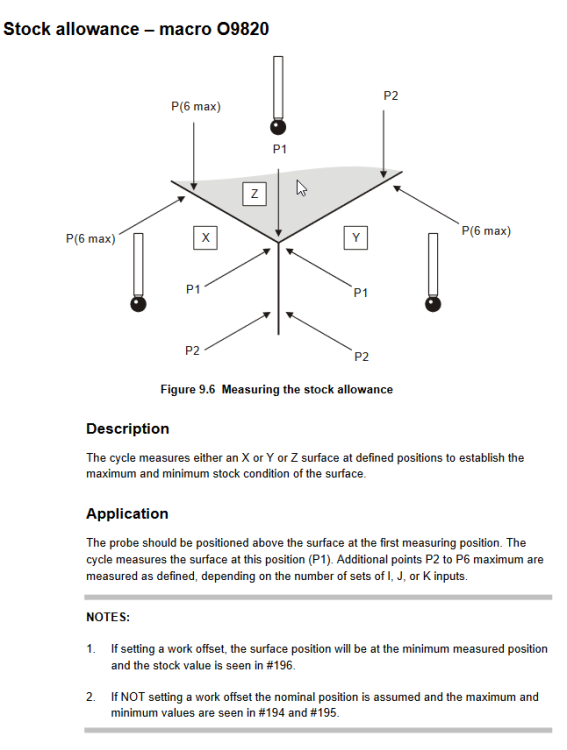
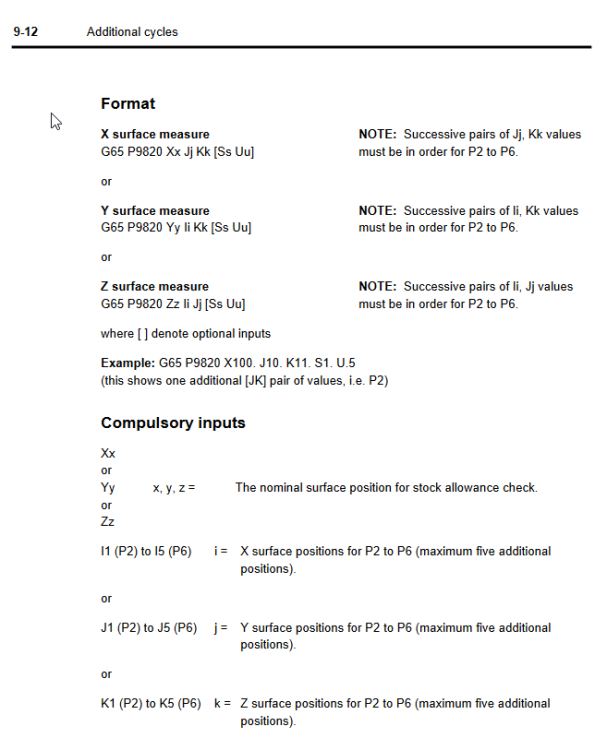
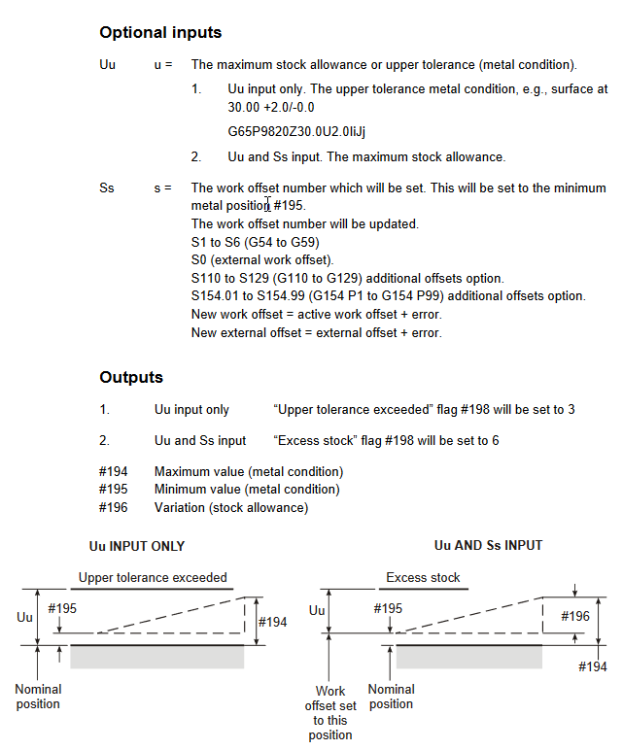
Neat, so I could interrogate 195 and 194 to pull an average z position
-
On 10/19/2023 at 12:16 PM, david said:
Recently retired from machining and working with Okuma mills. Now I am working with a Haas vertical machine with a classic control part time. I am familiar with Renishaw probing routines for the Okuma's but am learning the routines for the Haas. I would like to confirm flatness in the Z axis with a tolerance after Z is set.
Example;
G65 P9832 (Probe On)
G65 P9810 X3. Y0. F200.
G65 P9810 Z1. F50.
G65 P9811 Z0. Q0.4 S1. (PROB Z)G65 P9810 X-3. Y0. F200.
What kind of code is needed here to verify flatness within .001"
G65 P9833(Probe OFF)
Thank you for any suggestions.
With the Renishaw macros that are shipped with there is not a dedicated multisample probing macro to do what you want to do.You would have to take a Z probe sample and dump it out to a separate variable at each location, then perform the math on the sampled values.It appears that I am wrong, Millman has the solution
-
17 hours ago, gcode said:
If someone tightens the locking screw with no tool installed, the holder is ruined.
This can also occur if it is tightened on an undersized tool.
It was left with a cylindrical collet installed, and that collet still slides freely in and out
-
On 8/30/2023 at 12:27 PM, ChrisVermaak said:
I use white background
However when marking points for drilling the view of toolpath created is in this pale yellow which I can barely see.
How can i change the coulor such that it would be more visible and I do not miss points I should have selected
Picture below should indicate what I mean. There is a toolpath for a 8 mm cutter along a straight line quite clear to see. But the two holes to be drilled indicated in the obscure (missable) yellow. I just want to change that yellow colour and cannot find anywhere in configuration or where ever to do this
Please help if you can.
Uhh, by default rapid moves are yellow, and feed moves are blue.
Are you intending to drill in rapid, or what else is going on here?
-
How FUBAR is a Sandvik Corochuck 930 that won't tighten?
Is it simply a lack of fluid?
What fluid do these things even take, and what is the procedure for refilling them?
The backstory is it was sitting in the tool storage rack unused for quite some time and it is unknown if someone fiddled with it during that time.
What appears to be the fill port is a tamper proof torx, so there should be no good reason to loosen that instead of the 5mm hex that clamps and unclamps.
But my suspicion is that is exactly what happened and fluid was lost.
-
52 minutes ago, AGCOTAY said:
I have seen the fuzz
As did I, and my hold on reality was irreversibly lessened
-
6 hours ago, MrFish said:
This explains it well
Titanium is also a challenge. “In addition to its high tensile strength and low ductility, titanium has very low thermal conductivity, meaning that it doesn’t absorb heat very well,” Gennuso said. During a tapping operation, heat enters the workpiece, tap and chips, he explained. Because forming doesn’t create chips, the heat must go into the tap or the material. When form tapping titanium, a lot of that heat penetrates the tool and causes premature failure.
This is great to know.
The company I work for has yet to bid on any titanium jobs, but they love to imagine themselves more capable than they are, and make promises that are often of dubious deliverability.
And so, it's not a matter of if, but rather of when, thus I'd rather be armed with as much information as possible.
-
3
-
-
2 hours ago, MrFish said:
Thats a big NO
Is it because the material is quite springy and does not like to deform permanently in such an operation, or is it due to how titanium likes to adhere to other materials under such conditions?
-
 1
1
-
-
On 10/27/2023 at 12:43 PM, Manofwar said:
Something else, be very careful making threads in this material. You can tap it, but it requires tapping fluid, and peck tapping most of the time. It's generally a lot safer to threadmill, if you only have a couple parts to make, I would suggest it over trying to figure out tapping. (unless you have a sacrificial piece to figure out how the tapping works.)
What about form tapping?
-
1
-
-
3 hours ago, #Rekd™ said:
I bought my license personally, I can use it wherever I want/ need. Yes my employer should have it but….for $195.00 lifetime it was a no brainer to purchase.
Oh, I wasn't being naive enough to think I could get them to buy useful tools, I meant convincing them of the use of proper feeds, speeds, depth of cut, and stepover in dynamic milling operations.
Okay, their website gave me a giggle...
>>Ideal for more powerful machines such as HAAS
In what universe?
I work in a shop full of Haas, and it's like driving the plastic barbie jeep in the Baja 1000.
-
 4
4
-


High Feed Mills and Conventional/Climb Cutting
in Machining, Tools, Cutting & Probing
Posted
As always, the proof is in the pudding.