


SuperHoneyBadger
-
Posts
157 -
Joined
-
Last visited
-
Days Won
5
Content Type
Profiles
Forums
Downloads
Store
eMastercam Wiki
Blogs
Gallery
Events
Posts posted by SuperHoneyBadger
-
-
Looking to the future - and as time allows - I'm working on getting an IKE post together, planning to use the setup sheet function included at the bottom of the post. Getting closer to what I want, and it's giving me a good opportunity to comb through IKE and see what the structure is, and how everything is named etc.
Having some trouble with formatting the OPs table in the .html setup sheet. There is clearly a CSS sheet somewhere that controls the table widths and formatting of text, etc. The column widths are variable based on the number of columns, and the data in them. I would like to change them to exact widths to suit the layout I need.
Also curious how many of you guys are using the IKE posts.
-
2 minutes ago, Jayson Kramer said:
I like to call issue between the chair and the keyboard. lol
We tell them it's a Factor 14 around here. Issue is about 14 inches from the screen!
-
 2
2
-
-
19 minutes ago, TacoMachinist said:
Hoping someone will chime in and tell me its just a setting I missed.
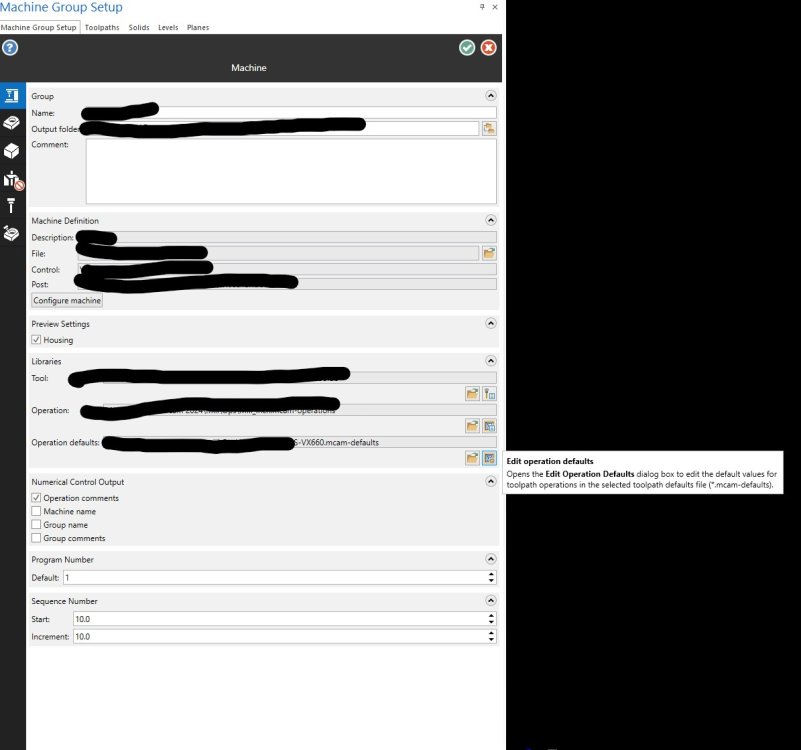
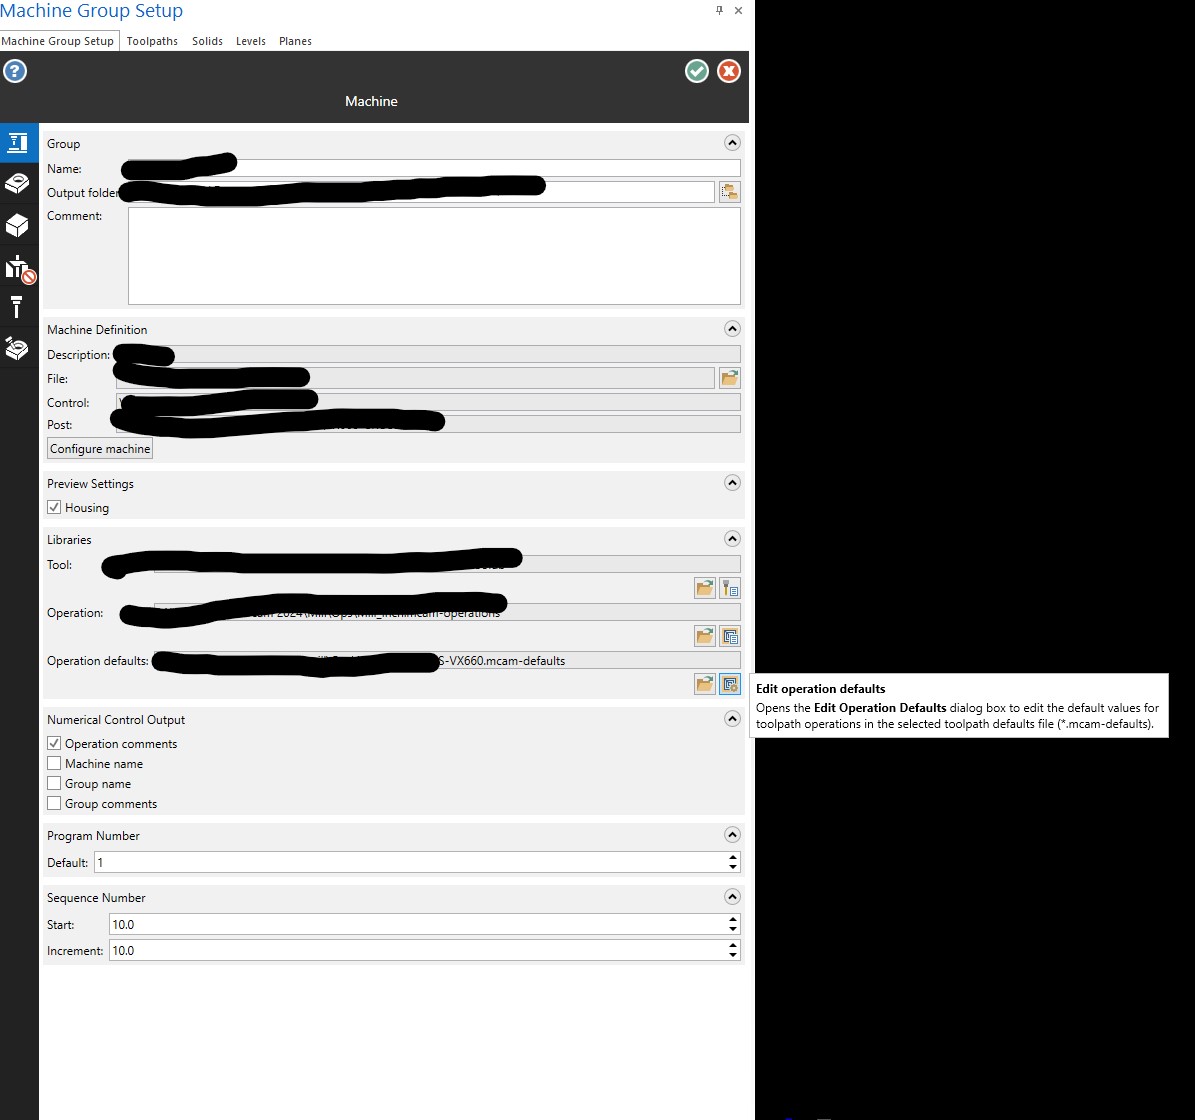
I'm going to say it's your operation defaults choosing "some tool". Before I set mine up to reference my tool library, contour 2d would default to tool 257 or something, etc. https://www.inhousesolutions.com/resource/changing-toolpath-parameter-defaults/
In there is where you can set all your defaults for each type of operation. Included a screenshot of what it looks like in 2024.
You will need to do this for each *.mcam-defaults file that your machine definitions point to.
-
Running 2024 for all new programs over here since the first week of release.
Just posted out a 3+rotary job, will see how that goes. So far so good on all other fronts.
I can say that 2024 over 2022, the viewport/camera rotation is much smoother, and I appreciate the new lower left cube
-
18 hours ago, Matthew Hajicek - Singularity said:
I encounter this on 3 axis programs for an array of a few dozen parts. I suppose one could put a "point" operation with forced toolchange just before the op to be transformed.
My usual workaround is to copy the op that calls the M00, remove the stop from it, and run the transform on the copy with the "disable posting in selected source operations" checkbox ticked. I think no matter what is done, you need 2 ops to pull off "only tool change the first time", and seeing the manual entry comment, then 2 of the same OPs tells me at a glance what is going on in that section.
-
 1
1
-
-
12 hours ago, cncappsjames said:
I still use Pfe32 for Post Processor editing.
That right there is some Master Splinter level post editing.
-
1
-
-
On 7/15/2023 at 10:46 PM, cncappsjames said:
Create a method for setup guys to put program change orders in..
We have a standardized grid sheet made up with tool#, N#, XYZ Δ's, speed, feed and notes. If they change something to make the program run more smoothly, I'm all for it, just LET ME KNOW BOYS.
On 7/16/2023 at 7:59 AM, #Rekd™ said:Create a standard for levels such as doing them in intervals of 10. Possibly having fixtures on a dedicated level in all files if possible. Have a dedicated level for Notes on the part/ job and programming so anyone that opens the file can view these.
Implement the use of View Sheets to easily pick views and or levels.
Levels and view sheets are a MUST, big +1. I like to keep a consistent system for myself, and if we were to train any additional programmers, I would insist they use the templates I have set up when starting new parts so that our levels and setup sheets would align.
There are a huge amount of older NC files here that I didn't program, and have never seen. When they get ordered, I take the time to reorganize/comb through so I can help with any issues on the fly. I hate that feeling of someone breathing down my neck while I decipher some whackadoodle toolpath that hasn't been posted since X6, and just snapped a 3/4" 2FL. So I check them first now, as time allows.
-
3
-
-
On 7/15/2023 at 10:30 PM, cncappsjames said:
That gravitation to HMC ship has sailed and she ain't coming back.
That's too bad. I love solving a headscratcher of a problem using the horz. For large production runs of maudite qualité A36 angle, there is no machine I'd trust more in the shop than our solid HMC. I've heard people aren't fond of programming or operating them, but I have not had that experience.
And I have definitely heard that they are one of the best ROI's if you have the work. I only have access to a 3+2 DMU50, so I was not aware that 5's were eating the HMC's lunch, so to speak.
-
1 hour ago, gcode said:
The difference between free and paid is the ability to import directly into a Mastercam library.
Ok, more understandable for an added feature to a previously existing tool.
14 minutes ago, OVodov said:...otherwise Greta Thunberg will sue you.
How dare you
-
I know we figured that these synergistic moves were going to be part of the Sandvik deal.
Didn't know we would have to pony up for a subscription, lol. Also, the BUY NOW button next to the tools is missing.
Aside from suggesting tools and inserts, EXTREMELY relevant to know how many grams of carbon emissions each tool will be responsible for. I know I have always been worried about that - for roughing passes especially.
-
1
-
-
1 hour ago, cruzila said:
Now, can we have levels visible but NOT selectable?? Or is that just too much?
Construction Levels? Everyone always wants another CAD feature around here, eh?

-
1
-
3
-
-
3 hours ago, Newbeeee™ said:
Waddabout Datums?

I'll get around to throwing in a G54.1 P18 once that sheet gets released to the boys, lol.
-
1
-
-
10 minutes ago, Bill Craven said:
I totally agree with this. I hate to say it but there are a lot of people out there that don't take the time to CAREFULLY read setup sheets or their reading comprehension skills are very poor.
Yep. That's absolutely the reasoning behind our simple sheets.
Get the Ø right, get the length right, get the tool number right. That's all I ask of you, Mr. Operator.
-
1
-
-
I'm sure once you have gone through the training materials suggested above by an esteemed community member of high regard, you will be quite adept! Even if you use them only to search for what you need doing at a certain point in time. Though I do suggest starting on 2D mill and working through the whole thing, as you are new to the software. I know you will find the guidance you seek, and to be Frank, everyone here will be willing to help you out once you dive into the training manuals!
-
8 minutes ago, Jobnt said:
Might be able to do something like that with AR??
In all honesty, I have been in full avoidance mode when it comes to AR. I'm hoping that my IKE tinkering will bear fruit, and I'll be sure to let everyone know if it does. Especially if it is a more global kind of problem to solve.
-
1
-
-
14 hours ago, So not a Guru said:
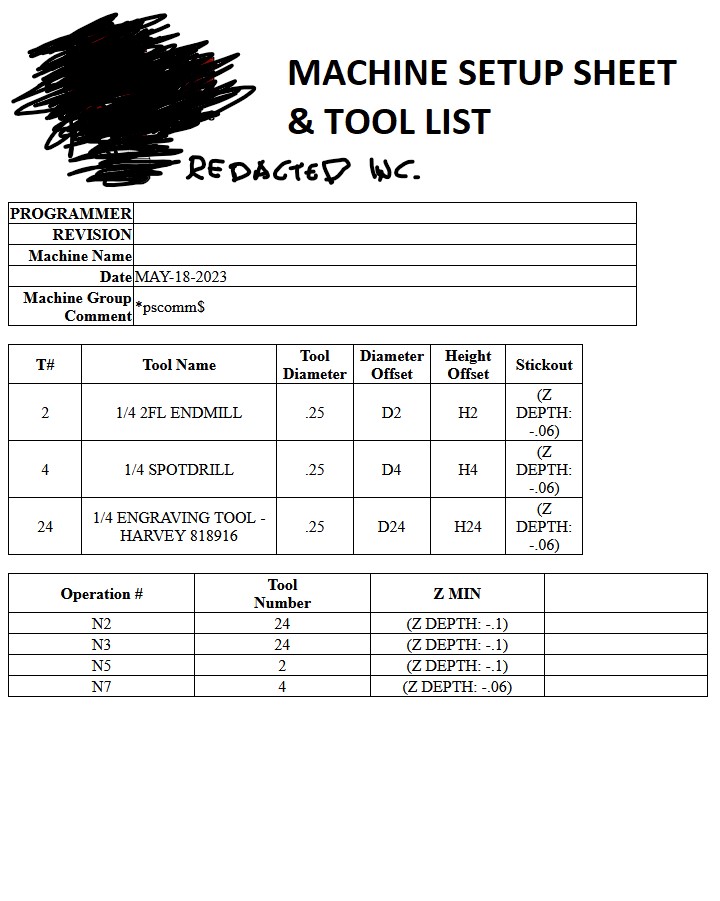
The new IHS IKE posts have a built in setup sheet.
14 hours ago, Bill Craven said:I played a tiny bit with the new IKE post, but that same squirrel...
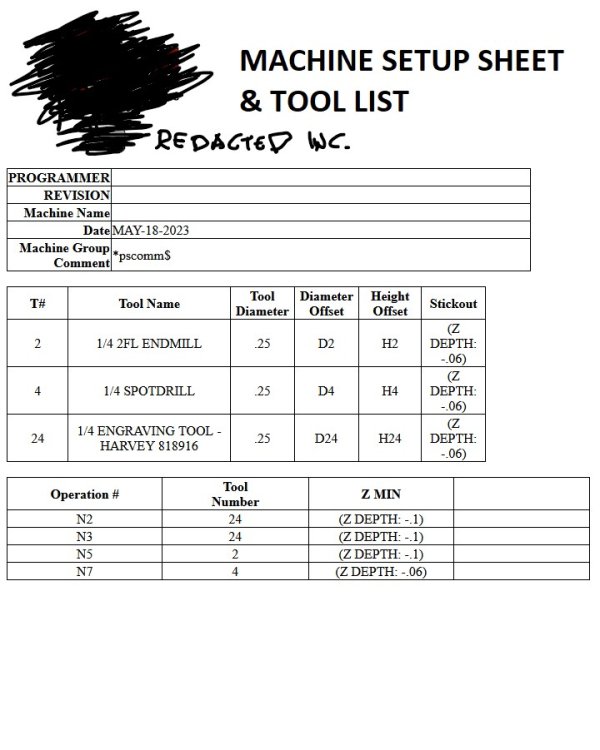
This is what I have so far from IKE. Having a hard time with the tool depth on these sheets as the Z Depth variables (pcomm_max_min_file, pcomm_max_min_tool and pcomm_max_min_op) seem to only output the depth for the lastOP the tool is used for, not the deepest point versus Z0. Working on it on the side of regular duties.
I will say, the post itself pumps out good code (but still needs mods for our subs/macros etc), and has no issues with rotations on our horizonal and our rotary table'd 3 axis. I use it for axis substitution on the rotary when I need it.
-
1
-
-
2 hours ago, OVodov said:
Talk to CrazyMillMan about folders in levels. He asks for them for how long? 7 years?
Yea. If the big guns' request falls on deaf ears, you're right, we'll get Dynamic Delete first...
-
1 minute ago, sharles said:
30 or more pages
My guy.
We are dealing with vastly less complex components over here in the bush leagues. That's an impressive workload to manage and make sheets for. Lots of folks here seem to favour X+ for their setups, and everyone and their Mother's best friend hates Active Reports. I hope you get some thought provoking answers from the vets!
-
 1
1
-
-
Levels should have folders/groups, and planes should have more flexibility to organization. Sucks adding a few in, or working on a big file that has no semblance of order in the planes manager. I often just sort by offset number to get all the used ones near the bottom. It's less than a band-aid solution, IMO
-
6
-
-
We are a job shop with an unforeseeable mix of low and high volume, sometimes one offs. The philosophy is a simple, top/side drawing showing XYZ zeros and clamps etc, and the plain text setup sheet below.
The "Setup Instructions" portion is a file that I copy and mod for each job, and is in the mastercam file as a manual entry pointing to a text file. We have a wild post from before my time, and it works for 80% of what we post. Misc variables handle what machine it will post for, high speed or not, etc.
I have seen a lot of complex setup sheets posed around here, we have a system that gives you a tool type, tool diameter and total Z engagement below Z0. It all gets posted after the M30 as you see it below. The operator takes that info and builds his tools, I make some notes in the tool name if we need extra clearance or grindback: 1/4 CARB EM 4FL - CLR 2.0. Usually just knowing how deep a tool will go is enough to pick an endmill.
The most I have handed someone is three sheets of paper for 1 OP. Usually it's two, and one is a nice drawing I made.
I have also been tinkering with the IKE post and it's auto setup sheet, but I can't get all the functionality of the sheet below. Yet... I will.
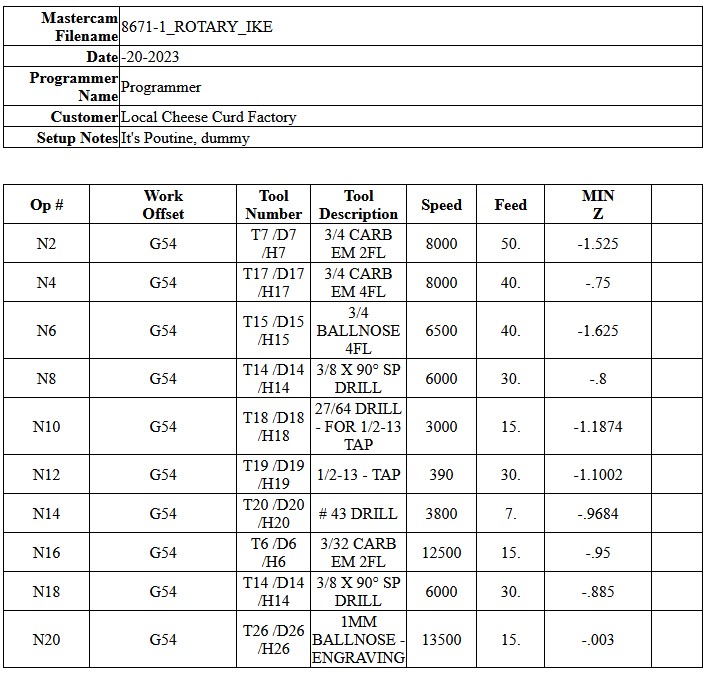
RECORD CYCLE TIME HRS: _______ MINS: _______ NO. OF PARTS: ____ MATERIAL: 3/16 - NITRO-V STEEL PLATE BLANK SIZE: WATERJET BLANK MILL TO: OP1 COMPLETE PARTS PER BLANK: 1 ***************************************************************** SETUP INSTRUCTIONS: ***************************************************************** HORZ ONLY HOLD ON FIXTURE 4731-0 ØTOOLING BALL IN .250 HOLE FOR MEASUREMENT BOLT TO FIXURE USING CLAMP (4731-5): 2X 4-40, 2X 1/4-20 G54 - B0 X=0 AT C/L OF TOOLING BALL Y=0 AT C/L OF TOOLING BALL Z=0 AT TOP OF TOOLING BALL G55 - B63 X=0 AT C/L OF TOOLING BALL (AS PRESENTED) Y=0 AT C/L OF TOOLING BALL Z=0 AT TOP OF TOOLING BALL (AS PRESENTED) G57 - B297 X=0 AT C/L OF TOOLING BALL (AS PRESENTED) Y=0 AT C/L OF TOOLING BALL Z=0 AT TOP OF TOOLING BALL (AS PRESENTED) SEE SETUP SHEET ***************************************************************** MAX SPINDLE SPEED = S15000 OVERALL MAX - Z2. / OVERALL MIN - Z-.8621 N10 G54 B0. T5 H/D#107/8 // TD( 0.5000 ) MIN_Z= ( Z-.4509 ) 1/2 CARB EM 4FL - FIN N20 G54 B0. T12 H/D#107/8 // TD( 0.2500 ) MIN_Z= ( Z-.4509 ) 1/4 CARB EM 4FL - FIN N30 G55 B63. T7 H/D#107/8 // TD( 0.7500 ) MIN_Z= ( Z-.8621 ) 3/4 BULLNOSE 4FL - RUFF N40 G57 B297. T7 H/D#107/8 // TD( 0.7500 ) MIN_Z= ( Z-.8611 ) 3/4 BULLNOSE 4FL - RUFF N50 G55 B63. T17 H/D#107/8 // TD( 0.7500 ) MIN_Z= ( Z-.857 ) 3/4 CARB EM 4FL - FIN N60 G57 B297. T17 H/D#107/8 // TD( 0.7500 ) MIN_Z= ( Z-.856 ) 3/4 CARB EM 4FL - FIN N70 G54 B0. T12 H/D#107/8 // TD( 0.2500 ) MIN_Z= ( Z-.4509 ) 1/4 CARB EM 4FL - FIN ++++++++++++++++++++++++++++++++++++++++++++++++++++++++++++++ !!!! TOOL FEED INFO !!!! t5 5 FEED- 6 PLUNGE- 50 RETR = 400 RPM - 1500 // EXT LGT = 4. FL/LGT = 1. t7 7 FEED- 4 PLUNGE- 50 RETR = 400 RPM - 1000 // EXT LGT = 2. FL/LGT = 1.2 t12 12 FEED- 10 PLUNGE - 50 RETR = 400 RPM - 3000 // EXT LGT = 4. FL/LGT = 1. t17 17 FEED- 10 PLUNGE - 50 RETR = 400 RPM - 1000 // EXT LGT = 4. FL/LGT = 2.-
1
-
-
Another method for renaming on-screen solids is to select one and hit F4 (or your shortcut for Analyze), top of that window is a field for the name.
-
3
-
-
1 hour ago, sharles said:
I'll have to try that on an engineering change in the future.
Extremely useful way of using it. Did an up-rev'd part not long ago and used the section view + edit to inspect where the holes got close to the part walls. Gave me a good idea of how far to poke the drill without breaking through.
I also made 2 separate planes I could section with to check backplotting, if you use this feature more I'd map it to a keystroke. I have mine on Shift+S to toggle it and check my work while I go.
-
1
-
-
Noticed in 2024's Sim I need Verify>Quality>Accurate Zoom a fair bit more than I did with 2022 to see that crispiness. Also, leave Turbo Mode off in the same area, and try jiggling with the Performance - Precision slider right of the transport buttons at bottom middle. Might help some with your initial views.
Also, don't forget Reset Zoom once you have used Accurate Zoom, as it cuts off what is outside of your current view
-
My most improved feature is viewport performance, moving from 2022. Even a simple solid would chug-a-lug when rotating, only started noticing after moving from a 1080p monitor. But now on 2024, she spins like a top, and holds near to 60FPS even with materials on, with a Quadro K620 @ 2560X1440.
Also, after my remedial classes on the new stock setup, I'm quite happy with Twenny Four.
Force tool change on first instance only
in Industrial Forum
Posted
Have you seen this one?
https://www.researchgate.net/publication/338480003_Grain_structure_control_during_metal_3D_printing_by_high-intensity_ultrasound