


Roger Peterson
-
Posts
2,629 -
Joined
-
Last visited
-
Days Won
1
Content Type
Profiles
Forums
Downloads
Store
eMastercam Wiki
Blogs
Gallery
Events
Posts posted by Roger Peterson
-
-
What version are you using? I think your issue is how you are defining your path. I haven't used ImportAllOperations but I think you'll need to define the path using the import options vs. just listing the path/name. Check the help file, it'll list all the different options for things like the file name to import, import toolpath geometry, import T/C plane, etc... I don't know which options are required other than the file pathe/name, I believe most/all of the others are just True/False settings which I would think would default to False if not defined.
HTH
-
 1
1
-
-
Yes, for large plastic part trimming. But when I was involved with this it was long before there were any useful offline programming solutions like RobotMaster or Octopuz. All of the paths were created with the teach pendant or via direct coordinate input. Robots can repeat processes very consistently, so once you have a process dialed in you are good to go which works great from long run or repeat run parts. To get to the point of a good part will more than likely take several iterations as the toolpaths will need to be moved around a bit, but this would be the same if you were using a 5 axis router as you are dealing with large plastic parts on fixtures that are often times less than perfect. The time it takes to get to a proven process will no doubt be faster with a 5 axis router.
With Robots you can think outside the box a little too. Your fixtures can be more creative to allow better access to more "sides" of the part. Many robots can be mounted horizontally, upside down, or on a linear rail to expand the work envelope or deal with limited ceiling heights/work envelopes.
HTH
-
1
-
-
sounds familiar with similar results. There was one place where they used to remove the 4th axis that was mounted on one end of the table every time a specific job was run so they could make parts in spec! I hate it when the real world and the laws of physics get in the way of making good parts... using a single axis approach definitely has it's place and can make a big difference, and it can be done manually if you don't have G60.
-
 1
1
-
-
What is our machine model and age? Have you done any testing to see if this improves accuracy on your machine? I had setup a custom drill cycle to do this manually for an old clapped out machine and it made a real difference. Being that rapid moves are all exact stop mode I'm just curious if you are seeing any tangible benefits.
-
The only way axis substitution would work is if the tool diameter is the same as the slot width.
Assuming you want to use a smaller too so you can have rough and finish passes, and you want to use the side of the tool, you are looking at Rolldie, Curve 5 axis, Swarf, Swarf Milling, and Ruled. The Multiaxis Parallel and Morph toolpaths would work as well, but they both add complexity to get what you are looking for.
HTH
-
2
-
-
I would recommend using the predefined variable tap_pitch$ as it will be correct for both inch and metric.
HTH
-
3
-
-
this was discussed in great detail during the initial testing of section views. It was set to be looked into for a future release.
-
if you want want to output multiple M codes on one line you can define it like this:
sm09 : "M09 M31 M31"
or
If you want to output multiple M codes on separate lines define it like this:
sm09 : "M09" + no2asc(13) + "M31" + no2asc(13) + "M31"
ASCII character 13 is a carriage return
HTH
-
1
-
4
-
-
you can create an .ini file for verify that goes into the program files/mcam2019 folder that will enable verify to show "O-ring" or "trepanning" tools. This will slow down verify so I would recommend removing it when you are done. I don't have the specifics of the .ini file in front of me. I'm sure your dealer can help otherwise I can dig into more later this afternoon.
HTH
-
I'm not sure you are looking for axis substitution. axis substitution is for when your tool is perpendicular to the rotary axis. Is that what you are looking for? Axis substitution is not typically supported by 5 axis posts but can be implemented.
if you are looking for your tool to be parallel with the axis of rotation Mastercam has this function on the rotary axis tab that will use the C axis. this functionality may be supported by your 5 axis posts, if not it can be implemented.
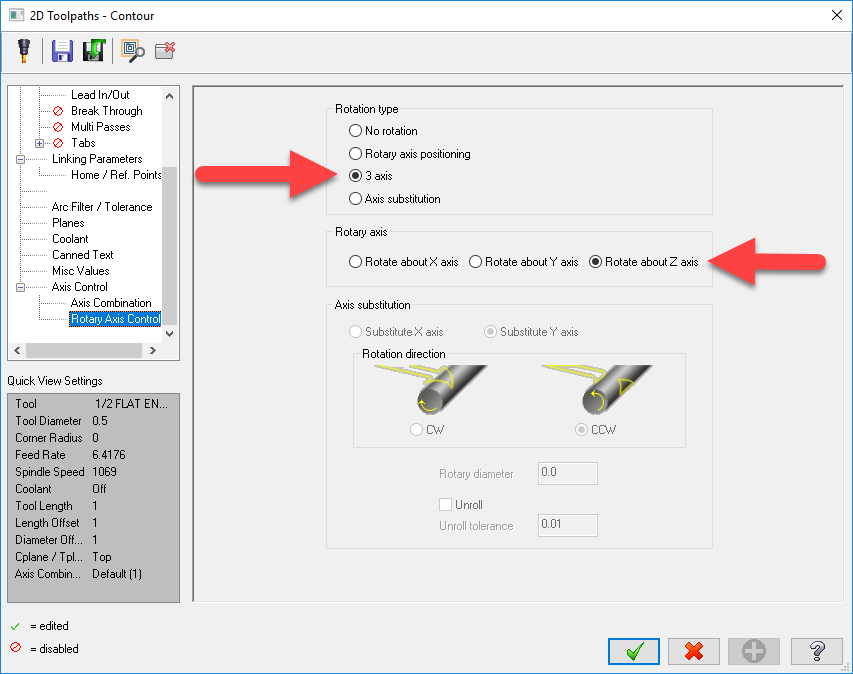
if neither of these apply maybe post a pick of your part in backplot so we can get a better idea of what you are looking for.
HTH
-
1
-
-
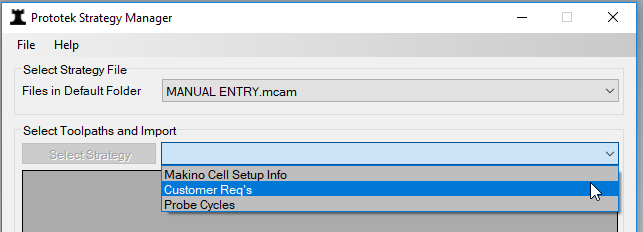
Importing Manual Entry Toolpaths work great. We do have a number of people that use our Strategy Manager to speed up the process of importing Manual Entry Toolpaths for setup info, header info, mfg instructions, probing cycles, etc...
HTH
-
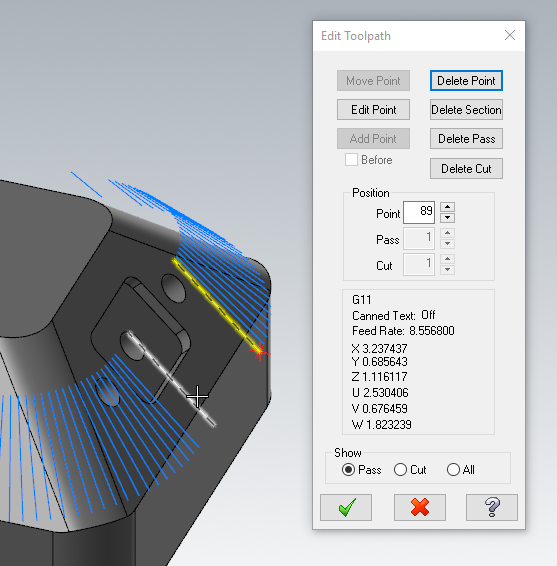
after you launch the toolpath editor you should just be able to click on a vector like in the screen shot below:
HTH
-
You can actually select the point via the graphics area, you just need to click the vector before hitting edit point. but using the up/down arrow to define the point works too.
HTH
-
the Toolpath Editor will allow you to edit the feedrate. right click on the toolpath and you will find it at the bottom of the right mouse button menu
HTH
-
1
-
-
While not the same as mass modifying multiple Transform toolpaths at once you CAN drag & drop the parameters from one transform to another. When you drag & drop the parameters it sets all parameters except which toolpaths are selected, but you can do some testing to confirm you are getting the results you need.
HTH
-
2
-
-
Mits makes good stuff, but you will find those who swear by Mits, ISCAR, Kennametal, Ingersol, SECO, Sandvik, etc... And they are all speaking the truth for what they do on their equipment. Insert technology (geometry, coatings, chip breakers, etc...) changes extremely rapidly, what was cutting edge a short time ago is now old news.
I would suggest you have all of the mfg's you know provide good service and maintain local stock in your area to come in and do a presentation, do several cuts on your machines with different materials you cut, and provide a comprehensive price list of the holders and inserts for the materials you work with. When doing the cuts keep exact data and video each cut to compare later.
I know we all want the best cutters and you normally get what you pay for, but if your equipment doesn't have the horsepower or rigidity to take advantage of some of the cutters you may find a less expensive option makes more sense for your company
HTH
-
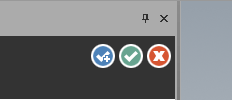
Blue check = Enter
Green Check = Ctrl + Enter
I have both of these mapped to thumb buttons on my mouse for quick access.
HTH
-
3
-
-
Lots of good info here. An "Adjustable Thread Ring gage" is notorious for going out of spec randomly, you will need to have a rigorous calibration schedule on them. You can get fixed gages, but they are not common and very expensive. What I've done is use two ring gage's, one on every part, the second is used by a second person to "audit" the production gage. Ideally this would be QC, but even just having a second person is better than nothing. The second ring gage only checks 1 per hour, 1 per10, or 1per 50, or whatever works for your application. Everyone has a different "feel" when using ring gages, so having a second person do it is important. While this doesn't eliminate ring gage issues it's gives you some redundancy. Don't forget to use the appropriate lube when using a thread ring gage.
HTH
-
2
-
-
many years ago I placed a .zip file on the FTP site in the post section that has a G10 list built in. You can update it or just copy the necessary logic out of it. I believe there are several other threads in the post section where this has been discussed as well, just do a search.
-
geometry selection is currently limited to wireframe geometry for 2D Toolpaths. For point based toolpaths you have the full point selection dialog and can work with either wireframe or solid geometry.
This is a limitation of the nethook api, I have requested the api to be expanded to solid selection for 2D toolpaths as well as for 3D toolpaths.
-
I've had a handful of requests to post this info here on the emastercam forum in addition to CNC Software's forum. If you are not familiar with the Strategy Manager we have had it since X9 to speed up the process of importing toolpaths and applying them to your geometry. The ultimate goal is to reduce programming time and improve consistency.
Like all the previous versions you are free to use the Strategy Manager at your own discretion. Here is the link to download the 2019 Strategy Manager:
https://prototekengineering.sharefile.com/d-sd6359f3a8524608a
In the .zip file you will find a pdf file with info on installing and using the Strategy Manager. There are also several example "strategy" files included for reference and testing. The video below has some good how-to info as well.
Regards,
-
2
-
-
Tool Shift on the multi cuts page
hth
-
1
-
-
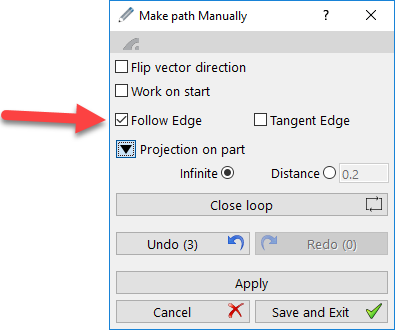
If you are doing a lot of this type of work I would recommend you look into the Moldplus 5 Axis Toolkit.
It does a lot for a little, including snapping to an edge when creating vectors.
HTH
-
2
-
-
There's really only one right answer, put the entire "shared mcam2018" on the network and point both pc's Mastercam to use it. if you do this updating from version to version is as simple as running the migration wizard.
Any other configuration requires re-linking to posts, tool libraries, etc.. While not necessarily a problem it is time consuming and in the case of re-linking posts can have terrible effects if done correctly.
below is a pdf file that goes through the process of sharing files over the network. The pdf is for 2017 but the process is identical for 2018
HTH
-
1
-
How to import operations with Net-HOOK?
in Mastercam C-Hook, NET-Hook and VBScript Development
Posted
As far as I know it's Mill & Router only, Lathe and Wire toolpaths are not supported.