


Justin Beebe at Folsom Tool
-
Posts
1,138 -
Joined
-
Last visited
Content Type
Profiles
Forums
Downloads
Store
eMastercam Wiki
Blogs
Gallery
Events
Posts posted by Justin Beebe at Folsom Tool
-
-
We finally got our Haas UMC-750 up and running and I am going to start cutting on Monday. We also purchased at post processor from In House Solutions through our reseller for this machine. I had a few general questions about the machine I was hoping someone could help me out with.
Question one is currently our Post is posting out G254 which is the code to turn on "DWO" Dynamic Work Offset. It is my impression that you would only want to use DWO for 3+1 or 3+2 machining when the part is positioned on the machine in a different location than it is in the CAD system. Currently I am programming all parts from the center of rotation and they are on the machine in the same location as I have them in Mastercam. How can I get the post not to post out G254 or only post G254 If I need it too.
Secondly should I use the rotary lock and unlock codes with this machine. The Haas tech told me not to unless I am doing 4 or 5-axis milling where the machine is cutting while moving 4 or more axis simultaneously. He said in this case I would want to unlock the B and C axis using the M11 and M13 codes, let the multi-axis tool path run then lock the axis with the M10 and M12 codes. He said if I didn't do this the machine would be trying to lock and unlock during the tool path. He also said for 3+1 or 3+2 machining you didn't need the codes because the machine would lock and unlock automatically. This doesn't sound right to me. I was wondering what people are doing who have this machine.
Last question for now anyway is G84 the code for rigid tap on the Haas UMC-750. Normally that is for a floating head.
Thanks in advance,
Justin
-
brandon b,
You can do it either way but from what I remember the G9 code makes your program run slower because the tool is decelerating on each move when it gets close to the end of the move. If you know what line the toolpath alarms out on you could add the G9 just prior to that line. The G9 command is modal and will remain active until you cancel it with a G8. I would also recommend running the tool a few inches above the part the first time you try it just to see how the machine is going to react.
Let me know what happens.
-
For the record I used to get this alarm on a Fadal back when I was programming with MC9 and have gotten it with all versions of Mastercam since then. The only exception is I haven't been using MCX7 very much so I can't say for sure if I have produced the alarm using X7. I believe it to be a Fadal issue and not a Post issue. The machine can't handle the move when "The radius of the circle and the helical rise are radically different in length.". I believe this is why fadal suggests slowing down the feed when you get this alarm. This is also why I believe adding a G9 may fix the problem. In the past I just kept messing with the settings until I got the code to run. Next time this happens, and I'm sure it will, I'll try the G9 and let you guys know the outcome. I'm really glad this topic came up.
-
mkd,
Good thinking with the G8 but I think the code that would help would be a G9. This is from the Fadal user manual:
G8 Acceleration (No
Feed Ramps)
This code is used when no hesitation is desired between moves. If the tool
hesitates the tool pressure lessens and the tool will leave a tool mark on the
contour. The G8 code would be used to eliminate the tool marks.
The hesitation is called a feed ramp or acceleration-deceleration. Ramping is
used to help the tool move to the desired position.
Fadal User Manual
• The G8 code is often used in combination with the M92 code.
• This code is modal and will remain in effect until the G9 code is used.
• The G8 code is a default code for format two.
• The G8 code is incompatible with a G41 or G42 coded on the same line.
• The G9 code is used to cancel the G8 code.
• The M95 code is used as a non modal form of the G9 code. It is generally
used when G8 is in effect. See M95 for more details.
G9 Deceleration
(Feed Ramps)
This code is used when hesitation is desired between moves. When the tool
hesitates the tool pressure lessens and the tool will leave a tool mark on the
contour. The G9 would be used to help the tool move from place to place when
inertia may be a problem. The use of the G9 code as opposed to using the G8
code will help insure contouring accuracy.
If an axis is faulting at a certain move, the G9 could be used to help the
machine to get through the move by decelerating at the end of the move and ------ READ THIS
then accelerating again at the beginning of the next move.
The deceleration will only slow the tool down at the end of the move. (It will not
come to a complete stop).
• This code is modal and will remain in effect until the G8 code is used.
• This code is default for format one.
brandon b what format are you using on your Fadal format 1 or format 2?
G8 is the default for format 2 and G9 is the default for format 1
I believe using a G9 will make your program run slower so I would turn it on only where needed.
G9 may or may not work because the alarm occurs on the arc move but maybe if the tool is deceling on that move it will help.
I will be interested to try this next time I get this alarm also because it drives me crazy when it happens.
-
brandon b
I get this message on our Fadals as well. Sometimes if I switch the entry method from helix to profile it fixes the problem. Other than that I just mess with the settings for example step over or depth of cut until I get the toolpath to run all the way through. You can also use the SUM command at the Fadal to check for errors before you run the actual program. It usually tells you if there is a problem. Here is one more thing to try. This is right out of the Fadal user manual.
HELICAL MOVE TOO SHORT, N =
See error message HELICAL RISE TOO STEEP.
HELICAL RADIUS TOO SMALL, N =
See error message HELICAL RISE TOO STEEP.
HELICAL RISE TOO STEEP, N =
The radius of the circle and the helical rise are radically different in length
(usually the rise is much longer in comparison to the radius). Also, depending
on the programmed feed rate, the control may or may not be able to handle the
situation. Reducing the feed rate in the program can sometimes correct this
problem.
May want to try reducing the feedrate where the machine alarms out and see if the machine can handle the code when it is running slower.
HTH
-
We have a Haas UMC750 coming in about one week. I believe we ordered this machine eight or nine months ago. Its been so long I can't remember. I contacted our reseller yesterday to inquire about post your guys are talking about on here. I'm still waiting to hear back from them. I'll let you know how it works out.
-
Thanks for the other suggestions we have solids so I will look into that.
-
Thanks JParis that looks awesome. I got something similar working. I chained the two vertical red lines and used Peelmill. By adjusting the start and end points of the lines I got a path that looks pretty good. I like your method better. Thanks for the help.
-
 1
1
-
-
Is there a way to get 2D Highspeed Dynamic milling motion on an open pocket. I want the tool to start outside the material and work it's way in like the old 2D open pocket method but I want to use a dynamic cutting motion. In the picture below I need to remove material inside the red geometry. The green geometry is my stock. I would like the tool to plunge off the material and works it's way in.
-
I got it working now using flowline. Thanks for all the help. I really appreciate. When I get some free time I will try the surface finish project method as well.
-
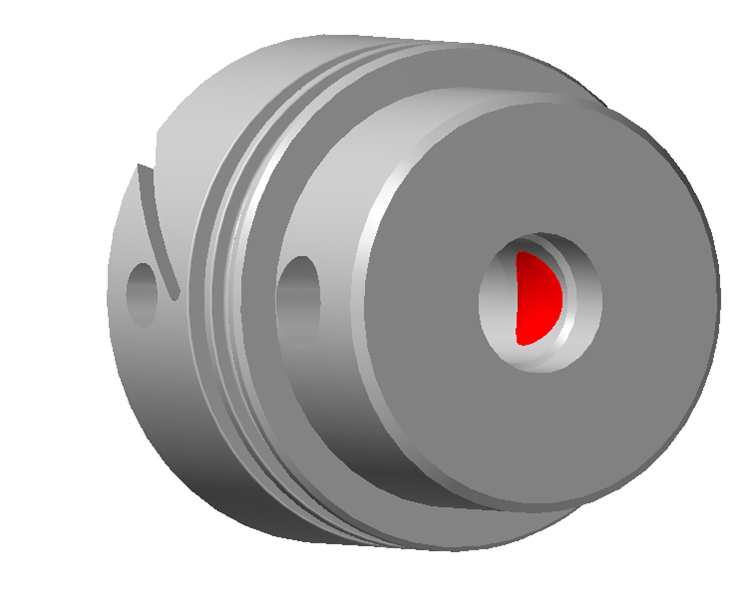
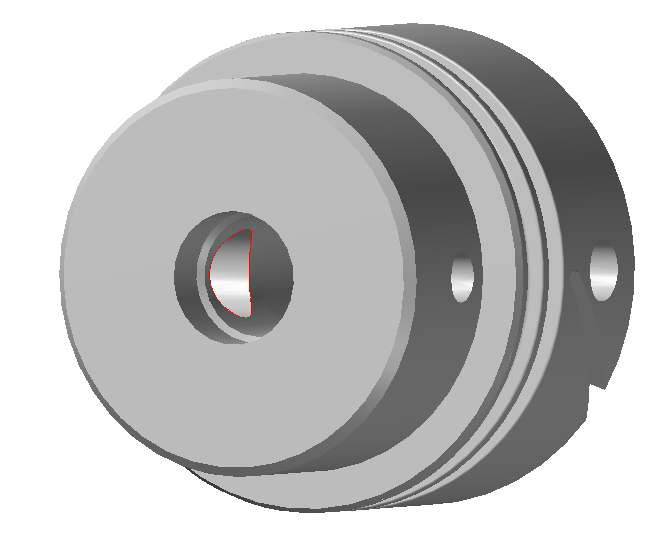
Ok now I think I know what you meant. I put a radius around the edge where the hole breaks through. It's shown in red. Still trying to get the toolpath perfect but I'm close.
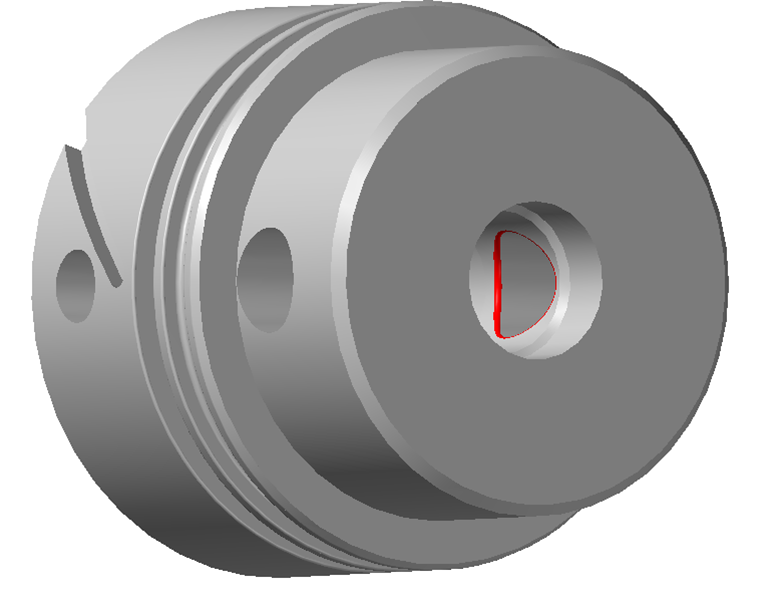
-
I created the red surface and used a flowline toolpath but it gouges the I.D. bore in verify. Not sure if this is what you meant to do.
-
Mark I'm not sure what you mean by small radius at the intersection. Do you mean with surfaces.
-
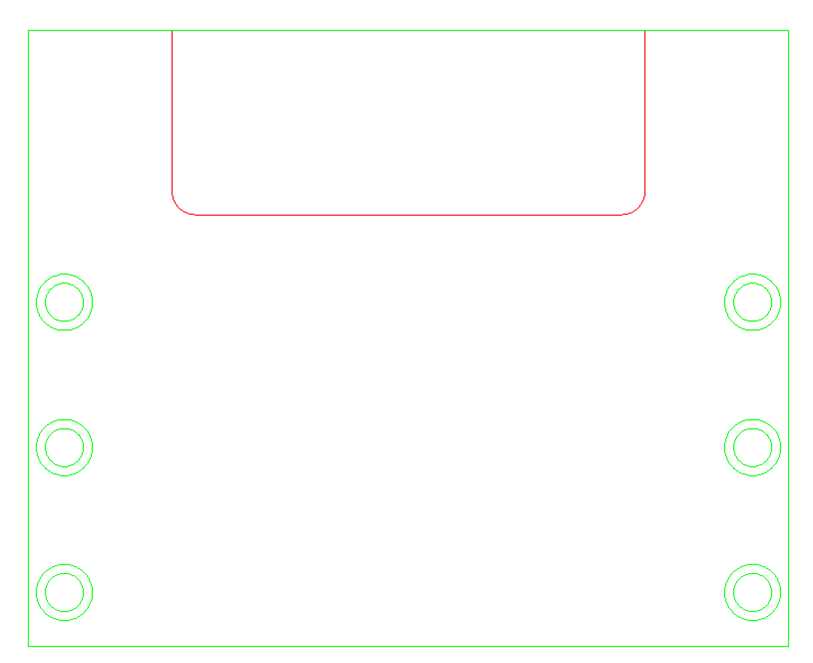
I know there was a post on this before but I can't seem to locate it. I need to deburr the inside of two holes that cross each other at 90 degrees. Please see attached picture it's the red geometry. Any help is appreciated. I can share this file if someone thinks that will help.
-
I have this same issue on my Fadal. My post was set to lock and unlock the the A and B axis in between cuts. So every time the tool finished cutting it would retract, move back to the start position, then both axis would lock and unlock, then the machine would do the next cut. This was overloading the control with too much information. Between the locking and unlocking of both axis and the switching between G93 and G94 it would cause the machine to have pauses and jerky motion during the cut. When I remove the lock and unlock codes in between cuts and just leave both axis unlocked until I am completely done with the multiaxis tool path I get very smooth tool motion. I'm not sure if your having this same issue but this is what worked for me.
-
Ok thanks for the help.
-
I have to mill a counterbore with a right angle head on our Makino horizontal mill. It's the counterbore going through the boss on the left side of the part. The axis of the counterbore runs parallel to the X-axis of the machine and the tool will be interpolating in the YZ plane. By using a router post I was able to post some code that looks good. My question is how do set the tool length offset for the tool in the angle head so the machine cuts at the correct Z level. I was thinking to use our tool presetter and set it to the centerline of the tool. I don't know what common practice is. Also how do I let the machine know how far out the tool is sticking out of the angle head along the X-axis so I can control the start and finish depth of the counterbore. Can I define this in the tool definition?
Thanks for the help. I have never used and angle head before
Here is a pick of what I'm trying to do.
-
I'm looking to do the same thing. Did you ever figure this out.
-
I had this same problem before. I think the issue is that you have two different size monitors. If you set up your tool bar states on one size monitor and then open mastercam on a second monitor that is a different size the tool bars won't stay docked. My solution was to get two monitors that were the same size. Ditch the 17" and get another 22"
-
Since your only selecting a small number of arcs try this after selecting the drill tool path.
Right click on "arc center" from the drop down menu on your auto cursor override. This will only allow you to select arc center points. Then select all your arcs one at a time. This may not be how you are used to doing it but it is an easy work around and my method of choice for selecting geometry to drill mainly because I have full control of the drilling order without having to use the sort function. Just don't forget to turn it off when your done or you will have problems snapping on to entities other than arc center points with your auto cursor.
-
One way to accomplish this would be to draw your own tool path and then use the tool path editor to change the moves around the outside to rapid moves. Since some of your geometry will most likely over lap use partial chain with the "wait" feature checked to chain the exact path you want the cutter to follow. Also you may have to turn off infinite look ahead unless you have compensation type to off.
-
1
-
-
Jeff,
I was clicking save the issue was with the size of my picture. When I deleted it everything worked.
Thanks for the info.
-
Jay and gcode
Thanks for the info. I checked my screen settings and disable hardware acceleration was not checked and open GL was checked. I also installed SP2 this morning and it doesn't seem to help the lag issues. I just had to go back and open an X5 file with MCX5 and it verified really fast. I'd like to get these issues fixed with X7 because I really like it aside from poor performance with verify.
-
When I change my sig the changes won't stick. I did a search but couldn't find any info on this subject. Anyone else have this problem?


Haas UMC-750 General Questions
in Industrial Forum
Posted
Thanks Chris,
I can call Haas and our reseller on Monday. I'm was just trying to do some footwork this weekend and get some answers before I got into work on Monday. I was hoping someone who had this machine could shed some light.