


Carbonwerkes
-
Posts
42 -
Joined
-
Last visited
Content Type
Profiles
Forums
Downloads
Store
eMastercam Wiki
Blogs
Gallery
Events
Everything posted by Carbonwerkes
-
Ops manager toolbar button move possible?
Carbonwerkes replied to Carbonwerkes's topic in Industrial Forum
Thanks for taking the time to let me know. It is strange in that Microsoft has all these requirements for MS certified software, and I write to those just because people want consistent behavior between applications. Why it is that the devs went to the trouble of allowing main menu config, and even pulldown menu customization, but didnt just replace the tool bar in the Ops manager is beyond stupid. It leads to breaking changes. And it is so unnecessary. How long would it take to replace that bar with a standard control- they already have the object (MFC or internally developed, whatever- they have it for the main menu etc)... Spend 2 hours to migrate this one over, and you dont have this problem of a really ugly mistake 5 pixels away from a super-common command icon. Anyway- thanks again, Ill just setup my backup strategy to every 1 minute with 200 saves deep... Silly the workarounds we have to do for a very expensive piece of software... Best, Rob -
Sorry in advance if I have missed a post on this. I would like to alter the position of several toolbar buttons within the Operations Manager/Toolpaths ribbon. I don’t see any obvious way to make that happen in MC2021. By convention, most Windows applications permit control over ribbons via drag or pulldown menu. And, that exists for the main ribbon bar, but not (so far as I can tell) for the Ops manager. The reason for the need may be obvious- but if that is the case, Im not clear as to why such a simple change would not have been implemented long ago. In my environment, we tend to favor using toolpath subgroups as blocks which can be included or excluded from post. This helps for a scenario where we have different hole patterns in a generic mount plate for example. In larger projects, we may have a subgroup that handles different ornamentation (surface milling patterns), and we may have different pocketing depending on the material in use etc. I can end up in a situation where I have several toolpaths showing in determining what config Im posting, and if I want to clear them- I might do a select all and then toggle that Show/Hide toolpath button. An accidental click on the Ghost and I end up will all ops set to the same post state, and there is no undo on that command. So yea, I know I can setup an F-key/macro for the hide/show toolpaths, but Id prefer to have the option to simply move the Ghost button to the far right of the command ribbon etc. This may be possible via registry edit- Ill have a look. But if there is some direct method via the GUI- that makes it easier in case of a reinstall/update that may overwrite the registry mod etc. I hope the week is starting out well for you all- Best, Rob
-
Colin- When I get a bit of time, Ill setup a test as you defined. Right now im treading water with a bunch of things and the workaround re: lock at least allows me to see the output I would expect. Im doing some very fine patterning- more or less just pinstripes on subsection of an American football- large radius for the X axis curvature, and smaller radius for the Y relative to the part . The challenge is just that even a tiny error in rotary synch.backlash comp is dead obvious, since the pinstripe is shallow cut with a 3/32 ball; any inconsistency changes the width of the scallop, and since that seems to happen in a few places along the path, consistently for each pass, you see these weird patterns/shift of depth of scallop etc. Its very intolerant of error. I will have a look at the NCI though; that is quicker for me anyway, and if the output from MC is locked at 20, but the post is altering that- OK. I expect this is MC, because I have seen these biases trend, where the deltas seem higher (i.e. 20.01) near the extents of travel on the X axis vs the center of the part where I see these tiny errors. If this is just a .000x rounding error, I would not expect to see this change. I just dont understand the order of precedence in how MC generates the path. If the 'angle' definition is early in the flow, and there are other components like damping or whatever that apply later, I could see how this could happen. It seems to me impossible to have damping or other smoothing/filtering have effect if the output can just be clamped at the final phase of the process. But, the table lock thing works- so I assume this happens at or near the end of flow where it will simply clamp a value. Not clear to me how this impacts coordinated motion- if X/Y/Z are filtered and coordinated with A upstream, and then A is changed later... So maybe it is all being handled before the motion coordination logic happens, but 'angle' is upstream of 'lock' to the extent that some other factor can exist between the two... Best Rob
-
This does work for me. Strangely, even with the axis lock/limit set (i.e. at 70/70) I still see the NC file with the initial A position at A20.001. I may step through the post and see what the NCI is saying vs if the post is doing something unexpected. But yea, thanks for the suggestion- it does seem to work for multiaxis parallel at least. Have a great weekend everyone- thank you for the help. Best Rob
-
Hey guys Ive run into an annoyance with my 4th axis moving a bit in an operation where I want it fixed. The operation in question will mill a simple pattern into a shallow domed surface. Analogy would be pistol grips or knife scales, where maybe I want a pinstripe or crosshatch pattern on a shallow curved surface. The goal with the rotary is to put the work at 20deg rotated on the X axis, so that Im cutting with the side of a ball mill- and not with the tip. Im running a simple multiaxis parallel op- where I have the 4th axis set to 70 for tilt angle and 0 for rotary angle. 5th axis is locked at 0. Problem is, the post is outputting what seems to be some noise- where in 10 lines I might see A20, A20.001, A20, A20.002. This matters- since it will trigger backlash comp and I can see negative effect on the finished surface. What is puzzling to me, aside from the system not observing the 20deg rotation value defined, is that this output is never < 20, and it always reverts to 20 between non-20 values. There is no A20, A20.001, A20.003, A20. It would be A20, A20.001, A20, A20.003 etc spread over whatever- 20 lines or so. Seems to have rotational change at start, midline, and end of each pass. These things suggest to me this isnt rounding noise- but it is hard to understand why if 20.003 is a valid/required tilt to achieve some other geometrical constraint that I never see A19.997. Any idea if there is a way in multiaxis parallel to force A20 as the output? Thanks all- Rob
-
Hi Colin I can do that in CAD. Im not very comfortable with MCAM’s Cad functionality, so modifying the part enough to not violate NDA, while maintaining enough of the problem to be useful for an example, is outside my comfort zone within the MCAM environment. Some details, including the shape of the island in question, are uniquely identifying, and that would all have to be obfuscated. If I cant get something to work a little better than Ive got the opposing face cutting, it may well be wort the effort to build a model up which demonstrates the same core problems, and post something up so perhaps someone could have a look. For the surface, normally Im just roughing, and it doesn’t matter if there are cusps etc because the patterning (which it typically ball mill) cleans all that up. And that is why I have not encountered this problem until now- I knew there were some cusps being left from the 5x Rough, but I didn’t realize how bad they would get at the corners when I started removing more material (read: creating a tighter radius). Now it isnt just a few thousands error- it is a hundredth or two... For this particular variant, the handle is to be smooth, with a much less dense pattern applied (more like an engraving). So, Id like to get the surface close to final both to save time in hand sanding, but also to keep tolerances tighter. If Im +.001 mid body and +.01 near the 4 corners- it is difficult to sand that such that the patterning doesn’t give you away. Best
-
Hi Colin As always- I appreciate your insights and support here. Thanks for the clarification on the Triangular Mesh stuff. I don’t know why this is placed in the Multiaxis- though I suppose the ‘tilt’ avoidance benefits of those paths can only be realized on a 4+axis machine. For this particular project, the setup has 3 billets along the Y axis. That offsets 2 of the billets from a conventional rotary definition, since the surface cannot be defined by a radius from the axis of rotation. But I suppose I could replicate the cylinder you mention by the same offset seen with the billets, and re-use the path approach? I don’t know if the cylinder must be on the axis of rotation or if it just serves to generate vectors for the tool which are later resolved in 3D space. I have had some difficulty getting the multi-axis patterns to leave the island alone. They don’t seem to respect the idea of a check surface- at least not very precisely. Is there a particular pattern/strategy you think I might be better off applying? Flow works fairly well for the opposing handle which is absent that island- but I just have nothing but trouble trying to apply it to the example here. The Roughing Multisurf creates a very nice-looking path- but yea, it just is stuck in 5-axis mode and there is no way out of that it seems. If I can get the island to be left unscathed- really neat idea about doing an offset chain from the edges of the island top (mine is flat/parallel with the table/raw stock). I have had great luck with Project in applying textures to shapes like the handle in question- and it had not occurred to me to leverage that as a 3D fillet cleanup method for the island… Kind regards
-
The part is aligned lengthwise along the X axis of the machine. It is running as Top plane where the handle is parallel with the table as X/Y. The rotary allows me to do far more efficient cutting in this orientation, since most of the radius/material removal can be addressed in that orientation. Attached is a generic example of the model. The handle in this example is basically domed in one axis. In the model Im working on, there is a slight amount of radius over its length also- so it is slightly more thin at the midline of the tail as the midline of the center of the handle. As you can see in the example here, there is an island which is proud of the rest of the body. This is very similar to the island in the model here- and poses a bit of a problem. For the opposing side, there is no island, so a Flow toolpath seems to work quite well. Flow has given me a ton of problems with this island, so I was looking for an alternate pattern/strategy. And all I have tried seem to be really unhappy with this slightly domed surface in the longitudinal axis. They are all fine if this is just a pure 4-axis (i.e. a cylinder). So maybe I just need to really focus on Multiaxis Flow to try to get it to work better with the island. But it just seems like a very open surface like this with no hollows, no sharp notches etc should be very simple to toolpath. But- nope.
-
Hi Motor! Yea, sorry, it is tough to balance too much with not enough info for a new thread post… So the actual part is a knife handle- in 3D. It has a very shallow radius- about 5”. It has a protrusion flat/island to support a pocket clip. The op is simply to convert a 2D waterjeted blank so a shallow dome, for later texturing. There is a tiny amount of radius in the lengthwise direction- call it a 10” radius or so. This seems to be the aspect that is causing trouble. The machine is a 3-axis VMC with a 4th axis trunion oriented along the X axis. The handle being cut is oriented in the same way- to permit 4th axis work on the primary radius of the dome- The goal is to try to get the handle smooth-enough to sand, where I can live with some cusps, but not with leaving 0.01” material on the extreme corners so that the mid-body can be cut to within a few thousandths. The material is 6AL4V, so hand-sanding it sucks. Multi-axis roughing seems to work about the best of anything I can get to work. It seems to care a whole lot about the geometry of the containment boundary, which seems to like to be elevated (as with a more typical 5 axis Flow op). I don’t know what that is- perhaps it is limiting the A axis rotation and also the X/Y travel to a good average… It just seems really weird to me that there may not be a basic multi-axis surfacing routine. It seems that I should be able to just define a 3D surface, define keepouts in whatever way is required (collision geometry, chains, whatever), and then define a pattern where the cutter remains as normal/tangent to the surface as possible, without a whole lot of effort otherwise. Thanks so much for any insight you can share- Im 2 days into trying every trick I know, and it just seems all those tricks are pocket-related! Best
-
Hey guys Im having a heck of a time with a 4-axis surfacing path that ‘should’ be simple. The part is NDA so i cant post an image, but conceptually, in the spirit of Superbowl weekend, it is very similar to just a rectangular section of a football, 6" x 3" by about .5" thickness, which includes the laces mid-body. So, yea- I have a 3D smooth surface with an island that has fillets around it. I am just not able to find a baseline toolpath approach that works, where I can run it 4-axis with a bull endmill for clearance (speed and smoothness), and then deal with the normal cleanup of the periphery of the island later. My understanding of the Multiaxis Triangular Mesh is near zero, having little experience with it. I read several posts here which imply it is a 3axis path, so Im confused as to why it is listed under Multiaxis Pattern, and why it has options for 4-5 axis output. Regardless, even with it- just not having a lot of luck. I can get 3 axis output from it which looks wonderful- constant cusp is about a nice as you could hope for. But, the only time the output will call an A axis move is if the collision control is enabled and tilt is required to prevent a gouge at an edge of the part etc. It doesn’t cause the tool to run tangent to the surface, even when Tool Axis Control is set to 4-axis set to ‘Surface’ for its 4th-axis bias… Multiaxis Application->Roughing works reasonably well but it seems I cannot lock the 5th axis to 0, so I end up with nasty gouges as the surface (tangent) bends further and further away from the XY place. Any ideas/direction? I have not really had to deal with a 5axis surface before- but it just seems to me that if I can emulate it via 3-axis, I should be able to emulate it better with 4 axis- reducing cut time at least for that section of the part which is more or less concentric with the axis of rotation. Thanks guys! Always appreciate the help.
-
Yea, I had already set all feed options to ‘use inverse.’ I mentioned that in my initial post- sorry I wasn’t clear with that. But yea, I had expected that when all mill options were defined as ‘use inverse,’ that is all you should see from the post. It seems as if perhaps the MPMASTER implementation doesn’t function quite correctly in this regard, or perhaps some edit to the post in the past has caused it to not apply to certain motions, but apply to others. For now, I have just modified the controller itself to better deal with the mode changes- just tweaking some acceleration values and buffering etc, and that seems to make it able to swallow these rapidly changing modes. But if anyone comes across a solution for this- where if all Mill feed options are set to ‘use inverse’ and you still see unit/min outputs for 5-axis linear motions, Id be happy to know the trick- Thanks guys
-
Hey guys- Running 2017 and MPMASTER for a 4 axis machine. My controller is having some trouble swallowing a bunch of interleaved G93 and G94 lines in a complex 4 axis cut- perhaps a buffering thing- where it seems to believe some of the G93 F commands are G94 IPM feedrates- and things lurch about. Anyway, I wanted to just pin the code into G93 mode, but it seems that option isn’t fully controllable via the Control Definition for MPMASTER. If I set all options under ‘Feed/Mill’ to Use Inverse, I would expect to only see G93 output. But I still get G94s intermittently through the file- perhaps 10% of the lines in a given 4-axis op. I know that in MPMASTER there is under pfcalc a commented line which is itself commented as ‘G93 rotary / G93 linear’. And, if I enable that line, and comment out the default G93 Rotary / G94 linear, I do get only G94 output. But I also get an error message in the post process: PST LINE (3834) - The formula/boolean failed (general message), , Label has not been defined[85] And with that, a series of errors like: 09 Jan 2019 06:54:09 PM - RUN TIME -PST(3834)- The math calculation/formula has an error 09 Jan 2019 06:54:09 PM - RUN TIME -PST(3847)- The math calculation/formula has an error Line 3834 is the as-stock logic: if not(use_frinv) & (abs(fmtrnd(cabs)-prvcabs) <= 0.001 | index | not(rot_feed) | opcode = 3), pfcalc_u_min # G93 rotary / G93 linear So, I don’t quite know what is going on. The output appears to be valid, but its hard to know is the math calculations warning is real (and yielding invalid output), or just some oversensitive whatever. Any ideas on how to pin the post into G93 mode for this type of file? As always- thanks guys- very grateful for your insight.
-
Hi Jeff That seems to work well- at least on a couple of basic trials. Thank you so much for this. Im not a C++ guy, but at least I have the source now so i can browse though it and see how the calls work, in the case I need to do something a little more strange (i.e. elliptical stuff- not sure if that can be called programmatically, I assume so). Again- thank you- huge time saver for me. I hope others can find application for it also- Best
-
Hi Jeff Yes- that is correct. So for any value < 100% and greater than 0%, you have a decreasing incremental change in radius increase per instance. For >100%, you have the existing scale function. Im very sorry to have been so delayed in response- had some other things come up which kept me sidetracked a couple weeks. But yea- if you can implement this approach, it will yield a capability that I dont believe can be forced via any native function, and it would be very helpful for pattern generation. And, it would save people like me who are looking to do patterns/texturing natively a ton of time. Maybe the programmers will at some point include a dialog box to permit this capability in the existing scale function- Best regards-
-
‘Blended’ spline pattern, how to achieve?
Carbonwerkes replied to Carbonwerkes's topic in Industrial Forum
Hi Aaron I doubt it is a linking setting I control- not only have I tried basically every variant, but they are all conservative (i.e. all in testing were set to retract to rapid distance for any gap etc). And, the fact that it works for 98% of the 50 splines that define the pattern suggests to me there is something awry. I did find that changing (removing) the 3D/2D containment did often help, but not always. For my application, the goal is just to be able to define any sort of winding river type pattern of lines along a handle- where the inter-line gap is not fixed (i.e. it might expand out- as with a river flaring at a corner, etc). At present, the pattern is defined by 2 splines and a surface in a single plane parallel to the top plane- connected by a loft, which then serves as a surface for a wireframe->Curves->Curve Flowline path, with 50 curves defined. That is then the pattern for a Project Curves path onto a 3D surface (a surface created in MC as a create-from-solid from the imported solid- to make sure this was all native geometry). I suspect this has something to do with the body geometry being a shallow dome, where the system determines that even a ballnose will have more engagement on the right/climb side if the body is sloping upwards on the right side of the cutter, I notice that the toolpathing is always +X to -X on the near side, and -X to +X on the far side, and that midline it zigzags. This seems to be related to the probem, because the drag tends to be related to this segmentation along the Y axis (3 regions). That is, the origin always seems to be at a transition of these regions on the -X side of the body, and exits at some max or min Y position mid X along the body. I dont know if there is a way to just force the toolpath to always move from +X to -X for each curve in the sequence. I cant seem to force this, even by screwing around with the direction or side of the chans in the chain manager... Any idea on if this is possible to implement in 2017? Ill look at parallel, but I dont know if that allows me to apply a pattern which has a source component which fans outside the physical body to be cut... Regards -
‘Blended’ spline pattern, how to achieve?
Carbonwerkes replied to Carbonwerkes's topic in Industrial Forum
Well, blend doesnt seem to work. it doesnt want to maintain the pattern closely for whatever reason. It does seem however the core problem with the Parallel projection pattern is related to a containment curve. By toggling that around a few times, and eventually trimming all ops except this core texturing op, the pattern compiled cleanly. Nothing had changed, so seems like a bug. Anyway- at least its not dragging the cutter diagonally across the textured surface... Not sure I can force it to cut only right to left bottom to top- maybe with manual edits to the paths in the Chain Manager within the operation, but at least the pattern is clean. I hate intermittent bugs... Not sure if this is closed- maybe just luck for a particular projection effort. But, it seems to illustrate that it isnt a parameter config, and has more to do with a functionality with MC. -
‘Blended’ spline pattern, how to achieve?
Carbonwerkes replied to Carbonwerkes's topic in Industrial Forum
Sorry, I cant- it is a proprietary part/NDA. I may be able to send just a surface along with the curves Im projecting, since untrimmed it isnt that useful or indicative of what the part is. I know it is hard to diagnose based on an image, and I wish I could send the model; Im sure there are many paths possible that would work. Where Im coming from on this is that, if I have a setup that works for the sort of simple example image above (the Venturi type thing), I was hoping that I could use that as a baseline and just focus on the curve geometry- since everything else is the same (MC is creating the projected lines on the same surface after all). I didnt want to get into a scenario where a small change required me to switch toolpaths and go through all that config headache, where there can be problems synchronizing parameter values (especially where the toolpath types use different functionality for a given result). This current approach works almost correctly- it just tends to drag the cutter for the last motion (between the final cut, and some random place it selects to retract, or between a mid-body edge and some center-dome (shallow) generated path in the pattern, where it never seems to want to just cut bottom to top etc, but always circular in groups (ie low to high, breaking that into two machining slices and then dragging the cutter between end of phase 1 and start of phase 2)... Im going to try Morph now. I work stupid late (graveyard) hours, so I tend to rely on emails from guys on other shifts, since we are all under the same NDA for these files. But none of the few others knows much about texturing. Thanks so much for your help jlw- I truly appreciate it. I wish I were more creative with surface texture approaches, but this one seems more like a bug than a parameter config error. Best -
‘Blended’ spline pattern, how to achieve?
Carbonwerkes replied to Carbonwerkes's topic in Industrial Forum
Maybe so- I suspect there are a number of alternate paths (no pun). I just had hoped to apply this (Projection) path since it worked well for some variants of earlier patterns. It just seems a bit buggy with some patterns- where often the drag is actually a move to an end retract position. I dont know why it would complete the entire path, then drag the tool half way along the surface lengthwise to some edge position, then retract as end-of-op... I dont have any specific start/end point defined, as that wasnt needed for earlier attempts, and I dont have to navigate around a jig etc here. So, it is a littl,e bizarre that it is so intent to exit at some random edge position that it would create a path to that position (without a retraction even) following a 3D surface... This is literally just a very simple cut, which I can run 3 or 4axis on a trunion. Neither variant changes the basic toolpath pattern; the drag of the tool remains when 4-axis is enabled... Ill see if Morph works- I have little experience with it for this type of operation- Best -
‘Blended’ spline pattern, how to achieve?
Carbonwerkes replied to Carbonwerkes's topic in Industrial Forum
Hey guys So, Im having some trouble with the Multiaxis Project toolpath. I thought it was a bug in my install, but I had a buddy at work who is running 2019 (Im on 2017) redo the projection and toopath creation, and he got the same result. The symptom is that there tends to be one or two reposition motions which should be retracts lefts as cutting passes. This is seen in the posted example here circled in red, where all the Flowline data yields sort of parallel (well, symmetrically spaced) cuts except for one pass. That pass drags along the 3D surface in a path that looks linear from the Top view- bisecting a lot of the patterned cuts. This cut is real- it shows in the sim and in Vericut. The surface here is a handle, and it is 3D (domed a bit in both axes). The pattern is created as per the above posts suggested- and used as the Projection pattern in the Cut Pattern dialog. Nothing I do there, or in any submenu, seems to prevent this dragging. The only thing I have found that will change it is to use ‘sort’ on the actual curves within the Projection chain manager window. Except, that yields all kinds of other problems- sometimes including multiple drags, but always a lot of rapids from retract/repositions between chains to be cut… I would have thought this would be a Linking parameter, where something analogous to ‘keep tool down if within x distance’ was enabled. But, there is no such beast to be found, and the default links are all about gaps in the surface. Even if gaps counted as repositions for the pattern, I have this setup at retract to rapid distance and ‘use leadin/out’ for both small and large gaps- which is clearly being applied here (except sometimes!). So, maybe this is some strange parameter, or a problem with a subsection of the Linking menu, where perhaps defaulting ‘Gaps Along Cut’ to ‘Use default links’ freaks it out… Also, is it possible to force one-way cutting on this? I know I can set cutting side- but that seems to have everything to do with the side of the projected spline to cut. Since the system wants to alternate directions (here, in X), that ends op screwing up the pattern badly. I just want it to always cut left to right (or right to left), so that my cutter deflection is consistent- and I don’t get weird pattern changes where reversing parts of the toolpath are adjacent… Regards,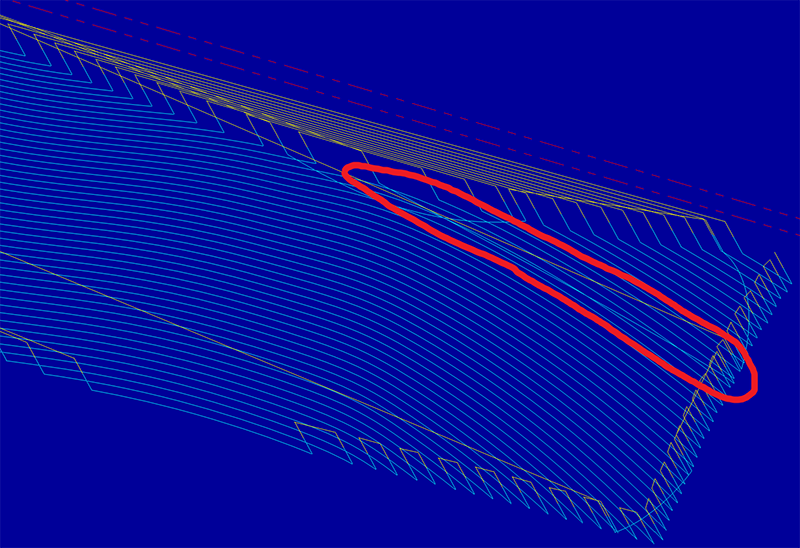
-
‘Blended’ spline pattern, how to achieve?
Carbonwerkes replied to Carbonwerkes's topic in Industrial Forum
Hi Aaron That may well be what the problem was. I dont think I used a flat boundary, but it is possible- as it was late The process is working now, but I have a toolpath that wants to drag the cutter across the surface for a couple of repositions. If it were easy, everyone would do it lol. Incidentally, is there any provision in MC's CAD functionality to permit linkage between steps in a process like this? Practical example- I use SW for CAD, and in this context, altering the spline boundary would alter the loft- which would make tweaking a pattern for projection easier/much faster. Seems like in MC every operation is independent, to the extent that I dont know if I can even resize a rectangle via a drag op or via dimensioning (stretch may work, but that seems sort of absurd, especially if you are just dragging a point in a 6-sided object around for positioning. A rectangle seems to become just 4 lines on a plane, with no relationships established. Im sure my understanding of MC's CAD is as near 0% as you can get, but I have never seen an actual CAD system where a rectangle doesnt retain its basic relationships. Best -
‘Blended’ spline pattern, how to achieve?
Carbonwerkes replied to Carbonwerkes's topic in Industrial Forum
Hey guys- Thanks! I would swear to you that I tried that first thing- and what I saw was just parallel lines which stopped/started at the boundaries as appropriate. But, it is possible there was some other factor in play- as this works exactly as you describe. So- thank you again. I have no idea what was going on with my machine (or my brain!) earlier… Hope you enjoy the rest of your weekend- Best R -
Howdy Im looking for a way to create a spline pattern. A simple example would be an hourglass, where I would define the outer two splines, and then some mechanism/function would allow me to define the number of splines which would fill that space between the non-parallel lines, with splines that follow the pattern as equal-spaced at any cross-section along the length of the boundary. For people familiar with aero, this would be called streamtubes. Here is a basic example: I know of one way to do this, which is a huge hassle. Effectively, you take a pair of splines, and create a Blend toolpath, defining tool and stepover to achieve the number of lines you want. Then you backplot that, save the backplot data to a level, then manually edit the plot as required (kill the leadin/out, etc), and then manually convert each path from arcs to a spline. What I want to know is- is there any native function in MC that can do this with just a couple of splines as the outer boundaries, where it then it generates ‘n’ number of splines which fill that space? Seems like all the native Curve stuff (Flowline etc) generates just pure parallel line, not the blended style of splines Im after. This is for patterning- so the resulting splines will be used to project onto a surface etc, but I want to be able to tweak the shape around so the pattern matches the shape of the body in a visually-appealing way. Maybe there is a Chook I don’t know about which will do this? Best
-
Hi Jeff I misunderstood your post with the Hook GUI shown. I looked at the GUI, and assumed we were talking about functionality not available in the native function. I should have read your summary notes more carefully. So yea, the Scale function already behaves as your Hook seems to. What Im after is scaling the delta between instances, not scaling the diameter directly. So, for a diameter of 1” and a factor of 80%, you would end up with diameters that would scale as: 1, 1.8, 2.44, 2.952, 3.3616, 3.6893 etc. Maybe there is a simpler math expression/function to deal with this type of thing (some type of exponent function), but for me, a simple and brutish method would just define a couple of variables- one for the last radius/diameter, and one for the last calculated delta. That way, each instance is only the last dia/radius value + the last delta * the global scale factor. Each variable takes on these new values, and the cycle continues for n instances as defined in the gui. The nice thing about this approach is that for values < 100%, you have a decreasing rate of change, and for values > 100%, an increasing rate. Scale already supports the later, but nice to have if you are just trying to experiment with patterns via a single tool. Also seems plausible to add a direction toggle (outwards or inwards growth), but I believe the effect can be achieved with some thought on starting radius and scale factor regardless.
-
Hi Jeff Firstly, very decent of you to invest some time and horsepower to develop a utility for this challenge. My experience with the Net-HOOK interface is zero, and my C skills are weaker than they should be. As regards the GUI and functionality, seems like you have it nailed here. For me, the goal is just to have some control over the rate of change in the incremental radius. So long as the result is just a series of wireframe circles on a plane I can assign to a level, and then project to a 2/3D face, Im a happy (and grateful!) guy. Hopefully the enhancement can be incorporated by CNC Software as native to the Scale function, so that it could be applied to other types of geometry (I can see how this could be useful with elliptical shapes and more basic geometry- at least for people who are doing some texturing/surfacing). Thank you so much for the effort in this- it will save me days of struggle with the net-hook interface.
-
Howdy- Unfortunately, there doesnt seem to be a factor to apply to stepover in Multipass. This does exist in Lathe, but Im not aware of anything like that in Mill. The goal isnt just concentric- but also a reducing value of the radius increase with each larger instance. I dont want to do this in CAD and import- partly because I have really bad luck with pulling in DXF/DWG curves while retaining anything like the original spline geometry, and partly because making changes to suit the object to which this pattern will apply are difficult to evaluate in CAD (not simple to do simulation of a ballnose vs bullnose vs whatever, with some 4th axis bias etc). I tried to upload an example image, but I get an error 200. Often I see that with a file too large, but this is a 60kb jpg. Tried png- same error. But I found an example which is similar to my goal. Mine is opposite- a spacing that decreases with increasing diameter- but the concept is the same-
