


RayHolt
-
Posts
18 -
Joined
-
Last visited
RayHolt's Achievements
")
Newbie (1/14)
0
Reputation
-
Got it. So you just had to draw some lines in order to make that an enclosed pocket. I have to do some practice with drawing in Mastercam, but that definitely answers the question. Very cool about the remachining too, never knew that was an option. Thanks so much! We got the part cut before and it came out awesome. Just need to make some tweaks to the original model. About to wrap it up for the day, but I'm looking forward to some machining tomorrow! Me and my professors REALLY appreciate the help.
-
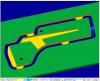
The problem I'm running into is that the Parallel pocket toolpaths cut that tapered part to the right way too rough, just steps. And when I use the high speed toolpaths, it cuts everything great except it leaves a thin wall where that pocket "goes off into space". I have gotten it so it cuts the walls, but still leaves the little rounds in those corners. Here's an example. We're trying to get away from FBM.
-
Yeah, this won't be a Mastercam specific class but rather we will be using Mastercam as part of our Polymers, Metals, and Manufacturing classes. We will have a few different options for CNC machines but all will be run by Mastercam, as long as we can learn it! I'm banging my head against the wall right now trying to machine that central pocket without using FBM Mill... it's pretty hard to figure out! FBM did a decent job but the toolpath was VERY inefficient. So I'm trying to do it with the regular toolpaths... even trying to copy FBM which used "2D High Speed Core Mill" and I can't quite get it. Got the part cut out with those tabs though, and it's awesome! I'm going to bang my head against the wall for a while longer on this problem before I start bugging you about it. Ray
-
Jay! Thanks so much, that was a HUGE help. My two professors got a lot out of it too and they're working on completely different parts. Like I said, Mastercam is obviously very powerful software, it's just some of these little details... we never would have thought that Mastercam couldn't put tabs on a solid. I forgot I had tab cutoff set to on... I tried that when I was in the "maybe THIS will make it work" stage and forgot to turn it off. Really, can't thank you enough for your patience and help. If we get stumped again I'll be sure to pick your brain! Now, I'm gonna go cut out this part! WITH tabs -Ray
-
Yeah Jay, I just checked and I got it. Thanks a lot! Looking forward to the new file/video.
-
Great Jay! Looking forward to it... It'd be cool if I could cut this part out today!
-
Uploaded the new file. It is RAYHOLT_TABS_UPDATE Are those e-office hours that you have? I don't want to take up too much of your time, and I really appreciate the patience.
-
Jay, When I backplot and verify JUST the contour op, I do see the tabs! Just so odd that the tabs then do not show up on the full verify. Thanks for the tip. But I still don't quite understand what you changed, when you said the tabs will not work with a solid edge so you added curves to the bottom. I have a new drawing (made some changes to the part) and I am stuck at the same point. I added depth cuts to see if that'd help but same deal. So what exactly did you do to "add curves" to the bottom? Also, I had the tool set to right side under cut parameters because if it was on the left it cut into the part, rather than around it. I turned lead in/out off because when I had it on it was cutting all kinds of wacky shapes into my piece. I'm sure I just had the settings wrong, but turning it off solved the problem... maybe created a new one for tabs though? You are a great resource then! I appreciate your help very much, as do my two professors. Mastercam seems to be great software, just a pretty steep learning curve and lots of LITTLE details that make big differences! The number of times that something has been thrown off by one little box either being checked or not checked... it can get frustrating! Very exciting when things do finally work though
-
Jay, Actually I'm not in class, but close. I'm a student at SUNY Oswego and we are working on opening our new manufacturing/woods lab for this coming semester. We have a lot of new CNC machinery coming in, so right now myself and two of my professors are working (struggling, sometimes!) to learn Mastercam. They have been going through the training books/videos, and I'm helping them experiment. I downloaded your file and gave it a run, but when I verify there are still no tabs. When you say you added curves to the bottom edge, do you mean you put a round on it? Thanks for all of the help, Ray
-
Hi all! I'm cutting a part, and on the contour toolpath I want to add a few tabs so the part doesn't go flying. In the parameters for the contour, I have tabs turned on, selected automatic, and have it set to put 4 tabs in. I gave them width and thickness (tried .125 and .250). I have tab motion set to partial, and "Tab All" selected. When I click OK and verify, everything cuts correctly, but there are just no tabs at all. I will upload my file through FTP and label it "RayHolt_TABS". (It is under X6 Files, and admin, you can delete my old "RAYHOLT_PART" files from the server. Thank you!) Thanks in advance for any help, you guys have been awesome! Ray
-
Thanks so much Jay. I got the two pockets to cut as 2D pockets. When I try to do surface rough for the curved pocket, I'm not sure what to select as the containment. No matter what edge or face I pick, it just doesn't create a toolpath. The odd thing is that if I choose Surface FINISH -> parallel, and don't even choose a containment, it makes a toolpath for the curved bottom no problem. Thanks again for all the help. Monster computer rig you're running!
-
Alright... I made it happen finally! For some reason, when I went to Surface rough -> pocket and just selected the whole top surface as the drive surface, it cuts every pocket. The only problem was that it cut everything with a 1/4 flat end mill, so I put a surface finish pass on the curved pocket and it smoothed it out. The only annoying thing is that I tried doing separate toolpaths (so the square&circle would cut with the flat bottom and the curved pocket would just use the ball end) but when I do surface rough-> pocket and select the square and circle individually, choose a 1/4 flat end mill, set the stepover to half the tool diameter, it says "No cut found- check tool, etc." every time. When I do this, I select the bottom face of the square and round pockets as the drive surface. Is this the problem? Whenever I try to select just the top edge, it selects the entire surface which leads to it cutting all of the pockets in one shot. But, overall, just really psyched that I got this piece to cut! Thanks to all for your help, and more importantly your patience!
-
Jay, yes that is what I am trying to do! I think what I am missing is the containment. When I click the button to choose containment I can't select the walls. You're saying select the walls of that pocket? Actually, I just got it so it selected the top chain of that pocket as the containment. But then it only cut one small sliver at one end of the pocket. Going to try selecting the area around the pocket next?
-
Yeah, but the problem is that pocket with the curved bottom also isn't being milled or even recognized at all. I only get the red toolpath for about one second and it is when I try to use Surface Rough->Parallel toolpath. And it disappears and continues to not recognize that front pocket. Is Mastercam just not capable of cutting this pocket?
-
Bump... Anyone have any ideas on the "red toolpath shows up for one second then disappears" problem?
