rsbeadle
-
Posts
239 -
Joined
-
Last visited
Content Type
Profiles
Forums
Downloads
Store
eMastercam Wiki
Blogs
Gallery
Events
Everything posted by rsbeadle
-
Thank you sir for your response. This information is very helpful. I will pass it on to our engineering staff so that they can be sure to rebuild their models before the do the final save in SolidWorks.
-
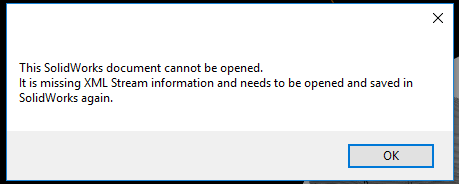
Good afternoon everyone. This might have been covered but I couldn't find anything in any search. Sometimes when I open a .SLDPRT file from SolidWorks 2017 I get this error box: It is a simple fix to open it in SolidWorks and save it again but it is a PITA. Is this a MasterCam Issue or a SolidWorks issue on the computer of the engineer that is saving the file? If anyone has figured this out I would appreciate it if you would reply here or post a link of the posts that have addressed it before. Thanks
-
Good evening guys. I am interested in having my post output B and C axis positions on every operation even if the positions don't change from one op to the next (on null tool changes). I have worries of inexperienced operators doing program restarts improperly and getting the rotaries out of position. Is there a relatively easy way to force the (example) G0G90B0.C0.? I do have safe retract turned on so that Z goes to the top if there is a rotary position change, but I would like the safety of having a rotary position call at the beginning of every operation even if it is redundant. I would rather not have a G53 Z2. move if it is avoidable but I can live with it if it is not. My post / machine def is set up to reset rotaries to the programmed position at actual changes so that is not an issue. Thanks in advance for any help. Example: G00G17G40G49G80G90G94 (1/2" GARR 5FL SQ ) (PATH 1 TOP) G53Z2. T3M06 T4 M08 G00G90G54C0.B0. S1528M03 G254X.5324Y.992 G43H3Z12. G187P3E.001 Z.05 ...... I-2.563 G00Z12. (PATH 2 TOP) M83 S7334M03 ****** add a "G0G90C0.B0." here even though it is redundant ******* X-1.563Y.5 Z.05 ........ G00Z12. (PATH 3 TOP) M88 S1069M03 ****** add a "G0G90C0.B0." here even though it is redundant ******* X-2.6879Y-1.8203 Z.055 G01Z.005F25.
-
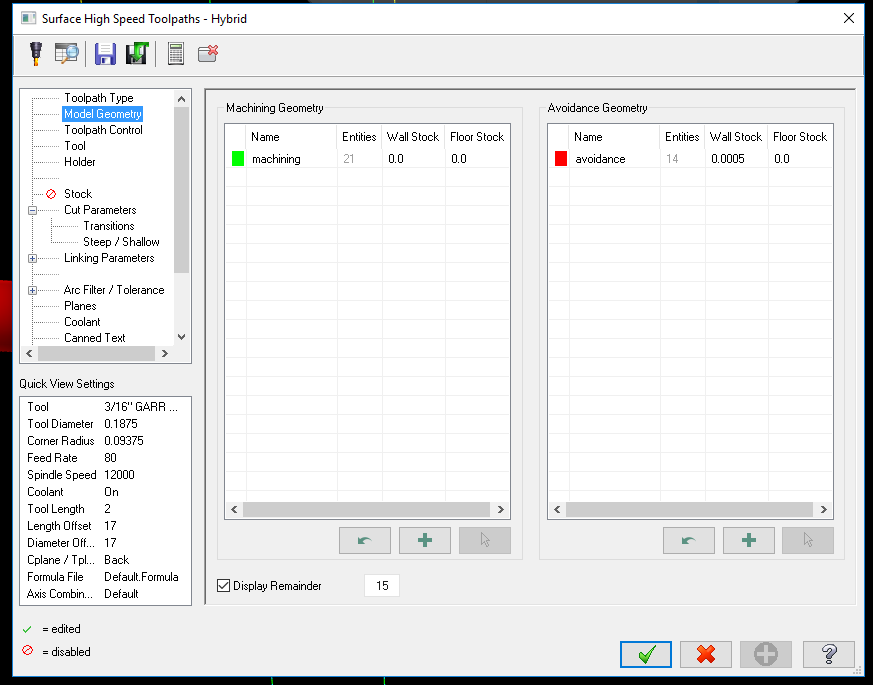
I guess I can reply to your 666 post. I am getting about the same finish as I did with the hybrid path, but that finish wasn't all that great either. The parts I am running have +/-.005 tolerance and will get buffed smooth after we mill them so finish was not as important as tool life on these parts. I am using a .010" step over with a 3/16" ball. The motion is easy on the machine with both paths so gouges are reduced. I tried several paths to get the cut time reduced and still get a decent finish and the hybrid path has been working best up until the 2019 update. I also tried to use a 45 degree plane instead of front and back to use the side of the ball instead of the tip but the tool life was about the same. The only difference is the side of the ball got dull instead of the tip and I had to add a path to cut the underside fillet so it took a little longer.
-
Good morning guys. I changed the toolpath type in the hybrid paths to equal scallop and it gives me a good toolpath that doesn't double cut. That should get me by until the Hybrid path gets fixed. Thanks for the help.
-
Thanks gcode. I don't have duplicated groups in the materials page but the path still cuts everything twice. The strange thing is I cut both sides, one in front view and one in back view, and the front view path is fine. The part is symmetric so I though about just doing a transform mirror path to do the back view. The only issue is I have 20-25 programs that are using the same path and I would have to change all the programs to use the mirror path or just keep them in 2018 until the problem gets resolved.
-
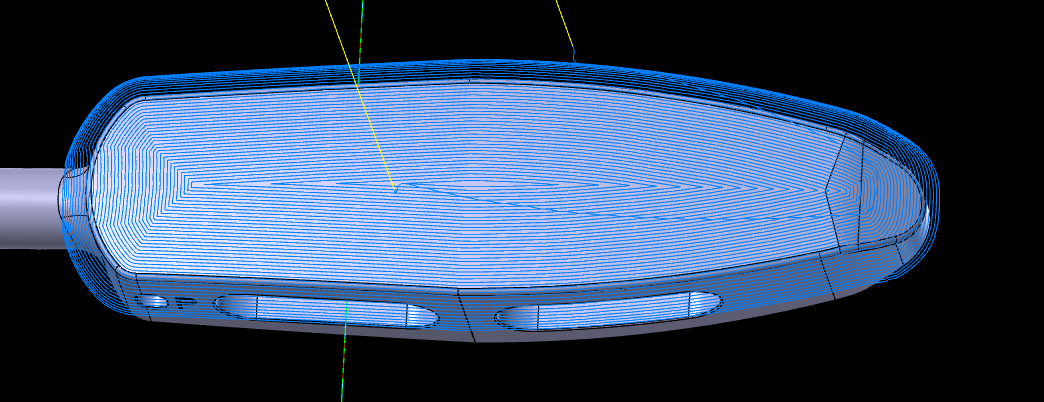
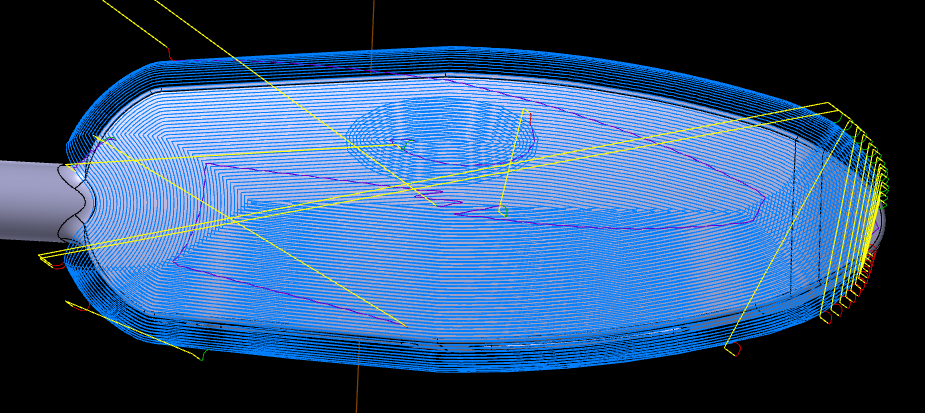
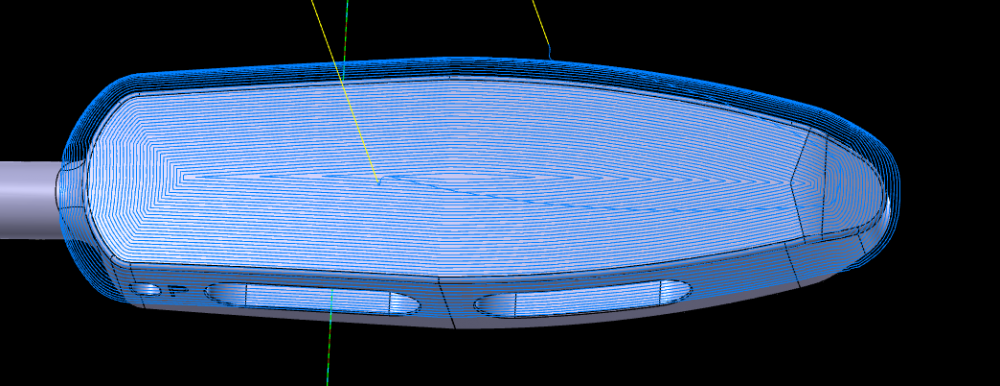
Hello guys. I have been having some issues with my hybrid paths double cutting and retracting differently than they did in 2017 and 2018. I used to get good smooth paths from the inside out on some oval parts I build every few months. Now I get 3 or 4 retractions and triangles cut on the ends and places where the path cuts the same area twice. Is there some setting that was added or changed in 2019 that I haven't noticed? This is the 2019 path. Notice the darker path areas that get cut twice and the multiple retractions: This is a similar part with the 2018 path: If anyone has any ideas or help for me I would appreciate it. Thanks
-
Thanks for the replies guys. This will be a big help in getting our maintenance update pushed thru.
-
Good afternoon guys. I am trying to talk the company I work for into updating our maintenance that expired last July. We are importing parts from SolidWorks into MasterCam, but we have to check the "import SolidWorks history" box or we get the "cannot find parasolid data" error (X9 update 2, we can't get update 3). As you probably know, it takes a while for the file to load and we usually end up with a "brick" anyway. I would like to know if 2017 beta versions are pulling in Solidworks 2016 files without any major issues. Also can we get sketch text to come in with the part file if we don't import the history? That would save us a lot of time waiting for the history to try to load. Only way we can do it now is convert to step or parasolid for the body and then make a DWG/DXF to get the text or wait for the history to load. I know this is an old question. If it has been fixed in the new version it will give me some ammunition to go to the owner for the maintenance update. Thanks,
-
3+2 Machining possible without Multiaxis seat???
rsbeadle replied to rsbeadle's topic in Industrial Forum
Thanks for the reply. I hope I can convince the bosses to consider a 5-axis mill instead of another horizontal. Having a simulation will better show them what a full 5 axis machine is capable of. I have ran some sample parts in verify to try to get them to understand, but seeing one of our parts being machined 100 % complete in one setup will be a game changer I think. Thanks again. -
Is it possible to do 3+2 machining on a 5-axis mill without having the multi-axis option in Mastercam? I haven't tried it but I have been programming some parts on a Horizontal with a 4th axis without it and I am getting good programs with B-axis outputs. I am wondering if I could use one of the generic 5-axis machine definitions that come with Mastercam to do some test programs to show the bosses what we could do with a 5-axis machine. We are only in need of 3+2 for compound angle positioning to cut under some part features instead of using disk mills and lollipop tools. Our reseller would likely give us a temporary key code to test with, but if it isn't necessary I would rather not go to the trouble. We are running X8 and X9. Thanks.
-
I checked in the eia programming and operating manuals and could not find it. would it be in a different manual?
-
I have a macro made up to calculate G54.2P1 from G54 and G54.1P1. We have a new VCU machine that uses the new G54.4 for dynamic fixture offset. Is there an L number for G54.4 that I can use in the G10 data setting? I have searched the internet for a couple of days and can't find anything. I can work around it by using the G10 to set another work offset and use macro variables to copy it to G54.4 but having the L number would be much cleaner. L2 P(1-6) is for G54-G59 L20 P(1-300) is for G54.1 P(1-300) L21 P (1-7) is for G54.2 P (1-7) L?? P(1-8) for G54.4 P(1-8) Thanks in advance for any help.
-
X8 / X9 Save files with solid feature suppressed
rsbeadle replied to rsbeadle's topic in Industrial Forum
Thanks. I did have the X8 version but it gave the error "invalid user application". We updated the C++ redistributable to version 12 and it worked. Thanks again for the help. -
X8 / X9 Save files with solid feature suppressed
rsbeadle replied to rsbeadle's topic in Industrial Forum
Thanks for the help guys. I loaded it on my computer and it works fine. Another programmer that doesn't have X9 installed yet tried to use the one for X8 and it would not run. I think it is the C++ version that was updated with X9 that he needs. Could that be it or maybe something else? Thanks again -
In older versions of Mastercam we were able to save a file with solid features suppressed. Now I get a warning message and it won't let me save the file. Is there a setting that can be changed to allow me to save the file or is this something we will have to live with? I searched the forum and I didn't find anything relevant. Thanks
-
SolidWorks 2015 - X8 update4 "part file could not be loaded"
rsbeadle replied to rsbeadle's topic in Industrial Forum
I updated my solidworks 2015 to sp2 and it worked. I think the issue is that I have SW2014 and SW2015 installed on my computer. Before the update I think Mastercam was trying to open the 2015 file with 2014. At first I was getting a "solidworks 2014 has crashed" error. I thought it was the .dll issue so I re-registered it. After the re-register I got the "part file cannot be loaded" error. But after updating Solidworks it must have straightened everything out. Thanks for looking into it. -
Hello I am having issues getting SolidWorks 2015 parts to come into MasterCam X8 Update 4 when I select the "import history tree" option in MasterCam. The same file from Solidworks 2014 comes in fine. When I open the file in 2015 and save it MasterCam gives me the "part file could not be loaded" box. The part comes in when the import history tree box is unchecked, but there are some sketches I want to come in with the file as well. I searched this problem and most of the results are for the "cannot find parasolid data in SolidWorks file" error. If anyone could point me to a solution I would greatly appreciate it.
-
I agree with betts. These little subtle changes are annoying. The thing that bothers me is that the file open dialog window no longer has the bar on the side that you can customize with mastercam specific shortcuts. I used those a lot. I also miss the dropdown with recent folders. I understand that with improvements sometimes sacrifices have to be made. They may seem minor to some but major to others that are "creatures of habit". I am getting used to the windows file selection method but I notice I have to pause to make sure I am selecting the correct folder where as before I had muscle memory with the side menu.
-
Quick help for Mazak horizontal nexus 4000 bolt pattern
rsbeadle replied to rsbeadle's topic in Industrial Forum
Just in case anyone else searches for this the spread on the Mazak HCN 4000 is 80mm center to center. The pattern starts at the center of the table but the center point does not actually have a hole due to the pivot shaft being there. -
Quick help for Mazak horizontal nexus 4000 bolt pattern
rsbeadle replied to rsbeadle's topic in Industrial Forum
I found some info on a tombstone website that has bolt holes at 300mm and 320mm spread. The 300mm spread would work out to 75mm between 4 rows or 100mm between 3 rows and the 320mm spread would work out to 80mm between rows. I would like to be sure so I don't have to slot the holes to cover both. Our HCN 5000 has a 100mm spread between the holes so it looks like the 4000 could go several different ways. -
Good morning guys. I know this should be in the other forums but I need a quick reply. Our company is expecting 2 used (2007) Mazak HCN4000 to be delivered by early next week and I need to make some fixtures for them. I am hoping someone can give me the pallet bolt pattern spacing for the 400mm pallet table top. Also I need to know a location from the center of the table to the rows if there aren't rows centered on the table. A quick picture or a CAD file of the table would be awesome. Thanks in advance,
-
After preliminary testing everything looks good. I made setup sheets for 5 or 6 files and everything came out good. Thanks again Colin for all the help. One question: Where does the name of the windows user get pulled from? I have one computer that had a user name from the previous programmer that I would prefer not to change. I can remove the variable call and just comment it in, but if I can change the name without changing the windows log in name everything will work out. Thanks again.
-
Thanks again Colin. I think I had to zip my files due to the forum not allowing .set files. I look forward to the next webinar. I will do some testing with the new file as soon as I get done with the Monday morning rush here.
-
Thanks a million Colin! I appreciate all your time and effort in helping me get this worked out. I also learned a lot about post logic and code meanings. However, I think you forgot to attach the file. Again, I appreciate all the time you took to help me out.