amw
-
Posts
64 -
Joined
-
Last visited
Content Type
Profiles
Forums
Downloads
Store
eMastercam Wiki
Blogs
Gallery
Events
Everything posted by amw
-
Yeah it would be nice to have a choice of how depth cuts are handled. Thanks for passing on the suggestion.
-
Thank you for the example, but this forces me to use conventional milling. I would prefer to use climb milling, bottom to top motion, but break it into 2 depth cuts, first one being on top. You would think this would be fairly logical way to do NPT threads.
-
We are machining 2" NPT 11.5 TPI. The tool is 5/8 diam solid carbide with 12 teeth. There is a lot of engagement with this tool, would be more efficient if I could do it in 2 depths with slightly larger stepovers. If I reduce the number of teeth yes it will do 2 passes, but starts with the bottom which is useless in my case. Same problem as the original poster had here over 10 years ago.
-
Still no way to do this properly in 2024? Im using a fairly big threadmill, getting a little chatter, would be nice to be able to break it into two depths.
-
Operation defaults messing up tool lengths and projections??
amw replied to amw's topic in Industrial Forum
Colin, in my case its not even saving the tool. The tool that is created is completely different length. Any thoughts on that? -
Operation defaults messing up tool lengths and projections??
amw replied to amw's topic in Industrial Forum
Yeah someone else mentioned this. I can live with that. But in my case its creating a new tool thats much shorter! I asked Inhouse solutions about it and they suggested that the projection issues were resolved in update 5. I tried update 5 with same result, it did not fix the problem. -
Operation defaults messing up tool lengths and projections??
amw replied to amw's topic in Industrial Forum
Seems very broken for sure. Even the linking parameters are messed up. For example in my drill cycle, I save a default depth of -0.030" for my spot drill but the operation created is at 0.0. I dont use viewsheets personally so cant say for sure about that -
Operation defaults messing up tool lengths and projections??
amw replied to amw's topic in Industrial Forum
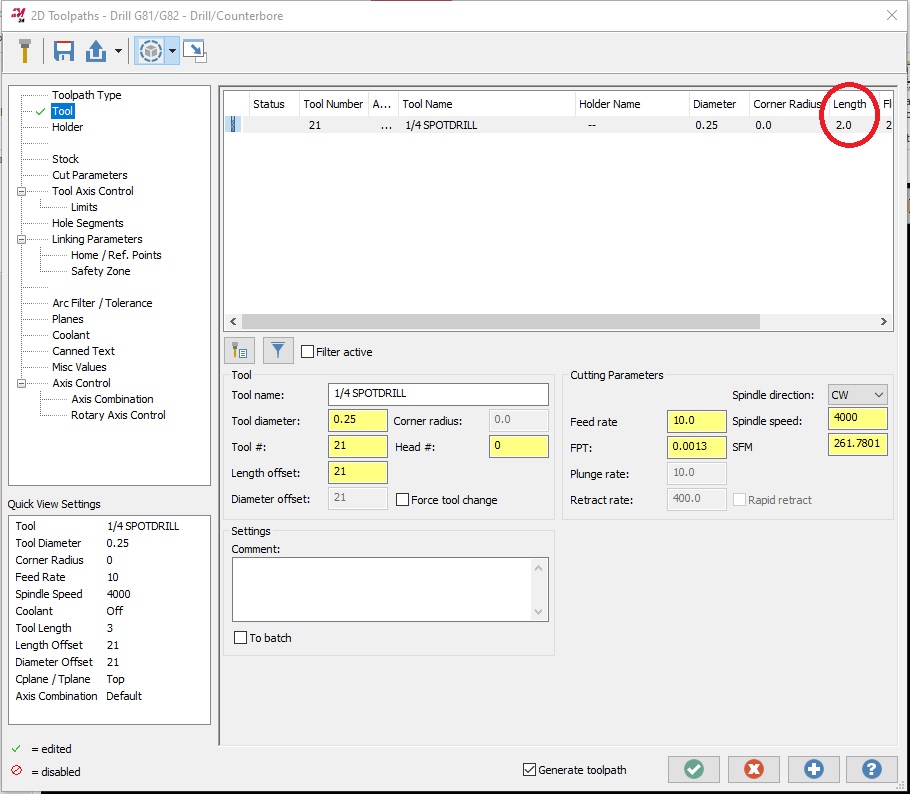
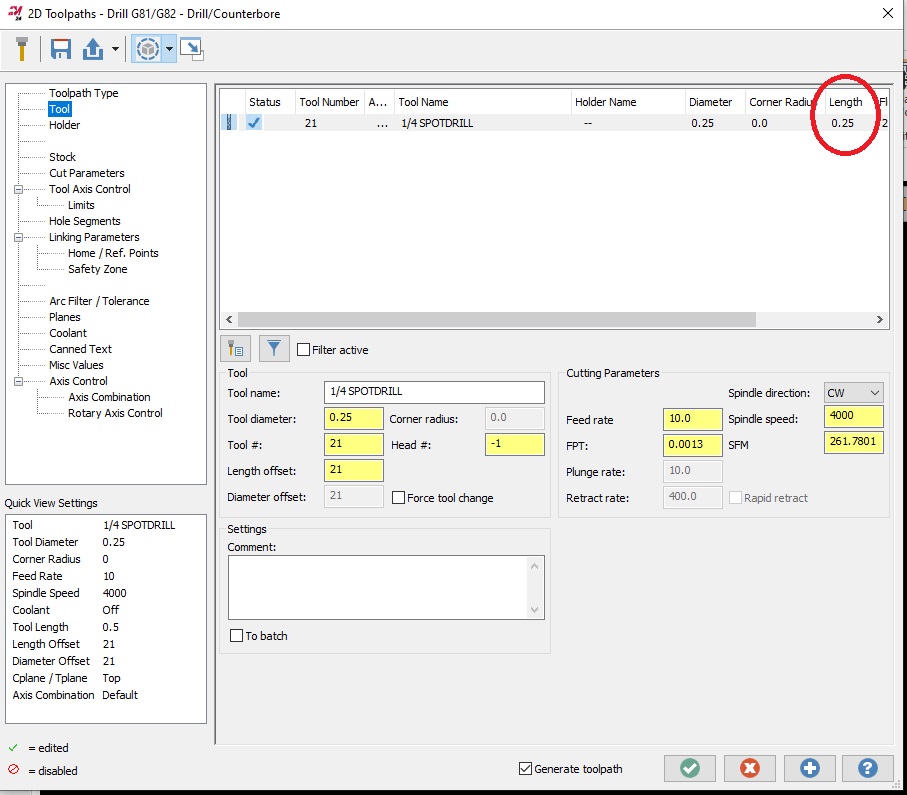
Just thought I would post an update on this problem. I tried changing from update 2 to update 5 and im getting the exact same result. I did notice something strange tonight. No matter what length tool I save in the operation defaults, the new tool that is created has cutting length equal to the diameter, and overall length is equal to 2x diameter. For example if i click on the following operations, this is the tool that gets created: Drill (1/4 spot drill) LOC = 0.25 OAL = 0.50 Pocket (3/8 endmill) LOC = 0.375 OAL = 0.750 Face (3" Facemill) LOC = 3.0" OAL = 6.0" The operation default file is saving the correct info for the tool. But the tool that is created by the new operation is always 2xD long. Is anybody else having this issue? -
Operation defaults messing up tool lengths and projections??
amw replied to amw's topic in Industrial Forum
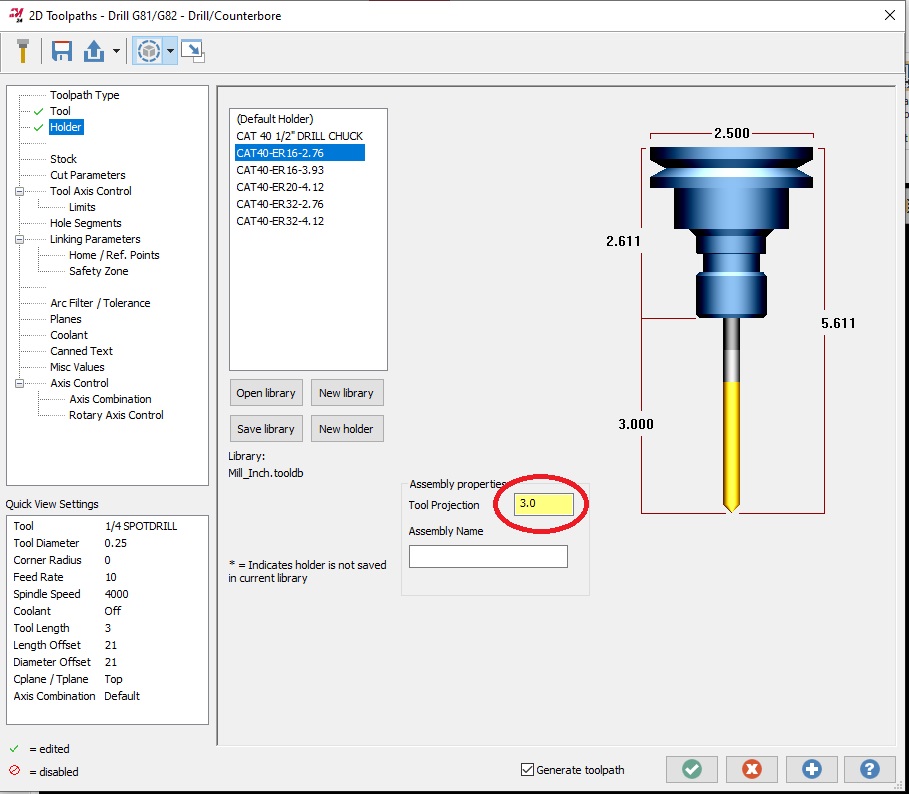
In older versions (like 10+years ago) I could choose a tool in the operation defaults and when I start a new file that operation would create that same tool. It is still doing that for me now, still creates the tool. But no matter what I try, I end up with a shorter tool, and 0.25" projection in a drill cycle. Its doing the same thing in a pocket cycle too, the tool created is shorter then the one saved. But its not shortened as much. I havent tried all the other operations... too depressing to go any further lol. Nobody else is having issues with this? -
Operation defaults messing up tool lengths and projections??
amw replied to amw's topic in Industrial Forum
That would be great if it did that. But in my case when I start a new operation I loose the holder (goes back to default) and end up with a completely different tool (way shorter) . -
Yeah that would keep you on your toes for sure lol.
-
Operation defaults messing up tool lengths and projections??
amw replied to amw's topic in Industrial Forum
Thanks for the help Colin. I could live with the default holders, as long as its saving the proper tool. But why are my tools becoming shorter? This makes no sense? And it messes up my verify with the short tools, I need to edit the tool every time. A normal length tool with a default holder and long projection would be fine for verify 95% of the time. Operation defaults are kind of useless the way they are right now. It would be quicker to just change to a library tool every time, and thats a big waste of time too. -
Only seems to happen when initially creating the operation with the default tool. Once I change to a different tool I can renumber and everything posts fine without forcing a second regeneration. As a work around now i've set my default tool to a tap, so programmer will be forced to choose a different tool every time.
-
It regenerates automatically, And shows green check mark meaning everything is good. Then I post and get the wrong tool number. Forcing another regeneration did fix the problem. This is still ridiculous. If I change a tool number, and it regenerates automatically, and i get a checkmark it should be good to go. If its NOT good to go without another regeneration it should not let me post.
-
Hey guys I have another bug here with 2024. This one is dangerous. After creating a dynamic toolpath it posts the wrong tool number. Anybody else ever see this? Easy to recreate the problem: - Start new file, and draw a circle. - Make a Dynamic rough toolpath from circle without editing default tool values, click ok - Wait for toolpath to generate, then open parameters, change tool number and click ok. - Post it out and you get the original default tool number, not the new number that you changed it to. Not the number thats currently showing! I dont think its a post issue, I get same result with default machine and my modified mpmaster post. This is a very dangerous issue! The number of bugs with 2024 is absolutely ridiculous.
-
Operation defaults messing up tool lengths and projections??
amw replied to amw's topic in Industrial Forum
No nothing is messing with that file. I can open the default file directly in mastercam and everything shows up correctly. And its not like the wrong path/file is being specified because if i change to a new tool, it does show up when creating a new operation. just that the tool length has been changed, and its gone back to default holder. I just had a look at the pocket operation and thats doing same thing too. What a mess. -
Operation defaults messing up tool lengths and projections??
amw replied to amw's topic in Industrial Forum
Thats great idea! I tried messing with that file. When I save the op defaults within mastercam its saving some things to the default file but not everything. I fixed up the default file to be exactly the way I wanted, opened it again a second time to be sure its exactly what I want. Then when I start a new file it goes back to default holder and the tool is modified to shorter. Also, i set a default depth of 0.030 for the spot drill, and that goes back to zero as well. This is such a PITA. I probably have like 6-8 hrs spent on this problem trying to figure out what im doing wrong or finding a work around. But seems like this is just another bug with 2024. Man for what we pay for this software we really deserve better then this. -
Operation defaults messing up tool lengths and projections??
amw replied to amw's topic in Industrial Forum
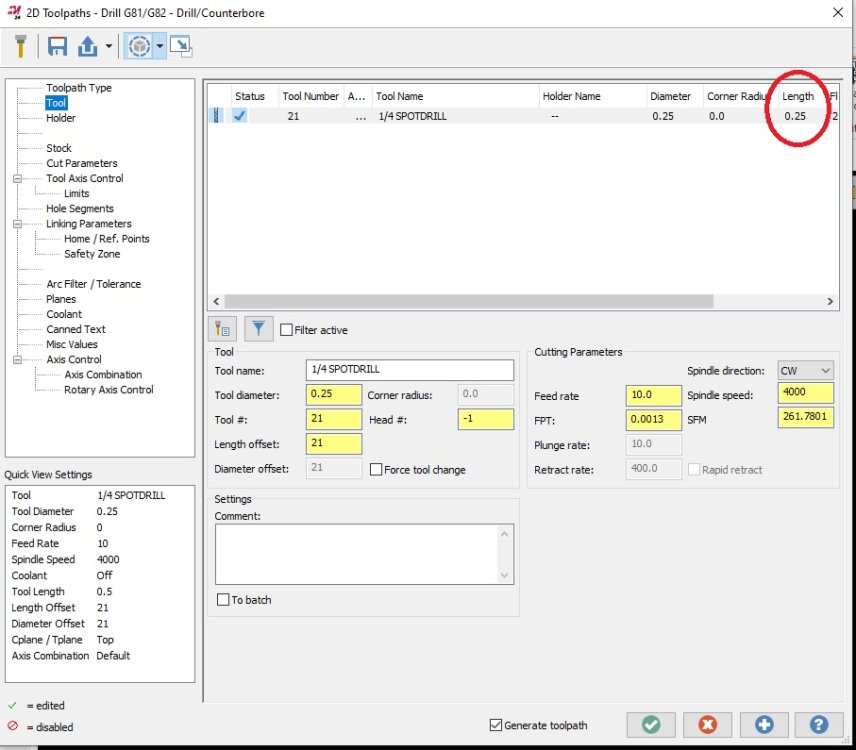
Yes thats exactly what im doing. But when I start a new job, everything is right except the tool is now shorter? This is very frustrating. I need to use defaults to save time, and the holder always crashes in verify because the tool is too short! Have a look at these pics. First 2 pics are initial settings, then I hit save, and when starting a new job I get what is in the last 2 pics. I have also tried opening operating defaults by clicking Machine group, Files, Library, operation defaults and setting it from there but i get the same result.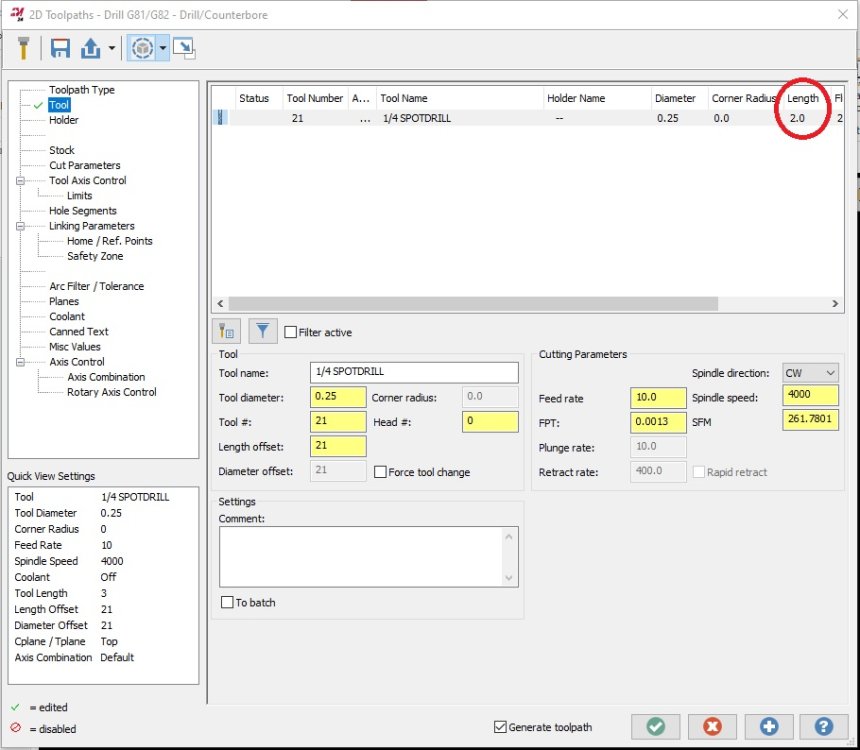


-
Hi Guys, Im having an issue with setting up operation defaults, and then getting a different version of the tool I save. Anybody else ever see this? For a Drill cycle I select a 1/4" spot drill from my tool library. The tool is defined as 3" long, 2.0 projection and in an er16 holder. I save this as default and everything looks fine. But when i start a new file and select a drill cycle, I get a 1/4 spot drill thats only 0.5" long, 0.5" projection, and using the default holder. I have tried the same with a 3/8 spot drill and get same results (end up with a shorter tool). I have tried setting defaults by hitting save at the top of the toolpath parameter window, and also by going into machine group, files, libraries, operation defaults. Nothing seems to work. What am i doing wrong?
-
Nperry I tried this tonight and it almost works. I created a new axis combination and this does post without rotation if posting just the deburr toolpath. But if i post the full program along with other operations (which use the default axis combinations) it posts with rotation again. I dont want to have to change the axis combination in every operation. Any other suggestions?
-
Awesome. I will try this later and will post an update on how it works. Thanks!
-
Hi Guys, Im using the Deburr operation on a 3 axis machine, and have selected 3 axis mode within the deburr toolpath. The part machines ok but for some reason the deburr operation makes the program post like a 4th axis program. The code includes A axis values for all operations, lock and unlock codes, and I get an alarm at the end of the program when the 4th axis is sent home. Using MPMaster post. Any ideas how to fix this? I could possibly make another post and get rid of lock codes and the A axis home move at the end, but it would be nice to have the normal MPMaster post work properly with this.
-
Working on my library here today. Looks like the files are stored in the library somehow. I just created a tool from a step file on a removable drive. And it opened up fine on another computer on my network. Awesome!
-
Drill and Bore with same tool... with tool on centerline?
amw replied to amw's topic in Industrial Forum
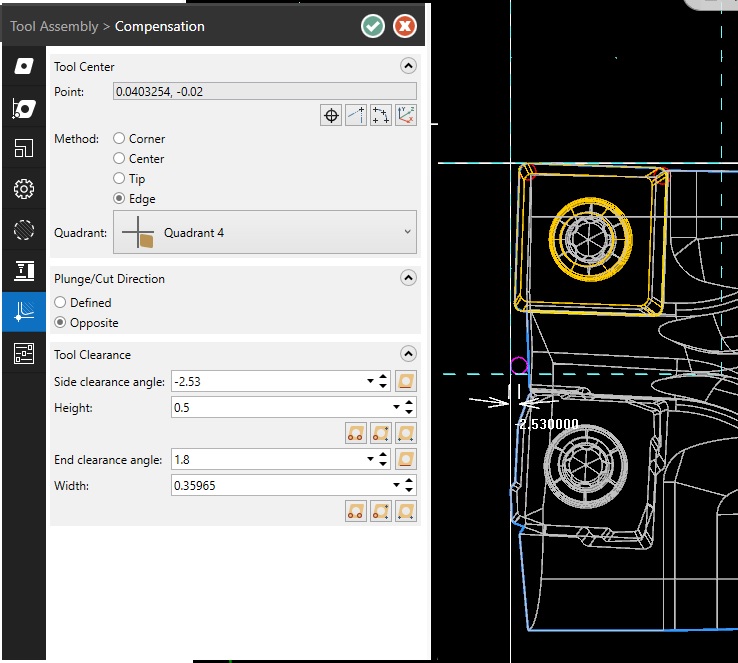
I had another attempt at this today and I managed to get the origin on the center of tool, and get it compensating to the edge of insert properly. It will do a finish bore cycle perfectly. But for some reason, no matter what i try, i cant get a roughing cycle to recognize remaining stock. Maybe because the center of the tool isnt actually cutting anything? Still strange since it works in a finish toolpath. While I was struggling with this I thought of another problem. If I do it this way, the diameter in the program is not the actual diameter being cut so it would mess up all the surface speed and RPM calculations too. So its obvious now that option 2 will be the best way to go. Only downside is I have a few programs done already drilling on centerline. Id like to keep our procedure of setting up insert drills the same everywhere so Ill have to go back and change those programs but not the end of the world. Thanks for your help guys, hopefully this post might be helpful for someone else in the future too.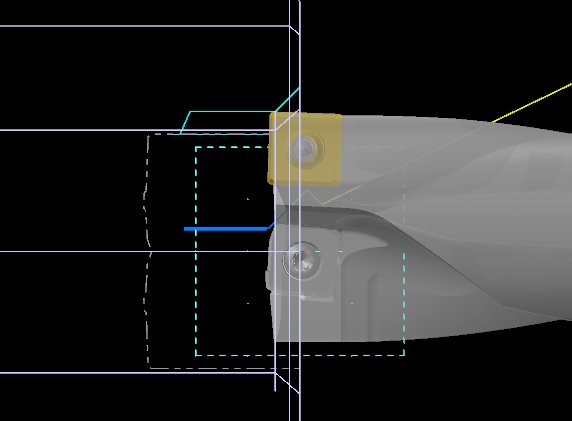
-
Drill and Bore with same tool... with tool on centerline?
amw replied to amw's topic in Industrial Forum
It took me a very, very long time to figure out how to setup the tool so that the center insert, which sticks out further, is on Z zero, and the outer insert still bores tapers properly to size. Might save someone else some trouble so here is how I did it. You need to setup a 3D tool. Make sure you use "Edge" compensation. Put tool center on the outer insert radius, and then adjust clearances to use a negative value to compensate for the center insert sticking out further. You need to play around with the clearance numbers until the other two circles represent the shape of what both inserts will cut together. The edges of these circles are very important. The edges will become the x/z zero point for the tool, and this is what will be used for calculating toolpaths. The 3D file is used to update the stock, but not actually used at all to calculate the toolpath. Once its defined you can drill by using "lathe drill" and entering a suitable X offset. And the same tool can be used as a normal boring bar. Can drill and bore with single tool and offset in the machine.