


btu44
-
Posts
17 -
Joined
-
Last visited
Content Type
Profiles
Forums
Downloads
Store
eMastercam Wiki
Blogs
Gallery
Events
Everything posted by btu44
-
Del. & F10Brandon, Thanks for the suggestions and will try them soon. Sometimes after work and family time there not enough brain cells left to think this hard LoL
-
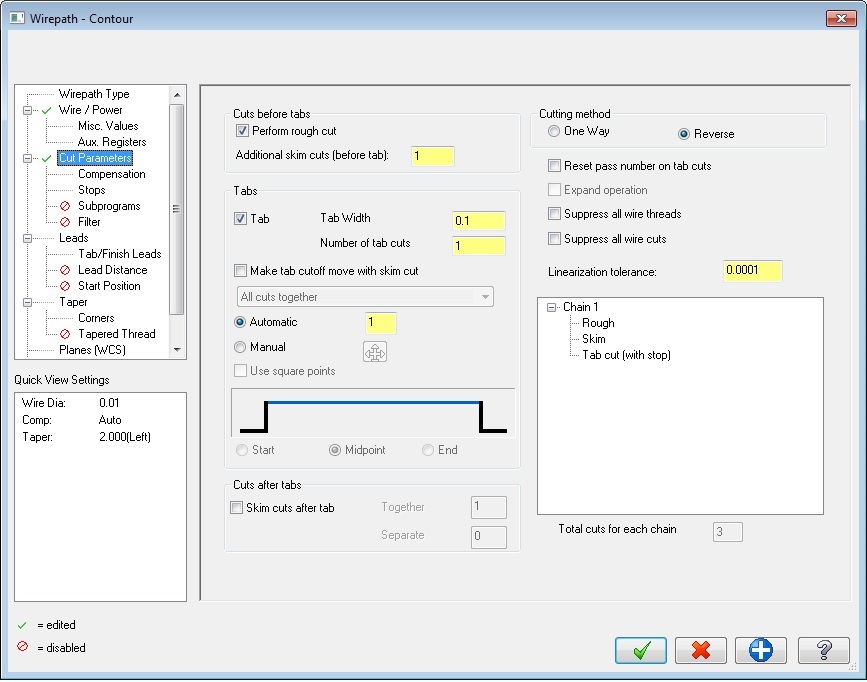
This sounds like what I am attempting to do and thank you for replying. Rough the taper, stop, support the slug, cut the slug with taper, stop and remove the slug, finish the land area. The SODICK training manual we have says this is good practice because I would only be finishing .200" deep of material instead of the full 1.5". When I look at the "Total cuts for each chain" window I think the sequence should go: Rough, Tab cut with stop, Skim. Does this sound correct? As for my Reseller I don't know if this is an option. We have a maintenance agreement for 2017 Mill but not Wire. Plus over the years with mill, I have found searching this site or YouTube is faster than waiting for a call back that half the time didn't come. Del. would you please explain a little more? Did I misunderstand you?
-
Hmm, I guess that is an option of last resort. I prefer not to do post edits because of forgetting during a repost after program change. Is there any other way in Mastercam?
-
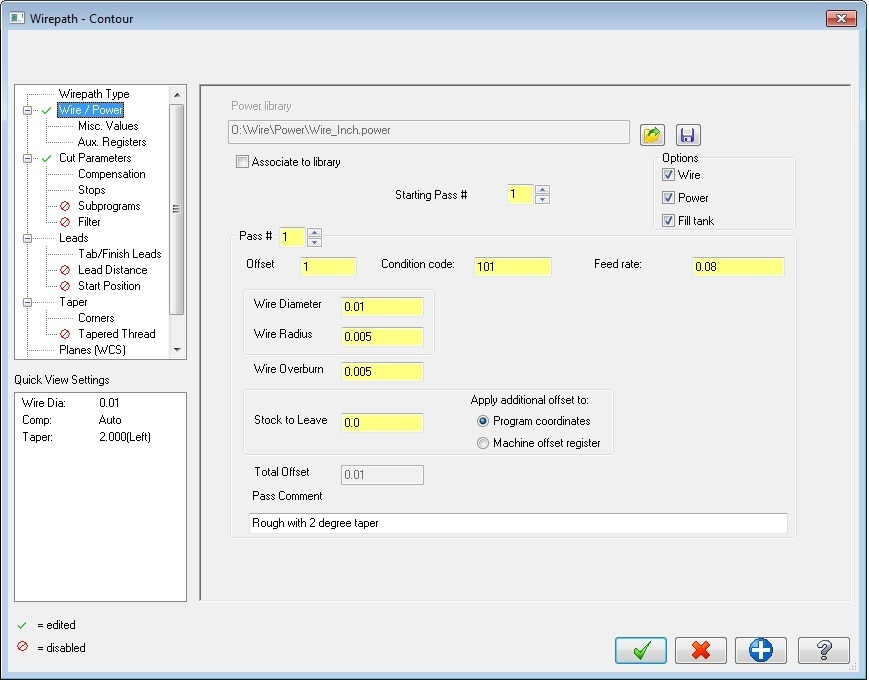
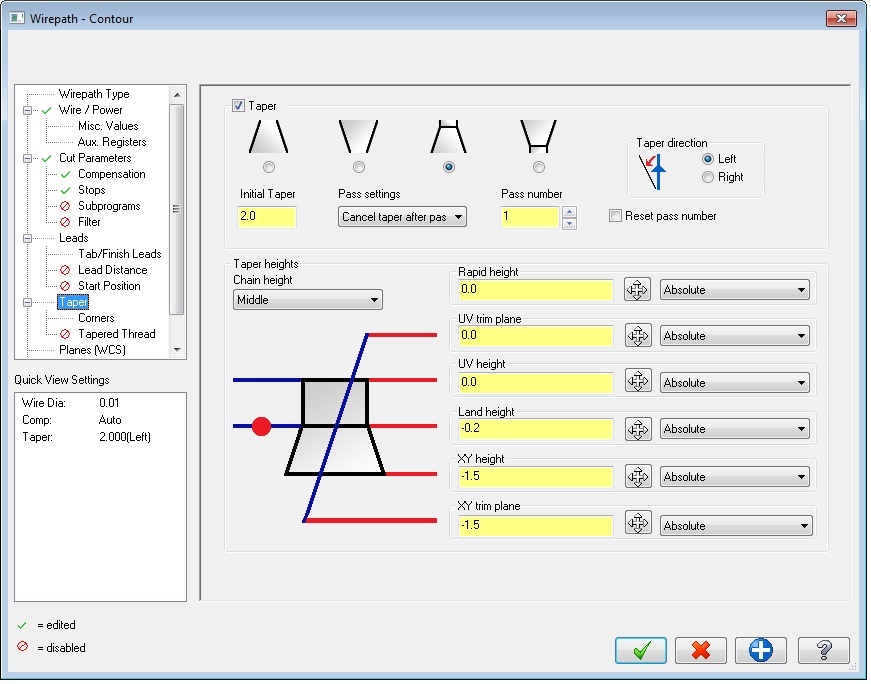
Hello, I am just getting my feet wet learning Wire EDM in a tool and die shop. The owner wants me to learn to program and run our old Sodick A500 EDM but the current operator is going to be minimal help. So if I may ask a question here I would appreciate the help. Here is my first project of a small block of D2 I will be cutting this slot cut into it. It will have a 2 degree clearance taper and .2" land. I'm trying to remove the tab rem from the tapered area of the slot. The machining sequence I invision: Rough pass with a 2 degree taper. Stop at glue tab. Support slug Cut tab with 2 degree taper. Stop and remove slug. Continue with skim cut to machine the .2" land. Does this sound like a proper technique? Should try with a second tool path? Here are screen shots of the setting I used. Thank you
.thumb.jpg.5ed2124ba644ad96f3263eb98999a00e.jpg)

-
-
Hello, Hope you guys don't mind me popping in here once in a while. I generally find my answers with a search. Is it possible and by a novice post editor, like myself, to get tool flute length and OAL output to the pheader section of a Generic HAAS VMC post? As a bonus number of cutter teeth would be nice but not a biggie. Example: %(Testing_E-1)(DATE=DD-MM-YY - 15-11-15 TIME=HH:MM - 09:13)(T1| 1/2 FLAT ENDMILL-3F|H1|D1|TOOL DIA. - .5|FLUTE - 1.0|OAL - 1.5|T - 3)(T2| 1/4 BULL EM .0625 R 3F|H2|D2|TOOL DIA. - .25|FLUTE - .75|OAL - 1.0|T - 2) N100 G20N110 G0 G17 G40 G49 G80 G90(RH OUTSIDE)N120 T1 M6 Any help or advice is appreciated, thanks Barry
-
I see that this is an old post that I found during a search. I would like to modify a X7 Generic Fanuc Lathe post to output sequence # only at tool changes. It seemed like this variable posted above would do the trick... tseqno : 2 #Output sequence number at toolchanges when omitseq = yes #0=off, 1=seq numbers match toolchange number, 2=seq numbers match tool number But I can't find the tseqno in the lathe post file. Would someone please fill in the blanks for me Thank you, Barry
-
Brendan, The change is working perfectly, thank you. Only other changes I made was add the image setup page and changed your logo to the company logo...hope you don't mind. The boss and the crew think it a pretty cool too. Thanks again, Barry
-
Hello dolan, I haven't had a chance to give it a look yet but I will soon as possible. Last month I was a temp. setup machinist on night shift. But then the shop got sold, the principals got fired and I became shop manager/program for eight machinist. I'm sooo over my head and think there asking too much...but if I can pull it off... My prior experience is a prototype machinist out of my garage so setup sheets for other people is new to me. Thanks for the help and I'll be back soon, Barry
-
Uncle dolan, Thanks for uploading your Active Reports template to the FTP, it helped me a lot. I spent the weekend studying the Active Reports tutorial with out much success. If I may ask a question. Can the Operation Name: be changed to use the Toolpath Group name instead of the Machine Group name? I tried a simple edit with the Active Reports Designer that didn't work. Barry X5 MU1
-
Thanks for the advise. I'm thinking on giving it a go. I do have some investment to make. A measuring microscope and a real air compressor are first on the list. I am trying to come up with a work holding method. Even a small vise would probebly distort the part to much. Any suggestions?
-
Hello all, First I'd like to thank you all for all the help you guys have provided me. I'm mostly a 'lurker' but learned much by just reading. The job...it is a small rectangular piece (.156" x .050") with simple 2D features on all long sides. It is to be made with Teflon type materials. Almost all tolerances are plus or minus .001". All deburr chamfers no more than .002". No coolant...only air jet. Quantity is 500 per month @ $5.00 a piece. Here is what I think the tricky part is. I want to do this part at my home on a Tormach CNC mill. If your unfamiliar with this mill it is basically a Bridgeport CNC conversion. R8 collet, 5000 RPM max., 64 IPM rapid, about .001" backlash in X & Y and .0015 in Z, manual tool change with preset heights. I am a CNC mill machinist of just 3 years but have become unemployed since the beginning of the year. So I have more time than money and my overhead is very low. At my old job, it was a aviation job shop with newer OKUMA mills. I had no problem holding plus or minus .001" on those OKUMA's but this Tormach maybe asking to much. Now I've heard the saying many times 'A good machinist can make up for a bad machine' but still? Any advice will be appreciated. Barry
-
I second the Tormach. I've had one in my garage for about a year. With there quick change tooling it is pretty good. It's definately no VMC but good bang for the buck. It's also a great way to learn Mastercam with out risking the bosses machine Barry
-
Thanks for the help. Been waiting all day for a tech support call back. Should have come here first.
-
Say I finished the first operation and I need to machine the side of the part. What I did last time was copy the mastercam file and then renamed it 'Part Op2'. In that copy I deleted all the toolpaths and then Xformed the geometry to the new desired origin. Then I created the new toolpaths. This seems like the hard way to do it? Any better ideas? I just finished my vendors 5 day mill training but this was not covered. Thanks, Barry
-
I appreciate the suggestions, good advice. I have given alot of thought about machine repair, I'd probebly be better at it than machining. Just not sure who to 'get my foot in the door' But I'll give machining another year. I just found a new one man shop were the guy wants to mentor me. Sounds like a great opportunity.
-
Thanks for the replys ... I believe I understand. I think I'll retry this lesson but omit that step. I'll see what happens. gcode: I was working as a machinist when I was much younger. I went to join the Navy as a machinist but they thought I'd serve them better as a EW Tech. But I've always rather been a machinist. Going from wigling a mouse and a oscilliscope probe to picking up Kurt vise's, pressing the green button and near 100% pay cut ... ambitious yes, others have called it something else. Hope everyone has a great New Year.
-
Hello, This will be my first post and I would like to introduce myself. I'm an entry level machinist with about 1 year of experience. I am career changing from the Electronics field ... I sure have alot to learn. In the hopes of quickening the learning curve I purchased a Tormach CNC mill and Mastercam with the Tutorial book. In lesson 8, page 8-9 it says to "Mirror the initial wireframe." I finished the lesson and ran the part on the Tormach, all seemed OK. My question is: Why did I need to mirror the wireframe? I do not see why it was necassary?
.jpg.807c1ac629671d53b06bde6d9a23cc9a.jpg)