


CamMan1
-
Posts
283 -
Joined
-
Last visited
Content Type
Profiles
Forums
Downloads
Store
eMastercam Wiki
Blogs
Gallery
Events
Posts posted by CamMan1
-
-
Are you liking it more now that you've got the resolution running a little tighter??
Things I like about X7 verify
1. the S and B keys work just like in old backplot... this is very nice...
2. being able to bring geometry into Verify.. it's nice being able to see a drive chain or surface
in verify
3. making the stock translucent and bring in the design model .. this is very useful for visualizing how much stock is left
4. Being able to zoom pan and rotate very large STL files... in early versions.. I might get a 100+meg stl to run but it was pretty
much frozen is space as it was impossibly slow trying to manipulate the stock in Verify.
5. Being able to leave Verify open on the second screen and run it over with new edits without having to relaunch..
something I don't like... the settings you make in a Verify session don't stick.. you have to reset them every time you start Verify
Yes I like it much better this way. Its still a little slower than I like but it does surpass the part size limit that I have had issues with in the old Verify. And I found out if I use an stl out of a stock model it works much better than the stl saved out of X7 verify. I am not a sofware coder by any menas but I do believe there is some room for improvement on the new Verify on CNC Software's part.
-
If anyone wants a little better quality out of X7's Verification there are some settings that you can adjust in the "MastercamSimulatorDefaults.xml" file.
These are the settings I adjusted
Under <VerifySettings>
<PrecisionFactor>1.0</PrecisionFactor> : is the initial "Default" accuracy factor that is scaled by the precision slider (modify at yor own risk,huge memory hog
dramaticly increases verification times but greatly increases initial accuracy) (rangle 1-10?) I have mine set at 2.5
<PrecisionIndex>5</PrecisionIndex> : is the start up "Default" setting of the precision slider (range 1-10) I have mine set at 8
<PerformanceIndexVerification>5</PerformanceIndexVerification> : is the start up "Default" setting of the speed that it verifies at (range 1-20) I have mine set at 20
With the way I set mine the visual quality is a lot better. Load times are increased and Accurate Zoom and Accurate Zoom Reset takes longer but is tolerable.
With the way I set mine Verification loads with Precision turned all the way up and Speed turned all the way up.
Like anything elses back up yor file before making any changes. Hope this helps some people.
Also when you make any changes you must restart Verify for them to take effect. I go one step further and retart Mastercam just to be sure they take.
-
 1
1
-
-
If anyone wants a little better quality ou of X7's Verification there are some settings that you can adjust in the "MastercamSimulatorDefaults.xml" file.
These are the settings I adjusted
Under <VerifySettings>
<PrecisionFactor>1.0</PrecisionFactor> : is the initial "Default" accuracy factor that is scaled by the precision slider (modify at yor own risk,huge memory hog
dramaticly increases verification times but greatly increases initial accuracy) (rangle 1-10?) I have mine set at 2.5
<PrecisionIndex>5</PrecisionIndex> : is the start up "Default" setting of the precision slider (range 1-10) I have mine set at 10
<PerformanceIndexVerification>5</PerformanceIndexVerification> : is the start up "Default" setting of the speed that it verifies at (range 1-20) I have mine set at 20
With the way I set mine the visual quality is a lot better. Load times are increased and Accurate Zoom and Accurate Zoom Reset takes longer but is tolerable.
With the way I set mine Verification loads with Precision turned all the way up and Speed turned all the way up.
Like anything elses back up yor file before making any changes. Hope this helps some people.
Also when you make any changes you must restart Verify for them to take effect. I go one step further and retart Mastercam just to be sure they take.
-
Aaron,
Can you toggle the the X,Y,Z origin off in the Verify?
Yes. edit "MastercamSimulatorDefaults.xml" file in MY Mcamx7 in MY Documents. Change To this to keep it permanent default
<ShowOnScreenInformation>false</ShowOnScreenInformation>
-
Yes I even have a thread monitoring tool that watches all 24 threads running. The problem is the size of the parts and the amount of toolpath. I just pulled in a part I programmed in X6 using the old verification method. I did a stock model on just the roughing routine and it took a minute or two before it started genning than it basically locked up for 5 minutes which in normal conditions would halt my work progress than it snapped out of it and finished. This is why I don't like using stock models.
-
You are really quite the optimistic Spin-Doctor. I guess you just don't want to see my point period. I want to be able to see my cuts in verify in progress and have them somewhat resemble a cut that an endmill would make. What was the point in even giving us verification if you don't want us to use it for model comparison. It can't be for collision checking because as chunky as the verification is how can it tell where the part is to the holder. Why even have the compare function in verify? Why don't you leave that out and tell everyone they need to use stock model for comparison from now on. And as for using the stock model in the back ground while still programming thats a good one. Most of the the time I have to wait for the stock model to gen before continuing because my PC is choking. And it has nothing to do with horsepower because I am running dual 3.07GHZ Xeons with 24 Gigs of Memory./
-
Sounds to me like I am going to have to do more work and use more tools which is not what I am after. We are a very quick turnaround shop and speed is of the essence. I get a model in the morning spend a few minutes coming up with a roughing routine and it is on the machine and running while I am programming finishing paths. Sorry to tell you but the old verify suited my needs much better than the methods that you are explaining. I don' have the time to wait for stock models to gen and when I have used them before I have had nothing but problems such as freezes and crashes. If I make one small chenge in a toolpath associated with a stock model than I have to Regen and sometimes it is a domino effect. Like I said maybe there is a group of people who are happy with this direction but you will be hard pressed to convince me.
-
Not to hijack this thread, but I'm hijacking this thread (which is all about saving a useable STL)
.gif)
Besides being a different window, it's also multithreaded and can use more than 4Gb of ram, in addition to a host of other things (like verifying things that could never have been loaded before)..
*edit: you just replied, and you're welcome!*
It sounds like you're starting to see the purpose of it, but one thing to note: If you have an issue with the quality of an edge or fillet or whatever, there is an "Accurate Zoom" button that will help with that:
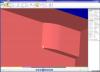
The thumbnail I posted was of 1 simple cut on a solid model in X7 verify and saved as an STL with the precision turned all the way up and STL save tolerance set to .001
So what you are saying that when I machine a 240.00 inch x 48.00 inch part all I have to do is spend my whole day accurate zooming every 4 square inches of my part so that I can see accurate cut quality. I would like to know if you actually program parts for a living. I do and I don't have the time to be accuarate zooming all my parts. All I am asking is why can there not be a better initial cut quality in Verify where I don't have to use the accurate zoom. Some of the parts I have programmed in X6 looked crystal clear and when I verify in X7 look like blobs of clay. I guess you guys don't get it. Maybe this working fine for a small group of individuals but I don't believe there is any smoke you can blow that will convince everyone that this is the way it should be.
-
1
-
-
Well it looks like no one has a good answer for the STL file issue. I was hoping to hear that there was a workaround that is commonplace in Mastercam. The Verify worked bad in the beta and release candidate and I was told that it would be better in the production release. Well that didnt happen! How can anyone possibly say they are okay with this. I don't get it. I actually thought that this new verification would be a step in the right direction. Boy was I wrong or should I say mislead.
-
2
-
-
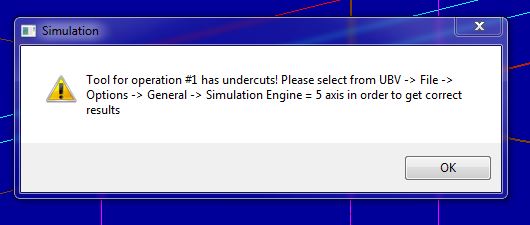
You right. I just tried a mastercam created tool from the tool wizard and got another error than you did. Sad Sad Sad

-
I have already done all that and it stiil looks like crap!! I can't believe anybody is okay with the Verification working like this! I understand that your thrilled gcode but this is totally unacceptable for me and the way I work. Here is an example screen of a simple cut with a flat bottom end mill saved as an STL.
-
This is a bug that has to do with the radius on a tool. I had this issue with a slot cutter that was .250 tall with full radius. I changed the tool to .1245 corner radius then it worked.
-
Do any of the Guru's that are loving the new Verify in X7 know a way to save a useable STL file out of the Verification? A lot of the programming I do requires multiple operations on multiple machines. I verify my part up to a certain point than save as an STL then pick back up on the verification using the saved STL. Any file I have saved out of X7's verification is so chunky and deformed that it is impossible for me to use it in that state. Any help would be appreciated because as it stands right know I will not be moving to X7.
-
I think he is trying to say that the Etch-A Sketch is better at verification than X7!
-
1
-
-
From the windows start menu, look for the Mastercam X7 Advanced configuration. From there you can enable the traditional backplot. New backplot will still be available if you want it by starting verify, then clicking the backplot button.
Thanks for the tip! That is actually an added bonus. I thought if you enabled Old backplot you would lose the new one. Thats pretty cool, you get all three.
-
Why in X7 tech preview verify and backplot "Move List" does it not show feedrates for tool moves? Also it looks like the Cutter comp and Coolant fields are reversed.
-
Does anyone know how to save your toolpath as geometry? I couldn't find any way to do it. Also is there a way to toggle shading in backplot? I do both of theses frequently in X6.
-
Select a holder from the holder page in the tree drop down and apply it to the tool. If you can't find one in one of the existing libraries you can build one from scratch. Then when you verify select the holder icon in verify and it will verify with the holder you created for the tool.
-
Just crashed 3 times in a row trying to regen a Constant Scallop toolpath. Oops!! spoke too soon it just crashed again. I think I might be going back to X5MU1.
-
0 times this week. Programmed a blisk, a turbine blade, a mold cavity, small lathe widget with a truckload of milling on it, and hacked togethers bome B-axis turning, I think there was a time study or two in there as well.
You were using Mastercam X6MU1 ??!!
 :blink:
 -
8 times today and I have only been at work for 3 hrs. Could they at least release a service pack to fix this. This is totally pathetic. I finally got the guts to start using X6MU1 and I have to say what a P.O.S. I get file open crashes every other time I open a file. The stock model is a joke. After about 20 high speed toolpaths the stock model slows to a crawl. I have been using Mastercam for over 19 years and I must say I am ready to jump ship!
-
Have you tried it with other tools besides the one you are trying. Could be that the library is write protected by the O/S. You might not have privileges to write to that file or directory.
-
any documentation on usage?
No there is no documentation. It is pretty straightforward You just need to set up your directories. One points to the tool folder where your Holder.MCX file is. The other points to the directory where you have your custom toolholder profiles drawn. The program basically just overwrites Holder.MCX with the custom profile you select. When you start the software it will show you a list of your custom profiles and you just double click the selected profile and it automatically overwrites Holder.MCX. Then when you go to backplot or verify Mastercam will use the selected profile.
-
Hmm, couldn't install it. Error window pops up and states: "Cannot download the application. The application is missing required files. Contact application vendor for assistance."
According to "ClickOnce Deployment" troubleshooting errors, the problem is described as follows:
"One or more of the files listed in the application manifest cannot be found on the server. Verify that you have uploaded all the deployment's dependent files, and try again."
Make sure you have the latest .NET installed with all updates and Windows installer 3.1.
Then you should be able to download the setup file by clicking on installer on the linked webpage.
try this link here for complete installation files.
After installing it close it and reopen it and it will auto upate to the latest version. V1.0.0.17

Getting more out of X7 Verify
in Industrial Forum
Posted
In Verify under file\options change the Number of moves before and after.
If you want to edit the XML file the settings are:
<numTrace>10</numTrace> I have mine set to 5
<numFollow>10</numFollow> I have mine set to 5