


.jpg.cc55b1e846f0b4d0335b9e6c4907ffe1.jpg)
nperry
-
Posts
155 -
Joined
-
Last visited
-
Days Won
2
Content Type
Profiles
Forums
Downloads
Store
eMastercam Wiki
Blogs
Gallery
Events
Posts posted by nperry
-
-
1 hour ago, #Rekd™ said:
I made a quick video showing how to check the location of the Machsim parts and the collision control settings. I don't have a UMC750 machine but I was practicing making Machsim's and made one up.
https://www.dropbox.com/s/94k3tdk40k6x7uv/Machsim.mp4?dl=0
I should have noted - I don't have these issues with the moduleworks machine simulator. That simulator seems like a little more work on the front end to get set up but it does seem to run okay.
-
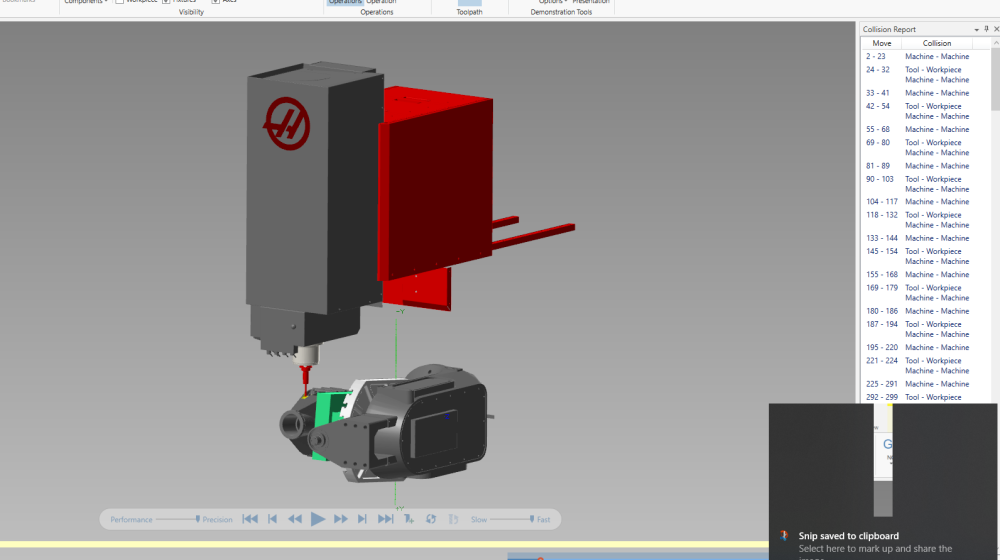
Anyone else have any issues with this? UMC 750 machine simulator on 2021 shows constant machine/machine collision on the sheet metal. Also shows constant tool/workpiece collision on optirough cutter paths. See screenshot.
If I open this file in 2022 and run the simulator it seems to better. That's a pain though...figure this should work just fine in 21.
-
35 minutes ago, ThickChips said:
@ danatoem
I ended up using the Spiral flowline which worked great, but it also doesn't allow any control for a lead-in.
For example, in my case, i am spiraling from inside a bore, out and upward. There is really no control over where the toolpath starts, so when it plunges down to its start position in the spiral, it will cut stock.
It worked fine. Thanks
In the "Surface Parameters" page of the Flowline operation you can click on and then use the "Direction" menu to control lead-in and lead-out so you aren't starting on top of the stock.
-
 1
1
-
-
On 3/3/2022 at 8:41 AM, miguelhot71 said:
hi , how can i plug this? , i dont know how. thanks
Local disk > users > public > public documents > shared mastercam 2021 (or whichever version you're using) > common > reports > sst
Copy the files I posted into that folder. To access the setup sheet, right click in your toolpath manager and select "setup sheet" option. In the lowest box there is an option for "report templates", make sure that "setup sheet (mill)" is selected.
-
1
-
-
Simple question - in the planes manager there's a little equal sign button that sets WCS, construction, tool plane ALL to the selected plane. Is there any way to make this button available as a hot key or in the RMB? I've done a little digging but I've got a serious needle-in-a-haystack type thing going over here.
-
On 1/14/2022 at 10:26 AM, Leon82 said:
Does mastercam comp the optirough to feed mills if you use custom geometry?.
Yes, it does. It took me one job programming a high feed mill with the "suggested radius" to realize it wasn't gonna work out well for the long term.
Grab the tool data off the manufacturer website, spin it up or whatever you need to do to get the right geometry, and voila! you've got yourself all the tools for a beautiful optirough that leaves an actually accurate representation of what you've got in the machine on your stock model.
-
1
-
-
35 minutes ago, gcode said:
found it
Blend is driven by the C/L of the tool
I just used the command offset/chain and offset the inside chain .06, turned off depth limits and got a pretty nice toolpath
This is exactly what I would've done in the past. I just feel like I'm missing something. Functionality was added to control from contact point, but it doesn't quite work as expected? Or is it just me?
-
Users -> tgolden -> desktop....
Maybe?
-
1
-
-
Z2G included.
Could I find a different way to do that top chamfer? Yes. Do I want to? No. Seems like a perfect opportunity for a really nice blend path.
Maybe someone can look at that and tell me what I'm missing on that path. For whatever reason it won't drop down past a certain depth and I think it's geometry related. In the past I've had to manipulate the geometry to get the path to work nicely, but I figured the addition of "Tool Contact Point" on boundaries would remedy the geometry manipulation issue. Having to do that is tedious and a time suck, so I've largely avoided blend in the past for that reason.
I feel like I remember reading somewhere on this forum that someone had largely replaced their use of flowline with blend because it was producing finer results. Wouldn't mind seeing some examples of how others are using blend to expand my use of the path a little bit if anyone is willing to play along.
-
On 6/17/2021 at 1:46 PM, lou said:
Hi all, it has been a long time since I have asked a question here. I tried to do a search and I did not come up with what I was looking for. So, I hope someone can help.
I am looking for a 1 page setup sheet with a picture of the part I am cutting and my list of tools. The one I used before was in "X+" But I guess it is not available anymore.
Any info would be helpful...
Thanks, Lou
Here's the setup sheets I developed for our shop based on preference for X+. Plug 'em in and see how they suit you.
-
3
-
-
37 minutes ago, crazy^millman said:
I didn't review the file, but I see the same issues from time to time. Do you have Machinesim for your machine built? If you have one tied to a Post even better. Use that and it will give you the best idea where you are out and not with Mastercam.
We don't have a sim for our 4th axis machine, but if I use the generic it gives the same results as verify.
-
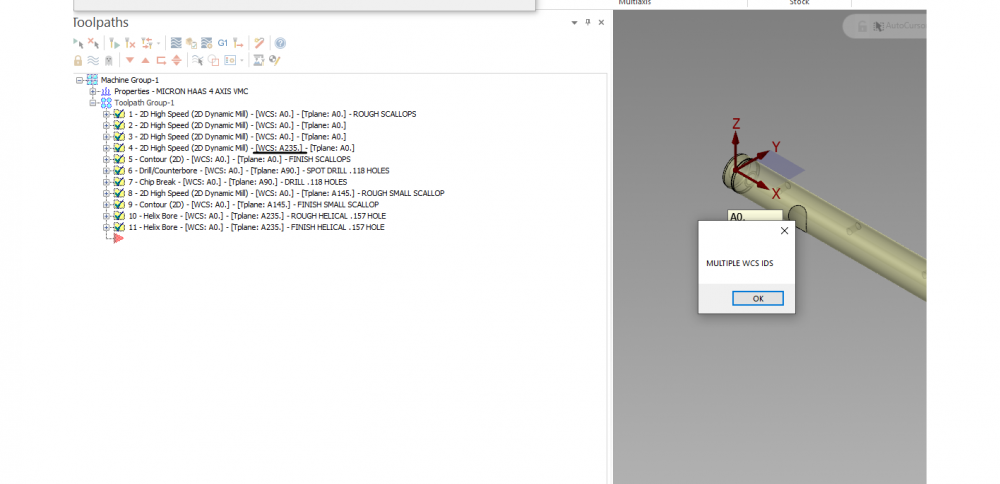
Pardon me if this one is known - or maybe I've got something messed up.
Looking at the 4th axis operations on this part, I've got a rotary advanced toolpath and a couple of 5x flow toolpaths both using transform operations. This gets a little convoluted...if I stock model only the original operations it shows a finished tooth in the correct spot. If I stock model all of the operations it shows only one finished tooth, but one tooth rotated over from the original path. So something is weird with that. Then the verify is flat out messed up. The rotary advanced transform operation will verify out cherry, but the 5x flow won't verify even close to correct.
I have, however, posted code and it looks good on an independent check.
File too large, using dropbox. Just curious if anyone wants to look and can help me see where I'm wrong if it's my fault.
https://www.dropbox.com/s/tgdochhcuq3n24y/RH HELICAL ELECTRODE.ZIP?dl=0
-
I click on groups, it locks up for about 5 minutes, then the window pops up and displays 0 groups.
-
23 minutes ago, Pete Rimkus from CNC Software Inc. said:
I've seen something similar over the past year and it was due to an issue with Groups. Some huge number of groups were somehow being created.
Maybe that's it?
As in Machine and Toolpath?
-
It's not really a question of methodology, I don't think. Even if I delete every solid in the file, plus all of the cutter paths, I still wind up with a file that's over 1GB.
Something happened with the file during some very simple extrude/mirror operations, I think, and although it's not urgent to get to the bottom of, I'm really really curious about it.
I forgot to mention until now that using the repair file feature yields no results.
-
4 minutes ago, JoshC said:
what i do for left hand and right hand mirror imaged parts is program one complete, save it as one name like Left hand, then i just save as again and save it as right hand.
then in the right hand part i just activate all levels and show all geometry, window select it all and mirror all of the geometry over.
From there all that needs to be done is simply reverse the chains for toolpaths that follow a chain direction, like contour for example.
that has always been the easiest way for me to do it, just make sure Transform mirror is set to Move instead of copy so all the toolpaths remain associative to the mirrored geometry.Yep, same method as me. If the file is small enough I might keep it as one, but this job will most certainly be broken out into two files at some point.
-
Thankfully I've got backup files and have worked around it so this isn't urgent so much as it is to satisfy my curiosity whether anyone's seen this before.
I have what was, as of yesterday, a moderately sized file. I've been chipping away at the fixturing and how I'm going to do the job and this morning I finally nailed it down. During some point between creating my RH setup and mirroring to a LH setup this file size blew up into something upwards of 1GB...which is insane when you look at the file.
What I did was grabbed a backup file that I know has all of the toolpaths and geometry I created, saved the trouble solids as steps and imported them into the backup file that way. So I've got everything I need in one place, but still had to do some finagling to save my work and have a file that isn't slow as molasses at the same time.
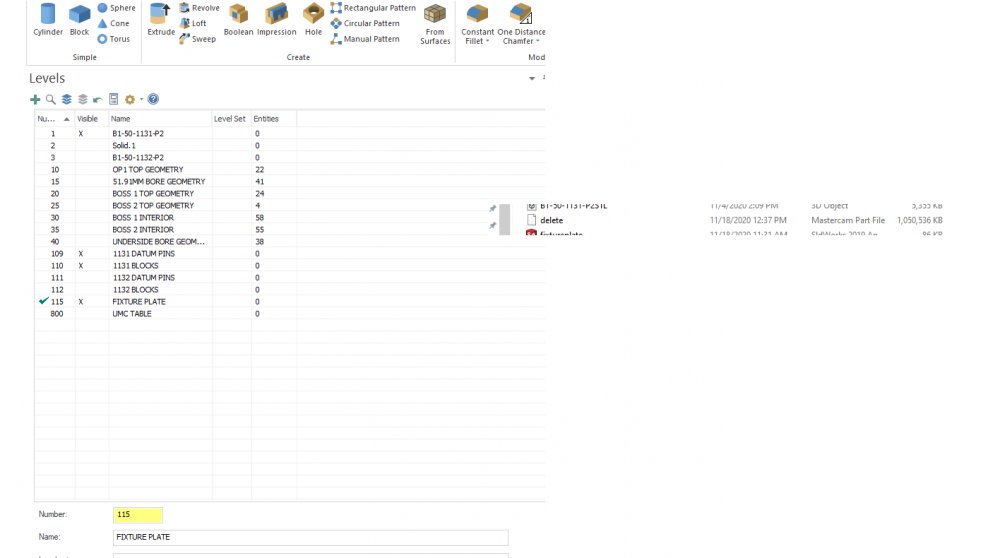
I think the issue is on levels 109, 110, 111 and 112. I created the solids on 109 and 110 and then mirrored those solids to 111 and 112 respectively. When I try to "save some" off of those levels into a separate Mastercam file they save with a gigantic file size. When I save them as step files they save small. I'm not sure about the functionality of save some and the difference between saving them as an Mcam file or step file...so maybe it's normal.
I was planning on sharing a Z2G here but it's over the limit. Here's a dropbox link for anyone interested....
https://www.dropbox.com/s/r9r1rfdpq9ldk9p/B1-50-1131-P2.ZIP?dl=0
-
7 minutes ago, byte me said:
The files are not blocked right?
If you right click and check the properties there would be an option to unblock, although i don't know why that would happen.
You could also check the path in the .ft file
Uninstall/reinstall did the trick. Thanks!
-
1
-
-
40 minutes ago, byte me said:
Sorry, are you getting the same chook not found error message?
If your simulator is just flat out not working you should replace the mymastercam and sharedmastercam folder with new ones from your backup, or if u have no backup, a colleagues computer or delete and reinstall.
Those issues are usually accompanied by "an unknown error occurred" or a message informing you that the server is busy.
Yeah, I'm getting the same Chook not found message. It's giving me the message when I click the verify icon or when I click the simulator options icon. It's popping up twice, gotta click okay twice before it disappears.
I tried doing a repair on it, I'll give uninstall/reinstall a shot.
-
Anyone have any experience or different fixes for this? I'm unable to launch verify for 2021 (2020 verify works great).
I don't have a Windows N or KN version, so no ability to install any of the Media Feature packs, even manually.
The MachSim C-Hook is where it should be and everything is pointed in the right direction in configuration. I've tried rebooting Mastercam/PC and still getting the same results.
-
Had some time today and finally got this figured out, so for posterity...
Went into the registry editor and deleted one key -
HKEY_LOCAL_MACHINE > SOFTWARE > Classes > Installer
Then arrow down until I found the one for Mastercam 2021. Delete. I understand how I might have missed this before but I don't understand how the CCLeaner program missed it.
Anyways, at the same time I went into the properties for the install file and there was a setting clicked on to run with Windows 8 compatibility, so I clicked that off also. Did both things before I clicked "run as administrator" so not sure what made the difference but my money is on the registry business.
-
1 hour ago, htm01 said:
don't understand , it's pennies in the long run, how many hours did you spend to get active reports compared to 5 minutes to set up X+
It took a solid 5 or 6 hours for me to get into a groove with Active Reports. There's still a lot of nooks and crannies to explore, sure, but what I really love about it is that your imagination is pretty much the limit for what you want to put on your setup sheets, or how you want to configure them.
Also, it took about an hour or two of post work, but I think I've got it...
-
1 hour ago, byte said:
That's slick. Thank you.
-
Just now, byte said:
Yeah, do you need a lower version?
Still running 2020 if that's something you can do! I'm pretty interested in this.


Scallop Rest Passes direction
in Industrial Forum
Posted
Do you have it set for open and closed contours to both go "one way"?