saltedfish
-
Posts
25 -
Joined
-
Last visited
Content Type
Profiles
Forums
Downloads
Store
eMastercam Wiki
Blogs
Gallery
Events
Everything posted by saltedfish
-
Custom setup sheet questions - min z depths and graphic
saltedfish replied to saltedfish's topic in Industrial Forum
I was hoping to have Mastercam do that for me, since it's supposed to be clever, but I can do that too. Any thoughts on how to cut down on the tool duplicates I mention above? -
Custom setup sheet questions - min z depths and graphic
saltedfish replied to saltedfish's topic in Industrial Forum
Essentially I want a single graphic, nothing more, that is an Isometric view of the Top plane. I don't need a picture of the tools or anything, just of the part. -
Custom setup sheet questions - min z depths and graphic
saltedfish replied to saltedfish's topic in Industrial Forum
Thank you so much! That seems to have solved the problem tidily. Do you know how to always force an isometric view when generating a graphic? The help mentions an "override," but I can't find it. It would also be nice to not have duplicates -- currently the program uses the same tool multiple times, so it appears multiple times with the various depths. As I understand it, the XML file generated by Mastercam organizes by operation or tool list, and the tool list doesn't contain the min Z. So I'm stuck with the operation list, which will list each tool for each operation, thus resulting in the duplicates. Is there a way around this? -
Hello all: I am fumbling my way through the bizarre world of active reports, and have my sheet mostly set up. My understanding of the sheets is as follows: Each .rpx file is sort of a.. bucket that holds a specific level of information from the XML file generated by Mastercam. The top level dataset is SETUPSHEET, and you have to embed each successive .rpx file in a way that links each sheet to the previous link in the chain. So if you want a tool report, you have to have an .rpx with DATASHEET, which has a subreport that calls on TOOLS, which in turn has a subreport that calls on TOOL, which finally can start pulling in information about that tool, like diameter and spindle speed and so on. Then all this information gets passed up the chain to the top level sheet which assembles all the data and presents it to the user. Why you can't just embed something like "//SETUPSHEET/NCFILE/TOOLS/TOOL/MIN-Z" is beyond me. Or maybe you can and I'm needlessly complicating things. Anyway, my issue arises when I go to make a comprehensive setup sheet for my whole program. The information I'm mostly interested in is: What's the tool #? What's the tool called? What diameter is the tool? What is the deepest that tool travels during it's cycle? Everything else is sorta useless to my particular use case. I've managed to get a setup sheet that actually displays this information, but some of the "MIN-Z" values were positive. I was baffled until I realized these were the values from the second operation that takes place on the back of the part -- since the work coordinate system was on the back of the part and thus opposite the "TOP" work plane, they were registering as positive values. (For clarity, I tend to do all the operations in one singular Mastercam file -- top, side, bottom, all of it; and just use strategically-placed work coordinates to determine where the tools are coming in.) Obviously this is stupid and useless, since I want the actual Z depth the tool is hitting once I turn the part over for the second operations, which will always be negative since the Z0 is on the very top of the part. Is there a way to force the setup sheet to always show the Z value from that operation's work plane? Will I need to restructure my rpx files to instead call on "//SETUPSHEET/NCFILE/OPERATION/TOOL"? Will that always give me the actual negative value? Follow up question: is there a way to force the graphic to always show the isometric view of the Top Plane? That's always my first op, so it makes the most sense to show that so I know what program I'm dealing with and how to orient it. Thanks in advance!
-
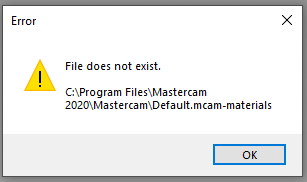
Whenever I add a machine, I get the error shown in the attached image. Did a file get moved? Where do I copy the file back to?
-
I'm trying to get Mastercam to always default to my Desktop when saving a new project. I want to create one folder on my Desktop which contains all the mcam files, solids, NC files, notes, drawings, etc. Apparently I can do this with the Project Manager, but it's default location is \Shared Mastercam 2020\. Every time I open Mastercam and start a new project, it directs me there instead of my Desktop. It's tedious and annoying to have to constantly navigate back to the Desktop to open the folder I've already made at this point. It's a computer; this should be (a) automatic and (b) configurable. Is there a way to point Mastercam in the right direction?
-
Well damn, that's the response I was looking for. Would still be nice if deleting the points in the "Features" list with the keyboard or mouse would work as expected, but this is a good workaround. Thank you.
-
Geometry selection page? Do you mean the entry shown in the attached image? Because that is what I've been using to modify the points, and I'm still getting the error I describe above in my first post. What do you mean by "reselect?" Right click does not give me that option, nor do I see it anywhere.

-
I suspect he was making a joke -- you're right that I didn't mention solid vs wireframe because I didn't think it mattered -- wireframe or solid selection, you'd think deleting points would work the same either way. I am trying to take advantage of some of the new features of Mastercam 2020 by not always taking the time to do the preparation that I used to do with earlier versions, but it looks like I'll need to revert to those methods to compensate for the shortcomings of 2020. Regardless, it was not my intent to upset anyone's day, and I apologize if that's what happened. I appreciate the point that wireframe and solid selection behave differently, and I'll keep an eye out for that in the future.
-
Glad I'm not the only one then... I see now it was using solid arcs as opposed to my usual wireframe points. That's a good distinction. I definitely feel that last part.
-
I do apologize if I came across as harsh -- I spoke out of some frustration that the first response was, "Did you try the thing you already tried?"
-
Please take the time to actually read my post. I clearly state that that didn't work.
-
I'm using the drill toolpath and having an issue deleting specific drill points. I have 20 points selected, but I want to delete the 3rd and 8th points. However, when I delete them, Mastercam instead deletes the 1st and 2nd points. I've tried right clicking on each point and selecting delete; selecting both points, right clicking and selecting delete; and selecting both points and pressing the delete key on my keyboard; selecting each point individually and right clicking delete, selecting each point individually and pressing delete. In all cases, Mastercam will only delete the first two entries. No combination of selecting anything will get the entries I want deleted -- Mastercam appears unable to do anything but delete from the beginning and work it's way down. Even restarting the program or reloading the file has no effect. Has anyone else seen this? My workaround, and it's ridiculous that I even have to do this, is to right click on the points, select "move to top," and then delete them. Then it "works."
-
Surface High Speed (Area Roughing) not cutting to bottom
saltedfish replied to saltedfish's topic in Industrial Forum
Really appreciating the responses here, thank you all so far. @Manofwar: I switched the toolpath type from Area Rough to Optirough so that I could explore the settings you're talking about. I found the Step Up option you were referring to, enabled it, and set it to 10% (the same value as the Step Down). However, I'm still seeing the same behavior as I was in Area Rough (see picture). I'm also not sure why the toolpath is all... wonky like that. Z Depths encompasses the entire depth of the pocket, Skip Pockets is set to 0, @The Chipmaker: Could you reupload those pictures at a higher resolution? I can't make out the text Mystery solved folks: It's a combination of me forgetting the scale of the view and the Step Up. I had .005" on the floor, and when I removed that but had the Step Up enabled as @Manofwar suggested, the toolpath went all the way to the bottom. I just didn't realize the enormous looking gap was just the stock remaining on the floor. Oops. Thanks everyone for their help. Follow up question: what are the pros and cons of optirough vs area rough? Is there any reason to use one over the other?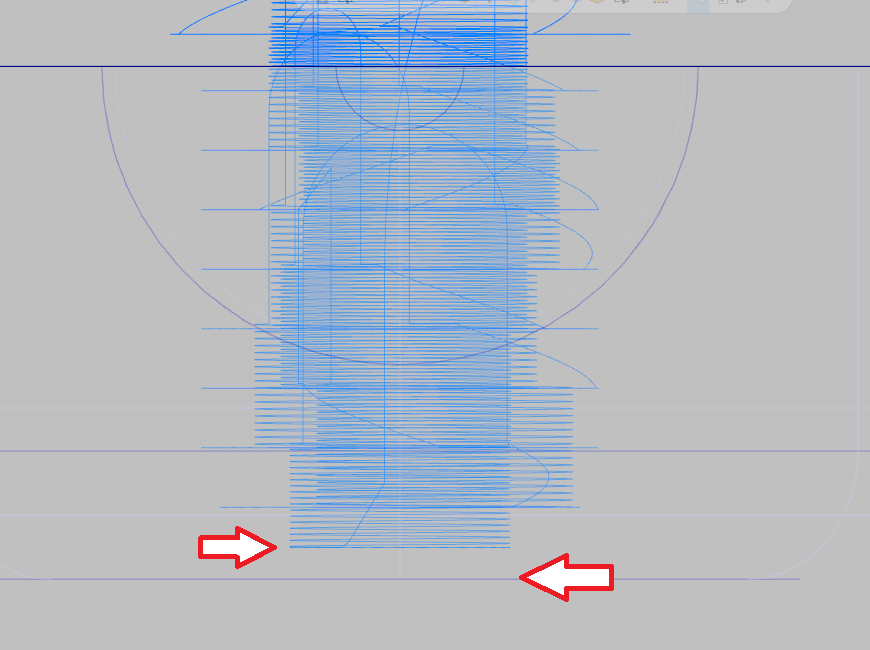
-
Surface High Speed (Area Roughing) not cutting to bottom
saltedfish replied to saltedfish's topic in Industrial Forum
When you say "step up," what value are you referring to? I'm not seeing it anywhere in any of the pages. Is that an option for MC2017? -
I'm running Mastercam 2017 build 19.0.15109.0 I'm having an issue with the Surface High Speed (Area Roughing) tool. As you can see from the attached picture, it's not cutting all the way to the bottom of the pocket. This is a known problem in my shop here, and we often have to go in with a secondary operation to clean up the bottom. The distance doesn't seem to be related to any of the options in the toolpath window, so I'm confused why Mastercam would just randomly opt to not finish the bottom of the pocket. Edit: I tried the Dynamic Optirough and had the same issue, and verified that the Z depths include the full depth of the pocket, so neither of those helped. The "leave material" is set to 0, as well. Is there a way to force this toolpath to go all the way to the bottom? Is there an alternative that people have used in the past to rough out a pocket before going in for some finish passes? This is a mold cavity, so dimensions are important here and I don't want to be too aggressive. Thanks in advance!

-
Does anyone here have any experience with Shelling vs Scaling electrodes for EDM sinker? My understanding is that Scale will shrink (or grow) the entire model to whatever proportion you indicate. Shell, on the other hand, offsets the surface some amount. This has the side effect of "wiping out" certain features that are below a certain threshold. For instance, if you have a boss that is .010" in diameter, and you shell the model by .005", this boss will be lost since there is no way to offset the surface that amount and keep the feature. If this is the case, Scale will always preserve features, even if you don't have tooling that can effectively machine it, while Shell will "destroy" certain features depending on the amount Shelled. Is this more or less accurate? Can anyone chime in with clarification or their own experiences? My only other option is to use the nominal, unaltered model and "cheat" the machine into thinking the tooling is oversize so all the toolpaths are smaller. I tried this before and it was just a mess of, "It says '.030 BEM' on the setup page, but I'm actually supposed to put a .040 BEM in the machine."
-
Active Reports: Minimum Z depth for each operation
saltedfish replied to saltedfish's topic in Industrial Forum
Probably should have mentioned this at the very beginning: MasterCAM 2017. Super thank you! -
Active Reports: Minimum Z depth for each operation
saltedfish replied to saltedfish's topic in Industrial Forum
Can you elaborate on what you mean by "and through the Shortcut on the screen?" -
Active Reports: Minimum Z depth for each operation
saltedfish replied to saltedfish's topic in Industrial Forum
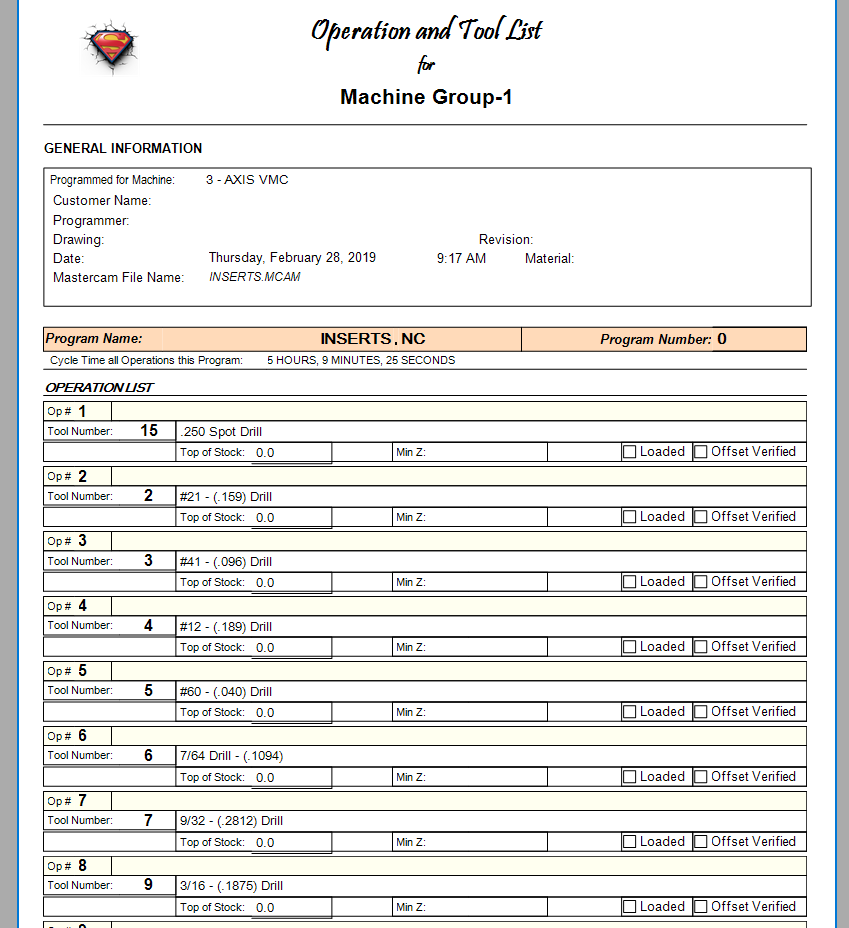
I apologize for the delay in response; you know how it goes in shops: you come in one morning and you're up to your eyeballs in work. At any rate, I did have an "a-ha" moment when I read your response: this whole time when you were explaining the hierarchy of reports, I didn't make the connection that you were referring to the report files themselves. I thought you were making an abstract tree of reports, and only just now realized that you were referring to the individual .rpx files and how they call on one another. That is, in your example above, your "OP and Tool list (OPERATION) Short.rpx" would have fields in it referring to "OP and Tool list (OPERATION-L) Short.rpx," "OP and Tool list (OPERATION-M) Short.rpx," and "OP and Tool list (OPERATION-T) Short.rpx." And that last one has a field referencing "OP and Tool list (MAN-ENT-INFO) Short.rpx." In other words, to make the report you're referencing above, you'd have to make a total of 7 separate files that are all linked as you describe above. I'm not sure if this makes me more or less confused, though. What this is telling me is that when I use the report generator inside of MasterCam, I invoke one of the final reports, such as OP and Tool list (MT) Short.rpx, and depending on the machine selected, MasterCam knows to travel down the chain until it gets to OP and Tool list (OPERATION-M) Short.rpx (in the case of a mill) and use that as it's template? I'm still baffled why ActviveReports was designed in such a way that empty reports are necessary, but I think I understand what's going on. Now my question becomes: "How does MasterCam know which report to use? Is it based on settings in the program that it knows to use the lathe template instead of the mill one, and vice versa?" Regarding your example, unfortunately my version of MasterCam is too old to open it. However, I did take a program I am currently working on and right click + "Setup Sheet" + F2 + op tool list (mt) short + ctrl+click yes + no + no + yes. The result is below: As you can see, the list is still not populating properly. The tools are all there, which is good, but not a real improvement on what I was doing before. To be clear, the program uses one coordinate (which was generated from geometry I drew) and is the Z zero for all the tools. All the tools generate properly according to MasterCam, so I don't think there is something funky going on there. I've explained the process I went through in the hopes that you'll find some flaw or mistake that will help towards a solution. As always, thank you again and again for your patience and help. PS: Part of me wonders if there's some sort of permission error at play here. I am not the system admin and recently The ActiveReports Viewer refuses to print from inside the program. I have to save my setup sheet as a PDF to my desktop, open that, then print from there. I feel like something fishy is going on here with MasterCam in general. Maybe I need to get IT to uninstall it and reinstall it.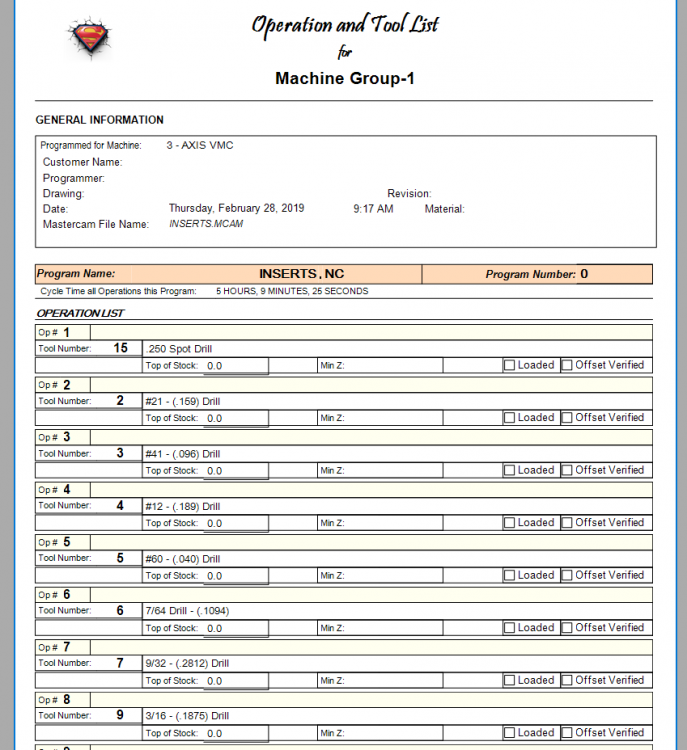
-
Active Reports: Minimum Z depth for each operation
saltedfish replied to saltedfish's topic in Industrial Forum
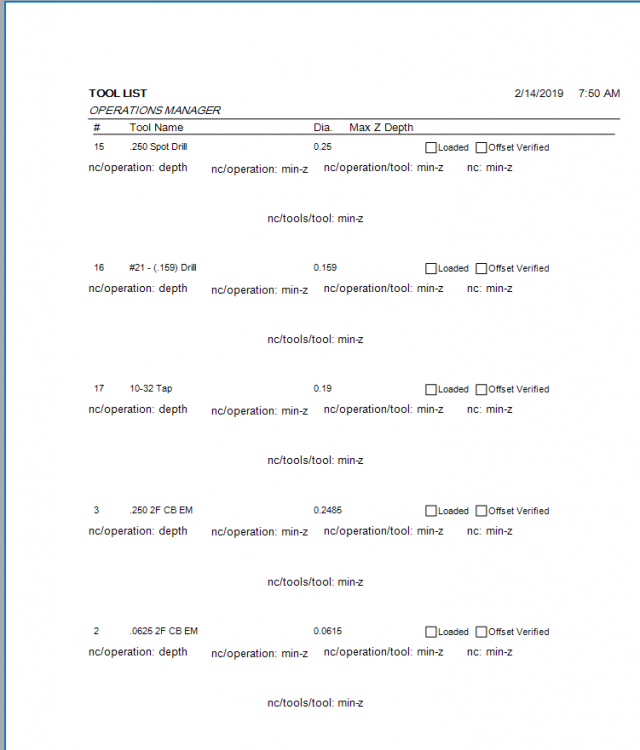
This is bizarre. I'm using the reports you posted yourself above. I've directed Mastercam to use these reports when spitting out the data. There are values for the "Min Z Depth" column, but they are the garbage numbers we've seen. Here's where it gets weird: I put in a specific Z depth like you suggested, like -.12345, and was able to find it in the XML under Depth, Min-Z, Min-Z2, etc etc. The coordinate system the toolpath is based on is at the top of the part and the simulations reflect the negative nature of the Z moves. But the output report was still the weird, positive garbage numbers. At this point I'm completely baffled because none of what you're saying is being reflected in the behavior of my setup; it seems like everything is being linked correctly and the XML output is showing the correct numbers, but ActiveReports is still broken somewhere? I feel like there is a fundamental flaw in my understanding, something I am overlooking or hasn't been communicated yet. I did a search in the XML for the weird numbers (in this case, 8.9262) and sure enough, there it was under MIN-Z. The proper value, -.25, was under MIN-Z2 and MIN-Z3. The other number (8.9312) was under still other MIN-Z values. Looking at the Z values, they're all over the place and don't make sense in the context of the Tool Plane. The max Z depth should be -.25, but they're all over the map.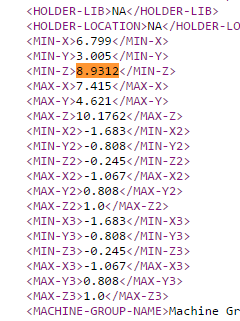
-
Active Reports: Minimum Z depth for each operation
saltedfish replied to saltedfish's topic in Industrial Forum
Ahhhh, that makes a little more sense. Is the secret handshake a permanent toggle, or will I need to do it every time? As for my test of your supplied files (which I greatly appreciate you taking the time to whip up for me), this is the result when I put them in the SST folder (I do not have an SSD folder) and directed MasterCam to use the report: There are now Z values, but there are no negatives which is mildly concerning. As I'm the one that created the program, I can say with certainty that none of the operations should be drilling lower than Z-1.2. Also, I was looking at the Report Data Source and don't see any huge differences between the way I was setting up my reports and the way that you set yours up. The XML you reference is different, though. Do I need to change it every time? How do I make sure ActiveReports looks at the latest version of the XML every time? I'm also still not understanding how you ensure the path to the information is maintained every time, as we were discussing earlier. Thanks again for all your help in this!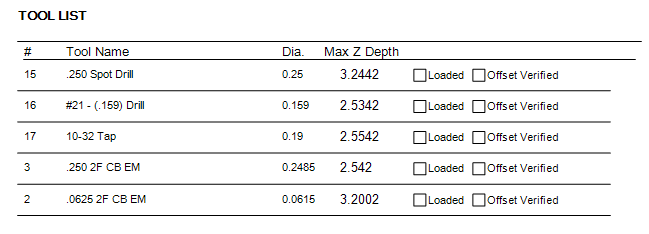
-
Active Reports: Minimum Z depth for each operation
saltedfish replied to saltedfish's topic in Industrial Forum
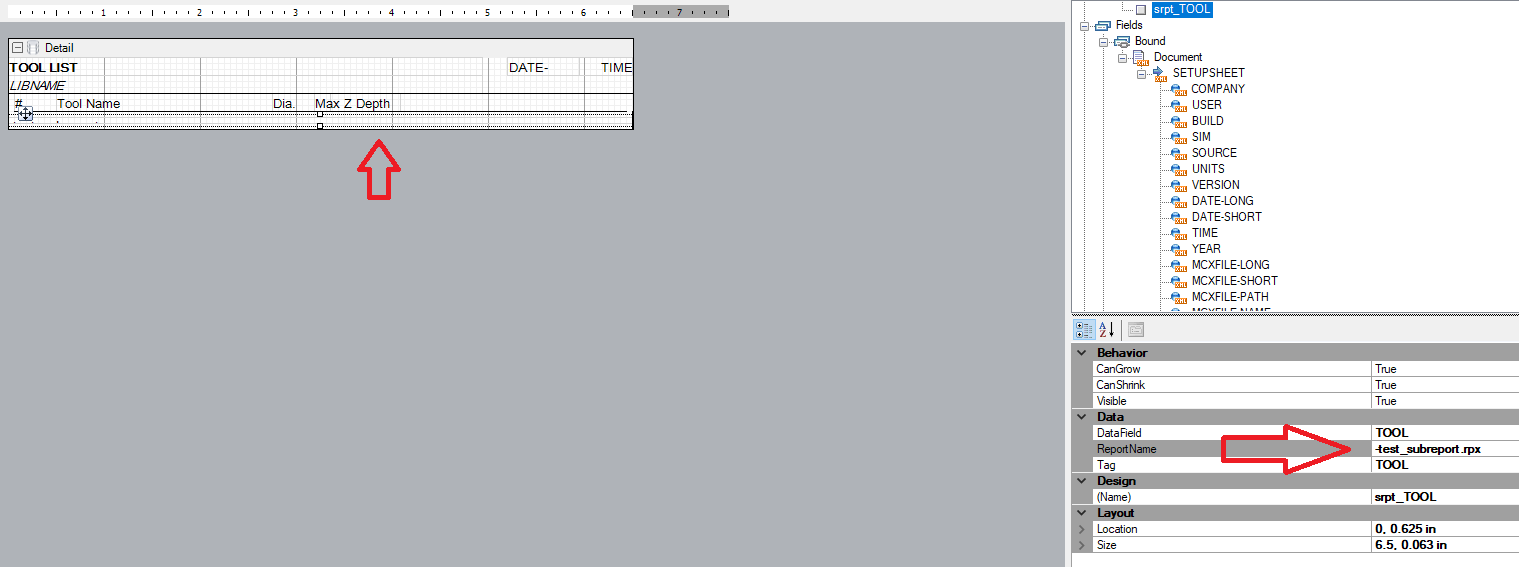
Thank you for the extensive write up! I really appreciate you taking the time to go through all of this with me, and provide screenshots to help. I'm still trying to wrap my head around this concept. The basics are clear to me: when you tell MasterCam to create a setup sheet, it creates a record of all the data associated with the program in question and dumps it into an XML file. From there, the ActiveReports sifts through that file and extracts the data you've requested via the .rpx file. Some data (probably most of it) is ignored, and the rest is displayed as desired from the .rpx file. Because of this, and the way the XML file is laid out, it is important to call on specific points of data inside the XML file, otherwise ActiveReports will pull in too much data, not enough, or none at all. What I'm not understanding is that as near as I can tell, the subreport I am using calls on a specific node of specific information. I understand the concept of making sure your "filepath" (so to speak) is complete so that the program can follow it to the destination and retrieve the desired information. What I'm not understanding is how to ensure that "filepath" is complete. Right now I have "test_report.rpx" and "-test_subreport.rpx" in the MSC folder under reports (bear in mind this is all practice and I'm trying to keep everything as simple as possible). I followed your instructions above and generated MA4CF.xml in the shared Mcam2017/common/reports/XML folder. I have pointed the test_report.rpx Report Data Source to this file, and made sure its Recordset Pattern is set to "//SETUPSHEET." For "-test_subreport.rpx" (which is called on by the "test_report.rpx"), I have set the Report Data Source to the same file as above, and set the Recordset Pattern to //NCFILE. I did this because the //NCFILE node is subordinate to the //SETUPSHEET, and it is my thought that by "nesting" them so, the chain will be complete? For clarity, the -test_subreport.rpx has a number of different "min-z" values I clicked and dragged into the main body of the report. My hope was that by having a few of them, I would be able to get at least one to work and then make the connection. You can see a brief description of what each node is right above the node itself. However, running a preview of test_report.rpx shows nothing at all, and I feel as though I have accomplished nothing. I think my confusion stems from the issue that when you click and drag onto the report (as you describe above), it is my thought that when you do so, the whole chain leading to that node should be preserved automatically, so all this chaining and empty reports makes no sense to me. Why can't the program just know when you click and drag SETUPSHEET/NCFILE/OPERATION/MIN-Z that that is the node location to search for? It feels like I'm doing twice the work? Like I have to tell the computer where the thing it knows the location of, is? I see that the nodes I have boxed above are truncated, is this the problem? Why would ActiveReports automatically truncate the information it needs?
-
Active Reports: Minimum Z depth for each operation
saltedfish replied to saltedfish's topic in Industrial Forum
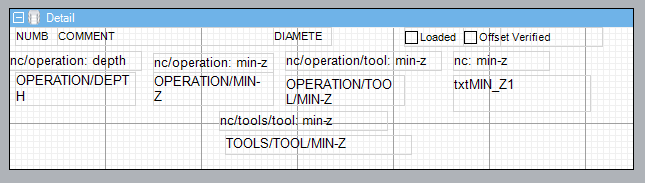
I recall reading this in the manual, but I don't understand what this means in a practical sense. I'm not even sure what this means: "Even if you do not use any data from a node, create a subreport that uses the node and calls the subreport of the next node level" Is this implying I need to make a chain of otherwise empty subreports before actually getting to the data I need? Is the Recordset entry I was talking about in my original post sort of like the root folder of a file system and I need to chain the file locations? I'm looking at the Creating Setupsheets with Active Reports PDF and it doesn't go into a lot of detail about how to use this Recordset aside from "it's a node that Active Reports looks for." Can you break down in a little more detail how you got your setup sheet to work? -
I've been trying to tighten up my tool report by condensing the info I need onto one sheet. One thing I'd really like is for each operation row to also contain it's minimum Z depth so I know how long to set the tool. I'm starting with a modified version of the default operation manager toolsheet for mills, which I've made into a master report (test report.rpx) and a subreport (-test subreport.rpx). My grasp of the Active Reports creation is a bit shaky, but my impression is that MasterCAM dumps a ton of info into an XML file and active reports sniffs through it and picks out the information you want and organizes it, based on the way the RPX file is laid out. I identified 5 different "minimum Z values" in the NCFILE branch: NCFILE: MIN-Z NCFILE/OPERATION: DEPTH NCFILE/OPERATION: MIN-Z NCFILE/OPERATION/TOOL: MIN-Z NCFILE/TOOLS/TOOL: MIN-Z That is, each of these are the values that can be clicked and dragged into the main body of the report, where I assume ActiveReports slurps in the data that value indicates it should find. My problem is that the values don't always load consistently. There seems to be an issue with the Recordset Pattern: //TOOL and //TOOLS seem to be the only applicable options that have any effect: Master report: //TOOL, subreport: //TOOL — Master report Preview reverts to some strange default template with no numbers; subreport Preview has values for all 5 Master report: //TOOL, subreport: //TOOLS — Master report Preview reverts to some strange default template with no numbers; subreport Preview only has values for #3 Master Report: //TOOLS, subreport: //TOOL — Master report Preview shows values for #1, #4, and #5; supbreport Preview shows values for all 5 Master Report: //TOOLS, subreport: //TOOLS — Master report Preview shows values for #1, #4, and #5; supbreport Preview only has values for #3 Despite the fact that the last two combinations show something in the Preview function, when actually tested through MasterCAM, there's no values in any of the fields. I'm wondering what I'm missing here, and hopefully someone can help me out. test report.rpx -test subreport.rpx