Gracjan aka Pullo
-
Posts
175 -
Joined
-
Last visited
Content Type
Profiles
Forums
Downloads
Store
eMastercam Wiki
Blogs
Gallery
Events
Everything posted by Gracjan aka Pullo
-
This has been a long time in the pipeline.
Gracjan aka Pullo replied to Gracjan aka Pullo's topic in Industrial Forum
Thank you for the feedback . This is the thing that I have always prided myself that I can get things designed without having to be pedantic about my geometry. I only use color to differentiate the geometry. Using levels for me is like a red flag to a bull (a myth according to Mythbusters). It seems now that the hihglihting in 2018 works the same way as in 2017, if you select the name of the solid in the solids manager , nothing happens, but touch any of it's subfeatures and they light up, so my info was a dud here.... -
Put linarc = 1 into your postprocessor. Gracjan
-
Mastercam 2018 has finally bidirectional solid highliting. It's not perfect , but it will do. Until now selecting a solid from the Solids manager gave you absolutely no clue as to what you're dealing with in the graphical window. The only way until now was to change the color of the solid thru' the attributes and then you could fish it out by color filtering. Well if you now (2018) select the solid, it does not light up, but if you select any of it's subfeatures , they will light up in the selection color! And all of a sudden Auto Highlight has become meanigful ! It now turns this highliting on and off. For those who try to get everything done in one environment (design and machining), there is still the problem of figuring out which wireframe is responsible for creating a certain solid. Right now you have to select the chain in the solid Chains window , which will light it up (select it) and then you can separate it from the rest of the geometry thru Alt-E (Hide) David Colin said he'd look if this could be done by a NetHook. He's done this with machining wireframe geometry. Gracjan
-
I have a Blum on a DMG DMU 60 , I simply cannot trust that thing. I know a company here that bought a DMU65 in May and they asked for a mechanical measuring solution. Worst ever use of 10.000 euros. I can only use it for drills. I have been monitoring that that thing now for like 8 yrs, but basically under ideal conditions repeatability is about 0.02-0.03 mm. For mold work that is not enough. With a 0.05 steel tape between the tool and the workpiece get repeatability about 0.002-.005 mm . GRacjan
-
DMG DMU 60 or DMU 50
-
I had noticed that the same part machined using surfaces was much faster to calculate , so I started using surfaces and also I had these issues with solids... The part with 1779 faces takes 29.8 seconds using surfaces, so the culprit doubling the time here is not solid to surf conversion as I had imagined , but the setting mentioned above. It's solids over surfs for me from now on. Gracjan
-
A certain thing came to my attention yesterday (the solution). I have been plagued during the past 5 months with machining errors when using solids as base geometry for calculations. The same problem seems to be in 2017 and X9. What happened was that I had to resort to welding.... To make a long story short here is the recipe for evading these kind of errors and also there is an up side to it. Set the parameter "Skip hidden face test for solid bodies" to "on" (tick active) in all the old school surface toolpaths under the "Advanced settings". Turning this off may lead to faces not being used in toolpath calculations i.e material addtition , I had three of these The upside is that for a mold half containing 1779 faces the calculation time fell from 41.04 seconds to 29.8 secs. I'll get back to this with examples , but for know I only offer the heads up. Mcam 2018 seems to be corrected , or at least one of my examples calculated correctly with the option in question on or off Gracjan
-
use Verisurf and command WCS XYZ-ABC if you want the same functionality i.e. A NEW ( I REPEAT NEW ) plane which is rotated around the axes. Gracjan
-
Creating center point via Bounding Box
Gracjan aka Pullo replied to Jeff2005's topic in Industrial Forum
And about 20 to move into X10 ))))....... G -
At least on the Heidehain tool life is handled by the control internally, so if your life is up , the sister tool kicks in. All this is done in the tool managment section of the control... I think that you should also tell which control you are working on as the solution will be control specific. G
-
Toolpath Transform , Source set to GEOMETRY (NOT nci otherwise Reverse order stays greyed out ) , Method Mirror and on the next page the magic happens when you tick Reverse order. It's not exactly what you asked for , but sort of gets you there . G
-
Life after X9 a.k.a. Mcam 2017
Gracjan aka Pullo replied to Gracjan aka Pullo's topic in Industrial Forum
Matt it just occurred to me , why would you even want to go half the way and press ALT "JM" , when what you are after is say to make a drilling program ? So you go and set up drilling to be CTR L- D , contour CTRL- P (profile) and skip the middle man.... I know you'll say that you want to "exnine", but we've been dealt a new pack of cards.... Gracjan -
1.You can put any function you can ever think of into any ribbon you want 2. You can put any function into the Quick Access Bar 3. You can put all the functions into the right mouse button. 4 . If you don't like the original ribbons that come out of the box , you can turn them off and build your own. 5. You can link any function to a keystroke , ALT+keystroke, SHIFT+keystroke,CTRL+keystroke 6. You can minimize the ribbons , so you'll never ever see them again in your life if you want to go cold turkey on them . This is called exnining 7 You can add new groups to the default ribbons G
-
1. draw a wireframe rectangle which is slightly larger than the part . 2. rough it out with a pocket rough (using this wireframe rectangle) 3. use the contour finishing , with flats turned on to finish the verticals walls and the floors 4. You have something small there which is not visible so a fourth and fifth op is warranted . Should take about 5-10 minutes of programming by the time you get good at this. Gracjan
-
Well , you can really bend 2017 it in so many ways , some new , some old (the tweaks) , X9 being the runner up / the thing you compare it to , in just a few days X9 will become a blurred bullseye.to You .Believe me. All the new threads are in one way or another stories of coping strategies for all of us in a transition X9 / X10 (aka 2017) . What is however new is the lack of information coming out of the official sources. People have to rely on places like this to get that extra info to get by. Maybe it's the sign of the times as Prince once noted An example , in order to get my mold designs done I need Moldplus to get by, yet as of yesterday it was still unavailable for 2017 . Yet I could not in any way make myself go back to X9 . So I did the core/cavity seperations on four parts all on foot just so I would not have to leave my cushy new surroundings. Gracjan
-
Best Finishing Toolpath for Cavity
Gracjan aka Pullo replied to randommachinist's topic in Industrial Forum
Pencil machining is by definition a leftover type of toolpath. The unlimited option is just a naturtal progression on the core idea. As I said I mostly use the old school version , but the high speed version has Stock as an option . you can use that to define your leftovers and dirty dishes . ( a previous op tool diameter , one chosen toolpath , or all ops up to now ). Gracjan -
Life after X9 a.k.a. Mcam 2017
Gracjan aka Pullo replied to Gracjan aka Pullo's topic in Industrial Forum
Well I sent the Usability folks this : Can we get control over the alt + something in 2017 ? There’s a guy who does not use the graphical interface but uses the keyboard and he’d like to e.g. change the alt + JM (toolpaths ) to something he is more used to . Gracjan -
Life after X9 a.k.a. Mcam 2017
Gracjan aka Pullo replied to Gracjan aka Pullo's topic in Industrial Forum
You'll have to wait until some whiz kid answers from CNC here .... Gracjan -
Life after X9 a.k.a. Mcam 2017
Gracjan aka Pullo replied to Gracjan aka Pullo's topic in Industrial Forum
I have not seen any place where you could change the "JM", are you thinking of using the graphical interface using keystrokes ? I will refrain myself from judging you and answer your question, I searched thru the file (mastercam.workspace) for a JM string and did not find it, so I think that these ALT + letters and numbers are assigned via some mystical Microsoft system.... You'll have to ask someone from CNCsoft. maybe they will answer here. But if you turn off the Toolpaths and make your own tab , you'll get a new ALT + something to work with , although I think you'd like to assign it something of your own accord... then we need help from the CNCsoft guys. I started this chain in the hope of seeing other people's screen so I can see some new idea or a neat tweak , so when you get your stuff in order send a few screen shots Mat . It took me a week and a half , an hour here, two hours there to get into a comfy place with 2017... Gracjan -
Life after X9 a.k.a. Mcam 2017
Gracjan aka Pullo replied to Gracjan aka Pullo's topic in Industrial Forum
You can't delete the default ones , but you can turn them off and build your own . Just click in the quick access bar area with your right mouse button and choose customize the ribbon or customize the quick access bar, they both lead to the same place. And off you go customizing. Gracjan -
water under the bridge G
-
Mastercam and Nurbs Interpolation
Gracjan aka Pullo replied to PAnderson's topic in Industrial Forum
One thing which pretty much summarizes this is an example of a NURBS polynomial in the Heidenhain 426/430 manual . I actually once entered it into the control and when I run it the control died on me.....There is no mention of NURBS in the fifth generation Heidenhain. I remember once talking to the Northwood bros at a dealer meet in Barcelona (early 2000s ? ) and they said that basically arcs and lines overtook the whole thing. One thing always kept me wandering , if NURBS polynomials come, how will I find a certain spot mid program on the control Gracjan -
Life after X9 a.k.a. Mcam 2017
Gracjan aka Pullo replied to Gracjan aka Pullo's topic in Industrial Forum
Slightly off topic , but not much : Things that are better in 2017 , but were not mentioned anywhere as major improvements: 1. One can finally use shift for selecting adjacent , tangent faces in a solid for drafting the faces selection 2. Auto cursor lock arc center. One can finally manually choose arc centers from a solid for drilling with a 100% success rate . 3. Single letters for keyboard shortcuts. This is both a boon and a curse. I use T for Trim/Cut/Edit, but now I can't use the letter T in naming a plane , as Mcam will jump out of text mode and offer me the possibility to Trim /Cut /Edit. I hope the next 2017 update will make simple text entry "numb" to that. (QC? ) 4. This one was actually corrected in X9 , but never bothered to check it until I noticed it works in 2017 and went back to see only to notice that you can do it there too. You can now go into a 2d -toolpath and change it from 2d profile to pocket or facing . Plz chime in with your observations. Gracjan -
Best Finishing Toolpath for Cavity
Gracjan aka Pullo replied to randommachinist's topic in Industrial Forum
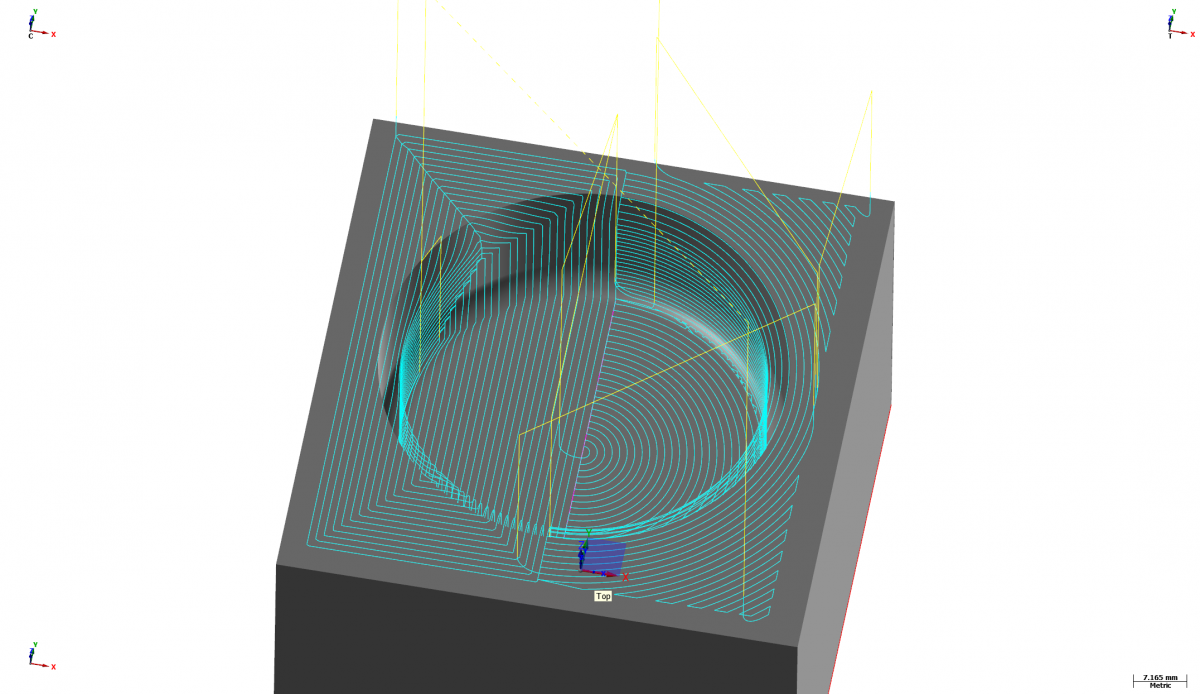
A very simple cavity type of shape , the left half done with scallop and the right one done with pencil unlimited. I'll let you judge which one will look better after machining . Gracjan
-
Viewsheets--- Why should I use them?
Gracjan aka Pullo replied to jaydenn's topic in Industrial Forum
RaiderX , great thanx . Only 7 minutes of my life went by and you totally sold it . I will definitely turn them on again and start using them. Gracjan