


ujmujm
-
Posts
110 -
Joined
-
Last visited
Content Type
Profiles
Forums
Downloads
Store
eMastercam Wiki
Blogs
Gallery
Events
Posts posted by ujmujm
-
-
Thank you for the help, I never use the right click option, I always use the tool bar at the top I thought they where the same, thanks for the quick response that's gotta be a record
.gif ":)")
-
Could someone please help me with Mastercam version 2017
1) Surface Finish Flowline: why is the tool containment option not active (greyed out) I’m pretty sure in older versions that was active.
2) What happened to: Surface Finish Parallel.
3) What happened to: Coons Toolpath.
Thanks for your help
-
The part is a 4” x 5” aluminum drive housing and we do a large volume of these parts, OP1 runs for 36 minutes and OP2 runs for 20 minutes, the operator runs another machine while this one is running, I agree with what you are saying my only thought is the expense for 6 more fixtures, time to modify the program, I will have 12 parts in inspection instead of 3 all of this you have to attach a dollar value to it, just to improve the margin only slightly, seems like it would take years to see any kind of return.
-
We have a part running in a horizontal machine that we are barely showing a profit on, I looked at the program there really wasn’t any room for improvement, however I did notice they were only running three parts at a time which didn’t seem right to me, I would of loaded all four sides of the tombstone, I use to work with an engineer that would enter some numbers in a excel spread sheet that would spit out the optimal number of parts to run, my question is how many parts is to many, I was told that at a certain point it becomes counterproductive, is there a formula to follow? Would it improve the profitability of this part to run 12 parts at a time instead of 3, any thoughts would be appreciated.
Thanks
-
I'm using CAMplete and when I select rigid tapping it outputs a G95 I think I figured it out, if I tell it my TPI is 8400 on the define tool geometry page then go to finalize properties page then my feed rate is .0357 (pitch) and my spindle speed is 300 that seems a little goofy but it works.
-
I'm trying to edit a 1/4-28 tap feed rate form IPM to IPR is there any way to override the Mastercam speed and feed calculator so I can output the speed and feed I'm looking for ex. .0357 (pitch) IPR and a spindle speed of 300.
-
Unfortunately this part is running on DMG Mori DMU-70 so I have to use the Cimquest post.
-
Thank you JP
-
Just for kicks I posted it out in CAMplete and it posted fine, I wonder if this purchased post only supports rotational 5-axis and not full 5-axis is that possible? This post was purchased from Cimquest for a DMG Mori.
-
oops actually that did not work my B axis posted out at B,0 it needs to be B180.
-
Thanks JP I changed all my planes to the same (plane) and now its posting out, I'm self taught at Mastercam I could really use a 5-axis class, what is your opinion on the materials you can purchase from this website.
-
Funny story
 I am helping a co-worker with his part the pocket is not coming out so good so I told him I would give it a shot the part starts out at B,0 C,0 and rotates to B180. C49.532 to do the pocket.
-
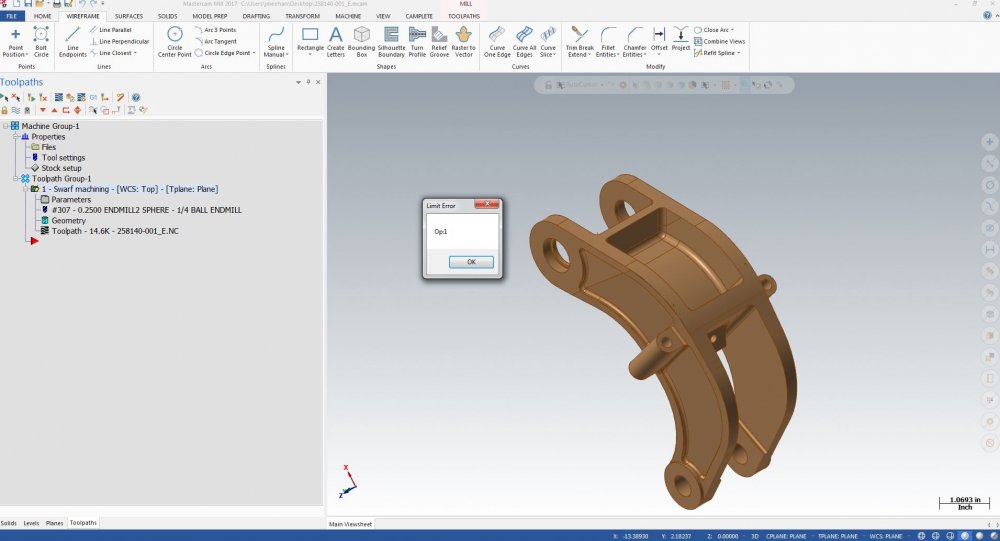
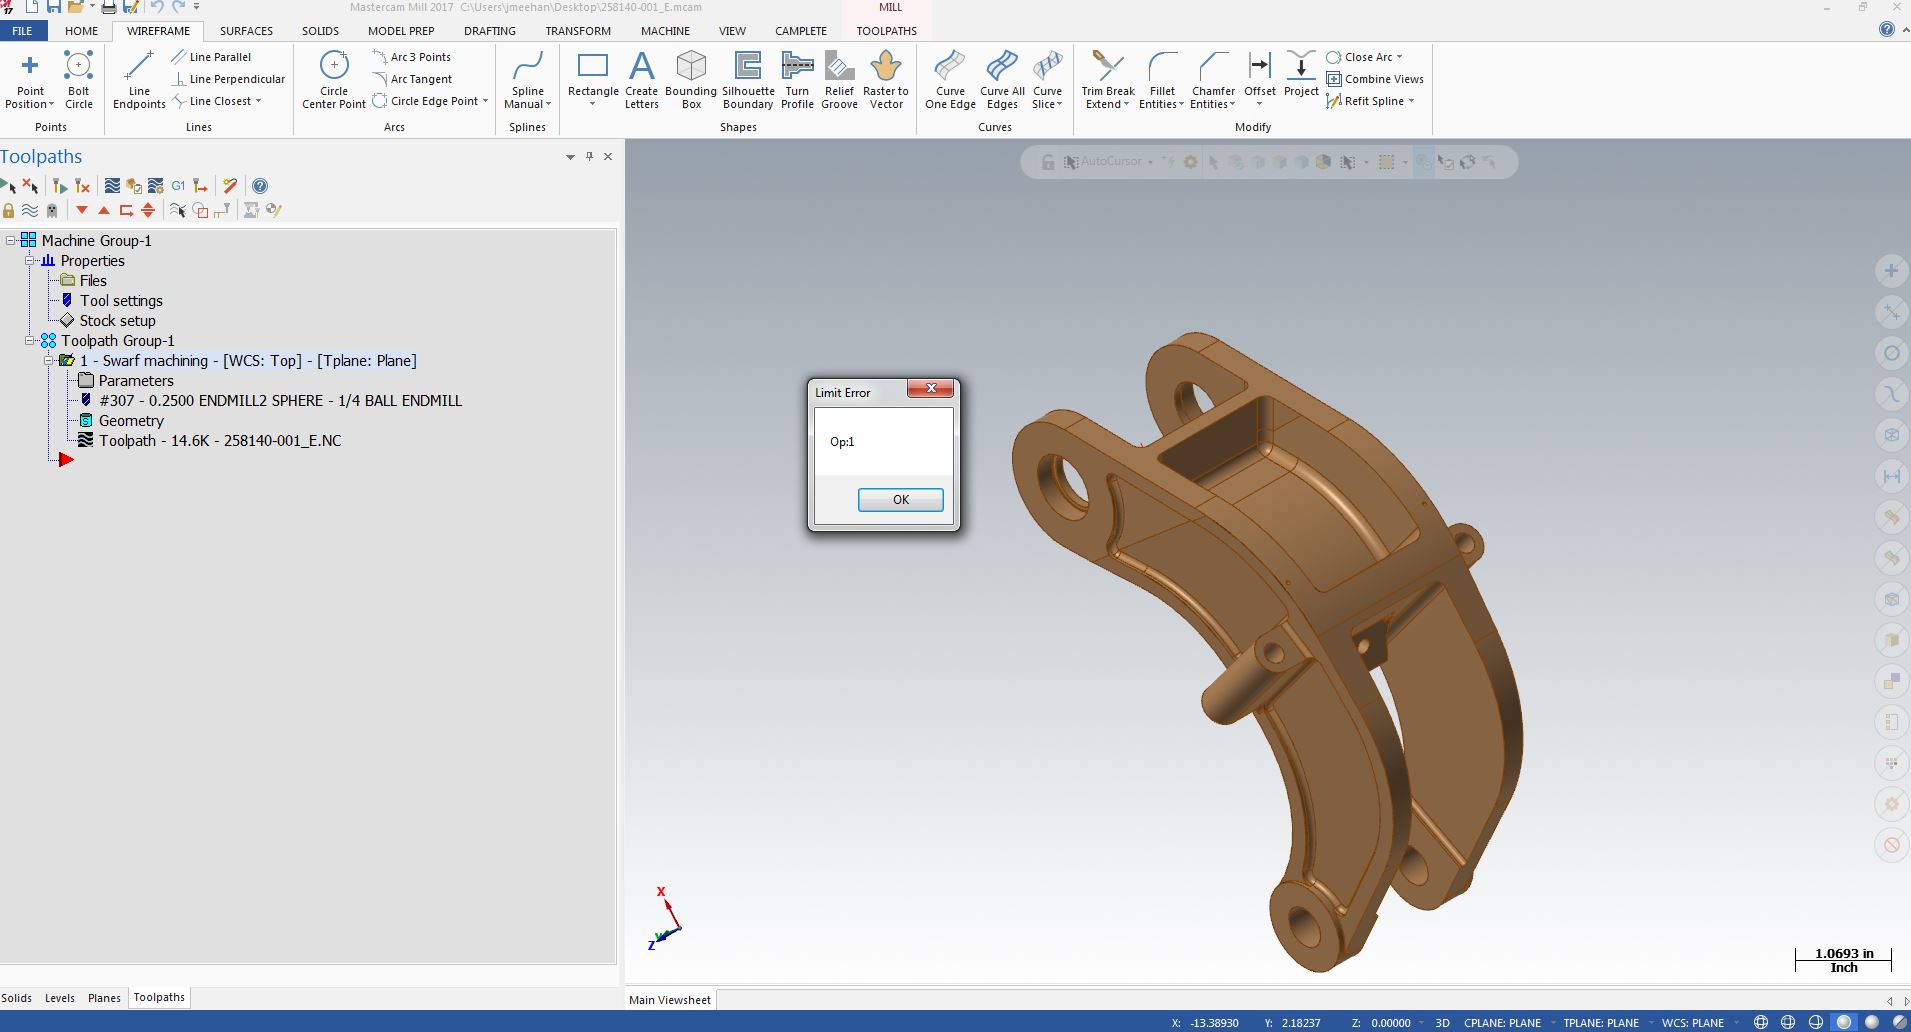
I did a Swarf machining tool path and when I post it out I get this error (see attached jpeg.) any body ever seen this Op:1 limit error.
-
I've always used verify in Mastercam it's never let me down, I'm primarily a mill guy and CAMplete has been kind of a hassle, I love learning new things but I need to see value in it.
-
Yes we do, I'm going to get a quote from my reseller for a post I'm not a big fan of Camplete.
-
Thank you for your help, the Matsuura is a new machine tool for us, we've had DMG Deckel Maho's for ever which are a lot different, there tired though so the powers that be would like to replace them with the Matsuura's looks like we are going to need a lot more training!
-
Your absolutely correct, I totally agree with what your saying, I have a situation that is out of my control though, the stock was ordered and the job was processed with the part laying down so I can only do four holes in the first operation and the other four in the second operation and the slot is .525 wide and 2.00 inches deep and the bottom of the slot is actually a pocket with 1/16 corner radii sounds like fun doesn't it, I ran 11 parts and 4 of them where to print the other 7 where out by .0005 to .0008, if the width of the slot varies more than a few .0001's then my .001 positional tolerance is out. That's why I wanted to probe each set of holes, the wall of the slot is a datum and the center line of the .1235Ø is a datum.
-
What you are saying makes sense at first I was just kind of poking and hoping, I was using active work offset (G54) to get the part rotated into position then I shared the "X" and "Y" from my G54 offset in G56 and probed a new "Y" and when that didn't work I used my active work offset to rotate the part into position and probed a new "X" , "Y", "Z" and stored it in G56 that also didn't work.
-
I need to probe and install the .0789Ø then using tilted work plane install the .1235Ø that is perpendicular to it, just for kicks I tried putting the holes in without the G68.2 and the .0798Ø was within .0001's of the slot wall but the .1235Ø was a couple of thousands from the .0798Ø which was way out of tolerance. That did show me how accurate tilted work plane is though!
-
Actually that is what I was doing I created a tool using lollipop to my probe spec and then did a drill canned cycle and modified the code when I posted it out worked great until my spot drill was off in the "Y" about eight inches, it seams so simple but I'm just not seeing it.
-
My O9812 macro is a web pocket measure. my templates main program looks like this, I was using N8 (Y NEG. SURFACE)
%
O2010(EZSET TEMPLATES PROGRAM)
G91G28Z0
(LISTING OF CYCLES TO SEARCH FOR)
(N1 BORE MEASURE)
(N2 BOSS MEASURE)
(N3 ID GROOVE-POCKET)
(N4 OUTSIDE WEB/RIB)
(N5 X POS. SURFACE)
(N6 X NEG. SURFACE)
(N7 Y POS. SURFACE)
(N8 Y NEG. SURFACE)
(N9 Z SURFACE)
("Q" IS ADDED SEARCH DISTANCE) -
Unfortunately we didn't get the Matsuura Renishaw probing we have the Renishaw macro's with a main template that points to the macro's
I have thirty parts to make out of 15-5PH with a tight positional tolerance on the eight hole's so I wanted to incorporate into the program to probe the side of the slot to put in the .0789Ø then rotate and put in the .1235Ø my new offset is G56 so I copied my "X" and my "Z" offset from my G54 and I was going to probe "y" every part should be able to meet that tolerance easy that way.
-
One of my attempts look something like this.
Working from my original WCS (G54)
G0 G90 G54 A-90.0 C-180.0
G68.2 X0.0 Y0.0 Z0.0 I-180.0 J-90.0 K0.0
G53.1
X-0.336 Y-0.098 A-90.0 C-180.0G65 P9810 Z-.118
G65 P9125 A8. S3. Q.75 (Probes "Y" )
G65 P9810 Z.2
G69
G53 Z0.
after I probed a new "Y" offset the tool went in the positive direction towards the top of the table. which made sense because my "Y" is now my "Z" and my "Z" is now my "Y" I've called Matsuura and I called the company that installed our Renishaw probing software and they really couldn't help me with working in a tilted work plane, the Renishaw programming manual has one page on working in a tilted work plane but it wasn't very helpful it mentioned a G53.6 instead of a G53.1 to align the tool posture to the active "Z" but I didn't have any luck with that.
-
I created a cad file so I could make the attached PDF. that represents the part I'm doing, I'm not able to share the original cad file.
Icremental Contour Help
in Industrial Forum
Posted
I have a slot with a floor that has a roller coaster type topography to it when viewed from the right side, I'm trying to chain a contour using that geometry, there is a .400 radius that is part of the geometry, I'm using a .031 ball end mill and it won't follow the .400 radius, the tool starts at the first end point and proceeds to the second end point in a straight line instead of following any help would be appreciated.
Thanks