


Chris In-House Solutions
-
Posts
433 -
Joined
-
Last visited
-
Days Won
3
Content Type
Profiles
Forums
Downloads
Store
eMastercam Wiki
Blogs
Gallery
Events
Posts posted by Chris In-House Solutions
-
-
Since this is a fairly common question that is asked I actually made a video up showing people how to do this. You can find the video at the following link: https://www.youtube.com/watch?v=XxeP6jEroCk&t=4s
-
 2
2
-
 2
2
-
-
Hey poolrod2,
When I opened your model in the software the model appears fine. I'm sure by now you may have figured this issue out but if not can you tell me specifically what areas you are having an issue with?
-
What are your computer specs? Are you geometry nesting or toolpath nesting?
-
You finish looks good. You could probably eliminate some of those retracts shown in your backplot screenshot by increasing the "Keep tool down within" value to a larger value.
-
To properly move the shared folder see the following post https://www.emastercam.com/forums/topic/90650-proper-way-to-change-shared-mcam2017-folder/
-
Kampfzentrum when you post is overwrite enabled? That might be why you arent getting prompted to save the NC file.
-
Hey Joeyls319,
Some computers have a integrated graphics card and a dedicated graphics card. I've seen it where Mastercam is running off the integrated card. If you can tell the dedicated graphics card run with Mastercam that should help with the verify time.

-
Hey Kampfzentrum,
To change your table you should just need to change your tool/construction plane. Front is typically B0, Right/Left would be B90 or B270 (-90) and back would be B180. WCS should be setup to TOP.
-
You can use a stock model to verify your toolpaths against by using the "simulator options" to pick the stock model
-
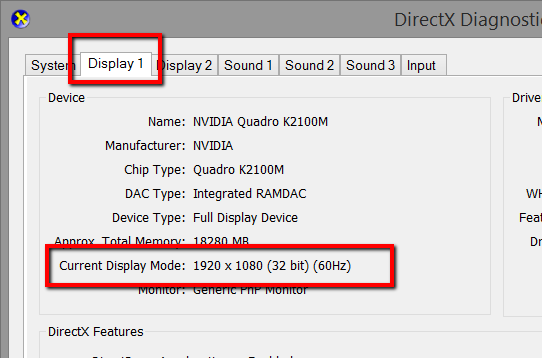
I have Windows 8 and my icons aren't that small. My guess would be you are using a 4K monitor. If you click on start and type dxdiag you should be able to see what resolution you are running under the display tab as shown in the screen shot below.
-
When I looked at your part file I get the same result you see in backplot. Below is an image of what I see. Do you not get the same result? Does backplot show something different than verify?

-
With lathe I would tend to try to start with a tool that is already setup and close to the geometry you require. Then all you should have to do is maybe select a different insert shape and define a few things. Creating lathe tools completely from scratch in Mastercam currently isn't the most intuitive process.
-
1
-
-
Hey Devendra T.
I think Daniel was asking if you could put your MCAM file up here so others can take a look at it and assist you with your programming. With those 5 Axis operations there are many parameters and one parameter change could completely change your toolpath. If I tried to re-create the toolpath you have there with the rapid moves going through the part it might be near impossible to get he same result. If you put up your file I'm sure someone here will download it and quickly be able to assist you.
-
1
-
-
Hey David What toolpath are you using? How is your part setup in Mastercam? Can you post your file here or a screen shot of what you are trying to do?
-
Spotterhphc you need to use stock model to verify mill ops in a lathe post. Once your done your milling ops just create a stock model then in the verify options select that stock model to verify against.
-
Hey Master80, You need to set your Rotary feed to unit/min. Then the post should output your programmed feedrate in either in/min or mm/min.
-
I ran into this issue today. We solved it by projecting the entities to the same construction depth and then deleting duplicates. It could also be related to something set in the advanced tab such as Thin wall as that was on as well when we tried making the Solid.
-
To get that option to be available you will need to un-select the boundary in the original operation. The toolpath will still start on the inside of the part though because its a rest mill operation and the tool cleans up stock left my the previous tool/operation. If you want the tool to plunge outside the boundary you will need to disable the rest mill operation (Stock). The issue with this is the toolpath will re-cut all the material that was previously removed by the last operation.
My recommendation would be to make another containment boundary outlining just the area you want to cut and select it with just a opti-rough toolpath (no rest mill operation) then tell the tool to start outside of that containment.
-
Hey Gary,
I'm not sure what software they use but I doubt its free or cheap to purchase. You could always reach out to them and ask them what they used to generate the automation. Or do a search for software packages that do this.
-
Hey Gary,
A animation from within Mastercam might be possible using machsim but I dont think it will be exactly what your looking for. If your looking for something similar to the video in the link below (see approximately :30 and beyond then Mastercam will not give you that type of presentation.
-
Tim Johnson what do you mean by extra drill parameters? The Area Mill Toolpath doesn't have drill parameters. Can you take a screen shot of what you mean?
QuoteThat's what I did but inside the extra drill parameters (8,9 and 10).
-
Maybe I need to re-start my computer to get it to re-produce but that doesn't really make sense to me. I had the issue, deleted all the operations and started making a video without the tool inspection turned on and sure enough the tool inspection code came out in the posted code. So I started a new session of Mastercam and when I did that I couldn't get the post to output the "tool inspection point - post customization required" output again.
-
Tim Johnson,
I cant re-create the issue and if I cant re-create it I cant really send it in to CNC Software.
-
Okay so now I cant re-create it to make a video or even a .MCAM file to send to CNC Software. Even when I have tool inspection turned on the post actually will not output the "tool inspection point - post customization required".
wood engraving project
in Woodworking Forum
Posted
Hey Movillermv,
The engraving options can give you a 3D looking project and if that is what you are looking for would probably be best. The other options would be to use a 2D Contour but it would depends on what you are engraving and how you want the project to look.