geirsj
-
Posts
118 -
Joined
-
Last visited
Content Type
Profiles
Forums
Downloads
Store
eMastercam Wiki
Blogs
Gallery
Events
Everything posted by geirsj
-
Hi! I wrote this comment in another post, but seems to be in relevance to what you ask of... In the download section at Mastercam for registered users you can download the Mastercam X5 NCI Parameter Reference.pdf and in that file it list the tool ops. Your reseller maybe has a newer updated version. If I then look in the NCI file in debugger for Definition 1016 and nr 3 output, it tells me the number of the operation which is the Internal toolpath opcode tol_op$ ----- Listing from that you should as the 3rd value have your tool_op id, listed as 67 in the nci reference, but you need to verify this yourself as things maybe are different, and try out with care! HTH.
-
Hi! In the download section at Mastercam you can download the Mastercam X5 NCI Parameter Reference.pdf and in that file it list the tool ops. I can not find any later edition than X5 of it. It maybe has migrated into other sections in the documentation or it's just the latest edition. A late reply for this maybe, but i searched for the reference and got to this thread, learned more from this thread also, so if others looking for it they know where to look...
-
 I started out reading the siemens books in German, moved onto the "Jinglish" of Fanuc and on to Okuma, this MP is understandable, LOL Joke aside, hope my english is understandable enough to get the right meaning for my issues anyway, however I can teach you this if you ever do scrabble: Dog is BIKKJE in Norwegian, and not as far as i know in no other language, so if you could use that word you be safe!
 -
Hi again! i got this solution working for me and would like to share if it could be used for your issue. I liked your strategy also and will use that for other issues for my post, this i have here gives you the details at a glance in the start of the tool change, HTH.
-
My solution to this was as follows: in this section i added this: # -------------------------------------------------------------------------- # Toolchange / NC output Variable Formats # -------------------------------------------------------------------------- fmt 2 Threaddiameter #Threadmill diameter value fmt 2 Threadpitch #Threadpitch value fmt 4 Threaddirection #Thread direction - bottom = 0 or top =1 fmt 4 Threadteeth #Thread active theet ----------------------------------------------------------------------------- in this section i added this: pparameter$ # Run parameter table if prmcode$ = 12188, Threadteeth = rpar(sparameter$, 1) # Capture THREAD ACTIVE THEET VALUE FOR THREADMILL OPERATION if prmcode$ = 12194, Threadpitch = rpar(sparameter$, 1) # Capture THREAD PITCH VALUE FOR THREADMILL OPERATION if prmcode$ = 12203, Threaddiameter = rpar(sparameter$, 1) # Capture THREAD DIAMETER VALUE FOR THREADMILL OPERATION if prmcode$ = 12205, Threaddirection = rpar(sparameter$, 1)# Capture THREAD DIRECTION FOR THREADMILL OPERATION --------------------------------------------------------------------------- in the section i added this: ------------------------------- ptlchg_com #Tool change common blocks if tool_op$ = 100, [ n$, pspc, scomm_str, "THREAD DIAMETER = ", *ThreadDiameter, scomm_end, e$ #Thread Diameter Value n$, pspc, scomm_str, "THREAD PITCH = ", *Threadpitch, scomm_end, e$ #Thread Pitch Value n$, pspc, scomm_str, "DIRECTION = ", *Threaddirection, scomm_end, e$ #Thread Direction n$, pspc, scomm_str, "NUMBER THEET = ", *Threadteeth, scomm_end, e$ #Thread Direction ] else, --------------------------------------------------- this got me this nc code output for my program: (MTSR 13 16UN -|T15 -|H15 -|D13.2) N102 ( COMPENSATION TYPE - COMPUTER ) N103 T15 N104 M06 N105 ( MAX - Z50. ) N106 ( MIN - Z-14. ) N107 ( THREAD DIAMETER = 19.05 ) N108 ( THREAD PITCH = 1.588 ) N109 ( DIRECTION = 1 ) N110 ( NUMBER THEET = 4 ) N111(Z STOCK TO LEAVE = 0.) N112(XY STOCK TO LEAVE = 0.) N113 G00 G17 G90 G54 X-30. Y-18. S6000 M03 N114 G43 H15 Z50. M07 N115 Z5. N116 G94 G01 Z-14. F1500. ------------------------ metric values! ------------------------ quite happy! Thanks to nickbe10 for pointing me in the right direction and Tim Johnson for answering! this opens up some other things i like to explore if its possible, I feel you can not get to much info or comments in your final nc code. have a nice weekend!
-
yes, i got this also from my reseller, he learned me to edit the post, and urged to ALWAYS take a backup before editing, and make a comment of the added data and name in the post so you can track the changes. I mainly use Cimco Edit 8 for programs, but see that Code Expert has some of the info built in, so i maybe switch for that when editing the post. Update: In the download section at Mastercam for registered users you can download the Mastercam X5 NCI Parameter Reference.pdf and in that file it list the tool ops. I can not find any later edition than X5 of it. It maybe has migrated into other sections in the documentation or it's just the latest edition. If I then look in the NCI file in debugger for Definition 1016 and nr 3 output, it tells me the number of the operation which is the Internal toolpath opcode tol_op$ . Then i know where to look next time, If the Active Reports Setup sheets could use those parameter info as tags in the setup sheets either directly or as a tag you self define or name it would really open up the workflow, have asked at Mastercam forum to see if they have an example or if it's even is possible to do it. I feel its more complicated editing post than an active report. the post is the heart, setup sheets just for info, rule nr 1 have to be not messing with the heart but use it wise for outputting good NC code and setup sheets for good info... anyway, ALWAYS take backup! rule nr ZERO !... G
-
Hi, got any solution for your issue?, or have you upgraded to 2018? lol have a good weekend!
-
Are there any list in the post ref guide of the different operations?, i know threadmilling was Tool op 100 cause i searched and i have seen trough my x7 ref guide, may be hiding in there somewhere !
-
N882 M01 (MTSR 0021 H21 12UN -|T28 -|H28 -|D21.) N883 ( COMPENSATION TYPE - COMPUTER ) N884 T28 N885 M06 N886 ( MAX - Z15. ) N887 ( MIN - Z-21. ) N888 ( THREAD DIAMETER =33.66 ) N889(Z STOCK TO LEAVE = 0.) N890(XY STOCK TO LEAVE = 0.) N891 G00 G17 G90 G54 X-140. Y-65. S4000 M03 N892 G43 H28 Z15. M07 T18 N893 Z5. N894 G94 G01 Z-17.5 F1200. N895 Y-66.13 F400. N896 G03 X-137.039 Y-68.169 Z-17.27 R3.169 N897 X-133.87 Y-65. Z-16.971 R3.169 N898 X-140. Y-58.87 Z-16.442 R6.13 N899 X-146.13 Y-65. Z-15.912 R6.13 N900 X-140. Y-71.13 Z-15.383 R6.13 N901 X-133.87 Y-65. Z-14.854 R6.13 Metric values Block N888 gives me what i was after, thanks for helping me out! I put the value inside a comment line and made a query of the operation for threadmilling , parameter was 12203 for Thread Diameter, 12194 is Thread pitch and i think i implement that also.
-
Hi! Thanks, i dig in more from your input, and I also found this thread that gives me what i looked for as a start to explore and see if i can get a deeper understanding. Before mastercam i programmed manually okuma, siemens, heidenhain and fanuc and used macro and variables, this is a new learning curve trying to understand the mp language. This example got the value from thread diameter calculated from the radius of I, times 2+ the diameter of tool, as i did manually, and the example gives me the comment for the tool twice when more tools than threadmill is selected. if only threadmill is selected it post just one tool comment line. anyway, just playing with a copy of the post in X9 for now, to see how different things changes the output. I am located around 90 Kilometers south of Oslo, our capitol. I know Kristiansand, it's around 240km more south of me, 3 hours drive from me, 4 hours from Oslo. Kristiansand is a nice town, founded of King Christian https://en.wikipedia.org/wiki/Christian_IV_of_Denmark which the town got the name from, nowadays its modern name is changed to Kristiansand. we go there and visit the Zoo there sometimes and see the animals from different places of the world, mostly in summer, winter here is not always pleasant!
-
Hi!, thanks for giving this example, i have looked for it to get the threadmill dia so i can check against my access database if the value has changed since last run of program. this got me a little further down the road of understanding it. I do the math manually for now, this at least add it as a comment before toolchange to compare. I get 2 comment blocks for the tool after putting it in my post if i have other tools than threadmill!, so i guess i just start over and see if it helps, took a copy and played with your code, again thank you. I also see this example can be used as method or strategy for some other operations i have, like circle mill spot face and calculate the diameters and input them in a comment.
-
Hi, i have that documentation, have read in it alot and have still need for help. I may have the right parameter but not for know the knowledge to implement it in the post and output. Also have i not found a tag for it in active reports as i asked if anyone knew if it is available. This is not for just asking others of doing it, it is how to do it. I ask the reseller, maybe quicker after all, This is not a issue of not wantimg to do it myself or not have the funding, it would just be nice to see if the forum helps out. I maybe get flamed for that comment, but is it not that what in the end its about, i have tried and failed in this, therefore asking kindly for help.
-
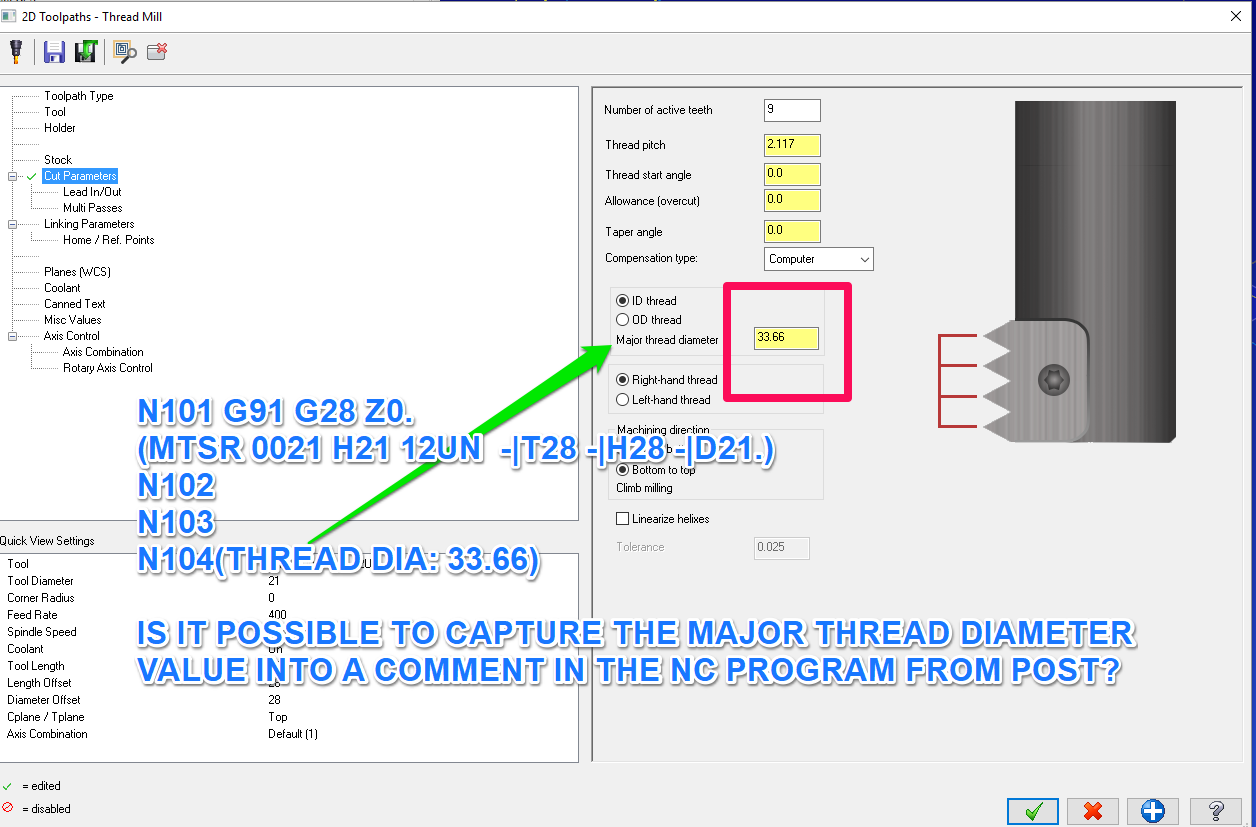
Hi! I have a question if it is possible to capture the major thread diameter value into a comment from the post processor. or if it is available as a value in a tag for setup sheets? see attached image Now i just put the value in the comment field, but sometimes that is also used for other comments so it gets a little crowded. I do thread milling on daily basis and have an access database of my default values and compare that to the program output and if it is and old value i changed it to the new in the access database. It would be nice to have the post to output the value for me in a separate comment when a thread mill operation is operational. I will need some help on this, and do not want to be breaking any forum rules of asking if that's not appropriate, then i ask for forgiveness in advance. This would help me a lot in my daily programming, as i make cavities for valve cartridges most of the time and need to change old program to run them again with new values on the thread mill diameter. my program is in metric, but i guess that is not a problem for this task. I make a lot of imperial threaded dimensions, but have all measures in mm for metric, to keep the post and programming tidy. I have also looked if i could use the machine to control the diameter, but as i change and setup tools slightly different sometimes its better for now to have them controlled by the computer. I also take the last R value and add by 2 + the diameter of tool to get the total value if i have forgot to put the comment of the value inside the comment section for the operation, would be great to just look at the comment outputted of the value right away and save some time... Maybe this is a reseller thing but at least by asking here if someone will help saves me some months time i feel. I have learned some good tips in the forum here, to tweak my post myself, still this is one of the things i need some extras help with. I use an IHS MASTER GENERIC MILL G-CODE POST with 4 axis output on a vertical mill. program would be something like this: N101 G91 G28 Z0. (MTSR 0021 H21 12UN -|T28 -|H28 -|D21.) N102 N103 N104 (THREAD DIA: 33.66) N105 N106 N107 Major thread diameter.nc

-
What's your go to engraving cutter?
geirsj replied to kunfuzed's topic in Machining, Tools, Cutting & Probing
Hi! I run the one i mentioned on 6000rpm, 11ipm and depth of cut 0.02I in metric it would be S6000 F300 Z-0.6mm if the numbers seems off in Imperial... if further cuts i have this depth of cut on engraving, on chamfering its max z-3.2 in metric and probably z-0.12 in imperial I run both steel, aluminum and stainless on this speed, its always in the machine and we do both engraving and chamfering with the tool. When the tool got on the market i knew of it before my supplier, and had asked of it many times if they had something like it. Ordered it, put it in the machine and change when i see build up of deburrs, not often. I could probably rum max spindle 12000 in my machine, but i prefer slower speed, feed could also be higher i guess, but i also prefer rather change the tip than spindle...... -
Glad it did! This tag also take the angle from drills and other tools so no need for different tags in the setup sheet for different tools, so it was helpful for us here too. Got help from the support from mastercam, if you ask politely and are helpful to others you achieve greatness i guess! As the others here in the forum who contribute. One step at a time digging into the mastercam world functions... G
-
The taper angle for a tapered endmill is available in the OTI (Optional Tool Information). In the DataField, use: OTI-TIPANGLE These tags are available in 2017 and 2018. In Help and search for "tags", then choose the product to get the complete list of tags available. Try this tag to see if its help you!
-
Thanks for clarifying this at least! Then you at least got some reports from me, and i know that should suffice if incidents like this happens again.
-
How is it working if you report the posts? Will any moderators get an alert? Also wondering if the forum should have a max post limit hourly or daily so this get stopped earlier. Maybe it has already and not worked this time. Certain members maybe should get higher post numbers i guess, by reading many threads in the off topic forum!. :-) Joke aside, not trying to get flamed, just Trying to browse trough those spam posts on a different time zone Or moderators on different time zone, to monitor when others not. Have a nice Saturday!
-
What's your go to engraving cutter?
geirsj replied to kunfuzed's topic in Machining, Tools, Cutting & Probing
This one is handy, comes in different angles so you also can use it as a chamfer tool. If you use that brand you maybe get away with just the insert and not the holder. Otherwise its fast to change the tool if needed. Works great in different materials, I use it both for engraving and chamfering holes before threading and also sometimes outside on the edges of the part. INCH: https://www.iscar.com/eCatalog/Family.aspx?fnum=3642&mapp=ML&app=0&GFSTYP=I Metric: http://www.iscar.com/eCatalog/Family.aspx?fnum=3642&mapp=ML&GFSTYP=M G -
Hi! Can you as a workaround use one of the fields: cutting length or shoulder length and set it as the same value as the overall length? Then you can use the tag: FLUTE-LENGTH or SHOULDER-LENGTH for the total length of the tool and maybe get you trough for now. It works for my 2017 setup, until new tags are available for you when you upgrade, in your setup sheet. If you need the operators to know the actual flute length or shoulder length it is maybe not the best solution, but at least an idea for now for you to consider. G
-
TIP-ANGLE is available for drill type tool, but list NA in setup sheet when endmill is displayed in setup sheet, have to look further into it if you not can use that tag. Look more tonight when gotten home from work... G
-
Hi, if you provide picture like the one in your other post it will help to narrow down what tag you need, and remember they add more of tags in the latest versions, so maybe your is available for 2017 also, i am now at EMO messe in Germany and are back on friday to the computer to see if i can help, or if someone else here can by the picture see what you need and replies to you. G
-
Hi. Yes in 2018 its more things added, i also use x9 and same setup sheet and i see the differences very clear. Anyway, if you Upgrade then maybe you find the solution for your issue. G
-
Hi! The procedure Ruth describe is the total length of the tool, including holder from base and with the stickout of the tool from the holder. If you downloaded and implemented the file Ruth provided you should get a start for your own setup sheet. the 2 files is to the default version of setup sheet, and you replace the original ones with them and then work from there adjusting to your own needs, at least I did it that way. If you replace the original files and go into active reports designer on the script tab on the MILL-OPMGR sheet you will see the code that calculate the total length including holder. In your setup sheet you then have to see that you have the DataField HOLDER-TOOL-LENGTH in your sheet. if not you should add it as that calculate the values in the script. You need 3 datafields in setup sheet for your calculation: TotalHolderLength ToolProjection HOLDER-TOOL-LENGTH All of this is included in the sample file Ruth provided that you replace with the default ones. This will at least give you the idea of where to start on your own setup sheet i guess. - But, what do you need the total length of just the tool for? I use the holder and stickout length in my sheet and the tool shank are inside the holder gripped so i do not see the need for it in my sheet, i was just wondering what you used it for. I include here 2 pdf files, one with the simple tool list as Ruth describe for the total length of holder and tool, i call that Assy. and one with more detailed info, it is not finished as i need to clean it up heavily, still its what i have at the moment for you to maybe get an idea from. If you provide your setup sheet maybe other can see and help you with the error you got, my tought of the error is that you are missing the 3 data fields or one or some of them and then get the error due to the calculations go wrong. but if you only want the length of the tool then, this is not the right procedure and you should investigate further for a solution. there is a datafield in the sst named ../../TOOLS/TOOL/OVERALL-LENGTH see if that helps you in any way My setup sheet are in metric, if you wonder of the high numbers! TOOL LIST EXAMPLE DETAILED LISTING.pdf TOOL LIST EXAMPLE SIMPLE LIST WITH TOTAL LENGTH INCLUDING HOLDER.pdf
-
Hi, glad you did, was also looking for it to my setup sheet. I get the total lenght and i also have max and min z in my setup sheet. The other thing i need now is the total lenght the tool can be used in example drilling, that is not the same as tool length. (AP), i know what i must just have not got to the task of doing more work on the setup sheet. The active report setup sheet i have made is more for special jobs, i really like the X+ setup sheet you can download here for standard production, the author of it can not get too many high fives for giving us this powerful tool in our toolbox! Anyway, got the total length working as Ruth described in the post at Mastercam.com forum, and it was not a difficult thing to implement, if you need help of it get back and see if we can help further. G