


cncappsjames
-
Posts
1,227 -
Joined
-
Last visited
-
Days Won
86
Content Type
Profiles
Forums
Downloads
Store
eMastercam Wiki
Blogs
Gallery
Events
Posts posted by cncappsjames
-
-

Went into power settings and a couple things were not set to maximum so I reset to the default and changed a couple video defaults. 5:44 if my math is correct. One more year this rig needs to last then I'll get another one.
I think I'm going to migrate away from the Xeon on a laptop and go with the fastest i9 I can get, and drop the Dell preference. Their configuration options for pro level engineering class portable workstations is just too small for my liking anymore. Their next day (usually) onsite support is pretty great, but, if I can't get what I want or need, well...
So, I've got around 12 months to do my research, so I better get started. It's going to be around a $4,500-$5,000 USD rig and I like it to last 3 years. LOL
-
 1
1
-
-
7 hours ago, Rob B said:
Can the average guy run a benchmark test on their computer?
It is specifically designed for that.
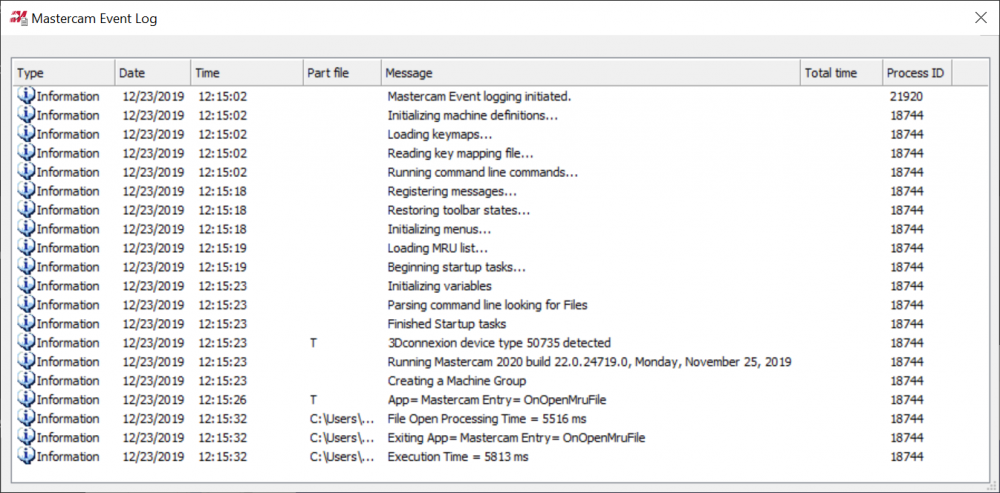
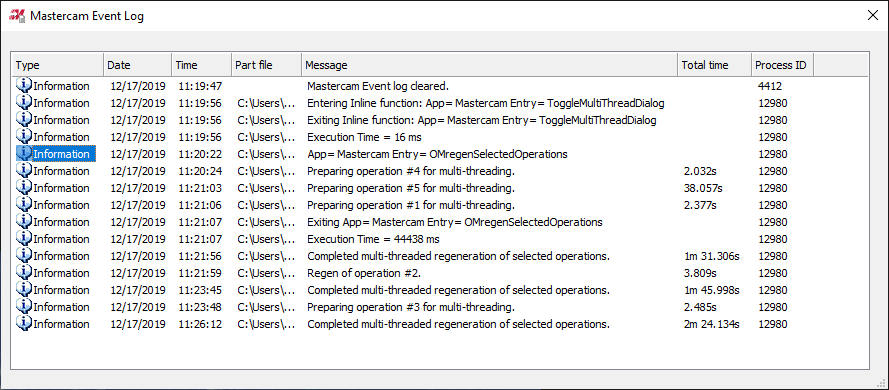
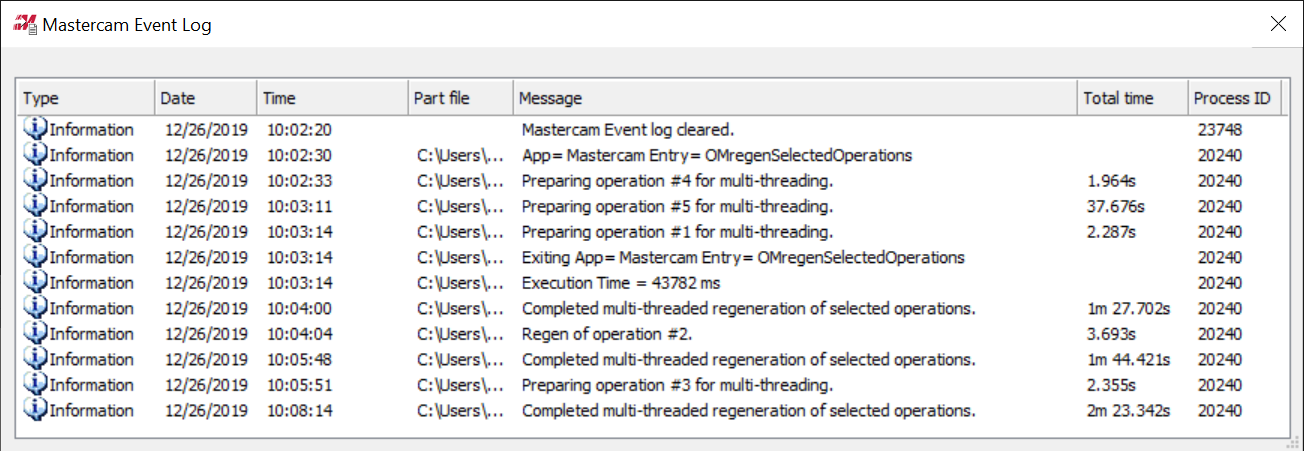
You open the file, select all the operations, open the log (it's in task area near your clock) clear the log, then regenerate. The log captures all the time elements.
-
 1
1
-
-
8 hours ago, gcode said:
... is there any chance the slow performance is due to power plan modifications??
There is ALWAYS a chance I can miss something. I'll check that out g. Thanks man I appreciate it.

-
I went through my Task Manager and saw some apps I use sparingly at most (LogMeIn and a few others), and uninstalled them Rebooted and now it's down to 26 seconds to become usable. Back to acceptable.
-
There's always a little play/backlash in the 90Deg. milling tool holders. Perhaps try conventional cutting?
-
Correct. No errors on startup. All drivers are up to date. Tomorrow after work, I am seriously considering a wipe of my boot drive and do a fresh install without all the Dell bloatware.
-
2
-
-
4 hours ago, David Colin said:
Perhaps there is an issue with a specific Mastercam start task that is slowing down (nethasp/custom menus) and should be investigated
As always, that is my first inclination. That the problem is on my side. But for the life of me, I have l have tried everything I can think of. Thay bag of tricks is very deep. Incomplete probably because nobody can know everything but still very deep nevertheless. Startup is spotless. No stop signs, no cautions. Just the expected "i" inside.
If you've got some ideas I am ALL ears.
-
My last Beta version was 2017 or 2018. Probably 2017.
My last unusable (for me) Beta version was, maybe X9. It was actually not even Mastercam's fault. 3D Connexion broke something in their drivers for that Beta Version and it wasn't fixed for a few Bata cycles. Even my CAMplete was broken. That was a ROUGH time. May as well have cut off one of my arms.


My favorite saying is there are 2 kinds of programmers; those that ask their software to do stuff and those that TELL their software to do stuff. Be the latter and things will go MUCH better.
-
2
-
-
On 12/20/2019 at 1:32 PM, PcRobotic said:
I have bought the holder of which has the KNOWN LENGTH and the PRECISE DIAMETER as well. Not sure the best way but please teach me how if you have better idea.
Thank you.
I don't know that my way is the "best" way, and I'm sure there's a faster way but it gets me to within .0001 or better every time;
-
Using a tape measure or scale, I estimate the length of the probe (to the tip) and add a "little"
.gif ":)") and put that value in the probe's length geometry offset.
and put that value in the probe's length geometry offset.
- Taking your known length tool, set your G54 (or an open offset) to the top of a FLAT easily accessible surface. I use a 4" gage block so I dont move Z and compress the bearings, and I can make my offset good wo within .0001"
- Call your probe into the spindle.
- Activate G54 (or the work offset you used)
- "Measure" that Z surface you set your work offset to with a probing cycle. No S value on the probe cycle line. Whatever you do, DO NOT reset that surface as your Work Offset Z Zero or you need to go back to step 2.
- Once you "measure" that surface, you will have an "error" value in one of them. Not being a Haas guy I don;t know what your variables are (on a FANUC it would be #142).
- Put that error value in your probe's length offset "WEAR" column.
- Measure again. The error should be 0 or maybe .0001" or so.
- If that was the case, add the value in your wear column to your geometry column and clear the WEAR offset.
- Measure one more time. The error should be within .0001" of what it was in the previous measure's error.
Again, not saying my way is the best way, this is just the most foolproof way I figured out BITD when I was learning.
The reason I do not use the tool measurement system to set probe length offsets is because 1) If it is touch style tool measurement system, you will get the probe's length without taking into account the deflection/trigger point in Z so measurements would be a little off. 2)If the measurement system is laser, there's virtually no chance of getting a good offset because spinning the probe at normal tool measurement RPM's will destroy a probe or the ruby will deflect the laser beam and give an erroneous measurement.
Hope this helps.
-
1
-
Using a tape measure or scale, I estimate the length of the probe (to the tip) and add a "little"
-
IF you choose to update, make sure your Windows Install is up do date.
I would follow this method just to be sure. I found I had some updates that did not get run naturally.
Running Windows Update From PowerShell
Also, make sure your graphics drivers are up to date as well.
It's been stable but, launch time and shutdown time have gone through the roof relatively speaking. 2019 was under 15 seconds to launch and get to work. 2020 is running around a minute plus. Stock models, if you've got threads in it... lookout. I suspect there's no difference version to version on that issue because threads are nasty consumers of bandwidth.
All that said, overall, I've nearly always found keeping my CAM software up to date outweighs the issues that crop up. Bottom line, all software has issues. Some developers are better than others handling that quagmire. Speaking of quagmire, I had a discussion with a CNC employee regarding a recommendation and he pointed something out I forget from time to time; 2,600 people makes up only 1% of Mastercam users. 2,600!
 That's a LOT of damn programming workstations to consider or affect when making a change. They still need to do better though.
JM2CFWIW
-
Yep. Found it. It's a FANUC Software issue.
PM me with your machine serial number and I can out you in touch with the people that can get you squared away.
-
3
-
-
I seem to recall this issue... lemme dig through my e-mails.
-
Here's both volumes of the Programming Manual. Nakamura's Programming Manuals cover the whole line mostly. Volume 2 has some samples for your machine.
Precision Turning Center Programming Manual, Volumes 1 and 2
-
3
-
-
You may need to move the proximity switch a bit. Of you may need to run the M-Code than allows that. I'll see if I still have the manual for it.
-
Question from a non-Haas guy about Haas; when calibrating the OMP's length, do you use the Tool Measurement system to do it?
-
My work-around for this has been to make a copy of the file. Set the properties to Read-Only, then open both. A SERIOUS PITA but the Read-Only one never has any toolpath in it. Just CAD. Still though. That function NEEDS to be there... a warning of some sort.
-
1
-
-
Does it have the iHMI interface and touch panel screen?
-
That's a great feature. It's easier to use than the old Manual Guide i cycles you can save.
-
5:50 for my rig. Can definitely go get some
 before working on another part. I would expect it to be faster honestly.
-
-
@Leon82, do you use the "Favorites" function in MDI mode?
-
Ok @Leon82,
- Press the button that has 9 filled boxes (looks like a negative of Tic-Tac-Toe)
- Press File Manager on the touchscreen. This brings up Windows Explorer
- On the left pane of explorer scroll down to the D:\ drive and double tap on it
- Navigate to D:\FANUC\iHMI\MTB\CNCOpera\Setting
- Double tap on Setting_Data.txt open with Word Pad (or notepad if you prefer)
- Scroll down to the following;
[Actual_Feedrate]
Max_Scale-Markings_Val=40000
Change 40000 to 1575
Tap File, Save, and save the file.
Close out of Word Pad (or Notepad). Close out of Explorer. Navigate back to your CNC screen. You may need to go to another screen to get the display to refresh. Hope that helps.
As to the keyboard not keeping up... I guess I type slower. LOL I did notice the computer doesn't seem to be quite as responsive as a dedicated PC or dedicated CNC. I'm going to do a little more testing between Christmas and New Years and see what I can figure out.
-
2
-
I know it's been a LONG time.

-
On 12/15/2019 at 12:16 PM, gcode said:
updated to MC2017 and all tolerances set to .0001
This link still works
I just tried downloading and the link to the file is dead.

Help with setting up new computer
in Industrial Forum
Posted
Everything Mastercam or Mcam here;
C:\Users\Public\Documents\.....
C:\Users\YourUserName\My Documents\..... (Note: you may want to check any other profiles as well for data)
Any special/custom C-Hooks. If you don't know what these are, you most likely don't have any.