


AlbertZini
-
Posts
179 -
Joined
-
Last visited
Content Type
Profiles
Forums
Downloads
Store
eMastercam Wiki
Blogs
Gallery
Events
Posts posted by AlbertZini
-
-
chuckle... :-) High speed 5-axis milling on a Haas, with a trunnion, and a ER11 tool holder??? Too funny. This must have been for Mastercam demonstration purposes only. If I were to try this I would generate a 2D HST peel mill or similar, then convert to 5-axis with the convert to 5-axis toolpath. Basically that toolpath gives tool axis control functionality to any 2D toolpath.
Here's the original theme) http://zueiaixingchen.blog.163.com/blog/static/72472425201311911231804/?latestBlog
-
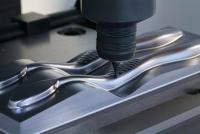
Dynamic multi-axis milling, I saw it on a Chinese website

-
Can you explain what you mean by control points and how to use them?

-
If u want use it,you have to go turn it on,and even though ur operation isn't dirty u have to
Regenerate.now for the next tool path if you dont wanna use it you have to go turn it off.
So if you regenerate your 1st tool path with it off your gonna loose ur slow down on arcs.
What i usually do is lock the tool path that i used that feature on.
Thanks
 it worked after I was replace post processor and regenerate operation
 -
The generic post should support what comes from those settings. Not sure why it is not working for you.
If the generic post supports it, show screenshots of how to do it ?
For "adjust feed on arc move" parameter meets 18,701, but not in the same post, I will not see it

-
You can also use the toolpath editor. Right click on the operation and look to the bottom for toolpath editot. Then cycle through the points and then adjust the feedrate where the arc start. You might want to add control points so you can add and delete points to have it start slwoing down right before getting to the corner, but you will figure out what works and what does not soon enough.
HTH
I knew that, but now I am interested to do this automatically
-
in the operations manager, go to tool settings there is a box for "adjust feed on arc move" check the box and enter a value.
I tried this, but nothing has changed, may be it must support post Generic Fanuc 3X Mill ?
-
How to make a reduction in feed on the radii and arcs?
-
Are you really 98?
I'm 27 years old, and I'm sorry for my English, I taught him 13 years ago when I was in school

More thoughts: what is your cutter grinder setup? Is it CNC?
I already did a week ago, these cutters only with teeth without angle, on 4 axis VMC machine
-
Thank you John !
I made it
 1111.MCX-6
Can you show how to do it with helix (spiral) or is it impossible to create in Mastercam?
-
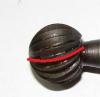
It looks like the cutter tooth was on a plane. It would actually be very hard to grind the cutter if it were not on a plane. The cutter tooth tip is a circle (a slice through a sphere), but the toolpath of the grinding wheel is not. It is the intersection of the plane through the tooth tip and a cone from the next tooth. Do you really make your cutters?
Thank you very much John!
Yes we want to create own cutters, it is for my friend, he want it
-
 1
1
-
-
Either way if you have a decent set of dimensions for this I would think you could make the spiral / curve in 2d and project it onto the diameter, then use that line to sweep the form you want.
I don't know how to create a spiral on the ball...
-
its on the ftp in this folder ftp://mastercam-cadcam.com/Mastercam_forum/X6_FIles/1.mcx-6
Thank you Brandon, but you made an angle, and I want to see it with a spiral (roll)
-
I created it, i have mastercam x5 and x6
-
I created it, i have mastercam x5 and x6
-
x6 or x5
-
i would try solid sweep, with 2 chains that would allow you to draw a arc segment on a helix and cut you flute shape accordingly
Can you show how to create it?
In words, everyone can.....
-
This is a 3d model on which to milling, I need to create teeth for further processing it in multi axes, it is not custom tool (lollipop) !!!
-
-
Now re-try the Post Update procedure.
Thank you very much, Roger !!!
-
When i update post from X3 to X6 there was a problem when I started to generate a program there was an error
-
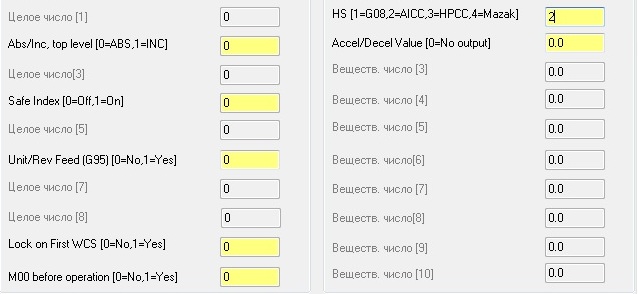
In Misc. Integers
mr1 - High Speed
# 0 = Off
# 1 = Advanced Preview (look-ahead) control - G08 P1
# 2 = AI-NANO 2, AI(nano)CC output (Artificial Intelligence Contour Control) - G05.1 Q1
# 3 = AI-HPCC and AI-nanoHPCC (High Precision Contour Control) - G5 P10000
# 4 = Mazak Geometry Compensation/Accuracy G61.1, Mazak High Speed Machining Mode - G05 P2
#
# mr2 - Accel/Decel Value (for G05.1 Q1 and G61.1 only)
# 0 = No output
# Value = Accel/Decel coefficient
# Fanuc Notes
# 0 Least Accurate
# 10 Most Accurate
# R 0-3 Roughing
# R 4-7 Medium
# R 8-10 Fine

-
2
-
-
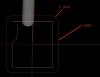
In perfection, should look like this
z = top of stock - min depth
Maybe somebody can help me?
-
This would be impossible to explain to someone who may not understand how buffers work.
And where can I find or read, how buffers work ?
How i understand this buffer calculated depth ?
# Buffer 5 Read / Write Routines
# --------------------------------------------------------------------------
pwritbuf5 # Write Buffer 1
b5_gcode = gcode$
b5_zmin = z_min$
b5_zmax = z_max$
b5_gcode = wbuf(5, wc5)
preadbuf5 # Read Buffer 1
size5 = rbuf(5,0)
b5_gcode = 1000
min_depth = 99999
max_depth = -99999
while rc5 <= size5 & b5_gcode = 1000,
[
if rc5 <= size5, b5_gcode = rbuf(5,rc5)
if b5_zmin < min_depth, min_depth = b5_zmin
if b5_zmax > max_depth, max_depth = b5_zmax
]
I want to do it to know the required work length of the tool for not to scroll the programm
Thanks for the answer and sorry for my bad english )
-
1
-


Clamp for Mastercam X6 32/64
in Mastercam C-Hook, NET-Hook and VBScript Development
Posted
Someone has this application for the Mastercam?
Please upload it to the ftp
http://zueiaixingche...uggestedreading