


FTI2007
-
Posts
355 -
Joined
-
Last visited
Content Type
Profiles
Forums
Downloads
Store
eMastercam Wiki
Blogs
Gallery
Events
Posts posted by FTI2007
-
-
I tried but couldnt get what I want. I dont want to ramp at an angle. For example . If I want to do .500" depth cuts. So I want to drop in to .500 deep . cut to the end of the slot, then drop to 1.00 deep and come back without any retracts or extra moves. Which setting am I missing. when I do it it cuts only 1 direction and retracts back to the start and then goes to the next depth cut. I am only picking 1 straight line down the center of the slot.
-
I have done this before but cannot remember how I did it. I have .395 wide slots that I want to rough with a .375 emill buy dropping in a pre drilled hole on on end and going straight to a pre drilled hole in the other end of the slot , then drop down to the next depth cut and come back to the starting point etc until the desired depth is reached. thanks
-
Great job. I was holding out trying 2017 until you had your setup sheets ready. The fixturing is something I have always wanted to try. It looks like you make it easy. Does it matter what file type is downloaded for the fixtures?
-
OK.. I used the point tool path and it worked for the most part. The only issue being I would like to position based on the center line of the spindle and not the tool tip. is there a way to do this without hand edits? Otherwise we were fighting over travel alarms since tool length varied from tool to tool and we need to be as far away as possible from the part for rotating the 90 deg head.
Thanks
-
LIke it says.. We are looking for a 12" Facemill. Just something for general purpose facing of everthing from aluminum to p20. We just started looking but thought I would drop a question here hoping I can get some direction. It looks like Mitsubishi stops at 10" but I have to give the rep a call first.
Thanks
-
Thanks guys. I will give those a shot and see what works best for me.
-
I have a part in our bridge mill that with the 90 deg head on we cannot clear the top of the part. So we need to move around the sides of it. Is there a way to use home/reference points to get it to do this without a bunch of hand edits? I have never used any thing on that page. I just need it to move in 1 axis at a time. So for example I might need to move in Y to clear the part and then move In X or X then Y etc. I hope this makes sense. Thanks
-
I came back to this topic many times and was not even going to bother.
How could I have worded what I originally said differently to help you understand?
I appreciate your input and apologize for not responding directly to your comment. I do not have time to be on here daily and barely get time to sneak in in between everything else I have going on lately. I meant it as more of a general Ill look it. Which I still have not had a chance to do yet. thanks again for any and all input.
-
I will look into this. thanks
-
Amera-Sieki bridge mill with fanuc control and I believe standard renshaw inspection plus.
-
I am not sure if I am over thinking this or not but hopefully someone can point out the obvious to me. We have a new Bridgemill with fanuc control and renshaw probing. I get the normal probing for the the top xyz in g54. But where I am stumped is what do I have to do for the RH angle head when I do the side holes/milling. If I probe the back left top corner for the top work, Do I have to do anything different for the sides? The z wants to go to deep on the side work and the only way I can get it to work is to edge find with the RH angle Head on and store in the G55 Z. And the difference between the 2 numbers is not equal to the head length. Ans support from the manufacture is basically zero.
thanks
-
I know we negotiated the price down quite a bit so I imagine if you pay sticker they have alot of room.I Cant really say yet on the machine. they finished the install on Nov. 25. I drilled a couple holes yesterday but we have ran into a couple issues that hopefully will get resolved on Monday. The training they offered covered maintenance and how to do a head change and tool change. So we got a new machine with an extra axis, a right angle head and a control we are not familiar with and zero training. They didn't know how to load a program, how to use the probe, anything programming related. We have not signed off yet or did final payment yet. They are suppose to come back on Monday with some Info hopefully. A little frustrated at this point.
-
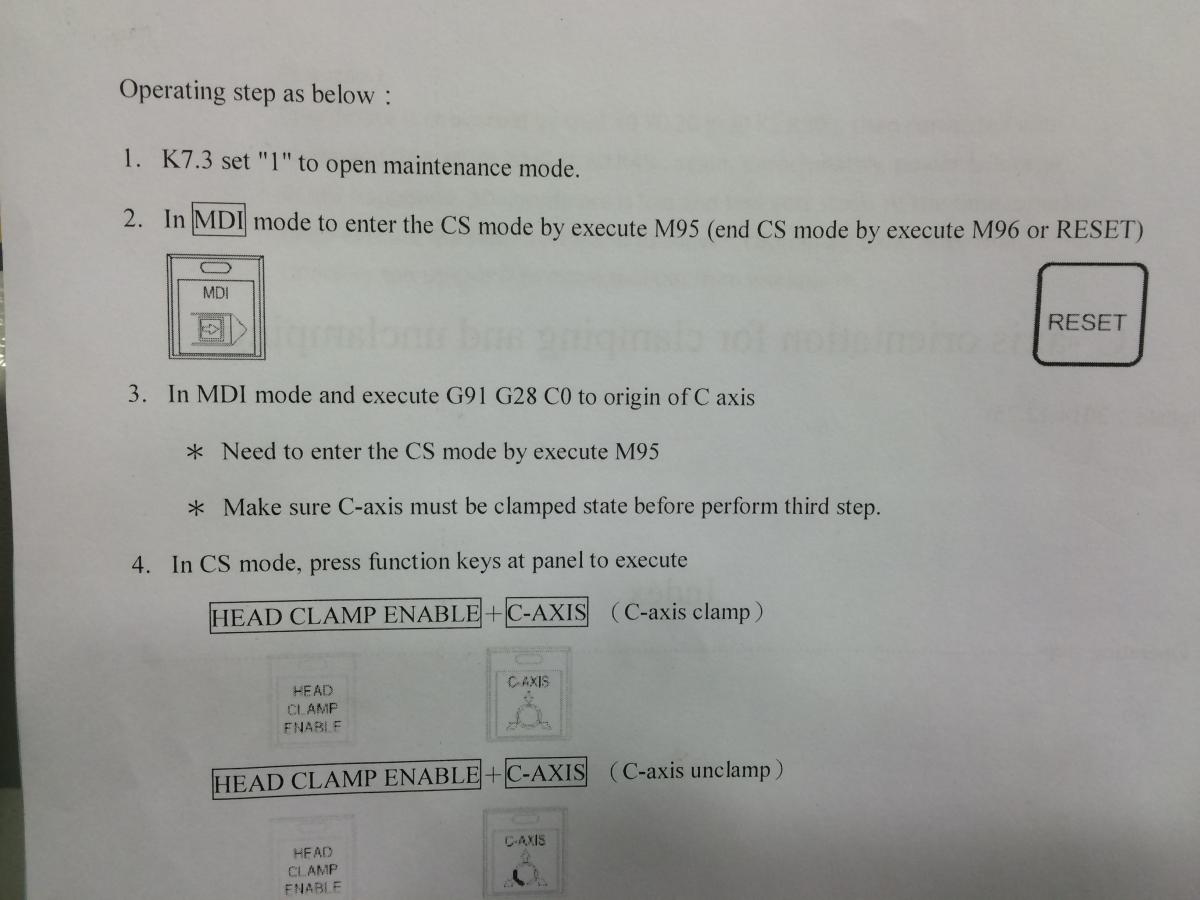
Just an update. We figured out how to reset the C axis zero but We think we are having a probelm with the machine
-
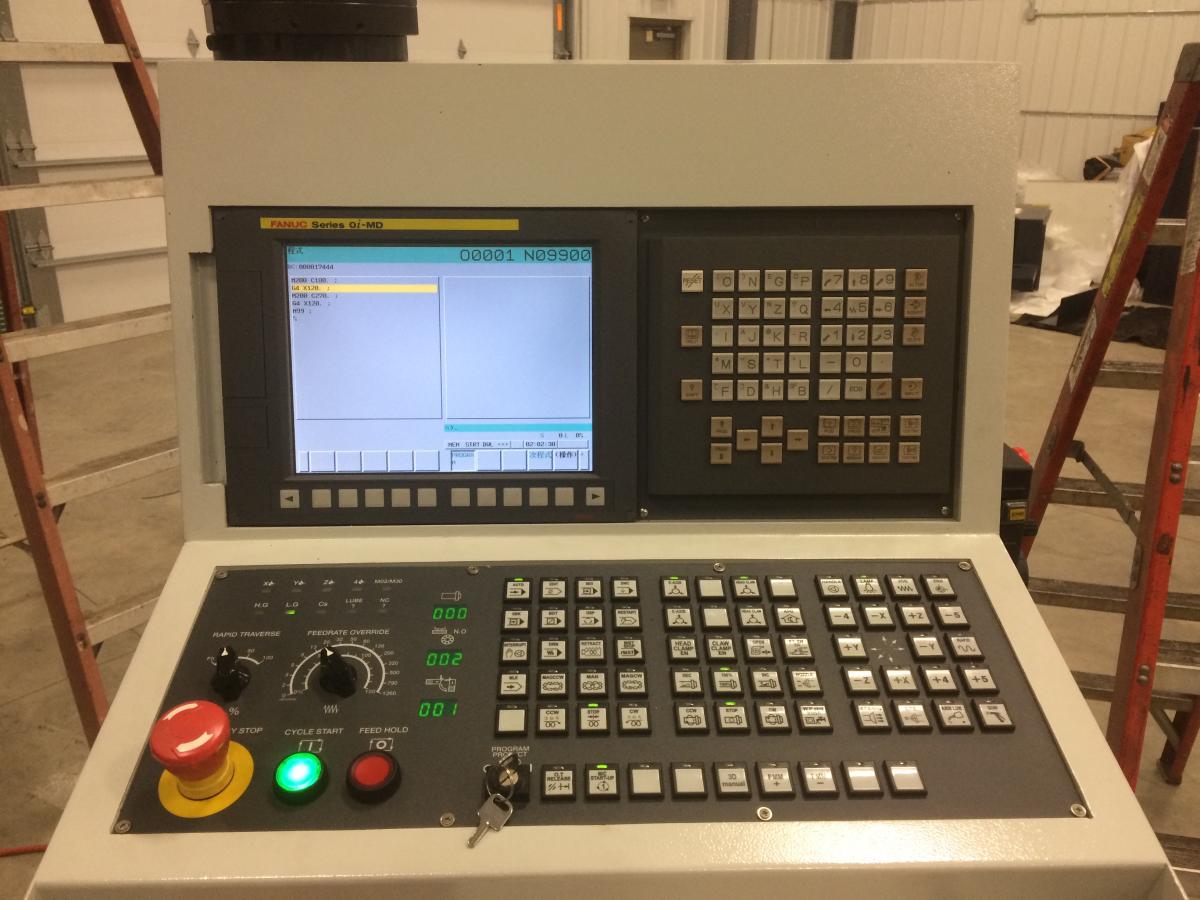
We have a new Ameri-sieki bridgemill with a right angle head and fanuc control that we are trying to get up and running and had minimal trainning on before the installers had to leave. the Right angle head lost its zero for some reason and we are trying to reset it. In the manual it says we have to do this first but We are not sure where that parameter is to set maintance mode.

This is the control.
We are trying to get in contact with the company also but just thought I would try here to see if anyone could help.
-
Thanks for the idea Bob, I implemented it this morning.
Ron, I have postability post so it was easy for me.
I planned to add it to the pn line but it came up about 8004 times so i added it to my pcomment3 section like this:

Here is the result:

Thanks again for the idea Bob!
I want to add the mastercam operation number to the post like this to. I am just unsure where to add . Would I add it here somewhere?? and If I do exactly what do I enter? also what does it mean when Bob says he added it on the null tool change also ??
Thanks
ptlchg$ #Tool change
pcuttype
toolchng = one
if mi1$ = one, #Work coordinate system
[
pfbld, n$, *sg28ref, "X0.", "Y0.", e$
pfbld, n$, sg92, *xh$, *yh$, *zh$, e$
]
if prog_stop = 1, pbld, n$, *sm01, e$
if prog_stop = 2, pbld, n$, *sm00, e$
pcom_moveb
pcheckaxis
c_mmlt$ #Multiple tool subprogram call
##ptoolcomment
##comment$
pcan
pbld, n$, *t$, sm06, e$
ptoolcomment
comment$
pindex
sav_absinc = absinc$
if mi1$ > one, absinc$ = zero
pbld, n$, *sgplane, scc0, sg49, sg80, *sgabsinc, pwcs, e$
pcan1, pbld, n$, *sgcode, *sgabsinc, pfxout, pfyout, pfcout, #pwcs,
*speed, *spindle, pgear, strcantext, e$
pbld, n$, sg43, *tlngno$, pfzout, pstagetool, e$
pbld, n$, scoolant,e$
absinc$ = sav_absinc
pcom_movea
toolchng = zero
c_msng$ #Single tool subprogram call
-
My reseller figured it out. I had my defaults set to turn on smoothing in the contour tool paths. Turn off smoothing and everything works as it should. I must have set it by mistake when I was doing the install.
-
in the control def the boxes are checked to support wear comp and reverse wear and to start and end cutter comp above part. I checked all the other values and everything is correct. The part that stumps me is why is it a problem on only our new installs. I have never seen this before and was running x9 on my old pc.
-
I didnt change anything but open a new part. now I it will lead in and apply cutter comp but then cancels it on the next line.......
%O1( TEST )( DATE=DD-MM-YY - 29-10-15 TIME=HH:MM - 08:29 )N100 G20N101 G17 G40 G49 G80 G90N102 T13 M6( 3/8 FLAT ENDMILL | TOOL DIA. - .375 )N103 G0 G54 X24.7813 Y2.375 S5000 M3N104 G43 H13 Z1.N105 M8N106 Z.2N107 G1 Z-.375 F25.N108 G41 D13 X24.5 F30.4N109 G40 X22.9688N110 Z-.175 F150.N111 G0 Z1.N112 M9N113 G91 G28 G0 Z0. M5N114 M30%I sent an email in to my reseller also... -
Straight line moves. Same post we have always used. we have one old workstation that works fine. We never had a problem until we got 2 new PCs with fresh installs. Its not the post. It will not show the lead in and out moves in backplot so I am assuming its the software. And it will not post cutter comp on straight line moves. if you Arc in and out with the lead then It will show the leads in back plot and post correctly.
-
I have 2 new installs of x9 on new PCs. Both will not apply cutter comp to the lead in and out. We use wear for our cutter comp. Even when you step thru the back plot the tool comes down then 1 move to the other end and back up. Is there a setting some where for this??>
-
ok restarting mastercam got it to work. I thought I did that but must have not. thanks
-
I am getting my new pc set up and I cannot get my space mouse pro to work with mastercam. I thought there was a setting somewhere or a box to check but cannot remember where it is. I downloaded the latest driver. it does work in solidworks. Thanks
-
7:03 X9
Dell T5500 (about 5 years old)
Intel Xeon X5670 2.93 GHZ
12 GB Ram
Windows 7 64 bit
Nvidia Quadro FX4800I should have my new pc by the end of the week. Cant wait to see how it does.
-
I just discovered yesterday solids is included with x9 mill 3d. I have never programed to solids so I may have to try it someday. I have Mastercam set to automatically bring in Solidworks file as trimmed surfaces.
slot depth cuts
in Industrial Forum
Posted
I think I found it. I chose ramp and then set it to plunge and seems to do what I want.