


Chally72
-
Posts
499 -
Joined
-
Last visited
-
Days Won
32
Content Type
Profiles
Forums
Downloads
Store
eMastercam Wiki
Blogs
Gallery
Events
Posts posted by Chally72
-
-
18 hours ago, riverhunter said:
This is long over due, but welcomed. Any chance this will roll into the regular contour paths? it would be extremely helpful to optimize feed rates in corners while maintaining the actual programmed feed rate. I know this can be done locally, but it is a real PITA and should be handled inside MC.
We're aware of how useful this can be elsewhere and are looking at how we can implement it. That's why we placed this edge feed rate control in the Tool page rather than sequestered away in a threadmill specific page.
-
 2
2
-
-
AMW, I'll pass this thread on to the product owner.
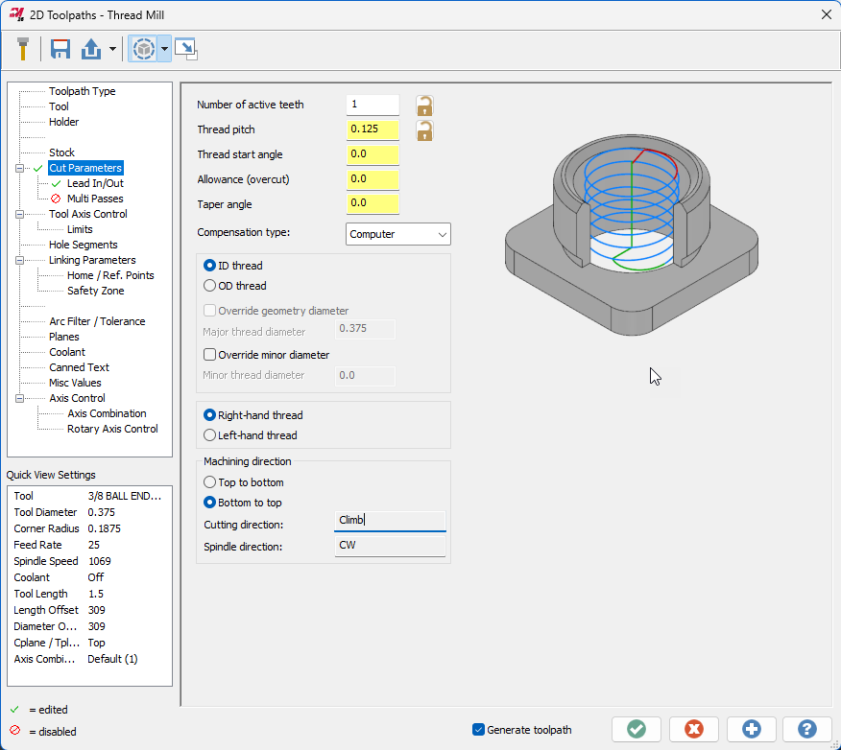
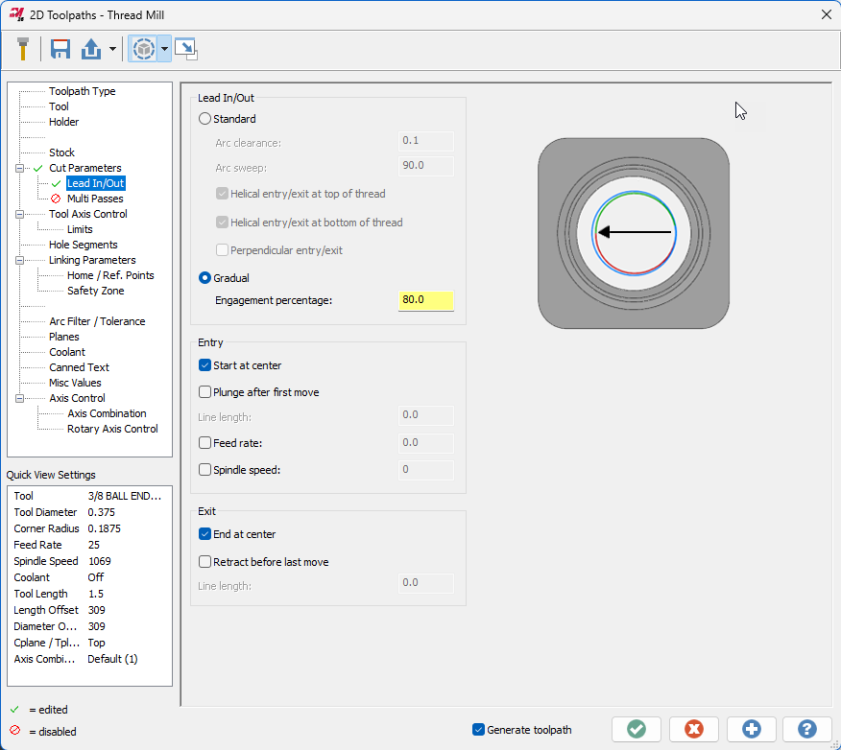
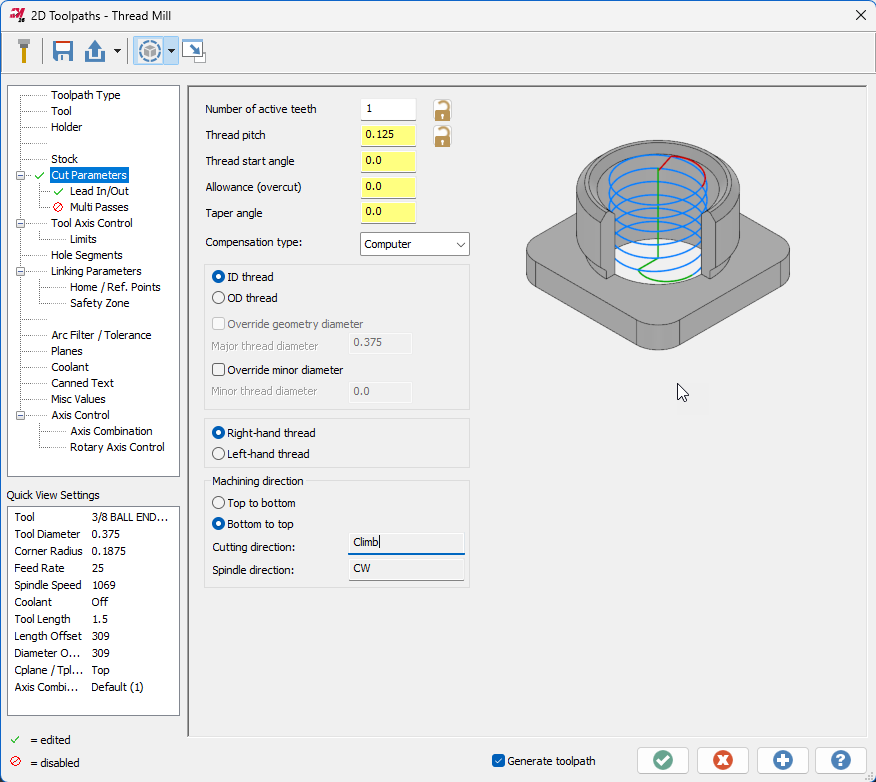
Just a note that 2025 has received a bevy of Thread milling enhancements developed in concert with tooling manufacturers. Check out the Gradual entry on the lead in/out page to reduce shock load on engagement and the expanded entry/exit controls and speed/feed overrides, among others. Spindle direction is also now considered when displaying cut direction in the Machining direction box.
Here's the full list of changes:
Mastercam 2025 – Thread Mill Updates – myMastercam
-
4
-
-
Saving as a parasolid- (.x_t) is the best solution, as both Mastercam and Solidworks use the parasolid kernel for modelling and there will be no translation or transformation of data when saving out to, and opening from, the parasolid format. Depending on the version mismatch between Mastercam and Solidworks, you may have to go into the Options box in the save dialog to set the output Parasolid version to a lower version that is supported by the older of the two packages you have installed.
-
 1
1
-
-
Yep, correct. It will be updated with the latest MW documentation upon 2025 release- not as helpful for Gcode now
-
1
-
-
The documentation is actually available on Mastercam.com, under the Learning- Documentation area:
Downloads – myMastercamThe "Multiaxis Help" files are the ones you're looking for. Of course, be aware that not everything in those files is implemented or interfaced as shown.
-
1
-
-
I looked into this and it looks like this escaped the What's New, but the description above is accurate. It's hard to quantify the changes you'll see other than "It does better in some scenarios". Because the results are different enough that it could change existing Swarf toolpaths substantially, they chose to leave in place the old method (legacy) as an option and default to the new Automatic in new paths.
-
1
-
1
-
-
1 hour ago, volitan71 said:
Speaking of the toolpath editor... Where the heck did it go?
MC2024, need to edit some jump heights which I've done many times before, right click on thge drilling toolpath in question, go down to toolpath editor, and it brings me to the screen where I can add points to drill. The editor in the screenshots here is gone.
Must be something right in front of my face...
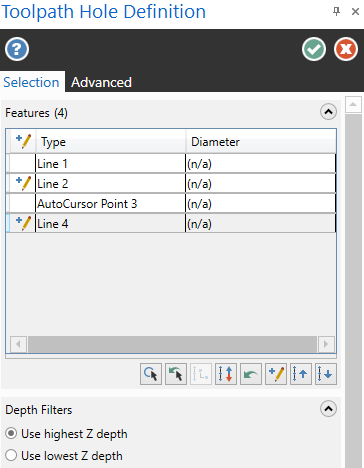
For holemaking toolpaths, this is done right from the Toolpath Hole Definition panel where you select the entities- just right click on where you want to make the change:
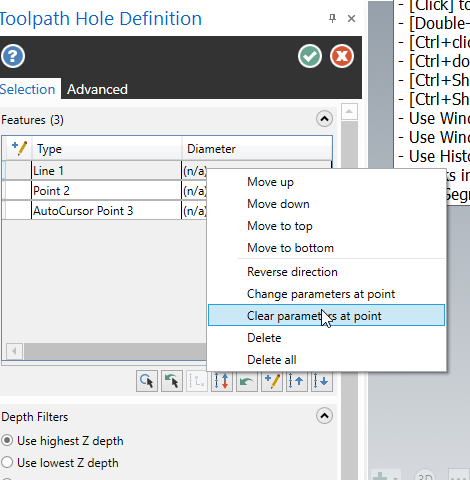
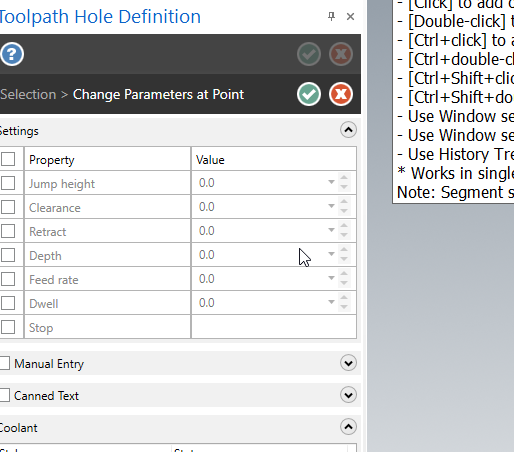
Points that received edits will show the pencil icon in the first column:
-
3
-
2
-
-
On 3/13/2024 at 3:54 PM, Kendo said:
Thanks for helping JP
I'm my own worst enemy, it was the linearize helix checkbox
I still think they should fix the helix bore bug, when you set the start angle and the depth doesn't divide evenly by the pitch, Mastercam seems to translate the start angle to an end angle, the the start just ends up where the math puts it.
A major impediment to doing so- anyone that had previously set up a specific start angle parameter would have their helix bore shift clocking if they regenerated.
-
1 hour ago, Jake L said:
I'm still on MC2023 so I don't have my hands on the new 3-axis deburr yet.
But for the 5-axis deburr set to 3-axis:
1. The deburr path is model driven, so you can set your "machining geometry" (surfaces) and also have avoidance geometry that will check against your tool, shank, and holder.
2. Deburr will automatically find the "sharp" edges that need to be deburred. You can also switch this to manually define the edges to deburr.
3. Deburr will walk up and down edges of walls, it'll walk across a floor - up a fillet - then up the corner of a wall. Can Contour 2D/3D in deburr mode do this? (honest question I don't know)
I'm sure I'm missing stuff but that's the first few things that come to mind. The coolest thing to me is to be able to select a whole model and the toolpath will just automatically find and deburr the edges.
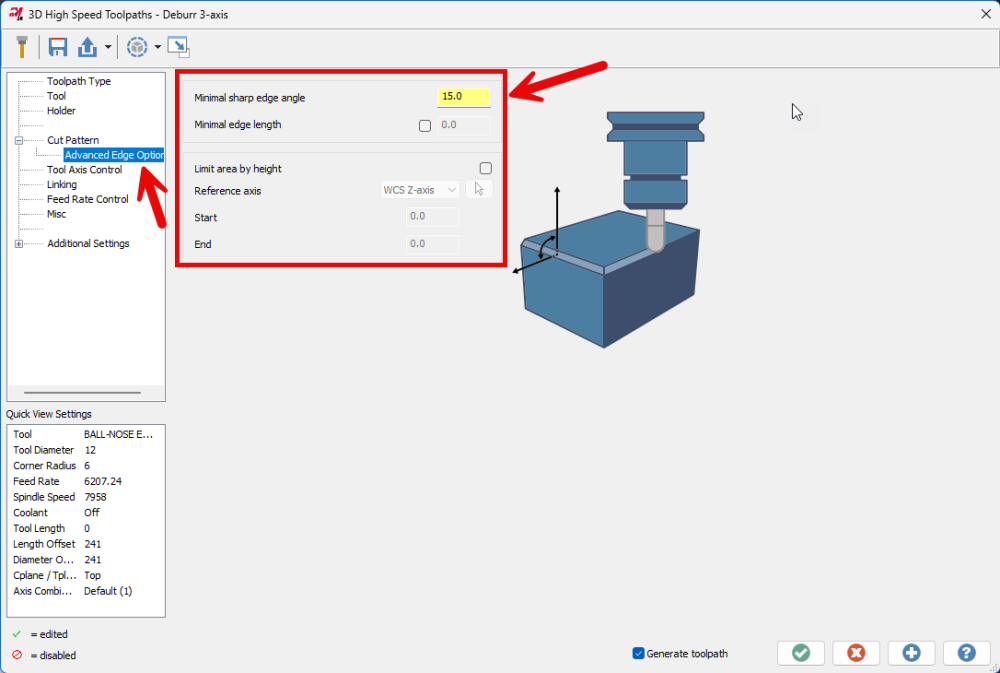
Well, Jake got to it before me and did a great job listing out some of the reasons to use Deburr rather than 2D chamfer in contour. The latter is a 2.5D wireframe take, and the former is a fully model aware toolpath with a lot of smarts built in specifically for breaking edges.
Don't forget about the options on the advanced page, where you can mess with the minimum edge angle necessary for it to "Find" sharp edges to break when set to auto, along with some other controls to filter out edges under a length threshold, and to target specific Z zones:
-
3
-
-
2 hours ago, gcode said:
I wish Moduleworks could output arcs when it was appropriate.
Moduleworks outputs some really sweet toolpath motion but most of the time, the file sizes are too big to run
on the old dinosaurs we've got around here.
Cimco used to offer a filtering app, but last time I looked, it hadn't been updated in years... and now
it's not on the Product list.
I often wondered how well it worked, but never had the opportunity to try it
I did find an old brochure
It definitely is not a simple lift- If you look at the spun-off 3 Axis Deburr for 2025, this is outputting arcs and lines, not just linearized segments, so that it has a wider availability to existing/older 3 axis posts and machines. This was a large component in the development of this toolpath.
-
4
-
-
1 hour ago, gcode said:
Will this convert the whole toolpath to point to point even if the seed file contains arcs??
Yes- all arcs are linearized when using Convert to 5
-
9 hours ago, Aaron Eberhard said:
Another way to do this is to use Convert to 5 axis, then use a Feed control Zone on the inside pockets to slow it down. It'll work volumetrically, so any changes to the input toolpaths will be instantly updated. I can grab a video tomorrow if it would be helpful.
Went to answer with this, scrolled down through the replies and found Aaron already here.....again....

-
 6
6
-
-
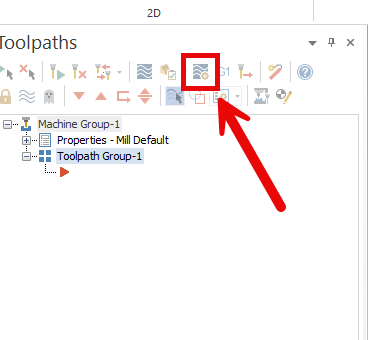
This is intentional. If you left-click on the Toolpath node of an expanded toolpath, it launches into Backplot, and if you right-click, it launches into Verify. To avoid this behavior, right-click somewhere other than this line:

-
3
-
-
17 minutes ago, Johnward Holmeson said:
Anyone get 3 axis deburr to work without a multiaxis license like it states? I'm guessing they forgot to make that accessible to full 3 axis seats.
For the Beta period there's some licensing hoops to make it available. If you want to test it, please reach out and we'll get you sorted to use it during the Beta cycle. Dan Parry, the product owner, posted about it in the official forums- you can contact him through [email protected].
-
1
-
-
This button, starting in 2024, also takes you directly to the Simulation settings page and Stock choice in MGS, which controls both Verify and and Simulate
-
3
-
-
1 hour ago, rgrin said:
Lol, this is how 99% of the people at my place of work do it. I think it's an old school holdover from when our computers were not as powerful and nobody sees any reason to change.
I was in the same boat as you guy's using 1 machine group to program a part start to finish. For the same reasons, I liked sharing 1 tool library for a part.
But I have been dabbling with using the machine group setups and it is nice selecting a "master model" for each op and stock setup/fixturing for each op. The tool library hasn't been AS important as I thought since I have large magazine and I just program all my parts with the same tools. I think I am probably just fortunate that way.
Like Millman said, we all need to be exposed to all the different ways of doing something and figure out the way that works best for us.
There are two things that will help retain the "one machine group, multiple setup" flow preference in the near term with new Machine Group Setup:
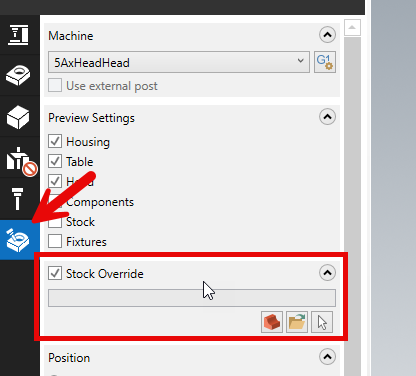
1. Multiple ways to override the Stock page selected stock for what you actually want to use in Simulation. In 2024 you have the "stock model operation" override talked about earlier in this thread, where selecting a stock model op as the first op in a selection to launch into simulation with will automatically apply that stock model as an override no matter what is selected elsewhere. Also in 2024 you have the Stock Override choice in the Simulation options last tab of MGS, where you can override the stock permanently and just point to a file, solid, etc.
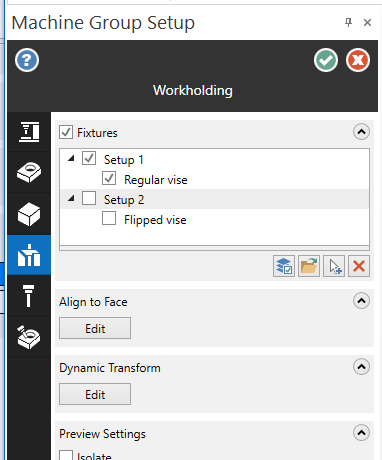
2. In 2025, the ability to make Workholding items or Groups Active or Inactive. This means that I can do things like select a bunch of solids and group them and call them Setup 1 and Setup 2, for example, then turn off Setup 2. This has the end effect of passing only the stuff that's active (Setup 1) into verify/simulation. This way you don't have to keep on adding/deleting workholding to support a multi-setup flow- you just toggle between your organized fixture sets. This is trying to take what you used to do via level organization, (IE, stuff all of setup 1 fixturing on a single level, all of setup 2 on a single level, etc) and divorce level management of individual solids from the act of organizing and simulating groups of fixturing.
These are a few immediately visible steps along the path that the team is taking to make MGS actively support and encourage single-machine-group, multi-setup flow.
-
6
-
-
1 hour ago, crazy^millman said:
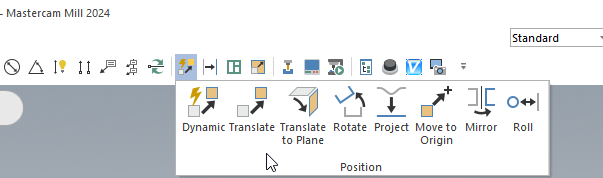
Many times. Here is 2024 with my 4 sub menu items and some of the QAT replacements for the Ribbons.
Always fun to see what tilting towards extreme efficiency and ultimate muscle memory for a power user looks like
.gif ";)") 57 minutes ago, Kyle F said:
57 minutes ago, Kyle F said:I've been at my first and only shop for about 12-13 years I think now. This is how it always was,... until recently figuring out the right way from these forums LOL.
It makes sooo much more sense to have everything in one file, now when I'm messing with a 5axis toolpath and "oh look, I need a little bit more clearance on my fixture"
Now I just hop into the fixture machine group and push/pull the solid, and change those milling depths, same file, easy peezy.
I feel the same, for now at least, I enjoy the multiple machine groups. Downside to these large files with lots of solids is though now my xxxxty PC specs are really starting to show. It's sad the percentage of my day I am just chilling waiting for something to regenerate... but I guess it gives me time to do research and write replies like this one haha.
agghh I am so excited for my new machine(s)

Very early on in my career I was at a shop that handled things similarly to the "one file per op" approach. I cannot imagine being shackled by that in the year 2024!
-
1
-
-
1 hour ago, crazy^millman said:
Since I have always used a Stock model as my first operation in Mill i didn't notcie a difference when doing this in 2024. Guess it is about time the software caught up to what I was already doing.

This is the flow I always taught as well.
-
2
-
-
Yes, new to 2024! One of my favorite new features and instantly something I can't live without.
-
2
-
1
-
-
If you look at the Update releases, generally Mastercam has been moving from a small number of large Updates, to spreading these out over a larger number of updates which can be delivered faster. This means that, among other things, we can sync up to things like file format changes for importers for different software like Solidworks/etc closer to when those other products release, rather than waiting months and months for the next Update to drop.
-
4
-
-
On 12/20/2023 at 1:57 PM, Aaron Eberhard said:
Oh, had another thought while eating lunch...
I'm not sure what the max tolerance is for the post, but I know I've had some issues with rounding/fuzzy math before. I'd imagine it's worse in this case. @Colin Gilchrist - Anything you can add here?
Can you run that machine in Vector mode instead of traditional positioning mode? That way you're not getting the rounding errors compounded by MP conversion.
^this
2024 scales 5ax path vectors to a unit vector before inserting into the NCI to avoid some of these rounding errors throughout the process, and vector mode will further reduce the possibility of fuzz/jitter.-
4
-
-
That "Stock Plane" should really be labeled something like "Transformation plane....don't touch this unless you have a really good reason to do so"
-
3
-
-
Here are two videos that go in-depth on how to utilize in-process stock models and how to set up the planes to move between Op setups, machines, vises, etc:
-
1
-
-
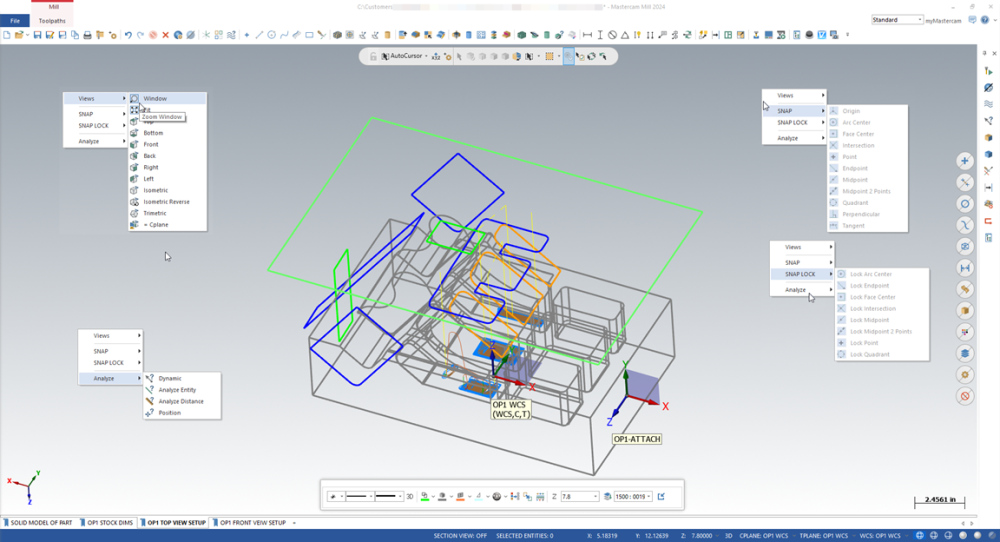
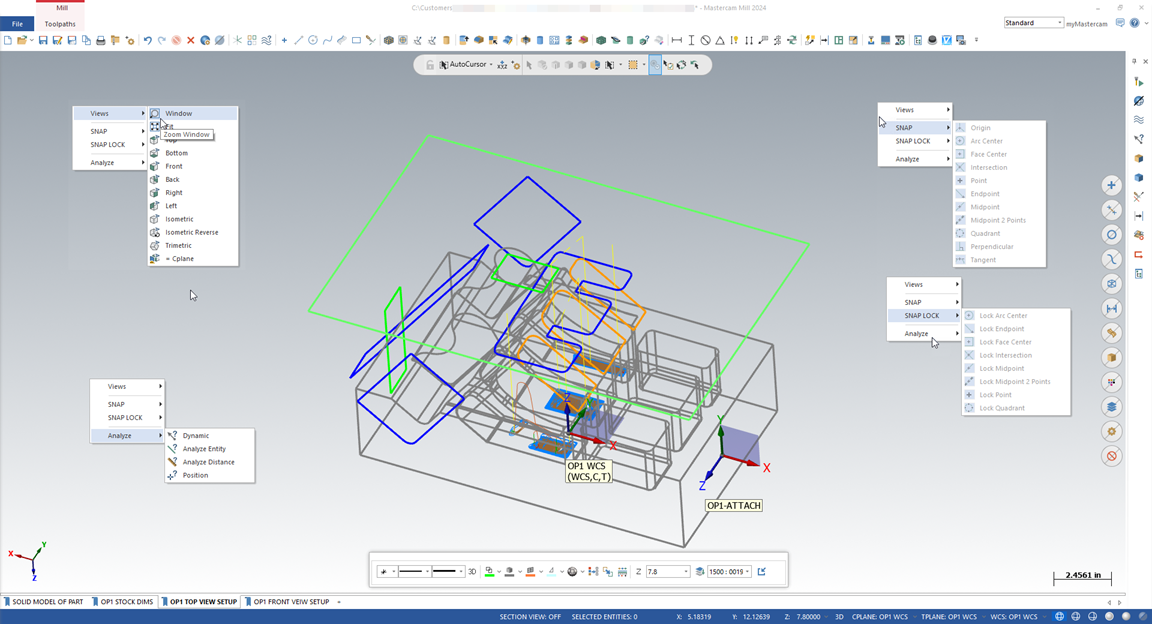
What you're seeing is the Graphical Linking Planes added to all holemaking toolpaths in Mastercam 2024, which provide graphical push-pull planes for holemaking linking parameters. See the video below for information. The graphical plane is huge and is taking up your entire screen, which is why you get that blue tint and can't see what's going on. If you zoom out your view you'll see the plane. The plane is supposed to be sized so that it is slightly bigger than your hole size (if set to incremental) or hole set X and Y extents (if set to absolute). What is your hole selection here?
Note if you don't want to interact with these planes, you can turn them off with the Graphical Elements toggle button in the top bar of the toolpath.
Here's another video from the rollout:
-
1
-


How to do a undercut program
in Industrial Forum
Posted
Unified toolpaths can be locked to 3 axis on the Tool Axis Control page and posted out and run on 3 axis machines