


Kyle F
-
Posts
175 -
Joined
-
Last visited
-
Days Won
2
Content Type
Profiles
Forums
Downloads
Store
eMastercam Wiki
Blogs
Gallery
Events
Posts posted by Kyle F
-
-
3 hours ago, rgrin said:
Side note. How did you get your planes and levels manager to not have all the extra junk underneath the spreadsheet? I kinda like the look of your screen layout and want to give it a whirl
Edit: NVM! Found the Hide Properties buttons on them!
jesus I love these forums LOL!!
I never knew about the hide properties either, that's amazing, I always wanted planes + levels smaller but I hate how jumbled up it all got.
and THEN I watched the video, and seeing @Aaron Eberhardright click drag and drop geometry from chain to chain,... amazing how many little hidden gems there are.
Almost sad I've been programming in mastercam for over 10 years and I still somehow know so little

-
stepdown/stepup is one of the best features in opti-rough, most especially when paired with a bull endmill with a radius on the tip. (something like a 1/2" dia endmill w/ .03r)
What used to take around 10-20 toolpaths for me to rough a part is now just one dynamic opti-rough.
Then I highly suggest getting a little more in depth with the settings you can really optimize this toolpath. here is a great resource:
-
 1
1
-
-
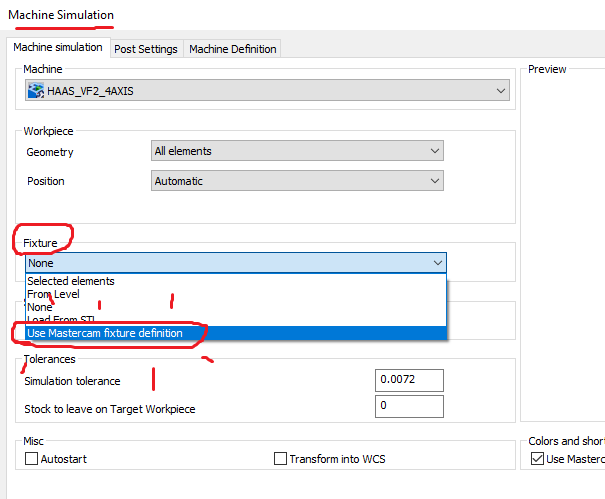
My best guess would be you have both vises on the same level, and maybe that level is selected as your workholding?
Your screenshot isn't showing the correct page to change that info, you are on sim settings
I usually keep op10 workholding on it's own level and op20 on another to make it simple, but if you have both vises on the same level just use the selection for individual solids
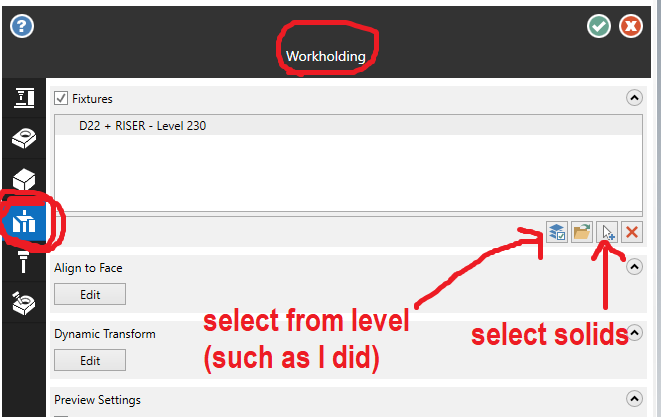
Once I get my workholding defined under these machine group settings, I'll go into the sim and select "use mastercam fixture definition"
-
Honestly first I would check youtube.
Haven't seen this but a quick search led me here:
I've taken a few Mastercam classes over the years and I've definitely learned the most from Youtube.
Also Mastercam University would be a good place to check although sadly I forget about that a lot haha.
-
12 minutes ago, JParis said:
Visually, yes...but if you're just using calipers to get numbers, you're not getting an accurate gage length...
Now if your guys are then picking up each tool individually, then yeah, it's close enough.....but when you're relying on that value and the setup guys ability to set the tool properly as those values are already set...not good enough...
ohhhhh yes I should state that, my personal machine(s) are the only ones in the shop with a spindle probe + tool setter, all my operators are manually picking up offset lengths via handle jog each setup. The gage length on the sheet are just ref numbers they aren't inputting any of that in the control. I do believe I understand what you are saying now.
In your situation, are operators taking the gage length off the setup sheet and then inputting that into the control for a tool setter to calculate the true offset?
-
39 minutes ago, JParis said:
Doing it in this way though, you don't get the gage length....
For us, that is an important number along with the tool stickout, to feed to the setup guys...
I could have the vocabulary wrong, but is this not correct?
technically the holder is listed as 2.5" and my setup sheet states it a little under that, but we only have 1 version of a stubby 3/8" hardholder so I don't think they would get confused. Hell, most the time it's like pulling teeth just to get an operator to *actually* read through the setup sheet LOL
-
4 hours ago, Alien said:
Maybe I understand something wrong, but all tool libraries in Mcam_2024 contain holders without a taper and the length is indicated accordingly.
Sorry if I misunderstood you.
Sincerely,
Michael.
Ron is a contract programmer so he programs for many different shops/scenarios. he probably uses a lot of specific holders downloaded from the manufacturer's website and they come with the taper included. It's only an issue when he's adding "new" holders to the library. It shouldn't be that hard for mastercam to remove the taper from the gage length measurement in activereports... You'd think it would be an easy fix.
@crazy^millmanthat makes perfect sense. I only program for my own shop so when I add holders to the library I just get out my 6" calipers and create my holders from "scratch" so I've never dealt with the taper added to my setup sheets. It's rare we are adding holders to my library so I don't sweat it but I understand in your line of work how much of a pain that could be.
-
 1
1
-
-
1 hour ago, crazy^millman said:
I have well over 2000 holders I have stripped the taper off over in the last 14 years. Say it only took me 5 minutes a holder that is 10,000 minutes or 167 hours.
What exactly do you mean by "stripped the taper off"?
-
1 hour ago, Colin Gilchrist said:
Will certainly record whatever we do and post it to YouTube afterwards. Trying to do "YouTube Live" takes a lot of production, but we may end up doing a Teams meeting invite, and just recording that. Teams is a bit easier to manage than a broadcast stream.
@Jake L, you're welcome to join as well!
oh yeah, live is no necessity! That is awesome to hear though. thanks. y'all rock
-
1
-
-
23 hours ago, Leon82 said:
Now they make a 42v same machine as the 35 but bigger max workpiece size
I saw that! When we were shopping for our new matsuura they were trying to narrow between an mx-330 pc10 vs mx-520 pc4, and I loved the idea of the 520mm pallet but only having 4 didn't seem great. a 420mm PC10 is a great compromise though! If we weren't getting the MAM I would certainly want one of those.
-
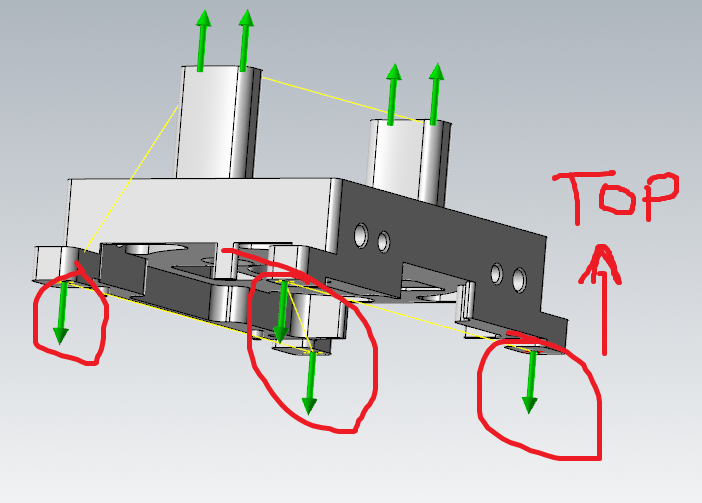
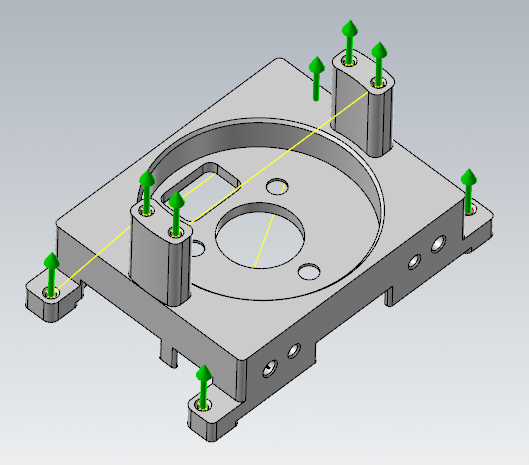
On your first toolpath operation, if you look at your solid chained geometry, your orientation is off on 4 holes. The arrows should be pointed up towards your theoretical spindle.
I went ahead and turned off automatic linking cause if your machine dogleg rapids it may hit those two island features sticking up.
For your 5axis drill, the orientation of your chain is correct but it seems as though you need to define a safety zone. (under linking parameters) Once I defined a safety zone consisting of your part + fixture it seemed to dodge everything well enough.
I am on mastercam 2024 or I would save the changes for you.
1st pic shows your hole orientation off, 2nd shows it corrected. and 3rd is with the safety zone defined.

-
1
-
-
@Colin Gilchrist Any chance you're planning on filming that for personal use or Youtube?
 I'm sure 90% would go over my head but I would be super grateful to be a fly on the wall for that discussion.
-
1
-
-
1 hour ago, rgrin said:
It also has a major problem with flushing chips away from the pallet interface. I am constantly dealing with chips getting underneath and am trying to find a better way than the single coolant nozzle they set it up with.
ooof that does not sound like fun. I wonder if an extra line or two can be retrofitted?
-
2 hours ago, rgrin said:
I am programmer and operator right now. But I am trying to put pressure on management to let me take over process changes for this part family so that I can make adjustments to it as needed. We have alot of old paperwork that is way out of sync for how we make these parts. We are extremely bad at keeping things up to date since our engineering team is more worried about quoting new work as opposed to updating old work.
My personal goal is to not be running this machine by end of year and to have enough work for someone to be able to keep it running. Currently, inspection is our bottleneck. We have 1 inspector and 1 CMM that services 10 machinists all making one off parts for the most part. I could see us getting another CMM for the shop floor this year just to inspect our repeat work.
Really nice machine you got there, by the way.
I am also very interested in the turnout of this thread, as I am my shops only 5axis programmer/set-up guy, and we just acquired 2 very nice 5axis pallet mills, so I can foresee a lot of similar issues for myself. Someone else is going to have to step it up lol!
Only thing I may have to add, since you say your bottleneck is Q.C.
assuming you're as9100/iso, our inspector lady told me she doesn't mind in-process probing for feature verification, but it does not take the place of any Q.C. checking like a FAI. So it works great for keeping the machine running and having confidence in parts being nominal, but it may not be enough to alleviate the q.c. bottleneck. She basically put it as "you can't have the machine that made the parts, also check the parts"
-
1
-
-
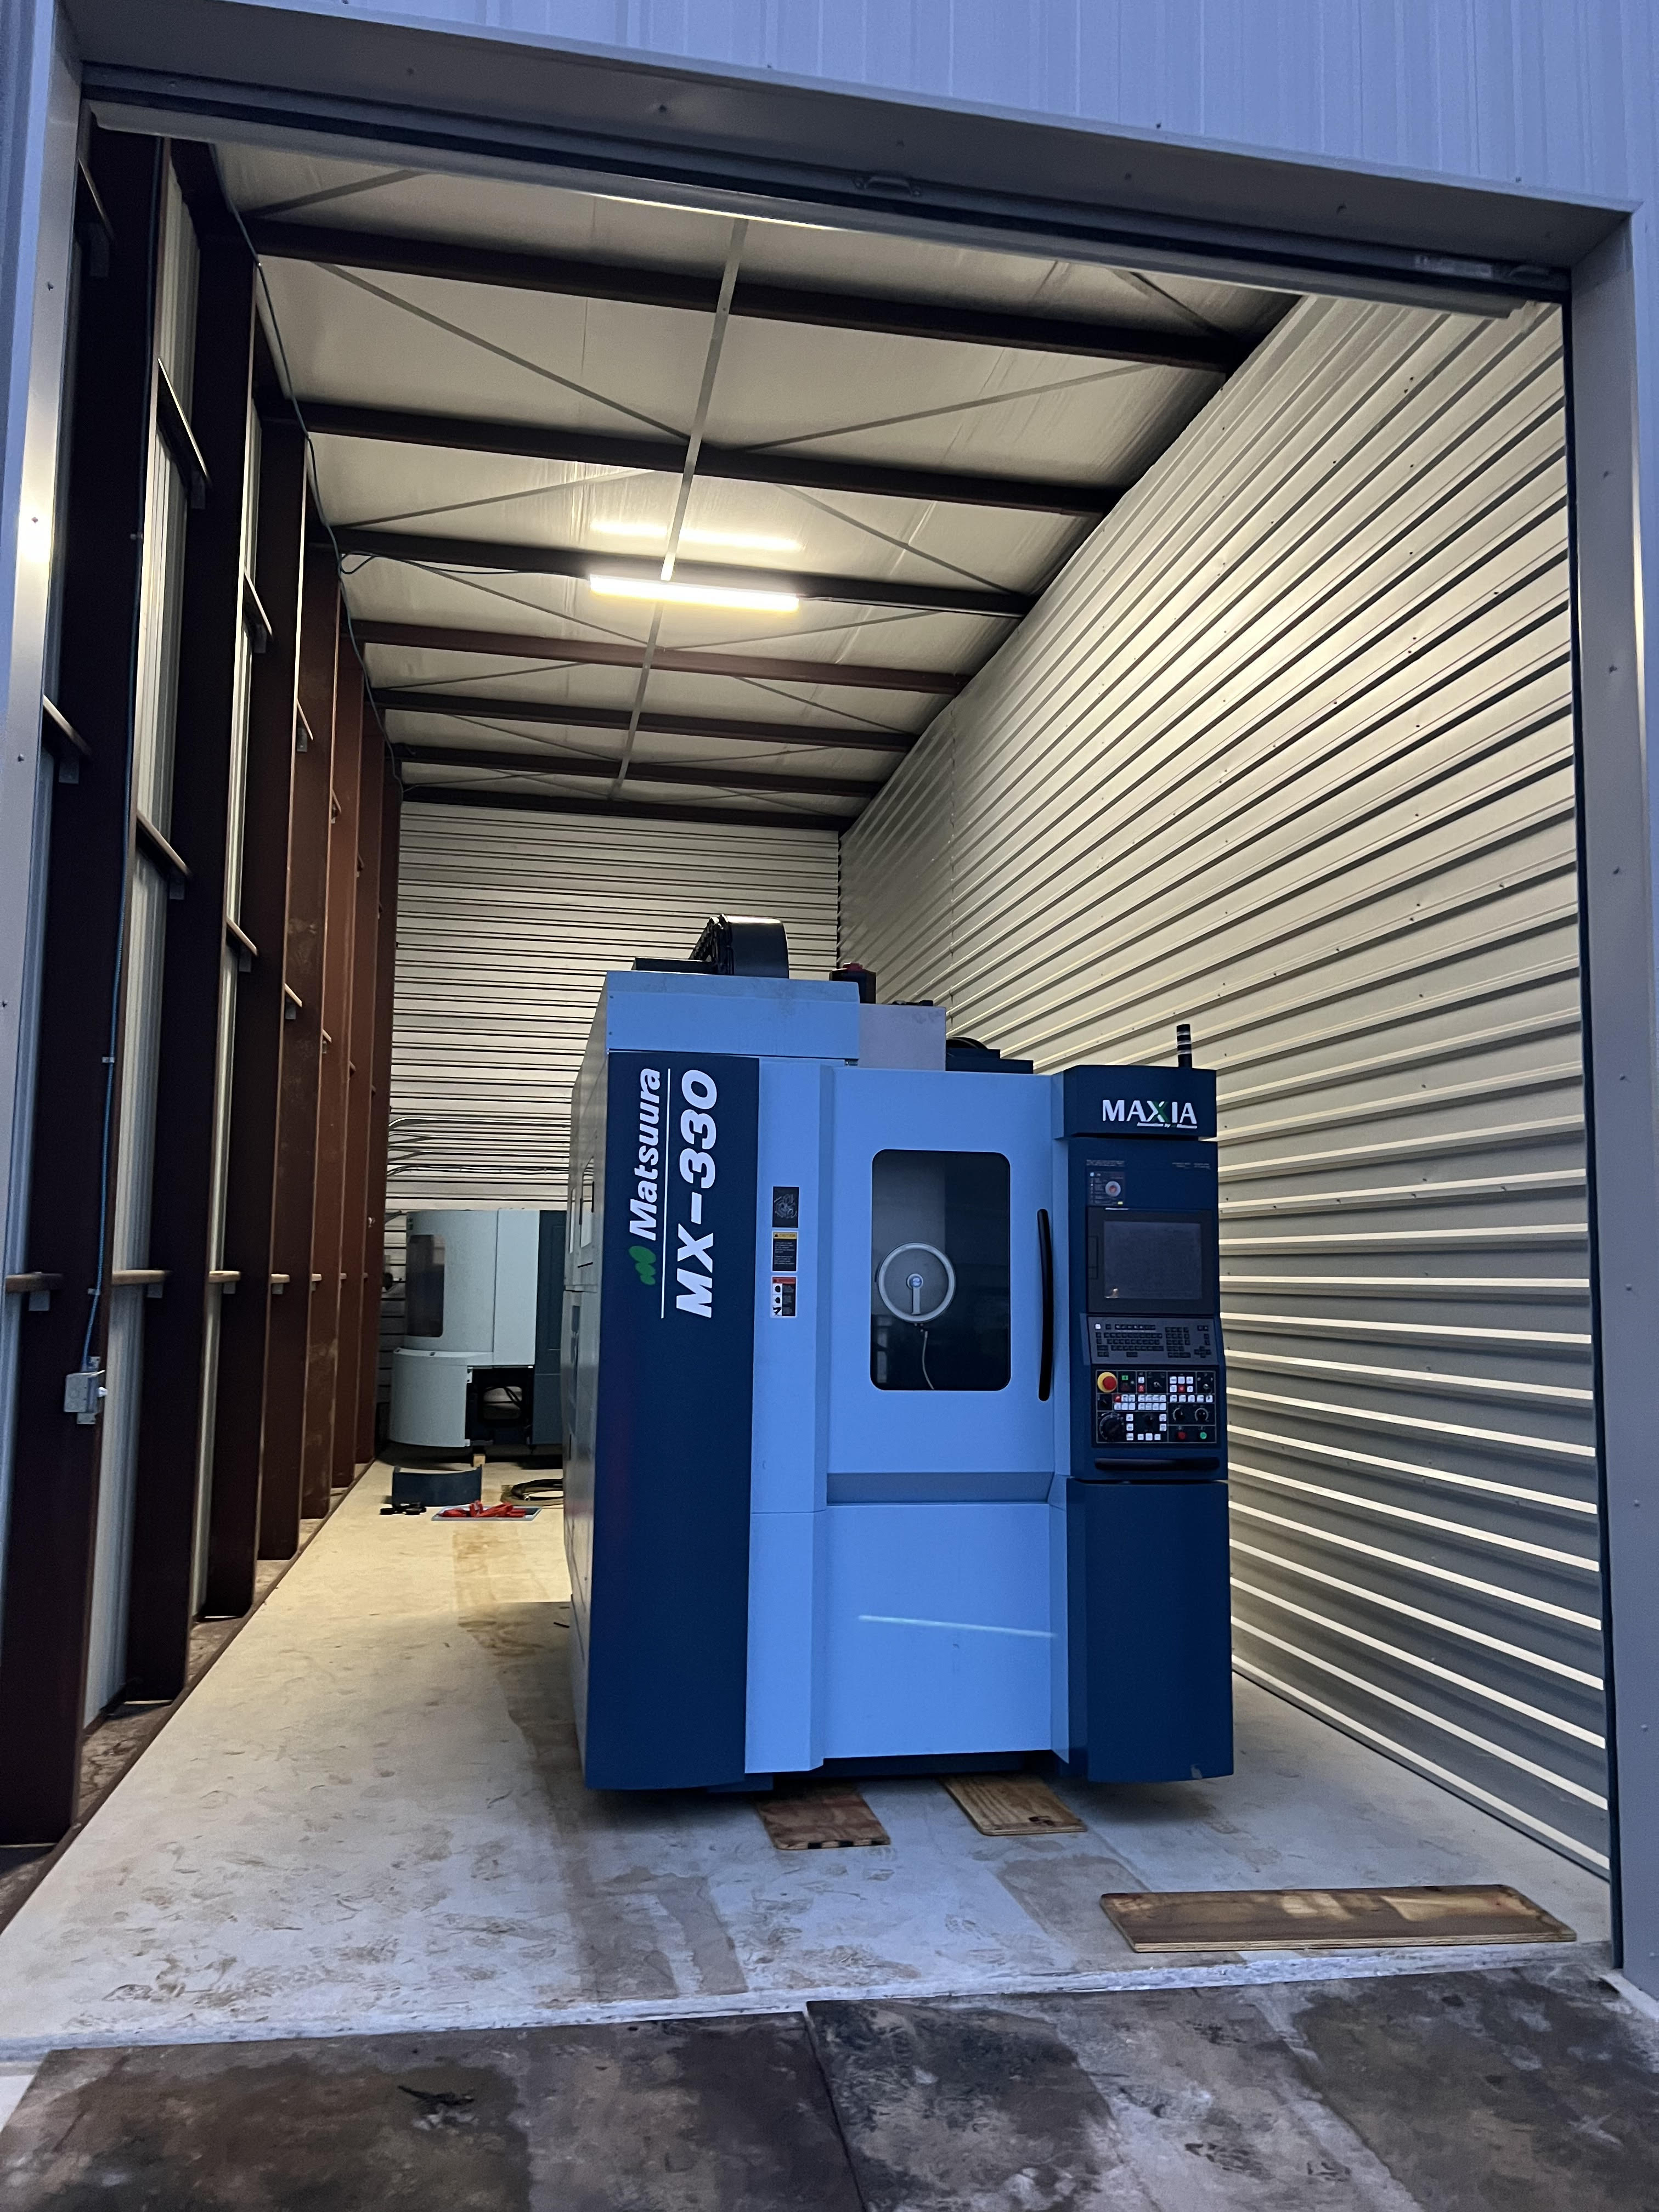
For those keeping up with the matsuura saga at my shop,.... while awaiting our precious brand new MAM my boss picked up a very lightly used MX-330 PC10
came with 6x 5th axis risers + mini 4 part pyramid dovetail fixtures which is a nice little bonus lol.
We are storing it until we get a few machines moved and another proper foundation poured. Should be getting install + training around late jan/early feb if I had to guess.

-
5
-
-
45 minutes ago, ThickChips said:
I think surface finish blend would be a quicker/easier way to go about it, but as with many things inside of mastercam,.. there's about 100 different ways one could get it done!
-
1
-
-
36 minutes ago, ThickChips said:
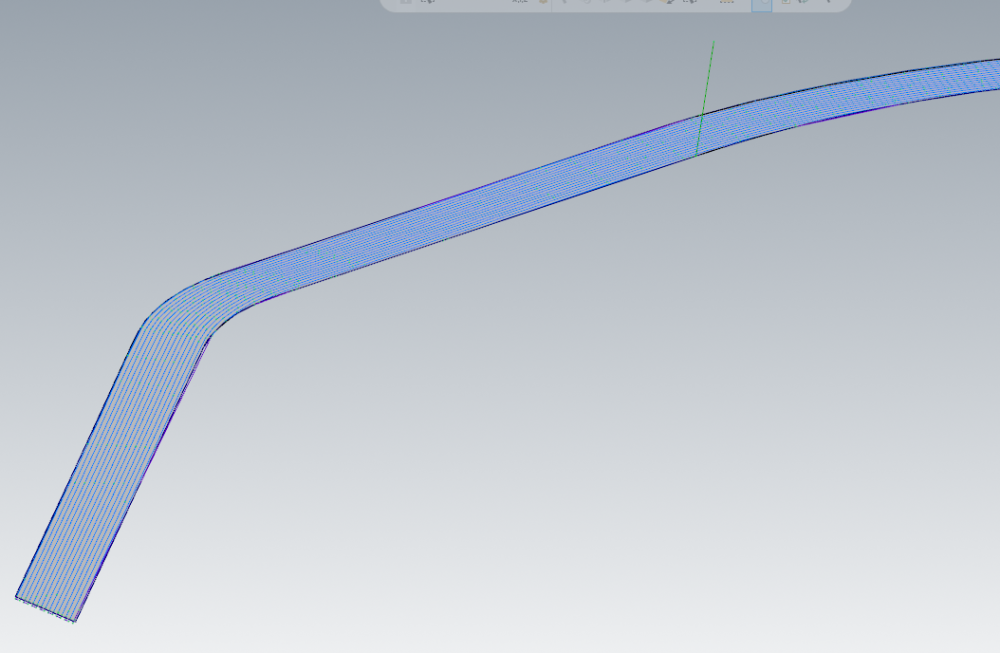
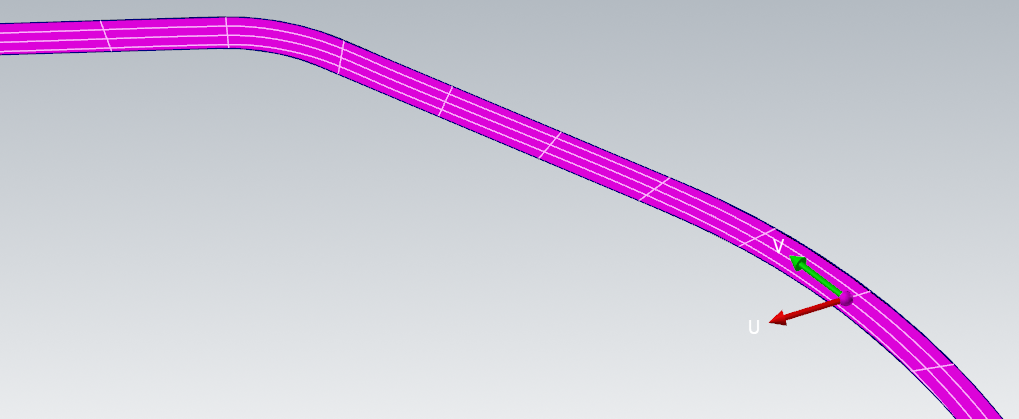
(I tried getting flow-line like wireframe from a surface but none of them followed the contour? U/V is left-right / up-down.)
it is until it isn't.
Lately I've been trying to learn as much as I can about surfaces and surface finishing, so I edited the U/V

-
I made a quick surface from solid and did a reflow to fix the UV for the flowline... Just something I wanted to make sure would work lol
saved in 2023
-
yeah I would probably do a surface flowline finish. You may find that they sometimes work when you're selected on only one surface at a time. Before I had 3D/multiaxis license I believe that is how I got it done.
If it's multiple surfaces you should be able to do an "overflow UV" to make it a single sheet.
I think I still have 2023 installed on this comp let me check for ya
-
On 12/14/2023 at 9:25 AM, gcode said:
My first choice would be parasolids X_T or X_B.
Second choice would be STEP
Dead last choice, drug kicking and screaming to the alter, would be IGES
No matter what you use I don't think X4 is going to import the part names.
The newer releases will do that when importing parasolids X_T or X_ B
I've always used STEP as first choice but I'll be keeping a lookout for any parasolid files in the future. thanks!

-
21 minutes ago, Wes09 said:
You are right, it should have been purchased at the same time. Unfortunately I joined this team after the machine was purchased (brand new and setup, but not running yet). The software is a $40k bullet, so I just want to do my due diligence before I throw that at them.
Very understandable
-
11 hours ago, JParis said:
If they have their own proprietary abilities, make them prove it. If they can, as far as I'm concerned it would be a no brainer to use their stuff.
My thoughts exactly... yeah maybe you can get it done in mastercam but if they have an option supplied by the machine tool builder and it's specifically designed for doing the type of work that y'all specialize in??? I'd probably talk my employer into biting the proverbial bullet on the add-ons. Honestly it should have been purchased with the machine by the sounds of it.
-
13 hours ago, DUM1 said:
wish I was running one now, all okumas now
Woah woah don't get crazy now. I work in a mainly haas shop and I'd love some okumas in their place

I'll take rigidity over a pretty GUI any day. For an operator, daily use is really just setting tool and work offsets, which is very similar between fanuc/haas controls
-
4
-
-
1 hour ago, Jake L said:
...5k max in 6061... yikes

90% stepover it is

-
1
-
2
-
 1
1
-

Any suggestions? My first time HEM with MAsterCam!
in Industrial Forum
Posted
Maybe it's because I mainly program for Haas mills, but I usually run 10% or less even on stainless haha. Now we are talking about a .236 dia endmill running at over 5x diameter stickout?? in titanium?! I'd be running probably 2-4 different roughing bull mills of varying diameters and stickouts to maximize rigidity.
I have also had INCREDIBLE results with helical high-feed mills. They have some with TPlus coating for harder materials.
https://www.helicaltool.com/products/high-feed-end-mills-steels-up-to-45-rc-metric-variable-pitch-coolant-through-reduced-neck
These are great and in their 6mm variety they have varying reaches of 12/24/36mm. It's hard to know without seeing a model or dimensions but if you're dead set on 6mm tool I'd be running one of each length, and as the tool stickouts increase your speeds and feeds should reduce to reflect that. The beauty of the high feed mills is that they love to run high stepover and low depth of cut, which is great for situations like this IMO.
They have their speed and feed chart on that page, use that.
When using the shorter mill, I'd run close to the top of the recommendations. ( 4% diameter depth of cut, as high of stepover that pleases you ) then as you move to tools that are further out start getting closer to that 2.5% diameter depth of cut.
They are bell shaped tools, so work really well on hard materials taking those light stepdowns. I personally would probably use typical 2D dynamic chains to get the majority of that roughed out, and then polish it off with a stock model + opti-rest to finish that curvature at the bottom of the I.D.
For finishing those fins, I would think of trying 2 ideas:
1) rough out the whole part and leave like .05 per side on each fin, and then finish ramp with a necked back low length of cut endmill (I'd personally run real low SFM and chip load here) I'm not sure how thick those fins are but sometimes the rigidity of that extra .100" below where you're cutting gives it enough strength.
2) if that doesn't work I would rough and finish them in steps like what was previously mentioned.
best of luck!!