Santa Fe
-
Posts
236 -
Joined
-
Last visited
Content Type
Profiles
Forums
Downloads
Store
eMastercam Wiki
Blogs
Gallery
Events
Everything posted by Santa Fe
-
Colin, I did a quick solid 1" tall to try your input above. The solid has three walls, one at -6.5° then a fillet radius of R.28 that transitions to a vertical wall. Regardless of whatever I do in the settings, the backplot shows the toolpath going down verticaly, it does not follow the negative angle wall. What am I doing wrong. I am attaching the sample I did. Do you have a sample file so I can look at what setting you check.
-
Forget to mension Coons patch toolpath. My issue with the Surface contour is that it is harder to control it or maybe I'm not checking the right settings. It is more propense to crash at plunge and retract.
-
What would be your prefered toolpath to machine a wall surface that has a negative angle and all you have is a 3-axis machine and a Lolipop EM or a specaial grinded EM to reach the end of that negative angled wall. I wonder if anybody has a different approach than mine. In the past I have used toolpaths like surface flowline, wire frame ruled, lofted. I would like to see other opinions and what has worked for other programmers. Appreciate all inputs.
-
thanks
-
I haven't being in this site for way too long and it is different from what it used to be. I need to find the ftp site and I just don't see a link for it anywhere. Can some body point me in the right direction please. Thanks in advance.
-
Cool!!! I will give it a try next time I do a multiaxis program.
-
Thank you very much guys. Ron, can you tell me more about what you said above "I really enjoy the ABC along with the XYZ showing the relationship between the Axis and their Rotations". Are you talking when working with multiaxis this gnomon will tell me the the rotation?
-
I come back to work and the IT guy installed X5 MU1 on my work station and I noticed that the gnomon is there at all times. Please look at the attached snap shot, it shows what I am talking about. I looked under Settings>>configuration for a switch to turn it off and I couldn't find anything. Does anybody knows how to turn it off? if so plese let me know how, it is very anoying. Is it possible that it was set up like that at installation? Thanks in advance.
-
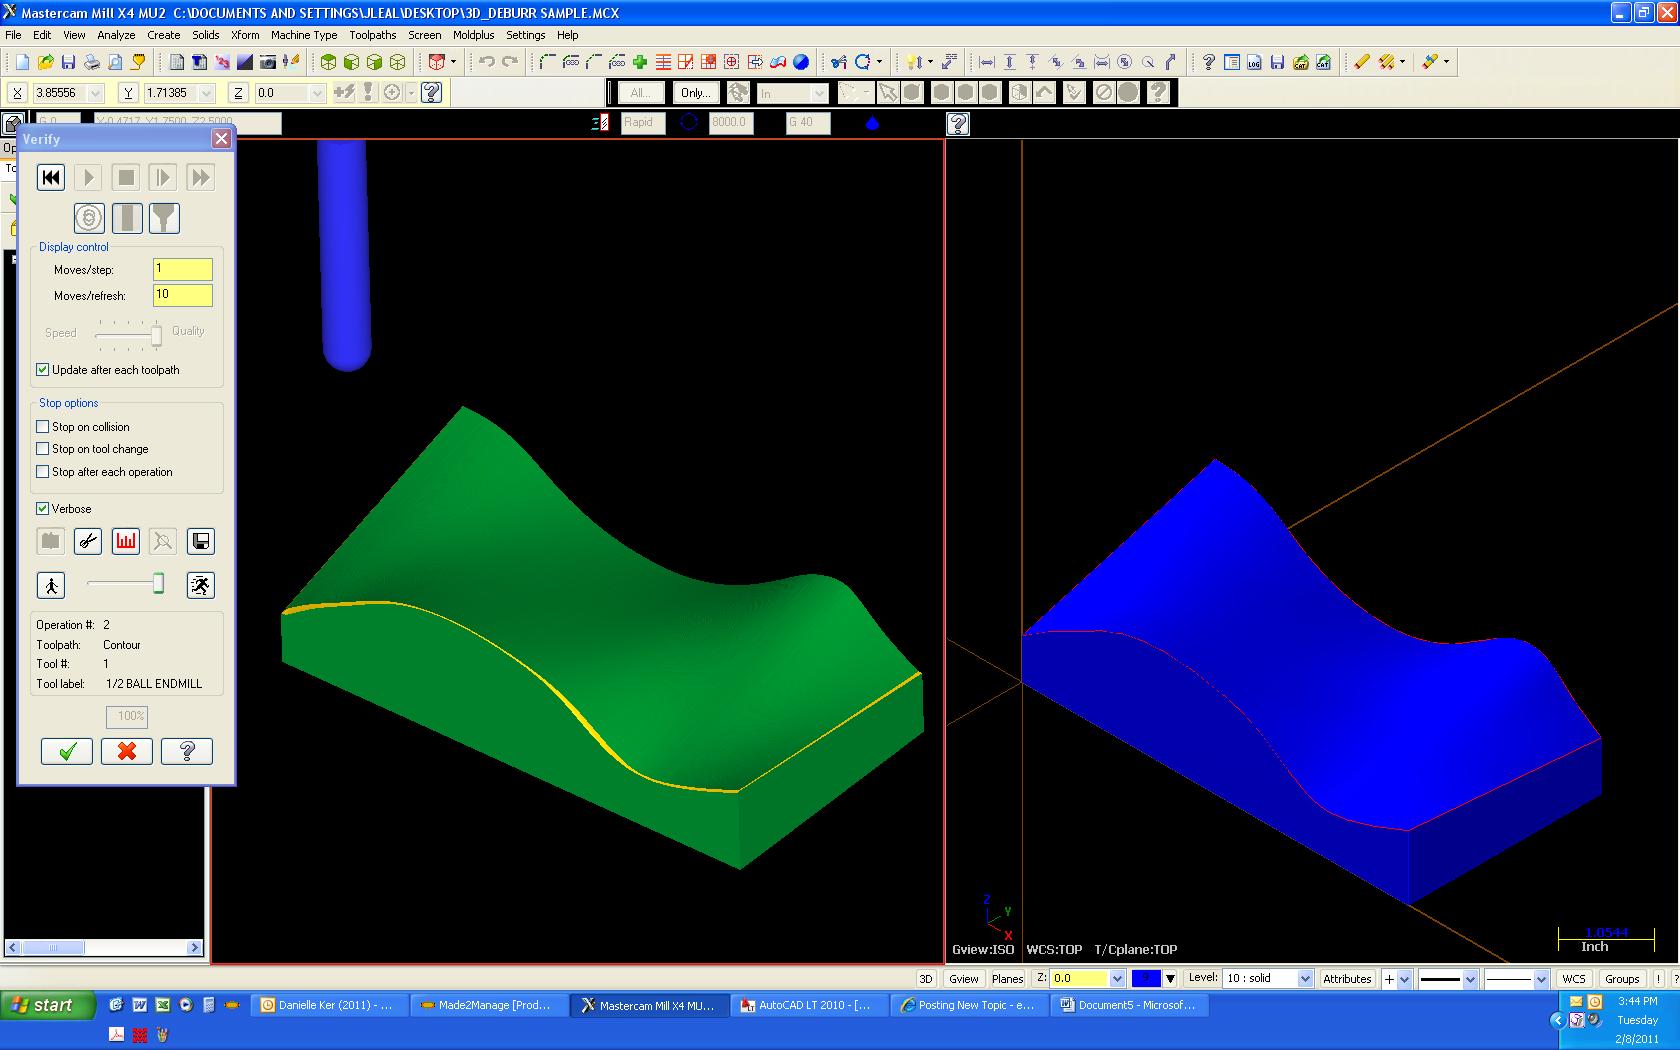
I tried the Surface->Finish->Project with the Ribcut check marked (first I made a .010" chamfer on all edges which is much extra work) and it did not work consistently on all edges. I have also tried Surface->Finish->Project in the past using curves and NCI with no good luck either. Joe to get a close to 45² chamfer edge multiply EM diameter * .15 Hardmill, I agree a surface toolpath is needed so the ball em can follow the intersection edge of two surfaces and compensate for the changes in vector direction. If anybody have succesfully accomplished a consistent debured edge, would you please share a sample file by loading it to the ftp. Thanks to all.
-
Tedly,I did create wire for all the 3D-edges. Bruce, what size of chamfer you use and are you allowed to modify your customer original models? Why to come up with patches and/or modifying the original customer models to deburr the edges of the parts. How can we encurage CNC Software to review this Contour>3D chamfer with a ball em toolpath, so it will do a nice and even cut all along the edge of a 3D part. I am sure that lots of programmers will enjoy having a reliable deburring toolpath like that.
-
Have anybody used Contour 3D-chamfer toolpath with a ball em. I would like to use this toolpath to deburr 3D-edges of parts, but the result is inconsistent. At straight 2D edges it works fine but at 3D-contours it makes deeper cuts than what I need. Have anybody had good results when using this toolpath to break the edges of 3D contours.
-
Download the Mpmaster post from this site. I just had to do minor seting adjustments to the CD and minor edits to the post processor. As I said, Mpmaster will output A-moves or not depending on your WCS, and Tplane. Make sure they are set correctly and you don't need anything else. Regards.
-
I use the same MD, CD and post for all the milling machines 4th axis or not. If you set up your WCS correctly the post will not output an A move. If you don't want A-moves make sure that WCS, Cplant and TPlane are all set equal to the view you are working on. If your WCS is set to top and Tplane is set to front then the post will output A90.0. By the way I use the Mpmaster post from this site.
-
Moldplus will open the Catia V5 .CATProduct files. Just make sure you have all the components in the same folder. i.e. Assembly-ABC.CATProduct is made of parts 1, 2 and 3. You need to make sure the files 1, 2 and 3 are there. If all you have is files 1 and 2 then Moldplus will open the assembly but part file #3 will be missing. I Hope what I wrote makes sense for you.
-
cool trick, I have being running multiple sessions since V8 and never tried copy and paste entities from one file to another. The only issue, I tryed to copy from file A level 5 and paste to file B level 10 and found that the entities will be pasted onto the file B at the same level they were copyed from i.e. onto level 5 of the file B.
-
I don't see why you want: o1000 m30 o2000 m30 o3000 m30 all in one file. Would it be the same if: You put it all in one toolpath group except make sure your toolpaths will have a specific WCS (you will have to create two new WCS). The places where you need to stop the machine to flip the stock do a toolpath manual entry and send the y-axis to home and insert an M00. Make sure all the toolpaths will share the same NC file name.
-
A quick serch for most frequent search topics by key words like: surface, canned cycles, wcs, 4th axis, etc. it will avoid creating new topics for already discused topics.
-
Nelson there is no 2D plunge milling toolpath but what I do is I create the 2D profile or pocket tolpath that I want in the direction that I want to cut then create a ruled surface or flat boundary surface right under tha wire of the toolpath above, then I do a Surface/Rough plunge toolpaht> select the surface you created, at the Rough Plunge Parameters tab under plunge path click on NCI, then on source operations select the 2D toolpath I mentioned above and that will make your 2D rough plunge code. It works good every time with Mastercam. As far as reverse direction cutting, I don't see any advantage on doing that since it is not the intention of the plunge milling toolpath. PS don't forget to use toggle post (gost) for the 2D contour or pocket toolpath.
-
Just draw two lines parallel to each other with the 5° that you need, then choose toolpaths/wireframe/ruled, then select the two line described above, select your tool (the 3/8 ball will work fine) adjust feed and speed, go to ruled parameters and select zigzag, across distance use about .010 to start, set comp in computer to "off" and set the tip comp to "tip" that should do it for level 1 licence.
-
I timed X4 2min 17 seconds to open and zero errors on the event log file.
-
Mine wasn't as bad until about 30 minutes ago after I did what Rickster described above. NOW it even crashed on me. I did enable the "show splash screen" again then restarted my pc and since is being starting slower than before. What do I do now to get it back to what it was
-
...
-
I have used many Haas machines and it always happens on Haas brand machines. Just tap light to medium hard with a hammer.
-
Well, it is difficult to define a specific application since I cut mild steel, tool steels, aluminum, plastics and whatever knocks on my door. I guess most important for me is to protect the machines from rust and to avoid any bad odors coming from the coolant. So, which of the two tends to smell bad sooner and protect less for rust? I do keep a small air pump making bubbles in the coolant tank 24/7 and it seems to keep it well oxygenated.
-
What do you prefer between soluble oil coolant and the synthetic coolant? I have heard that soluble oil is better because it does not harm the paint on the machines(?) but I wonder what gives me a better finish and a longer tool life. A brief explanation of "why" would be good as well.