


Steelab
-
Posts
41 -
Joined
-
Last visited
-
Days Won
1
Content Type
Profiles
Forums
Downloads
Store
eMastercam Wiki
Blogs
Gallery
Events
Everything posted by Steelab
-
Pitch in your little gems that make mcam life easier
Steelab replied to jlw™'s topic in Industrial Forum
The 5 axis nesting that I've done has been limited to swarf mill, horizontal area, and contours on tilted planes(so, all technically 3+2 not full 5axis). It's worked very well and all of them have had associated solid geometry. Also, I've had to convert the operations that try to post as 3+2 into 5 axis because our router(2006 CR Onsrud split table) doesn't work with 3+2 operations on the larger table or table lock mode... -
Pitch in your little gems that make mcam life easier
Steelab replied to jlw™'s topic in Industrial Forum
Simple swarf mill program to show ascending tool numbers changed after nesting to post a single tool and cut in correct sequence. -
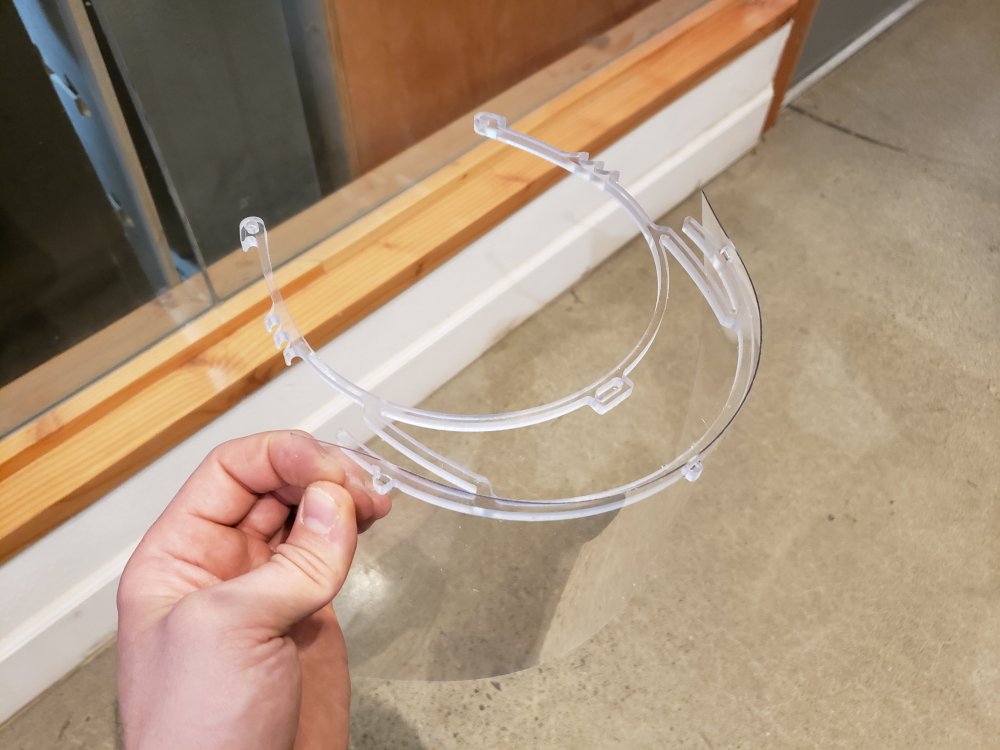
I've suddenly found that my normal work load has dropped off... Last week I started looking for ways that I could use the equipment and skills I have available to make Personal Protective Equipment for our Healthcare Professionals. I'd like to share a project I found and ask if anyone else has found other projects along these lines. I've adapted a 3d printing project to be cut on a CNC router. 2+ hours to 3d print, under 2 minutes to route. Grabcad files for routing: https://grabcad.com/library/covid19-face-shield-hole-punch-v1-1-1 Original Prusa 3d Printing Project: https://www.prusaprinters.org/prints/25857-protective-face-shield-rc1 I hope this is appropriate here, I wanted to reach people who may have the capability to make parts for their local communities, I feel that sharing on social media reaches a more diluted demographic...
- 1 reply
-
- 10
-

-
Pitch in your little gems that make mcam life easier
Steelab replied to jlw™'s topic in Industrial Forum
Check "Output sequence numbers" in Control Definition>NC Output For a long time I was clicking insert block numbers in Code Expert for every single post... -
I've been a press brake operator for a decade and a half and constantly need to explain how complex bend calculations are... If you want to dive into bending calculations there is an excellent series of articles starting with: https://www.thefabricator.com/thefabricator/article/bending/a-grand-unifying-theory-of-bending-on-the-press-brake-part-i When you say "bent stock" is this something that is bent because of damage or is it a formed part that you're trying to get a flat pattern for? How tight are the bends and what angles are they? The larger the inside radius and the closer to flat(more obtuse bend) the closer your neutral axis will be to the center and the better the 'center line' method will work. If you're dealing with all 90deg bends that are closer to sharp than a radius you may get a more accurate flat pattern measuring your inside dimensions because like Matthew said most materials will stretch more than they compress which moves your neutral axis towards the inside of the bend. If you have access to the machine that made the bends or can ask for a sample for bend calculations have a 4" square bent at 90deg in half, measure the out side of each leg and subtract 4 from the sum of the two sides to get your bend deduction for one bend. Using the tooling that I use for .25" material 90 degree bend deductions are : Steel - .431 Stainless - .445 Aluminum - .402 So if you have a 2" x 2" outside dimension angle your flat will be: Steel - 3.569 Stainless - 3.555 Aluminum - 3.598
-
Change tool number without changing speeds and feeds
Steelab replied to Programinator's topic in Industrial Forum
In Code Expert, yes. Is there an exact string function in notepad? -
Change tool number without changing speeds and feeds
Steelab replied to Programinator's topic in Industrial Forum
If the guys running the machine want to change the tool number why do they need to go into Mastercam?... Just open the G Code in notepad and Edit>Replace All>T(x) for T(y) The only change will be the tool callout in the program, no need to re post or even open anything in Mastercam... edit: one challenge with this method is if there is another T(x) in the program, for instance on our router there is a G500 T20 F32 in the beginning of the program so if I'm changing tool 2 to something else I need to make sure to change T20 back after adjusting the tool number... -
Pitch in your little gems that make mcam life easier
Steelab replied to jlw™'s topic in Industrial Forum
Just figured out a Nesting order trick that has helped me to make sure that things are machined in the order I want because I've noticed that sometimes Mcam does weird things when nesting... - For initial programming I assign a new ascending tool number for each operation(regardless of if it's the same tool) - I nest using the Tool number: Ascending Sorting Method - I then go back to the operations and re-assign the tool numbers so each tool only has one tool number By doing this when I post the code the tool numbers are updated but the order is still as it was with the ascending sorting method. This allows me to nest many different parts while maintaining the operations manager cut order and minimizing tool changes. Not sure if there is a better way of doing this but it sure beats having to replace tool numbers in the code editor... One project this saved loads of cut time with was a 5 axis nest(was actually a 3+2 converted to 5 axis) that when nested normally was re-positioning to each faceted face of each part, after doing this I was able to stay on one plane for all parts before re-positioning for the next plane. -
Pitch in your little gems that make mcam life easier
Steelab replied to jlw™'s topic in Industrial Forum
File>Options>Keyboard shortcuts[Customize] will allow you to assign keystrokes to specific functions. I use this combined with a Logitech G600 so I can have my most used functions with one button click(logitech gaming software allows you to record keystroke macros) -
When I need to do this I: 1 - Curve all Edges to create wireframe geometry on the face that is at the bottom of the workpiece, 2 - Fillet the inside corners using the Clearance option and setting the radius to the radius of the tool. 3 - Use the wireframe chain for my toolpath. Depending on the geometry I sometimes use the Relief option instead of the Clearance option in Fillet Entities.
-
Something else that helps if you want to maintain cut direction(because zig-zag will switch from climb to conventional) is to change the entry method to "Profile" or "Medial"(depending on the pocket shape). I've found this especially helpful in long narrow pockets or when pocketing letters. It will still do some looping at the end to clean up corners but the initial shape will be close to the finished shape so it will spiral out in an efficient shape for what you're cutting. Also, be sure to set your back feedrate to something closer to your rapid speed so the loops at the end don't take forever >.<
-
I run into this issue also and use a few ways to get around it. 1- if your cutter is the dado width create a line from the mid point of the dado ends, split the line in the middle and run 2(ramped 2d contour) cuts, with cutter comp off, from the center to each end. This will stop your tools center at the end of the dado. 2- In the model prep tab use Move to change each end of the blind dado by about 51% of the cutter diameter. Then instead of creating 2d geometry just use the Solid loop selection when picking your toolpath geometry. 3- To maintain the width and length of the dado, use the create curves on all edges of the bottom face of the dado and then create a "Relief" Fillet(using the radius of the tool) in each of the 4 corners so you end up with a dog bone shape. Of course using this method you end up with a little cutout next to the piece going into the dado, but it's very useful when you can get away with it so you don't need to go back in with a re-machining toolpath and a tiny cutter...
-
Pitch in your little gems that make mcam life easier
Steelab replied to jlw™'s topic in Industrial Forum
This was driving me nuts... I just found that in MC 2020 this is no longer in System configuration, instead there is a drop down menu called "Follow Rules" at the top of the Planes Manager. Thank you! -
This could be a similar problem to what I'm having with logging into My Mastercam... I think something is wrong with their server...
-
Unfortunately [Enter] does not work every time...
-
For about a week now I've not been able to log on to the My Mastercam site. Is anyone else having problems with this?

