


Leaderboard


Popular Content
Showing content with the highest reputation on 02/16/2019 in all areas
-
try checking Maximum Distance in the Surface Quality setting and set it to .010" The file will be very large, but this makes a huge difference in the finish I get on our Okuma 5X trunion1 point
-
Here is the problem:1 point
-
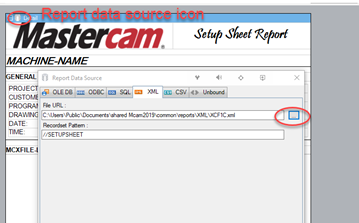
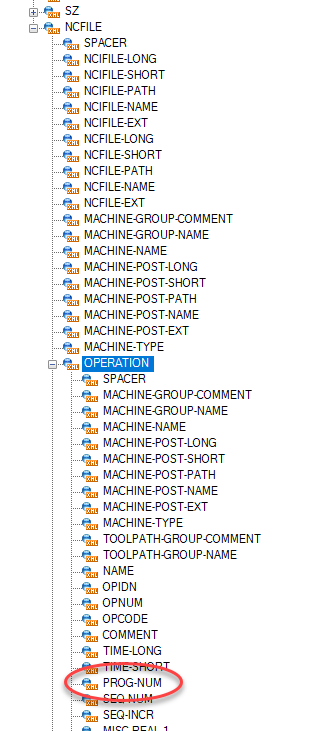
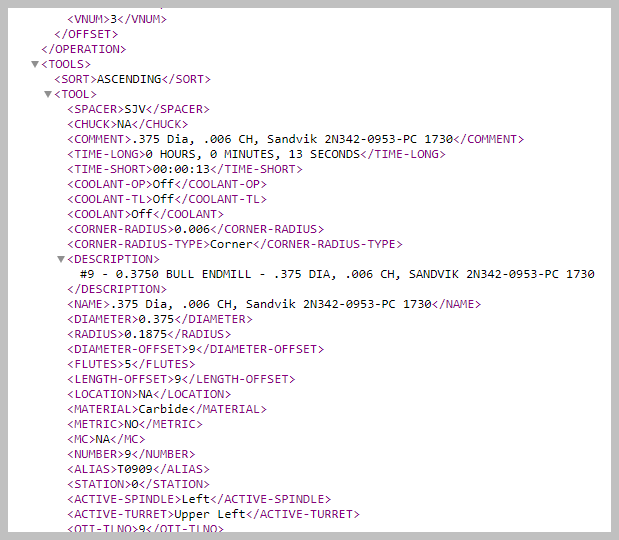
The answer to this is: Yes for the best results. One of the reasons that you are seeing inconsistent results from the preview output is that the data that is being used to generate the preview report is an old sample xml file in the samples file directory. It doesn't have your data and the tags could be different or not in that sample xml file. Every time that you run a setup sheet, Mastercam makes a new xml file with the data that you requested via the rpx report. This is not the full data set. It only contains the data that AR (Active Reports) finds xml tags for in your report template (rpx files) To generate a full data set xml file we need to invoke "The Secret Handshake". Right mouse click in the Operations manager and select setup sheet. Select the setup sheet that you want to run. Hold down the control key and click on the Green Check box You will be asked three questions: Deactivate RPX Parser? Answer: No Display messages? Answer: No Write ALL data to XML file? Answer: Yes At this point all of the data from the Mastercam file will be written to the XML file. This may take a while if there are many operations. Normally Mastercam will only write the data needed from the RPX report and leave the rest out. Navigate to c:\Users\Public\Public documents\shared Mcam2019\common\reports\XML Sort by date and locate the XML file that you just created. Open Chrome browser and drag and drop the XML file into Chrome. It may take a few minutes depending on the size, but you should see the XML in a “document tree” format. From here you can search for 1277 (the number that we entered above for the program number) You should see: <PROG-NUM>1277</PROG-NUM> You can also see the hierarchy of where the data is located. In this case the PROG-NUM is located in OPERATION, which is located in NCFILE If you have tried entering just PROG-NUM into the ActiveReports Designer and it doesn’t print out the Program number we will have to go to the next step. In ActiveReports Designer, open the report that you want to modify. Select the report data source icon and then navigate to the XML directory and select the XML file that we created earlier. Click Okay Now go to the Fields branch of the tree and start expanding, Bound, Document, SETUPSHEET, NCFILE, OPERATION You should see the PROG-NUM field listed there. If you want to find the NC file Name without the .NCI, Search in the Chrome XML file for the program name that you entered and you will see several occurrences of it. The one that you want without the .NCI is: NCIFILE-NAME Drag and drop it onto the report. You will see that the path is maintained and shows up as NCFILE/OPERATION/PROG-NUM Sometimes you can get the data that you want to display by putting in extra path statements like: ../ or ../../ or like the sample in the line above. BUT: this can cause AR to start at the beginning and take a screen capture for every operation, every tool, etc. if you have a very large file with lots of operations, it might take half an hour to generate the report. Report hierarchy: One of the things that I have done to help me understand the relationships between the different reports and subreports is to document the outline structure of the reports. I do this by opening up the main setup sheet and then looking at the sub reports and copying down the name of subs (indented), then I open the subs and do the same thing, and keep doing that until I have the complete outline of the report structure. Here is an example of the default MT setup sheet: Setup sheet (MT) Sandvik.rpx -Setup Sheet (SZ) Sandvik.rpx -setup sheet (SZ-M) Sandvik.rpx -setup sheet (SZ-L) Sandvik.rpx -Setup Sheet (FILE) Sandvik.rpx -Setup Sheet (OPERATION) Sandvik.rpx -Setup Sheet (OPERATION-L) Sandvik.rpx -Setup Sheet (TOOL) Sandvik.rpx -Setup Sheet (OPERATION-M) Sandvik.rpx -Setup Sheet (TOOL) Sandvik.rpx -Setup Sheet (OPERATION-T) Sandvik.rpx -Setup Sheet (MAN-ENT-INFO) Sandvik.rpx -Setup Sheet (MAN-ENT-DATA) Sandvik.rpx -Setup Sheet (TOOLS) Sandvik.rpx -setup sheet (Tool) Sandvik.rpx -Setup Sheet (TOOL-M) Sandvik.rpx -Setup Sheet (TOOL-L) Sandvik.rpx -Setup Sheet (LATHE-TOOL-HOLDER) Sandvik.rpx -Setup Sheet (LATHE-TOOL-CUSTOM) Sandvik.rpx -Setup Sheet (LATHE-TOOL-INSERT) Sandvik.rpx -Setup Sheet (LATHE-TOOL-DRILL) Sandvik.rpx -Setup Sheet (OP).rpx When I create a new setup sheet, I typically start by copying all of the existing sheets to a safe location so that after I have buggered up one of the report templates and it no longer works correctly, I can go back and get the original rpx file and see what I did that caused it to stop working. Another strategy that I use is to have several AR designers open with the templates that I am working on. I will make a change but not close designer and try running a report. If it is too messed up, I just click the undo button in designer (as many times as is necessary), save the file and run the report again.
 1 point
 -
Don't forget to build in your error rounding into your macro process. When you are doing even number of indexes it is not a problem, but when you get to odd number of indexes and needs to be precise you may need to do a stack error adjustment. I would do some parts with 221 places needed for indexing. This is 1.6289 degrees, but the problem is you only have 3 place decimals on the 4th Axis for most machines. Not a big deal until you do the math. We use 1.628 and multiply that by 221 we get 359.788. If we use 1.629 we end up with 360.009. That would be the value I would use for my indexing, but I now need to reduce the total amount index by .009 degrees. 221 divided by 9 is 24.5. I would make my main program call a sub program with the index of 1.629 24 times then I would have my other sub program with the index of 1.628 called one time and then back and forth till I ended up at 358.372 as my last index position letting the 9th shift difference come into play then. Problem is how do you know unless you go run it at the machine might be what your thinking. Nope I would use Excel to do all the math before I every got out to the machine. Excel type programs have been around since the DOS days and this is what I would use to help me map these things when I did 4th Axis work with Pencilcam. I use to surface machine long parts on the 4th axis and use 10 or 20 lines of code. Once I figured out the down motion and then the upward motions for radius and other features and they went the length of a part I would just make that sub program and figure out the spacing needed and just loop it. I have done roll dies, timing gears, twist cams and many other things back in the early 90's all with Pencil and Paper and help of the computer to do some of the math.1 point

