DavidSV
-
Posts
227 -
Joined
-
Last visited
Content Type
Profiles
Forums
Downloads
Store
eMastercam Wiki
Blogs
Gallery
Events
Everything posted by DavidSV
-
At those costs and yields, why don't you just have a company like Guhring make you a special drill. It could be larger on the shank to where it almost rubs and then ground down to the drill diameter on the tip. If you have enought quantity, you can just have them made as a production run of drills and order them in larger batches.
-
Rotary broaching question.
DavidSV replied to Bruce Caulley's topic in Machining, Tools, Cutting & Probing
Is there any way to rotary broach first and then cut the slot into it? -
Rotary broaching question.
DavidSV replied to Bruce Caulley's topic in Machining, Tools, Cutting & Probing
I think the problem with a rotary broach is that you really have no control of the angle that it starts. When we rotary broach, its usually on a lathe or a mill where we are broaching a square, hex, or terx head onto a part. The part (lathe) or tool (mill) just spins at the required RPM and when the part and tool touch they engage and start the broaching process. Maybe you could feed the tool into the part at 0 RPM, get it lined up and pressing into the part, close the door and hit start and have the spindle turn on and start the broaching process. Thanks David -
Your desk is way too clean!
-
Its a Leadwell, Pretty much all generic fanuc control. Its an Fanuc 0i.
-
We have purchased our first 5 axis mill, and I am working on getting it running. The machine builder said that all the axis do not line up, and its typical. The table and the tilt, and rotation axis all do not run through the same point by a little bit. is there any way to set it up through the machine definition to have all the axis off from each other and then when it posts it will compensate for that? Thanks David
-
We have a new machine that is slightly different than our older machines. When there is a tool change it wipes out the D and H value and it has to be respecified after a tool change. In my post, if I use a tool with a diameter comp, its modal until changed. With the other machines this work fine because the Fanuc will hold the D number until changed. Now if I have a program that uses the same tool again, the D is not output after the first time it is used. Is there a way I can reset the diameter comp to 0 at tool change to force the post to respecify it every time there is a tool change? Thanks David
-
So I loaded the Haas trunion machine definition and post into Mastercam so I could play around with it. It seems like if I create a plane off the geometry that when posted the code just automajically comes out at the correct angles. I guess what is confusing to me is that when I load that view in MC the part is at a weird angle that is not like it would be in the machine. Does this make sense?
-
The owner of the company has bought a "5 axis mill". I put that in quotes because he really don't understand that its really a 4+1 or 3+2 machine and not a full 5 axis mill. Its a small trunion machine with a 8" table. I have got a quote from MLC-CAD for a machine definition and post for it, but I have just been messing around in MC to try to figure out how to program and set it up. At my last job we added a 4th axis to a vertical mill and I programmed that using tool planes and just rotated about X to get my diffrent rotations. I really had no training on that, so I was just winging it. How do you setup tool planes for 3+2? is there a tutorial for it somewhere? We are going to setup a training session through our reseller, but I really don't even know what to ask them about yet. Thanks David
-
grooving backside of part -lathe
DavidSV replied to ampston's topic in Machining, Tools, Cutting & Probing
There is a cutoff tool path. it has options for back side chamfers, radii, clearance cuts, overcuts, all of that. Try that toolpath instead of a groove for parting off. Thanks David -
Mitsubishi/Kitamura Arumatik control questions.
DavidSV replied to DavidSV's topic in Machining, Tools, Cutting & Probing
It appears to be some sort of interface problem. I think that the real problem is that Kitamura wanted the control to look and function like a Fanuc, since thats what they used for the last few decades. I think that the Kitamura side of the interface tries to make the Mitsubishi side look like Fanuc. I have found that I can actually get to the Mitsubishi OSD/GUI and attack it from there. While I am not well versed in the Mitsubishi, I got to the file import area and when I looked at the card, I could see all the programs on the card. The problem bacame that after I imported that program into the machine memory and went back to the Kitamura interface the program was not selectable, although I could select it through the Mitsubishi interface. I just deleted it through the Mitsu interface and uploaded a program that the Kitamura interface would use. Its kind of dissapointing that we had to pay $300+K to be guinnea pigs until Kitamura can work their interface out. I kind of just wish they would have made it strait Mitsubishi and eleminated some of the problems. -
Mitsubishi/Kitamura Arumatik control questions.
DavidSV replied to DavidSV's topic in Machining, Tools, Cutting & Probing
The machine can read a file with no extensions. To get it to work for now, I just named the program Oxxxx and then I could see it on the card at the machine. I am wondering if there are some settings or parameters that need to be set to get it to read the .nc file names or files that are not named "OXXXX" Our Fanuc machines can read a file like "000-9099 REV A OP1.NC" without any problems. Thanks David -
These might be more Mitsubishi questions than Arumatik questions. The control had a CF card reader. I can write programs to the card from the machine, and I can read programs that I upload to the card from another machine. The problem is that machine is not seeing the programs that I copy to the card from the network where all our programs are stored. I tried taking the .nc off the end of the file, as the programs from other machines do not have an extension and they are still not shown in the directory at the machine. Does anyone have a clue what might be going on? Thanks David
-
yes
-
You can put a * in front of the B call out for your position block to force the B output. Also, maybe the Makino works different, but shouldn't you be calling offset G54.1 P1? Thats the offset you assigned in your G10 line.
-
So I didn't have time to get to editing my post until this morning. Thanks guys! Heres what I did and the logics I used, in case anyone needs to do something like it in the future and finds this thread. in the post variables i created a variable, slowtc : 0 In the Tool change I replaced the M6 line with the logic If mi6 = 99 | slowtc = 1 M306 else M6 if mi6 = 99, slowtc = 1 else slowtc = 0 Then, in my end of file, I added a line before my M30 if slowtc = 1, M306 That makes sure my heavy or sensitive tool comes back out slow and doesn't get slammed around by the high speed tool change at the start of the next program.
-
Ok, so the " | " in if mi4$ = 1 | dsv = 1, is the or if an if/or block?
-
The flag is so that if the tool goes in with a slow tool change that it will then be triggered to be removed with a slow tool change.
-
So I am looking to have an option set with a MI to have a slow tool change. I would like to have a flag to have it then do a slow tool change to remove the tool also, so for my tool changes, I am looking to have a flag and on my tool change have a logic that goes something like this: If MIxx = 1 and/or Flag = 1 M306 else M6 If MIxx = 1, Flag =1 else flag = 0 How can I format that? Thanks
-
Could you email me your part and let me see if I can get it?
-
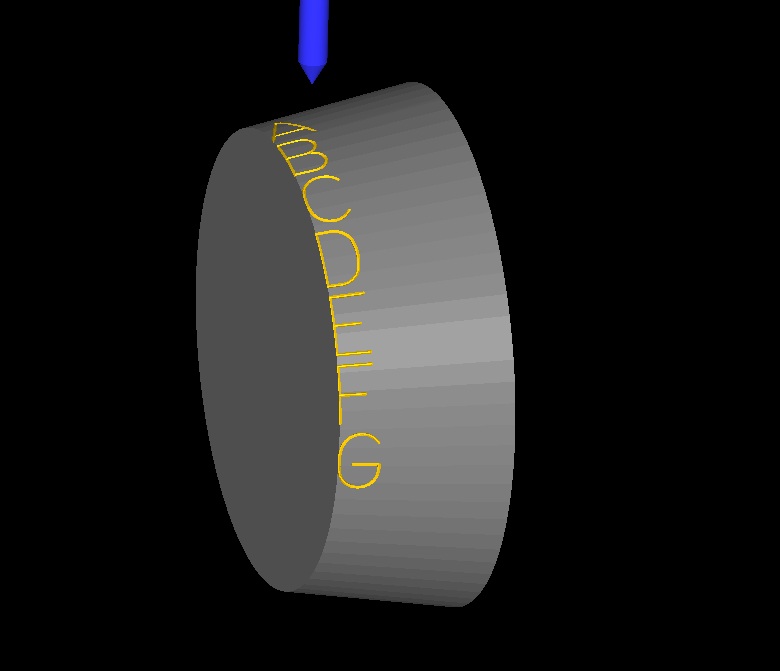
Here is the MCX file for the last picture I posted if someone wants to see what i did. coned engrave.MCX-6
-
Why not? All he has to do is angle the letters to match the angle of the cone.

-
We have a flag in out post that if a cutter comp move is posted with an arc move that it pops up a warning and flags the NC file where its at so we can go back and change it.
-
What kind of machine are you going to run this on? I have angled the text at the same angle as the part and then used axis substitution to engrave it. You engrave at the bottom diameter on the axis substitution. Here is a little sample I whipped up
-
Question about the Raptor Workholding fixtures
DavidSV replied to DavidSV's topic in Industrial Forum
Seems like a huge piece for such a small hold Cincy. How much cutting are you doing on that part? Thanks