Rotary Ninja
-
Posts
1,310 -
Joined
-
Last visited
Content Type
Profiles
Forums
Downloads
Store
eMastercam Wiki
Blogs
Gallery
Events
Everything posted by Rotary Ninja
-

Rotary Machining with Vertical Rotary - How
Rotary Ninja replied to Rotary Ninja's topic in Industrial Forum
With Colin's Machine/Control Definition and post it wants to put -X- on the positive side of the part. We need it on the left. I tried flipping the axis zero position like I did on our Haas definitions but it is not making a difference. Any ideas? -
Rotary Machining with Vertical Rotary - How
Rotary Ninja replied to Rotary Ninja's topic in Industrial Forum
Colin asked me to post his zip2go file so you guys could see what he did. This works much better than what I came up with. ROTARY-C_COLIN.Z2G -
When I click Top View now for some reason my zoom is so far into the part it takes forever to zoom back out using the mouse wheel to where I can see the part. Fortunately I have a 3D mouse. But this is getting annoying. What is causing this?
-
Rotary Machining with Vertical Rotary - How
Rotary Ninja replied to Rotary Ninja's topic in Industrial Forum
I got pulled off and stuck on 6 other jobs LOL. I will post the results as soon as I get back to it. Thanks! -
LOL
-
Rotary Machining with Vertical Rotary - How
Rotary Ninja replied to Rotary Ninja's topic in Industrial Forum
I just moved my X 0 location in my machine definition and that appears to have worked. It still backplots on the right side (X positive). But all the coordinates are X negative. -
Rotary Machining with Vertical Rotary - How
Rotary Ninja replied to Rotary Ninja's topic in Industrial Forum
All that does is flips the direction of the arrows. The tool is still cutting on the X positive side. I even tried rotating the part 180. -
Rotary Machining with Vertical Rotary - How
Rotary Ninja replied to Rotary Ninja's topic in Industrial Forum
The only problem I am having is I now can't control the start point for the toolpath. I am using flowline. It wants to place the tool on the right side of the part and I need it to be on the left at Y0. I have tried a Transform rotate without much luck. -
Rotary Machining with Vertical Rotary - How
Rotary Ninja replied to Rotary Ninja's topic in Industrial Forum
Our reseller is sending me a 3+1 Machine def and post that he says will work for me. -
We have a lathe part we have to cut a profile on with our rotary. The part is too big to just clamp to the table and machine. So the rotary will allow us to rotate the part to machine the surfaces. We were thinking that we could just position and machine the surface in quadrants. But I want to use the rotary to just surface the part all the way around. So I would like the tool to stay at -Y- 0, and machine with -X- -Z- and technically -C-. I have never had to do this before. Do I have to create a new machine definition to make this work? Ours has the rotary sitting horizontal along -X- axis (-A- axis rotary). I am attaching a model I created to represent the part. The area that needs to be machined is the 1.500" rad and the ID angled wall. Thanks. Rotarty Vertical.mcx-8
-
Did the OP disappear?
-
Thanks. I am starting to get comfortable programming the lathe. I got an attaboy for a beautiful part we just pulled off. Grooves and all looked very good. I am impressed with how easy it is to program a lathe part and how well MasterCam is at generating a toolpath that really works well. They are talking about getting a large VTL. I was dreading programming a lathe. Now I am actually looking forward to getting that big guy in here. It's really quite fun!
-
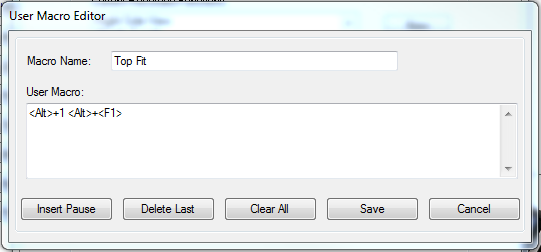
Rebind your buttons with a new macro to switch to the correct view then fit. So click Custom Function on the Button Configuration tab in the 3DConnexion Panel. Click New in the dialog that pops up. Type in a name (Top for example) and in the user macro area Hold ALT and press 1 to create a top view macro. Then after that hold ALT and press the F1 key to create a fit macro. All tied to one button press. Then back in the Button Configuration window for "T" click the drop-down and select your new custom macro. Sorry, I didn't realize you can edit the standard macros. Just edit the Top View macro. Make sure it has <ALT>+<F1> in it. Hope this helps
-
I have used reference points a lot in milling for just such occasions. I just didn't see that grayed out check box down there until I saw the screeny here. My machinist thanks you guys too. More to come
-
Ahh, there is the devil I was looking for! Thanks!
-
Ok, I have messed with Reference Point. Is there a science to it? Or do you just select user defined and pick a point somewhere in space that looks safe? Thanks guys.
-
We have noticed that the final retract moves aren't clear of the part sometimes before the machine is sent to home. Luckily the machinist running the job is keen on this and has caught it every time. How do I tell MasterCam to pull straight out to a safe position (like Z+.250") before sending the tool home? Thanks.
-
I was guessing it would have to be a custom tool. Why can't there be a simple check box? Anyway, I cheated and used a different hand tool and got it. It works just fine, it just backplots the tool holder backwards, which isn't an issue. I will delve into this deeper when I have more time. Thanks.
-
Ok. I am programming a face groove. The OD of the groove is a tight diameter and the machinist wants to touch off of the OD of the tool. I understand his thinking so I got to looking and I cannot see a way to change which side of the groove tool you are compensating to. Is there a way to change this? Other than lying to MasterCam and telling it is the opposite hand tool I mean. Thanks.
-
Yeah, that is awesome. I have 3 seats of MasterCam at my disposal with a NetHasp. 5X, 3X, and Lathe. Now I can launch each seat and have all the machine specific parameters and configs loaded. This is a real time saver. Very cool. Thanks guys.
-
The problem is, our IT guy is the owner LOL. I will try that. Thanks
-
Those didn't stick either.
-
THAT is what I was looking for!
-
HOLDING THE TOOL DOWN IN PARALLEL TOOLPATHS
Rotary Ninja replied to Mousongie's topic in Industrial Forum
Rstewart is correct. I use a gap setting just larger than my step over. I also set the dropdown to smooth. And I usually set a tagential line length to .050" or so to extend the path beyond my part a bit. -
Ok, you have exceeded my technical ability at this point. Our Haas Lathe is a limited edition. Meaning we don't have live tooling LOL. So far the worst I have to program are grooves. When I get to threading I will look you up!