


4VRGJ03
-
Posts
51 -
Joined
-
Last visited
Content Type
Profiles
Forums
Downloads
Store
eMastercam Wiki
Blogs
Gallery
Events
Everything posted by 4VRGJ03
-
I only used the demo version because when I posted this I was at home. The dongle is at work. Got to go to work. I'll be back on this topic after work.
-
This was going to be my next discussion on this issue. I will put something together this weekend about this. It's all about cost. The part that I am machining is 300M (4340M) Alloy steel in the normalized and tempered condition which is not hard its about 28-30 HRc. I have 200 pieces to cut. I could use and endmill but how long will the endmill last as compared to the inserts on a High Feed Mill......but then we start talking about the savings in machining time as a high feed mill will have a higher machining time as compared to an end mill. Endmills start to go up exponentially in price after 3/8". Stay tuned because this thread is not over yet.
-
You see!!! I just learned 2 new valuable things! In a matter of 7 minutes! You guys are the best! Incredible!
-
JParis That’s the method I was after. Thanks a lot! I had seen it done once before but couldn’t remember the details. Sth Axis CGI…..I’m not telling any one with a substantial amount of experience to go and pound sand. Please don’t make it seem like that. In fact the method of OptiRough and Rest Material that Leon82 and the In-house solutions technician mentioned actually opened my eyes to another way to do this. I had originally thought of using 2D Dynamic mill at 2 depths (2 sections) which had a pretty attractive result in terms of machining time eliminating all air cutting. The real issue 5th Axis CGI is that this a real life situation. I actually have to mill a Rod End on a 4-Axis which looks like a lollipop after it comes off the lathe. But there is a few problems with Dynamic milling which forcing me to find a solution to travel back and forth the sphere with a High Feed Mill. Now this method will take some time as I can only cut .025” deep forcing me to find a way to eliminate as much air cutting as possible. Believe me I am not telling anyone to pound sand. Problem 1. My Boss hates Dynamic Milling. He thinks it ruins machines. My boss has about 35 years experience and knows 3 tool paths. Contour, Surface Finish Parallel, and Flowline. I think he knows pocket too Problem 2. Even though we have nice new machines they have Fanuc Controls. Fanuc controls out of the box have limited memory. You have to pay, what my boss thinks, is a lot of money to buy bigger memory. SInce he never uses Dynamic Mill there has never been a need for him to shell out money to buy more memory. Therefore I may have no choice but to use a simpler toolpath like facing back an forth because the dynamic milling program may not fit in the machine. To everyone who posted on this thread my hats off to all of you. You guys are the best and I love these discussions. All I’m trying to do is find a way to work with the tools that I have. Stay Safe and have fun Gentlemen!
-
Leon82, In all honesty I really do appreciate every answer I get because I learn different strategies. This is exactly the same way tech support from In-House Solutions told me. In fact your answer is so identical it makes me believe you are the same person. In this case I don't agree with that solution because if I want to use Dynamic Milling I will use 2D Dynamic mill and create 2 sections (depths) and 2D dynamic mill both depths. But Leon82, here is what I am trying to accomplish......I want to use a cutter with inserts and travel back and forth along the surface making cuts without cutting air. I want the tool to follow the surface as I cut down the sphere essentially minimizing the air cutting. There has to be a way to do this. Once again I thank everyone for thier time.
-
Good Evening All. I hope all of you are staying safe. I was hoping to get some ideas on this. Attached is a file. There is one operation. It is a facing operation. In a nut shell I’m milling a flat on a sphere. When the tool starts facing the sphere at the top there is not much surface to cut. As the tool progresses down, the cutting surface area progressively increases. So while the tool is cutting near the top you can see it is cutting air. How do I cut the sphere without cutting air? Basically I want the tool to follow the surface of the sphere. Or in other words I want to face down the sphere without cutting too much air. Mabey the facing toolpath is not best toolpath to use?? in it's simplest form, I want to use a cutter with inserts and travel back and forth along the surface making cuts without cutting air. Any ideas? I appreciate everyone's time on this. SPHERE.emcam
-
Good Afternoon All, I came across this thread but I cannot get the "Dynamic Database" The link is gone. Can anyone repost or share the file again? Thanks,
-
Is Mastercam 2020 released yet? I'm on maintenance and I don't have 2020 yet.
-

Dynamic Milling VS Machine Accuracy....over time
4VRGJ03 replied to 4VRGJ03's topic in Machining, Tools, Cutting & Probing
Yeah you right. Mitsubishi underneath but Mazak Branded -
Dynamic Milling VS Machine Accuracy....over time
4VRGJ03 replied to 4VRGJ03's topic in Machining, Tools, Cutting & Probing
Thanks everyone for your input. Alot of good points mentioned above. Just for everyone's input the Machine I'm using is a Mazak VC-500A /5X -
We are trying to do the same in the shop I work in. Tricky though. lots of elements to consider. If you are successful with this it would be great if you shared some details and some things to be aware of. The biggest problem I see is that you will need a large tablet. The larger the tablet the more expensive it is. Zooming in is a problem as it's much better to view the whole page. plus you can only see one page at a time. Viewing only one page sucks and after you scroll down 5 pages you may want to back up a few pages....in a nutshell the navigation will suck. It's not the same as paper. Then what happens when your operator wants to scribble a note on the set-up sheet or make adjustments to the the set-up sheet? Things become trickier with tablets. To solve alot of the problems I mentioned above you would need a windows based tablet (or apple based) and those are double the price if not triple. That way you can use software like adobe to allow the operator to mark-up the set-up sheets. Now you need to protect the files you share from sabotage....Hmmmm. Tricky. We put this idea on pause because we ran into these slight issues with no efficient solution. If you become successful with the implementation of tablets as a replacement for set-up sheets and drawings......Let me know how you did it.
-
I kind of need eveyone's serious thoughts on this..... We all know Dynamic Milling makes a series of these funny spline looking toolpaths. So while our machines are dancing away at these crazy toolpaths , apparently our ball screws are really going through some rough times. Someone told me that Dynamic milling is very nice....but like with all things....at a price. The price seems to be a thought that the ball screws wear out quicker due to the constant high speed motions and that if you value machine accuracy dynamic motion should be avoided. It was said that it's good for automotive because machines run all the time due to high volumes and after a few years the machines pay for itself so you can get rid of them but if your a small to medium sized machine shop and you want your machines to last that you should avoid Dynamic milling. The person is dead set against Dynamic Milling and hates it. He is completely convinced that Dynamic Milling reduces machine accuracy quickly as opposed to conventional contouring. Based on the physics of the machine....is he really wrong? How right is this person?
-
is it a requirement to have the threaded hole hard anodized? Usually threaded holes do not have a hard anodize requirement just the regular anodize. I highly doubt a 6-32 hole requires hard anodize. If it is a requirement then this would be the first time I have ever seen that on a thread. Usually hard anodize is used for frictional surfaces for wear resistance....but what do I know?
-
Nobody has an answer to this?? I asked myself this exact same question earlier this year. I didn't pursue it any further because I realized that if I really want this type of simulation to work for me it will be better to have it linked to the post. In-house solutions can link the simulation to the post for you. If it's not linked to the post, the simulation may not be accurate enough to prove your program rendering your efforts to revise the position of the 4th axis useless. Better to have it linked to the post.
-
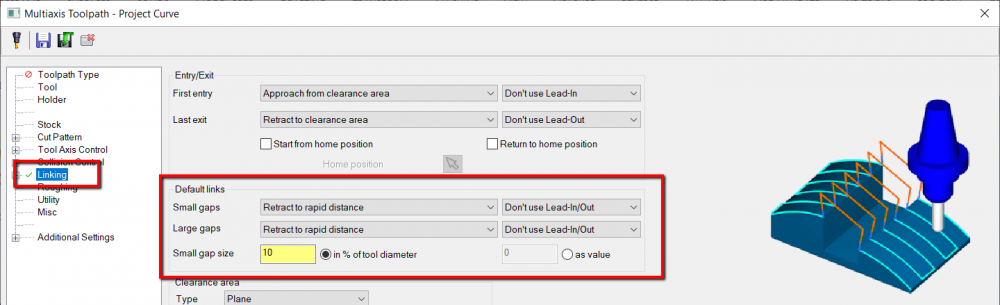
Alright. Our friends at In-House Solutions have found the solution. See picture... Thanks Everyone. Setting the "Default Links" to "Retract to Rapid Distance" The Handbook that in-house solutions have to cover multiaxis tool paths (Volume 3) doesn't really cover this tool path very well. (I have the 2017 series so mabey the 2019 series is better) The example file they give is also not very well constructed either. The example they give has the "Default Links set to "Direct" and the tool still manages to jump over to the next chain. I'm not sure what setting they have in that file which makes the tool jump. But in a nut shell. I expected more from the Handbook.
-
: Good Evening Everyone, I hope all is well. I’m having an issue with trying to engrave characters on a non-planar surface using curve and project curve toolpaths. This is for my 5-axis Mazak VC-500A 5X machine. (Trunnion Style) The orientation of the part when you open the file relative to Mastercam’s default “Top Plane” is exactly where it needs to be. Re-orientation of the part in Mastercam is not an option. I have attached the file for everyone's reference. It looks as though the project curves toolpath is working but I cannot get a Z- Retract between each letter (or chain) The tool drags over the next letter without a Z- retract. The goal is to engrave the letters in a 5-axis fashion (keeping the tool perpendicular to the curved surface.) I appreciate everyone's time in advance. 5-AXIS_ENGRAVE_ISSUE.mcam
-
I'm not to fond of free spinning wheels. I need a good sturdy scroll wheel as with cad and cam the depression of the scroll wheel activates part rotation and I find free spinning wheels are not as robust.......the Logitech you mentioned shows a decent scroll wheel.....now that we are on this topic...... When I shop for a Mouse, I pull the trigger on the one with the most Robust scrolling wheel. I use a 3D Connexion 3 button CAD Mouse. For Mastercam I programmed the middle mouse button to act as the 'shift' key so I can pan my models without touching the keyboard. So Now I can rotate, pan and zoom in and out without ever touching the keyboard. The problem is the Zoom Increment. I would like to have a better zoom increment so I can navigate smoother. The 3D Cad mouse is expensive about $150 Can. The only another mouse (in my opinion) which is good for Cad and has THE BEST (again in my opinion) scroll wheel is the R.A.T Mouse. I used a R.A.T Mouse at a company for 2 years on CAD systems 9 hours a Day everyday and that mouse is still alive today. The buttons literally NEVER WORE OUT. It clicks and scrolls just like the day I bought it. I am not kidding. It's a great fit for your hand and it has the Best Scroll wheel on the planet. The problem is I cannot find one with 3 buttons. However I think the 3D connexion CAD Mouse is the Ultimate CAD Mouse on the planet as it is a perfect fit for your hand and is more professional looking when it sits on your desk, it just needs the scroll wheel from R.A.T. I have a 3D space wheel which can solve my problem with the zoom. I just hate putting it on my desk because everyone stares at it. I even bought the small one so it's not as big. I prefer not to use it. I hate attention.
-
The issue I find with Doosan is obsolete parts especially sensors which can get costly if needed to replace. We have several Doosan Machines Lathe and Mills. But overall a cost effective and very capable machine. I see them more and more in Machine shops. Good way to keep the overhead low. Better than Haas by a long shot. Wide range of machines as well. Lots to choose from. Try to get one which has a external oil spindle cooler.
-
Oh geese I didn't realize that this was posted not too long ago. I thought this was an old post and mabey there might have been a solution by now. Mabey there really is no setting in Mastercam. Sorry.
-
Good Evening All....I have to open this one up again... I'm looking to increase the zoom and unzoom increment of the mouse wheel. In a nut shell when I scroll down the mouse wheel to unzoom is there any way to increase the increment of the unzoom. Does Mastercam have a setting for this?? Thanks all
-
.....Interesting. I was thinking of creating multiple tools as well. But when I tried it it just made things twice as confusing especially when trying to figure out which operation uses which tool. I tested the "Lock Feedrates" function and it works. Creating multiple instances of the same tool to control different feed rates for different operations is not necessary.
-
Thanks MrFish! You hit it right on the nose!
-
: Good Afternoon All, I have a problem with assigning custom speeds and feeds for each individual operation which use the same tool. Have a look at the attached PDF document which explains the issue Im having and let me know your thoughts. I thank everyone for their input SPEEDS_AND_FEEDS_ISSUE.pdf
-
Thanks Ajmer! That's exactly what I was looking for! Thanks Everyone else for your input all are very good tips! I use toolpath groups but not to that extent Old_Bear. Interesting though. Mabey I can use that...Hmmmmm... Interesting
-
Hello All. Here is the issue. I just finished a program which had 66 toolpaths (processes) and 22 tools. From the Tool Manager I can see all the tools that the program is using and they are all nicely listed. Lets say one of the tools I used was a Ø1/4" Endmill and I wanted to find out which Tool Paths were using that tool. How do I do this? The issue is I have to expand all of the toolpaths (processes) one by one to find that tool. The more Toolpaths you created the more time consuming this becomes. What I have been doing is saving the file deleting the tool...at that point Mastercam makes the applicable toolpaths "Dirty" and then I reopen the file and make my changes. (This method sucks the big bag) Thanks Everyone!


