All Activity
- Past hour
-

Bsod when install Mastercam 2018
cncappsjames replied to duytam.pham2024's topic in Educational Forum
Did you get the installer from the Mastercam website? - Today
-
It is all about tool type. No D offset for a drill tooltype it is baked into the software. Use a chamfer mill defined the same as your spot drill and your good. AB
-
 Tim Burmeister joined the community
 -
 DJ005 joined the community
 -
 LUIS MACKOW joined the community
 - Yesterday
-
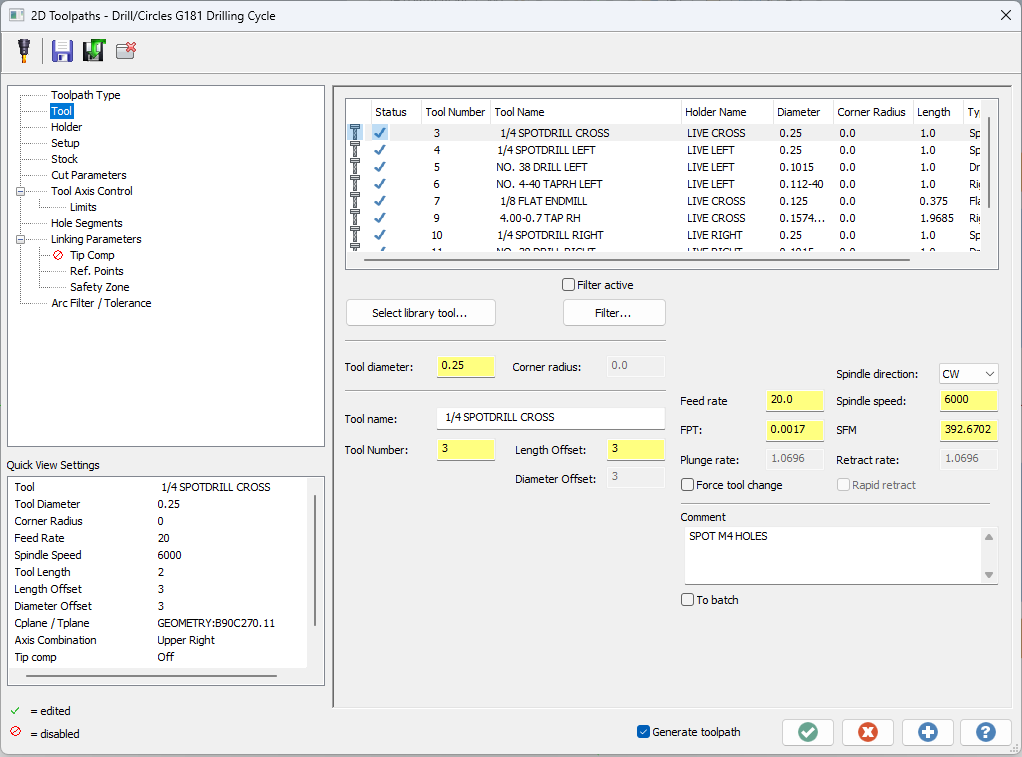
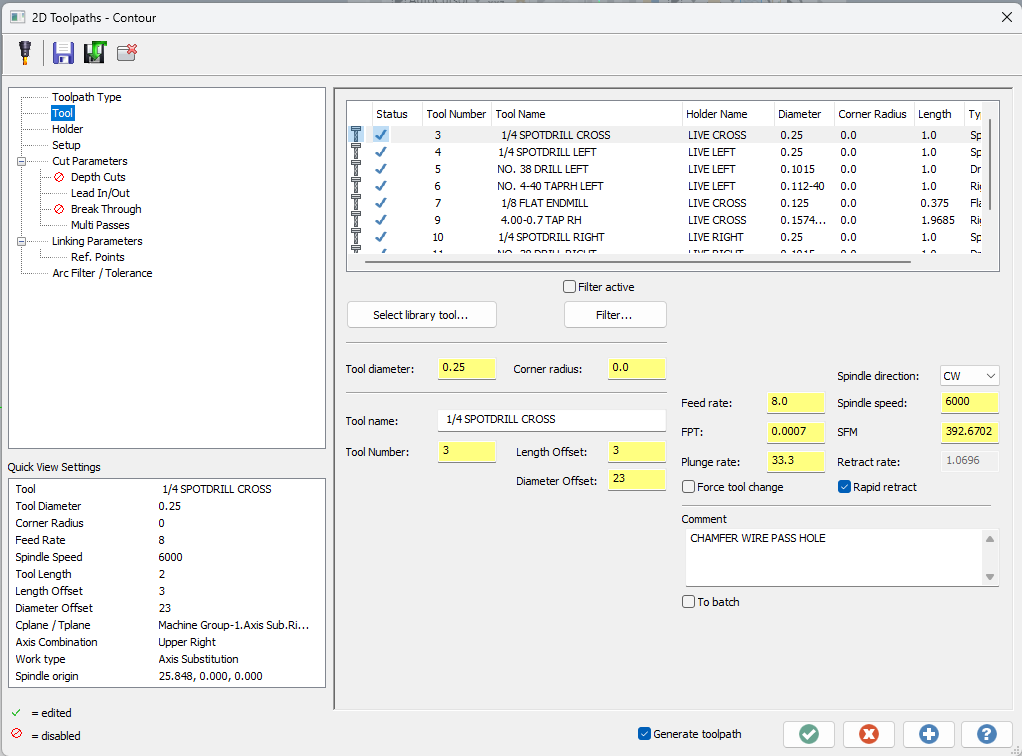
We have an Okuma LB3000 and I put offsets for the right spindle as (tool location 1 offset 21) (tool location 2 offset 22) etc.. This works fine on mill tool performing a contour or pocketing operation (I just change the diameter offset in the toolpath settings). However when I have a tool that does a drill/tap cycle I can not change the offset because it is greyed out and I have to go into the post and change them by hand. Is there a setting that can be changed to allow me to change the diameter offset in drilling toolpaths? The images depict a 1/4 spot drill in a drilling toolpath and a chamfering toolpath.


-
 Troy123456 joined the community
 -
New Toolpath Group - Keyboard Shortcut Possible?
SuperHoneyBadger posted a topic in Industrial Forum
Pretty straightforward. Looking to assign "New Toolpath Group" to a keystroke. This command only seems to exist inside the right-click menu of the Toolpaths Manager. Is it possible to assign it to a keystroke? I'll even accept some modifications or workarounds. I do a lot of updating old programs (not through all 4000 yet), they usually have the OPs unorganized. I'll be lucky if G54 and G55 have separate groups, usually just divided by a comment. So naturally I need to organize them when I open one up, and making multiple toolpath groups is a pain in the patoot. And at speed, I have often clicked "cut" on the way to the Groups flyout. There is no dialogue box or anything, your toolpaths are just poofed, and the red arrow now lives in the last group you made, so good luck pasting them back in the right spot. Anyways, kind of a long road, but that's the deal. A "New Toolpath group" shortcut would be useful.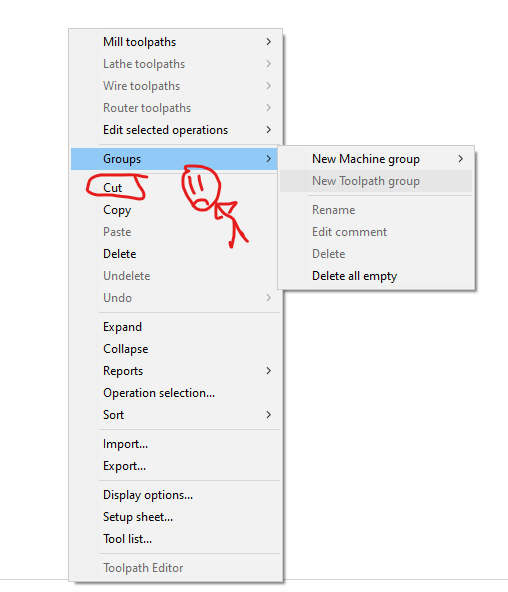
-
 Anthony Bastiani joined the community
 -
 Not a way through Active reports since this is not really tracked that way. Best way is to build them and then make screen shots you add to your setup sheets.
 -
 I am trying to fine tune a lathe setup sheet such that it spits out static tool projections automatically. There is obviously a value in Mastercam (2023) for tool projection adjustment, I just can't figure out what the datafield is for it in ActiveReports, or if there even is one. I've tried 'PROJECTION', 'Projection', 'ToolProjection', 'ToolAdjustment', etc. My current work-around is to use a PDF editor and manually entire that field. This kind of feels like it defeats the purpose of having an automatically generated setup sheet though. So, if anyone has figured this out I'd appreciate some insight! PS: Based on an older post on the forum I downloaded an XML viewer to try to find this data in the XML file, but the XML file that gets generated looks like it only contains the exact data that I'm currently using in the ActiveReport. It doesn't retain everything else (incl. datafields that I know work, but am not using.). If there is some XML default file somewhere that shows the path to all of the data I would scour that for the info I'm looking for, but I cannot find such a thing.
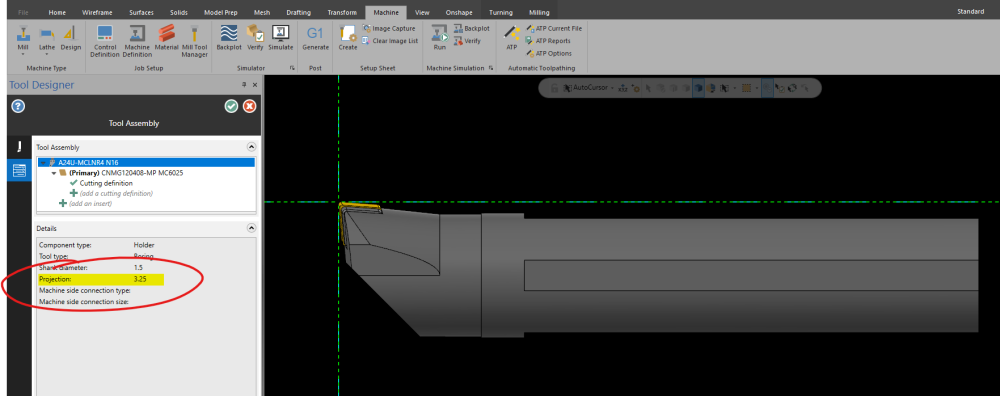

-
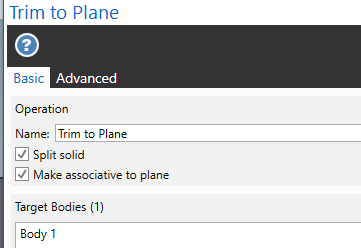
You made sure this not checked? VVVVVVVVVVVVVVVVV VVVVVVVVVVVVVV VVVVVVVVVVV VVVVVVV VVVV V
-
C'mon, Dad, we were just poking the new guy... Looked like the other spam this morning, I felt obliged to give him the gears. I usually extrude>cut with dummy wireframes, this is better if the desired cut lies on a plane, thanks!
-
Trim to plane and split solid is checked. I normally uncheck Make associative to plane to not get issues when deleting un-needed plans in the planes manager. 5 seconds of work answer both of your questions?
-
 PWAGNER joined the community
 -
 Albert Z joined the community
 -
 Maxime Leveille joined the community
 -
 Yep, Post Debugger, and you need a Mastercam License to use/run this. Also, you can install and use Mastercam Code Expert, which has all the pre-defined variables and functions listed, using an "auto-complete" feature. By the way, if you're looking to learn about Post Processors, I have a free Post Processor Class (actually several) on my YouTube Channel. Link in my Signature. For MP 101 - Basic Post Processing, there are 28 videos. Be sure to watch all the Office Hours sessions as well. For MP 301 - 5-Axis Post Processing, there are 20 videos.
 -
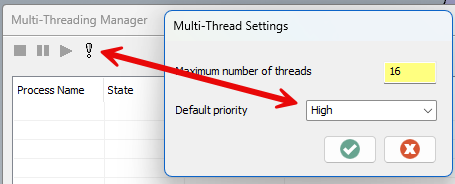
FYI, If you've got the Multi-Threading Manager open, with no threads active, this enables a "configuration" button (looks like an exclamation point > !). You can then set the "Default Thread Priority" to High, instead of needing to remember to set it on each thread. Also, are you Filtering each-and-every Operation? Because if you're not (assuming they are also non-vector based), then you're missing out on both shorter NC Programs, and decreased processing time for Verify and/or Stock Models.
-

MCAM 2023 Config Issues - overwritten by the default
gcode replied to F800R's topic in Industrial Forum
Is One Drive running on your machine? -
To change these colours....when in Verify go to File - Options - Graphics and make your changes.
-
Having a single Stock Model, at the end of your process, means you single-thread the removal of stock, from start to finish. Because each subsequent operation is dependent on the removal of material from the previous operation, you're limited in the speed the operation can execute at. Jake gave three great suggestions on how to potentially solve this issue. Or, just hit regenerate, and go get a cup of coffee while you wait. If you pause the operation, you can also Right-Click and set the Processor Priority flag. I like to use "High". I've seen no difference between High and Real-Time, but High does seem to give a performance boost versus standard.
-
Easiest way is to only create the 1/4 of your solid then use Mirror to duplicate each part or parts as needed. You can cut that solid using the extrude-cut function with a complete chain to cut it by. You can also use Model Prep push/pull and reduce the model to the 1/4 shape and then use Mirror.
-
Here's a link to another post about this topic: Here is another link to a benchmark testing thread so you can see how you stack up: Another link from MC Northwest on the topic: (the benchmark file download is on this page) https://mcamnw.com/how-to-optimize-your-pc-for-mastercam/ And one more link discussing computer specs for the heck of it: The biggest points: 1. loosen tolerance on the stock models if you can 2. use more stock models to spread the load 3. stock model regen is primarily a single thread process, which bottlenecks the regen times HTH
-
I'm just a newcomer to CAD
-
Danie Copperfield out here with the big CAD/CAM tricks. Please teach me how to cut stuff in half, my guy. All my parts are whole still.
-
The suspense is killing me.
-
Hello everyone, Today I would like to show you how to split a solid into two solids in Mastercam. This can be useful in various situations, e.g. if you want to edit different parts of an object or if you need to prepare an object for production. i would like to divide/cut the solid at the horizontal line into two parts or two solids

-
 Danie Terrazas joined the community
 -
Hi Why does having an i9-14700kf when creating a stock model take so long? Isn't it the processor who is in charge of managing that model? maybe the graphics? I have had to reduce the attachments. No space in the forum? https://ibb.co/TM6zQ6x https://ibb.co/BtfBxHf


-
Integrating G234 in fanuc 5x generic post
Colin Gilchrist replied to ikertx0's topic in Post Processor Development Forum
Leon is correct. Without access to the encrypted portion of the Post, you're not going to get TCPC on a Haas Post to work correctly. One of the problems if you don't use the encrypted section of the Post > you won't be able to take advantage of the Misc. Values which give you control over the Posted code. For example > using Misc. Integer #10 to force the secondary (tilt) to either positive or negative, so you can keep the rotary on the correct (operator) side when needed. All the Safe Z Retract and or "Approach/Retract To/From Limits" code in the Post requires you use the encrypted section, and so on. Also, having features like the ability to "read a T/C Plane which has the same orientation for the Z vector as the WCS", but using the XY vector angles to allow you to "clock" a part, so you can overcome travel limitations of the machine, these are all things you need access to the encrypted section to control. -

MCAM 2023 Config Issues - overwritten by the default
F800R replied to F800R's topic in Industrial Forum
thanks, I did this and it seems to be stable for the last few days. -
Mastercam a fidia post lazım