Leaderboard


Popular Content
Showing content with the highest reputation on 04/16/2024 in all areas
-
I looked into this and it looks like this escaped the What's New, but the description above is accurate. It's hard to quantify the changes you'll see other than "It does better in some scenarios". Because the results are different enough that it could change existing Swarf toolpaths substantially, they chose to leave in place the old method (legacy) as an option and default to the new Automatic in new paths.2 points
-
Saving as a parasolid- (.x_t) is the best solution, as both Mastercam and Solidworks use the parasolid kernel for modelling and there will be no translation or transformation of data when saving out to, and opening from, the parasolid format. Depending on the version mismatch between Mastercam and Solidworks, you may have to go into the Options box in the save dialog to set the output Parasolid version to a lower version that is supported by the older of the two packages you have installed.1 point
-
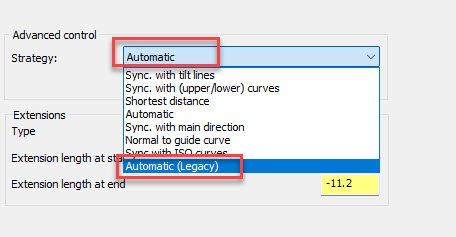
Asking questions on the Mastercam forum is a lot like shouting at clouds, so I thought I'd try here. The MC2025 PB3 Swarf Toolpath/Advanced Control now has Advanced and Advanced (Legacy) Obviously there is something different about the new Advanced or they would not have let Advanced (Legacy) behind. Does anyone know what the difference is? I'm doing a new project and getting excellent results from the Swarf toolpath. but I really can't detect any difference between Advanced and Advanced (Legacy)
 1 point
 -
As always when you need help, ask the experts. Thanks guys!!! I'm using the new automatic on a vane I'm doing as it looks really good in MC Backplot , Postability Machine Sim and Vericut It will be several weeks before it gets a real world test on our Okuma MU-1000H. I'll report back then.1 point
-
Yep, correct. It will be updated with the latest MW documentation upon 2025 release- not as helpful for Gcode now1 point
-
The documentation is actually available on Mastercam.com, under the Learning- Documentation area: Downloads – myMastercam The "Multiaxis Help" files are the ones you're looking for. Of course, be aware that not everything in those files is implemented or interfaced as shown.1 point
-
I had to search for the latest release of MW documentation: ------------------ Automatic - Contact lines are placed in a way primarily minimizing the undercut to the target geometry and secondarily minimizing the allowance to the target geometry. In case the target geometry forms a ruled surface, this strategy will try to create a toolpath with neither undercut nor allowance. In case the target geometry is no ruled surface, it will try to create the toolpath with the least undercut and allowance possible. This strategy is intended as the default, first-shot strategy. It contains a number of heuristics to create a reasonable tool axis tilting on a wide range of input geometries. Optionally, users can define tilt lines to fine tune the tool axis alignment in specific areas ----------------- Automatic(legacy) - tries to place the tool on the swarf surface in a way that minimizes the area between the contact line from the lower to the upper curve and the swarf surface. Since the swarf surface is sometimes a parametric freeform surface (with double curvature), the area is not necessarily zero. ----------------- Sounds like they improved a some of the cases where automatic choked up, but are acknowledging that it might break some other situations they couldn't test for?1 point
-
Whether or not inspecting on the same machine that made the part will meet your needs, will depend on your needs. If you want to do it properly, you should meet the same bar as for other measurement methods; get your machine laser / ballbar calibrated, do a measurement repeatability and uncertainty test, etc., and make sure that your uncertainty is less than 1/10 your tightest tolerance. You can include measuring a gauge block / pin / ring as part of your inspection process to warn you of any calibration drift, thermal expansion issue, or other problem.1 point
-
For 90% of people, the CIMCO add on will be way less setup pain and get you there faster, cheaper, and easier utilizing the I+ macros already set up on the machine. For 10% of the people, I haven't seen anything else on the market give the ease of use of setting up complex logic (multiple nested If/Then/Else logic) like P+ can do. Inspection+ are the macros that ship with the probe on your machine. If you use the GoProbe app on your phone (or the Renishaw manual) to enter, say, G65P9901M2.D0.5S54. to probe a .5" bore, that's Inspection+. Productivity+ was developed by Renishaw as a stand alone program (yes, you can buy just P+, not integrated into Mastercam!). The problem was they can't trust the I+ macros to be the same everywhere, that no one edited them, and that they could support all the logic they wanted so they developed the P+ macros. You'll have two sets of macros loaded onto your machine, two sets of calibration data in the parameters, etc. P+ coming out of Mastercam will ONLY use P+ macros.1 point
-
Might be worth checking out this thread: From what I remember there was a lot of good stuff in that one.1 point
-
Since the spindle is cantilevered out so far, if the front of the column gets warmer than the back, or asymmetric heating of certain other members takes palce, it will arch and lift the tool much more than the linear thermal expansion rate. This problem plagues the whole UMC line, in combination with poorly done thermal comp software. To fix it with thermal comp, they would have to add a bunch more thermocouples in several locations, and have a much more complicated compensation model. What I've heard works best on these machines is to turn off the thermal comp, and take every measure you can to keep the temperature of the machine constant within a very small window. For comparison, I get less than .001" Z change over 20°F on my CM-1's.1 point
-
bin it.1 point
-
even after the spindle caught fire???0 points