motor-vater
-
Posts
379 -
Joined
-
Last visited
-
Days Won
4
Content Type
Profiles
Forums
Downloads
Store
eMastercam Wiki
Blogs
Gallery
Events
Everything posted by motor-vater
-
I was already on the ball endmill train of thought but I cant figure out what roughing tool path to use... A lathe would be nice but dont have that here
-
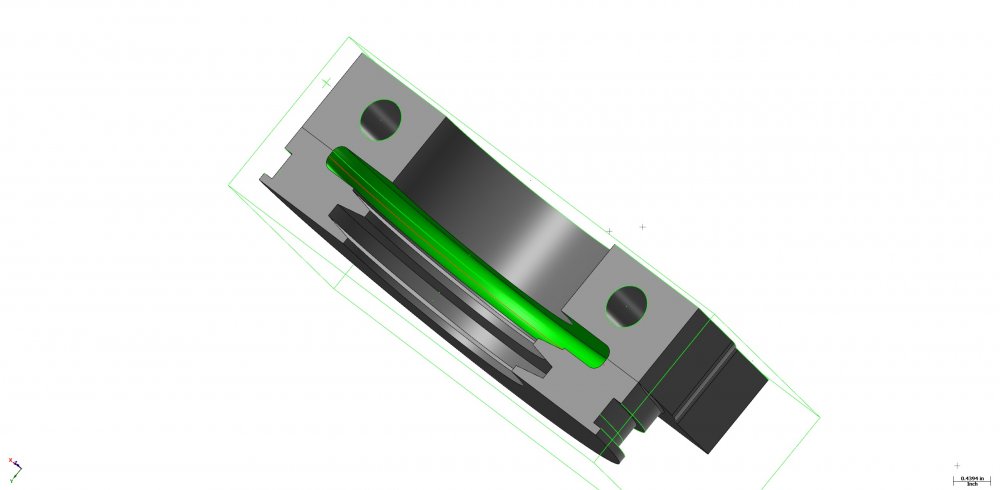
Good morning everyone I could use a little help here. I need to remove the material from the area in green and would love some advise on the best way. I do not have multi axis. Also because it is a one of part I do not want to invest in a custom woodruff cutter. I have found that with a raster path and a long ball endmill I can finish it but I am at a loss as to how to rough it.
-
Back Story: No need to read unless Bored.... Some of you know I took on the position of programming for a 40 year old Job shop that has employees that have been here for 30+ years, change has been hard to implement but I have been told on numerous occasions thats what I was hired for and they will have to keep up with it or get out.. lol They have beat me down as far as Compensation at the control, because wear just proved to hard to implement and considering there catalog of 1000's of programs are all at control, I gave in. Not the problem. Problem is all of their old programs while functional are hack jobs and require way to much messing with on a change over so I have been assigned a new task. Every time a old program is called to the floor it is now my job to go through it and try to eliminate the guess work. Some examples are things like instead of calling a chamfer mill a chamfer mill, its in there as a .125 endmill. ( A machinist told me just look at the the Z depth and you will know its a chamfer mill... lol). Best part is the machinist also has to double the depth in the diameter offset column for it to work right, if its Z-0.030, the diameter offset needs to be set at 0.060.. But the one that kills me the most is there work offsets. All machines are haas with renshaws. But the part zero maybe anywhere. Could be Z-.150 from top of stock, could be X 1 inch from the left side of stock, etc... Much time is wasted trying to figure this out every time they pull a job out of the archives, and dont get me started on the tool list issue, so much has been programmed at the control that you have to read through the whole program to find out what tools are required... So, I have been manually editing a bunch of Gcode which I really actually enjoy, being a 12 year veteran of MCam and having the right posts has really enabled me to not really have to know G-code as well as I should. I now add a tool list to the top of each existing program, change the tool descriptions to match the required tools, and even add in some comments to help quickly set the work offsets for next time. I started plugging in G10's to set tool offsets for things like the chamfer mills and the boss thinks I'm a rockstar.. Lol The Question: So in order to utilize the renshaw system I would love to just quickly probe parts and use a G52 to modify the work offset to catch up with what ever part zeros they used in the program. I dont think this is a problem. What I am concerned about is I think I need to use another G52 to move back to probed zero at the end of a program, or it will just continue to move the offset every time the machine is reloaded, Correct? So how does that affect the programs ability to reset. Example Running program and a tool breaks, or they use op stop it and decide to offset the tool more to maintain a clearance and re run from there. When they restart in the middle of a program whats gonna happen? Common practice here is to stop the program, change the offset, hit reset, then scroll to what ever tool it was and press cycle start (recut same hole). Should I use G52's at the beginning and end of every tool, or does the concept of G52's not make sence for my current situation? As always thank you for you help..
-
Is there a link some where to Colins Post class? Nevermind found it... DUH!!! 2 more weeks of second shift and I get my life and mind back!!!
-
I get that too... lol
-
More and more the quotes seem to be piling up on my desk, its getting hard to keep up with them and still have time to actually program. I some times wonder why they even have me quote since they generally gut my quote and submit it to the customer how they want to anyway.. lol Seriously its driving me nuts. If I fill out the sheet and say 2 ops, 15 hours program and set up, 17 min first op, 4 min second op..... They just change it to 4 hours set up, 12 min first op, 2 min second. Then when it hits the floor the production coordinator is on me cause it says on the traveler what they quoted at.. lol I'm at the point where I'm gonna start making copies of my original submital to show the PC that I am right on time with what I said it would be.. I mean it takes time to program, fixture, test cuts, and proof out a program right? By giving them an honest estimate of that time you would think I was doing them a solid right? LOL... end of rant! But that being said it takes me to much time to quote because I am pretty thorough, Alot of times I will spend an hour or so whipping up some quick toolpaths just to get a better idea of how I wanna machine it and how long it might take. Cutting into the time I need to actually program. I think most guys rely on experience and can just look at something and say, yeah this is gonna take this long, but every time I do that I seem to miss an important feature, an undercut or something that requires a custom tool, etc. So I prefer to actually spend a little time looking at it in the world of 3d. But I am wondering if anyone uses some sort of system to make this process any easier? I am assuming most of the burden of quoting falls on the programmer anyway so I might as well find out how to conquire the quoting system. Thanks for the help, and if this turns into everyone ranting about how their company does the same kind of BS well thats fine too, at least I will know I am not alone in this... Lol
-
Trouble w/ Control Comp+High Feed+Haas
motor-vater replied to motor-vater's topic in Industrial Forum
must be doing something of the sort. I am using 120% on both still with no joy. -
Trouble w/ Control Comp+High Feed+Haas
motor-vater replied to motor-vater's topic in Industrial Forum
this button, Note this is not the file I am talking about just something entirely different that I'm working on, took a screen shot just to show the high feed button. So please do not assume I am trying this with a ramp cut or helix. The Alarm is happening on a standard exterior contour, with control comp on and only after using the high feed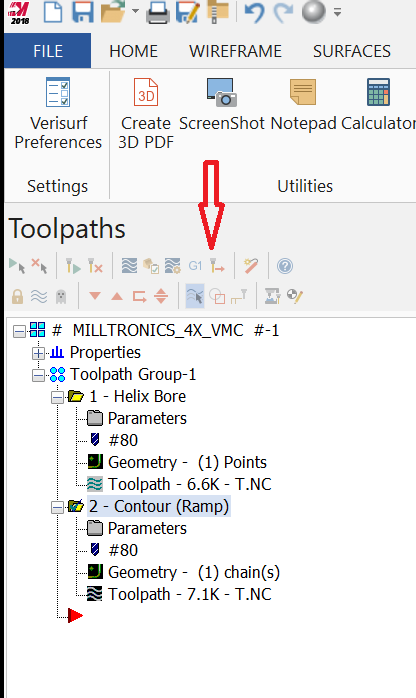
-
So they have beat me down. The operators in my shop have proven to me they are not capable/willing to accept Wear. So I have caved and am programming in Control. Strange thing today. Contour in "Control" Alarming out on the Haas. I know about the lead in and lead out, adjusted accordingly and it will take the code, but the second I take the same tool path and run it through the High feed it goes Back to alarming out. I tried up to 120% on both radius and entry length with perpendicular. And the control has no problems, run it through High feed and game over. Anyone else ever run into this? Oh the things I will put myself through to get a cleaner corner. If this doesnt work I'm just gonna have to order a smaller tool and let it roll the corner.
-
Colin as always I'm intreged by your thought process. Although I am screwed on this project I still want a full understanding of the process for future jobs. Are you saying for example 2x2 part, use a 5x10 sheet and cut multiple parts out of it? If so toe clamp it to my table, or sacrificial plate? And If I am following you right you square the overall sheet so that you can re indicate it on the flip? Next order of buisness would be the bottom ops, in this case surface, drill, counter bore, serial number, and then remove the center pocket material Then the flip the sheet, re-toe clamp and surface to height, then cut in features, followed by exterior profile, and finally the last .100 cut of the profile with tabs? Does it sound like I'm getting it or did I just fly off the tracks?
-
you guys are gold! to bad the production coordinator all ready ordered the material a month ago and put this off tell now! It has now become a hot job! FML parts is a 2x2 square material is 2.25. to complicate it more I have to engrave part numbers in the bottom of the flange! Is it always like this when you take a job or did I just really win the lottery? Hes telling me we dont even have time to build a fixture he wants me to soft jaw it and let it ride....... I feel a reckoning coming!!!! I cant work like this, I really like to do things the right way even if it takes more time "the bigger picture"! Im suppost to program and get this running tonight and to top it off my lathe operator called in so I am also suppose to keep 5 lathes running with no operator.... Hahaha this is going to make Monday something to look forward too... hahaha Im just gonna machine the top in a vise and figure out how to hold it on the flip..... I love working with a gun to my head
-
awesome ideas here folks thanks. Yes I have to do 500 of them so a fixture is not out of the question. I was almost thinking about the new mitee bite expansion pins for the job. That bottom part of the plate is only .100 thick when finished(not alot to hold in a vise. My original thought was do all the bottom work, drilling, counter boring and outside contour in the vise first, then flip it onto the expansion pins sized for the counter bore tighten um up and run the top ops. But now I am having my doubts. Alot of good suggestions here and the mandrels might apply to much pressure and crack the part. Bolting it down sounds good but having to move bolts in the middle of an op seems like a PITA and our operators are real princesses... decisions, decisions.
-
I like 2 ops but not quiet following you. Also the corner holes are counter bored for a recessed allen head bolt from the bottom. And can you really bolt delrin down with enough force to hold it and not distort it?
-
yes, sounds good but thats 3 ops if I'm reading right???
-
Not asking anyone to do my job just need a push in the right direction. I am not sure the best machining strategy to take on this. This is an example piece I whipped up. Real file is not for sharing but youll get the idea. Its Delrin, and hollowed in the middle. My first instinct is to do the bottom first because fixture it from the top after the top has been machined might be somewhat more difficult. but I am worried about holding it in a vise after removing the material in the center. to tight and snap to loose and parts flying. Maybe a plug? eitherway I know the combined years of experience on here might give me some insight on how the big boys do it. As always thank you

-
Got the documentation today. It was like pulling teeth. My sales guy was like u don’t want that, leave that to the experts, etc, etc... I was like look man, I just wanna learn this stuff can u hook me up or what. He told me along story about DIY home repair vs hiring a contractor then finally sent me an email. Holly Molly you would think the answers to all the worlds mysteries were in that document.. now for some reading. I printed all 154 pages and am putting it next to my reading chair aka the toilet... I would love to take Colin’s coarse next time around...
-
Got it. Thank you Jparis for this great example... I see what you are talking about now
-
how do you guys know all this stuff? is there literature somewhere I can pick up?
-
yeah got that far, So then I have to drag and drop all the different files to their proper locations? I was hoping there was an ez button in the zip2go manager that I was missing.. lol
-
Thanks JParis, now I just gotta figure out how to open a zip2go...lol
-
Jparis can you show me with the attached sample file? I hear what your saying I'll have to play some more when I have time. I got a stack of hot jobs in front of me and a gun to my head to get them done yesterday... Man I wish my boss would ever ask me how long something takes before he commits to a ridiculous deadline...
-
-
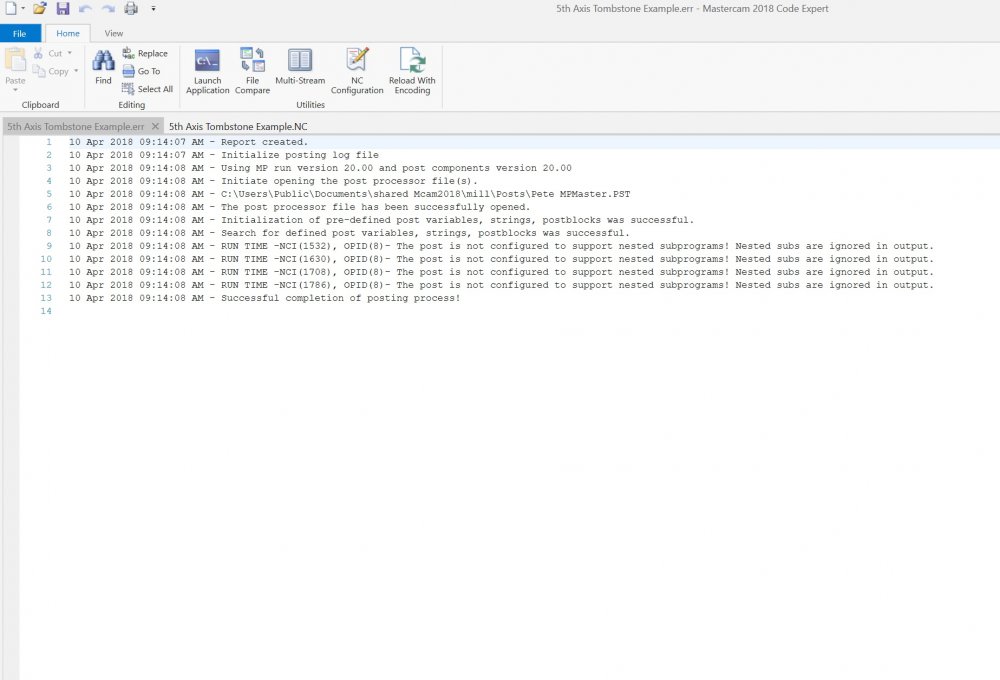
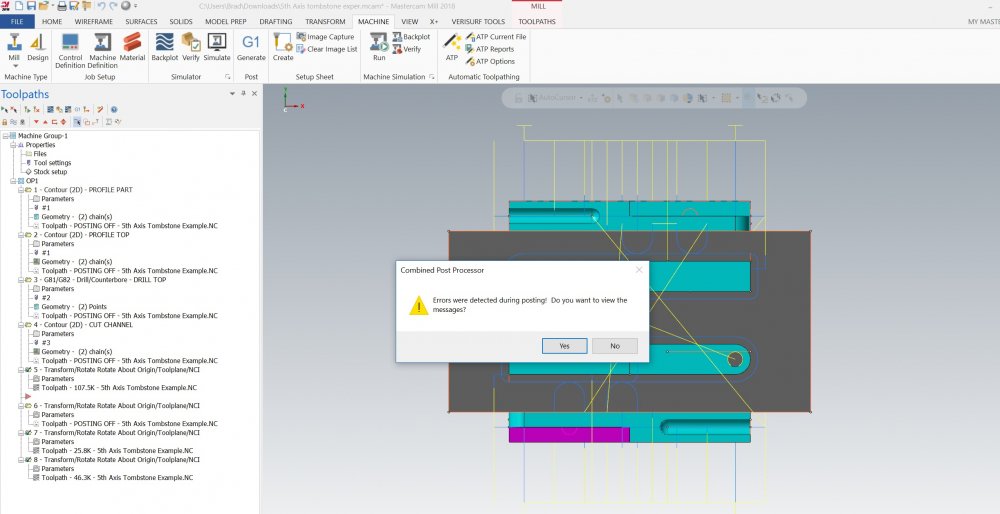
% O0500 (5th Axis Tombstone Example) (MPMASTER GENERIC 3/4-AXIS VERTICAL) (MACHINE GROUP-1) (MCX FILE - C:\USERS\BRAD\DOWNLOADS\5TH AXIS TOMBSTONE EXPER.MCAM) (PROGRAM - 5th Axis Tombstone Example.NC) (DATE - APR-09-2018) (TIME - 11:55 AM) (T1 - 1/2 FLAT ENDMILL - H1 - D1 - D0.5000") (T2 - 1/2 DRILL - H2 - D2 - D0.5000") (T3 - 1/2 BALL ENDMILL - H3 - D3 - D0.5000" - R0.2500") (OVERALL MAX - Z6.) (OVERALL MIN - Z1.75) G00 G17 G20 G40 G80 G90 G91 G28 Z0. (PROFILE PART) (COMPENSATION TYPE - COMPUTER) T1 M06 (1/2 FLAT ENDMILL) (MAX - Z6.) (MIN - Z3.) G00 G17 G90 G154 P1 A0. X.25 Y-3. S3056 M03 G43 H1 Z6. M08 M98 P0501 G91 G28 Z0. (PROFILE PART) G00 G90 G154 P2 A90. X.25 Y-3. G43 H1 Z6. M98 P0501 G91 G28 Z0. (PROFILE PART) G00 G90 G154 P3 A180. X.25 Y-3. G43 H1 Z6. M98 P0501 G91 G28 Z0. (PROFILE PART) G00 G90 G154 P4 A270. X.25 Y-3. G43 H1 Z6. M98 P0501 M09 M05 G91 G28 Z0. M01 (DRILL TOP) T2 M06 (1/2 DRILL) (MAX - Z6.) (MIN - Z3.) G00 G17 G90 G154 P4 A270. X-3.5 Y1.5 S1833 M03 G43 H2 Z6. M98 P0502 G91 G28 Z0. (DRILL TOP) G00 G90 G154 P3 A-180. X-3.5 Y1.5 G43 H2 Z6. M98 P0502 G91 G28 Z0. (DRILL TOP) G00 G90 G154 P2 A-90. X-3.5 Y1.5 G43 H2 Z6. M98 P0502 G91 G28 Z0. (DRILL TOP) G00 G90 G154 P1 A-0. X-3.5 Y1.5 G43 H2 Z6. M98 P0502 M05 G91 G28 Z0. M01 (CUT CHANNEL) (COMPENSATION TYPE - OFF) T3 M06 (1/2 BALL ENDMILL) (MAX - Z6.) (MIN - Z1.75) G00 G17 G90 G154 P1 A0. X-4.5 Y3.5 S3056 M03 G43 H3 Z6. M08 M98 P0504 G91 G28 Z0. (CUT CHANNEL) G00 G90 G154 P2 A90. X-4.5 Y3.5 G43 H3 Z6. M98 P0504 G91 G28 Z0. (CUT CHANNEL) G00 G90 G154 P3 A180. X-4.5 Y3.5 G43 H3 Z6. M98 P0504 G91 G28 Z0. (CUT CHANNEL) G00 G90 G154 P4 A270. X-4.5 Y3.5 G43 H3 Z6. M98 P0504 M09 M05 G91 G28 Z0. G28 Y0. A0. G90 M30 N0501 (PROFILE PART) Z4.2 G94 G01 Z3. F12.22 Y-2.5 F24.45 G03 X-.25 Y-2. I-.5 J0. G01 X-4. G02 X-4.25 Y-1.75 I0. J.25 G01 Y-.75 G02 X-4. Y-.5 I.25 J0. G01 X3.5 G02 Y-2. I0. J-.75 G01 X-.25 G03 X-.75 Y-2.5 I0. J-.5 G01 Y-3. Z3.2 F12.22 G00 Z5. Z6. X-.25 Y3.25 Z4.2 G01 Z3. Y2.75 F24.45 G03 X.25 Y2.25 I.5 J0. G01 X4. G02 X4.25 Y2. I0. J-.25 G01 Y1. G02 X4. Y.75 I-.25 J0. G01 X-3.5 G02 Y2.25 I0. J.75 G01 X.25 G03 X.75 Y2.75 I0. J.5 G01 Y3.25 Z3.2 F12.22 G00 Z6. (PROFILE TOP) X1.5652 Z4.2 G01 Z3.5 Y2.75 F24.45 G03 X2.0652 Y2.25 I.5 J0. G01 X4. G02 X4.25 Y2. I0. J-.25 G01 Y1. G02 X4. Y.75 I-.25 J0. G01 X0. G02 X-.25 Y1. I0. J.25 G01 Y2. G02 X0. Y2.25 I.25 J0. G01 X2.0652 G03 X2.5652 Y2.75 I0. J.5 G01 Y3.25 Z3.7 F12.22 G00 Z5.5 Z6. X-1.5 Y-3. Z4.2 G01 Z3.5 Y-2.5 F24.45 G03 X-2. Y-2. I-.5 J0. G01 X-4. G02 X-4.25 Y-1.75 I0. J.25 G01 Y-.75 G02 X-4. Y-.5 I.25 J0. G01 X0. G02 X.25 Y-.75 I0. J-.25 G01 Y-1.75 G02 X0. Y-2. I-.25 J0. G01 X-2. G03 X-2.5 Y-2.5 I0. J-.5 G01 Y-3. Z3.7 F12.22 G00 Z6. M99 N0502 (DRILL TOP) G94 G98 G81 Z3. R6.5 F8.8 X3.5 Y-1.25 G80 M99 N0504 (CUT CHANNEL) Z2.2 G94 G01 Z1.75 F9.78 X-4. F19.56 X-1.25 Z1.95 F9.78 G00 Z5.75 Z6. X4.5 Y-3.5 Z2.2 G01 Z1.75 X4. F19.56 X1.25 Z1.95 F9.78 G00 Z6. M99
-
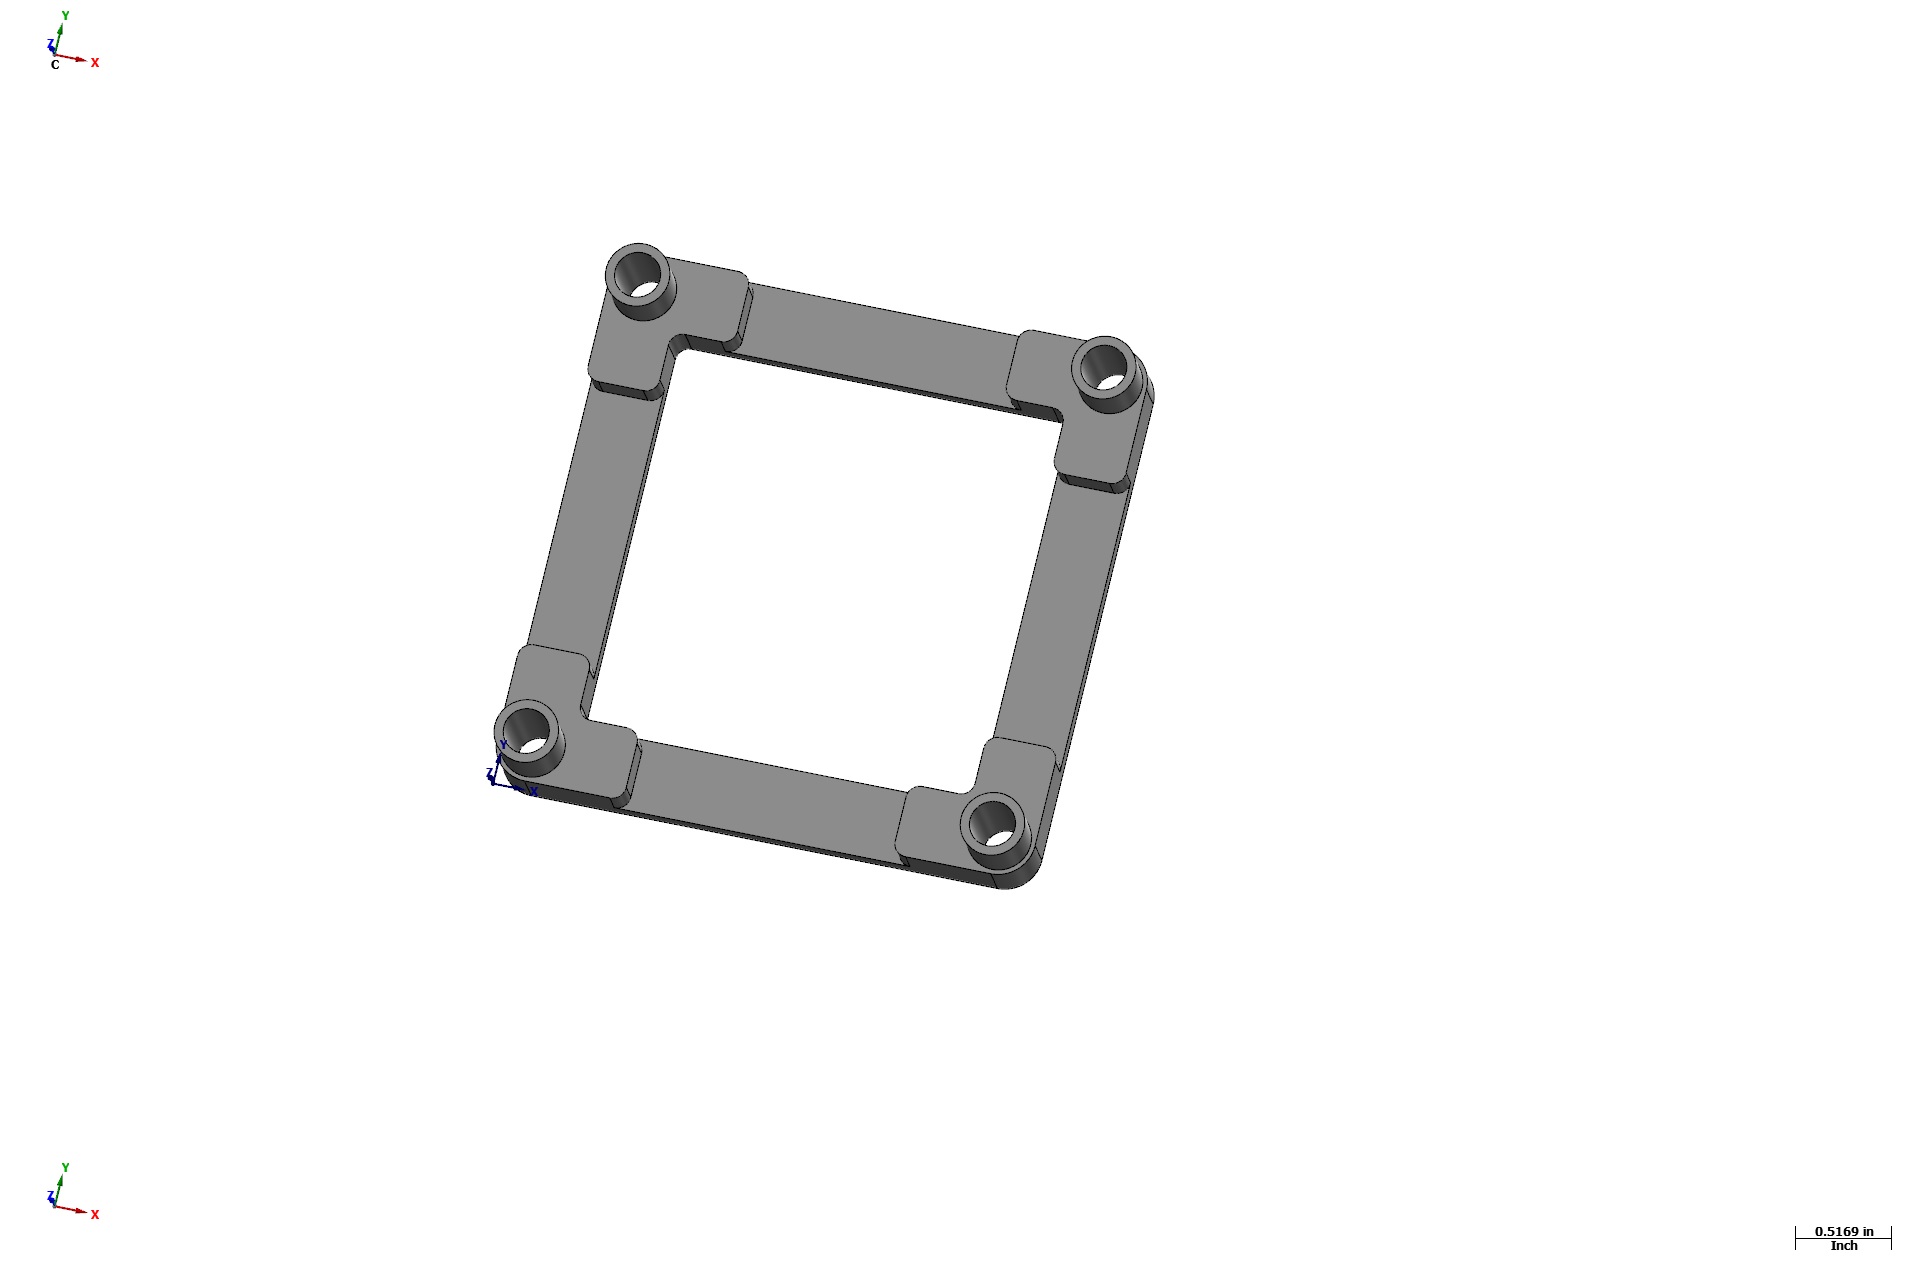
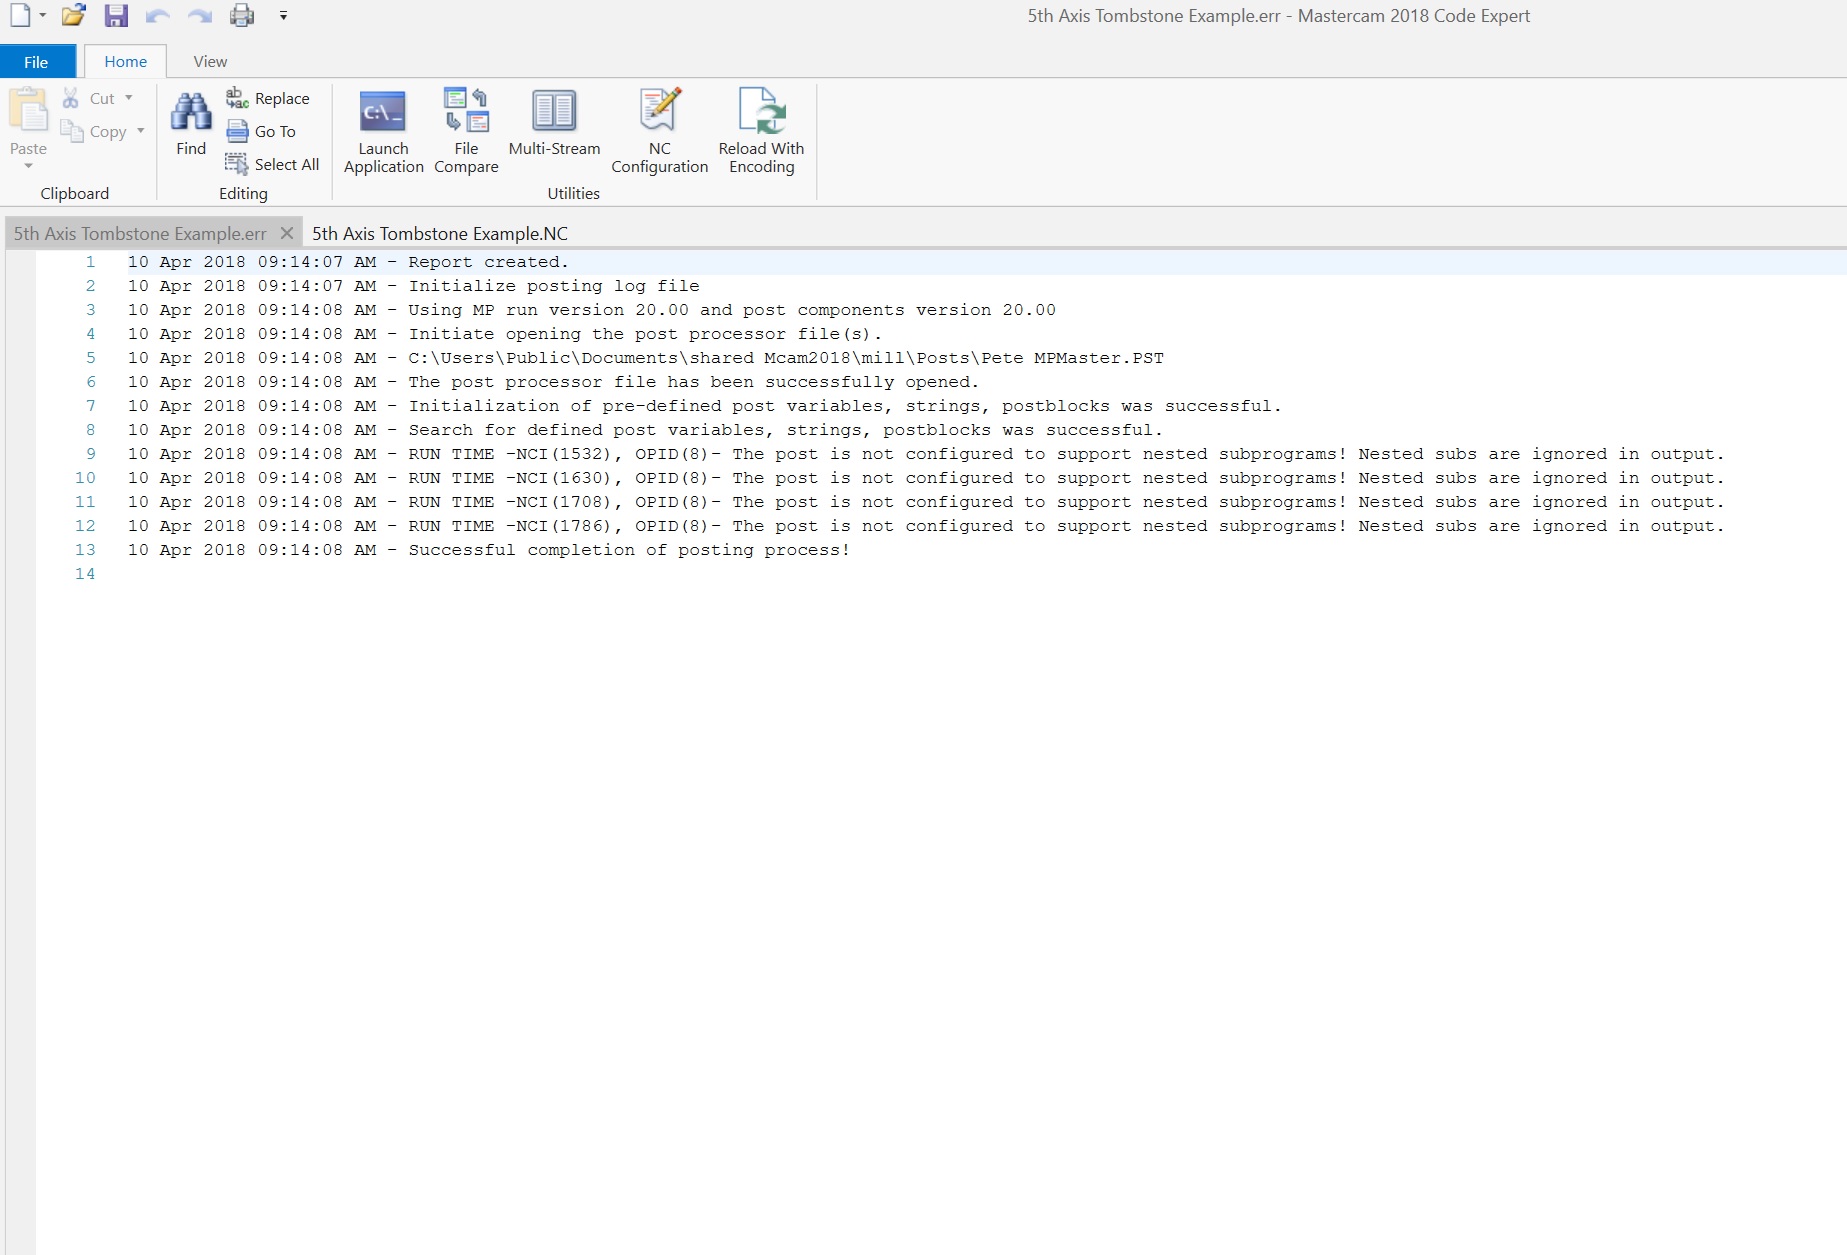
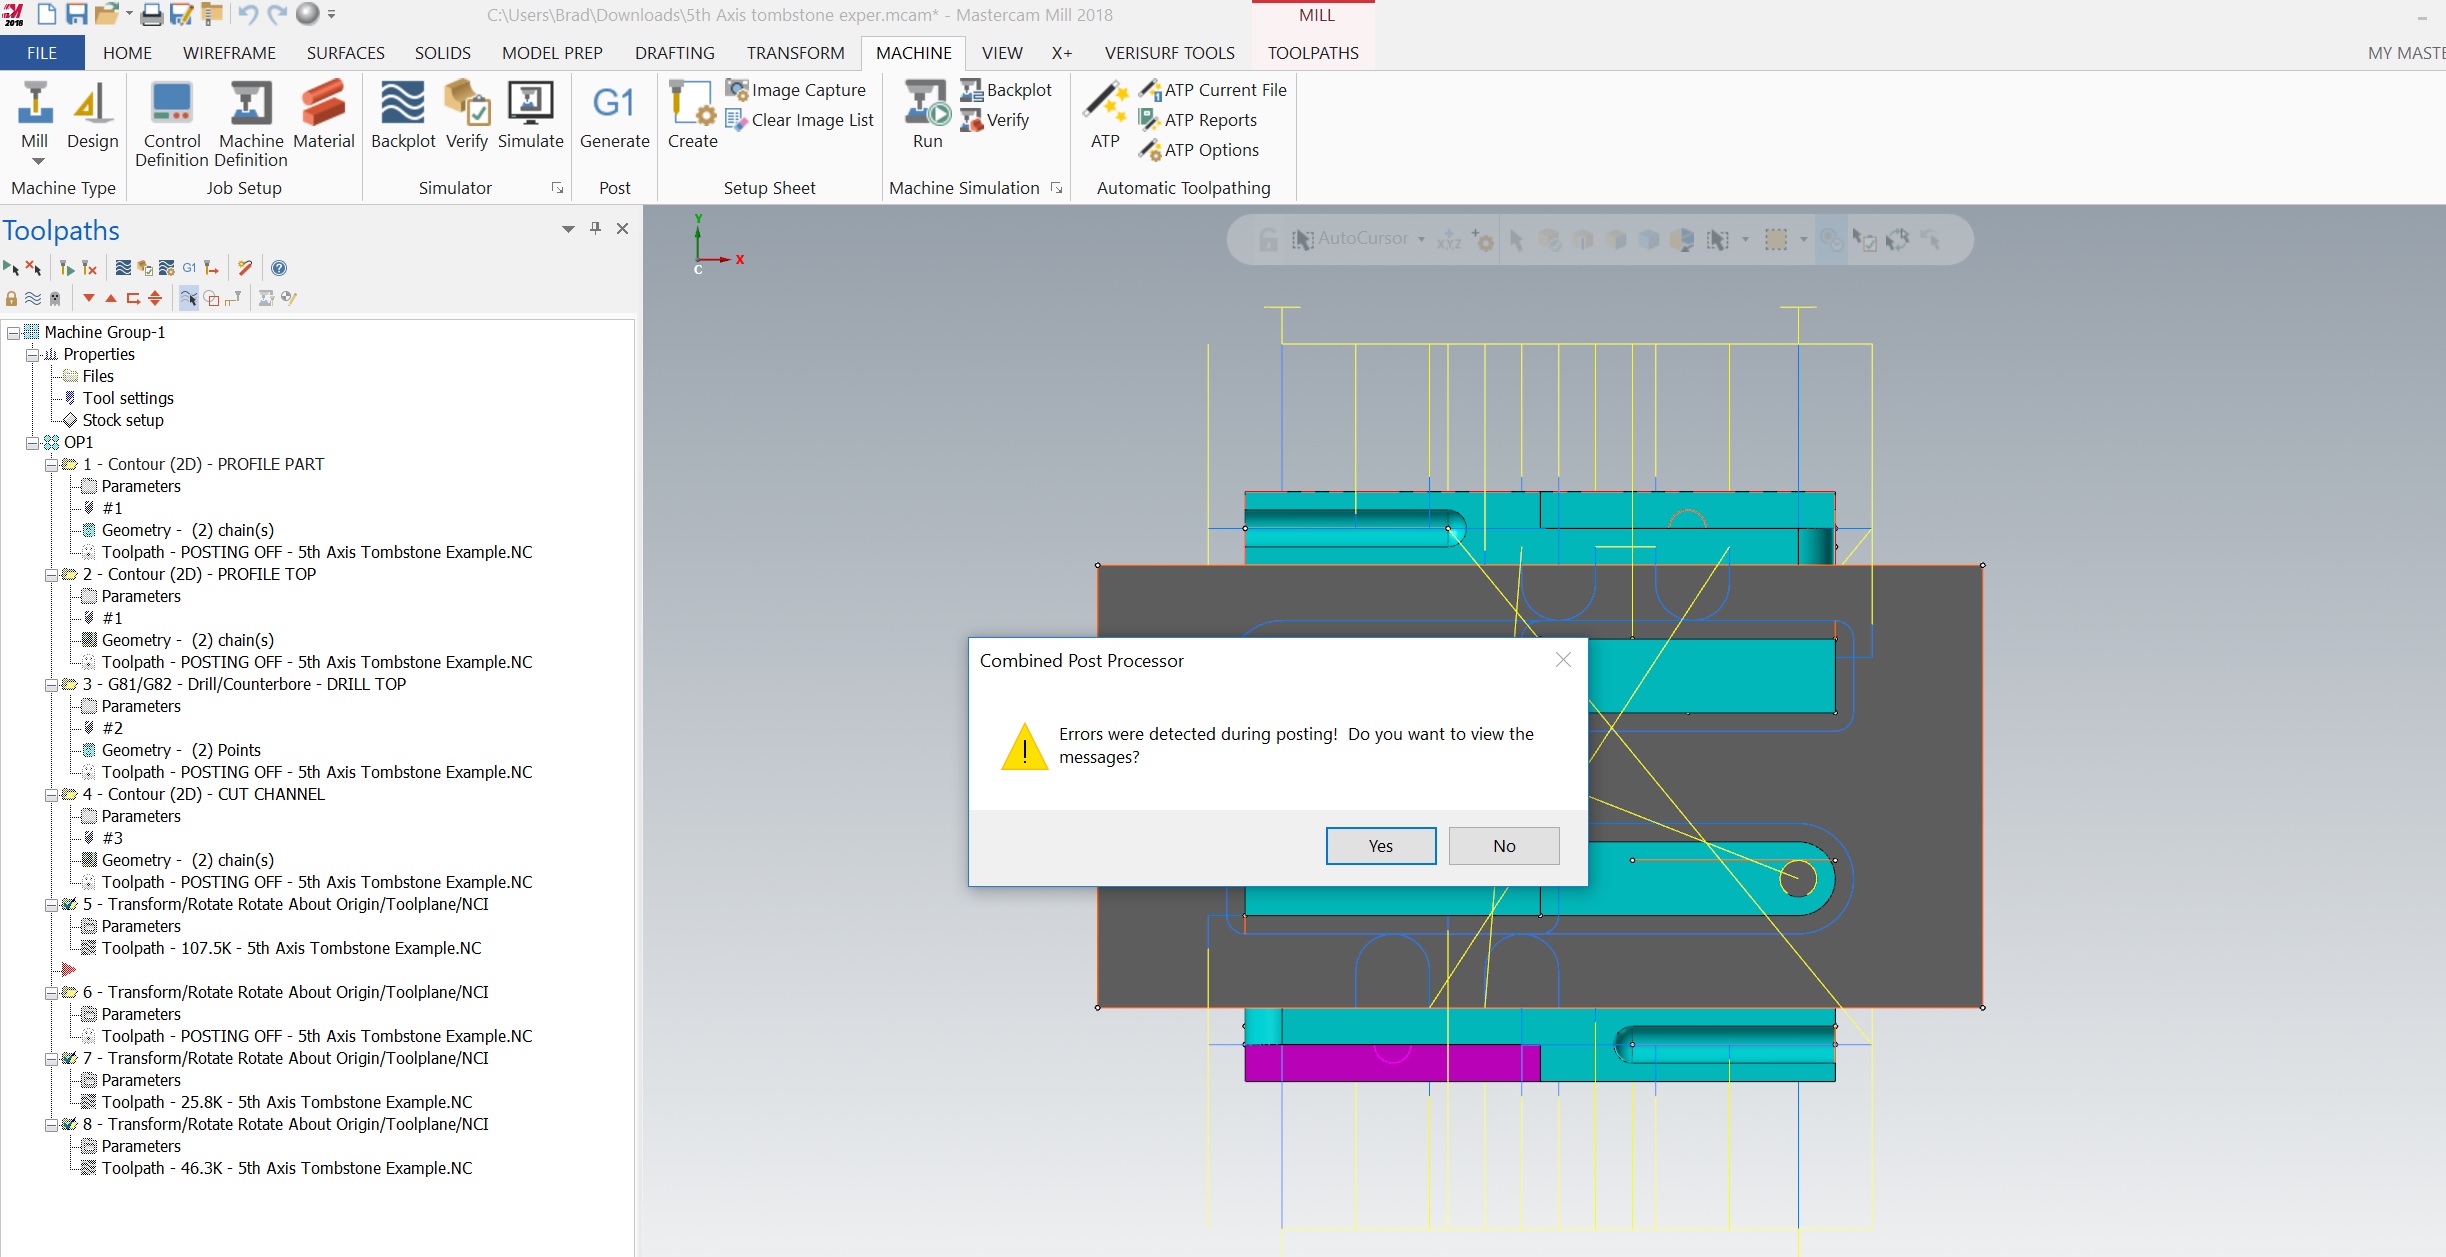
Code looks good but getting this when I post. but as stated code looks good?
-
Ron Saw what you did there, Awesome! Now I understand what you are saying. Thanks again. Colin as always I love getting your input on these things as well. There are many great minds lingering around here and 2 many ways to accomplish the same things in mastercam. As many opinions as possible are always helpful.